PAGE CONTENT:
External hard drives are an essential tool for expanding storage, creating backups, and transferring large files between devices. For Mac users, understanding how to seamlessly integrate an external drive into their workflow is crucial for efficient file management. In this article, we'll cover everything you need to know about using an external hard drive on a Mac - from connecting it to formatting, transferring files, and troubleshooting common issues.
External Hard Drives on Mac - Overview
External hard drives offer a flexible storage solution for various needs, such as expanding your computer's storage space, backing up important data, or transferring large files. With the growing popularity of Mac computers, understanding how to efficiently use external drives on macOS is essential. This article will show you how to connect, use, and maintain an external hard drive on a Mac.
Whether you're using an external hard drive to back up your system using Time Machine, or to store photos, videos, or large documents, it's important to ensure that your drive is properly set up and configured for macOS. The following steps will make sure that your experience with external drives on Mac is smooth and straightforward.
Checking Compatibility
File System Formats:
One of the first things you need to consider when using an external hard drive on a Mac is file system compatibility. Your operating system organizes and manages files on a disk using a file system. Knowing which file systems work with your Mac and which external drive it is compatible with is crucial since various operating systems utilize different file systems.
- HFS+ (Mac OS Extended): This is the default file system for macOS versions prior to macOS High Sierra. If your drive is formatted in HFS+, it will work well with Mac, but Windows computers won't be able to read or write to it without special software.
- APFS (Apple File System): APFS is the current default file system for macOS. It's optimized for SSDs but can be used on HDDs as well. Like HFS+, it's not natively supported by Windows, but it offers better performance and data security for Mac users.
- ExFAT: ExFAT is a cross-platform file system that works with both Mac and Windows. This makes it a great option if you need to transfer files between the two operating systems. It supports large file sizes, making it ideal for media storage.
- NTFS (New Technology File System): Windows comes with NTFS as the default file system. While Mac can read files from an NTFS drive, it cannot write to the drive without third-party software. If you need to share the drive between Mac and Windows with full read-write functionality, ExFAT is a better option.
How to Check the Drive Format (File System):
To check the format of your external drive, follow these steps:
- Connect the drive to your Mac.
- Open Finder and select the drive.
- Press Command + I (or right-click and select "Get Info").
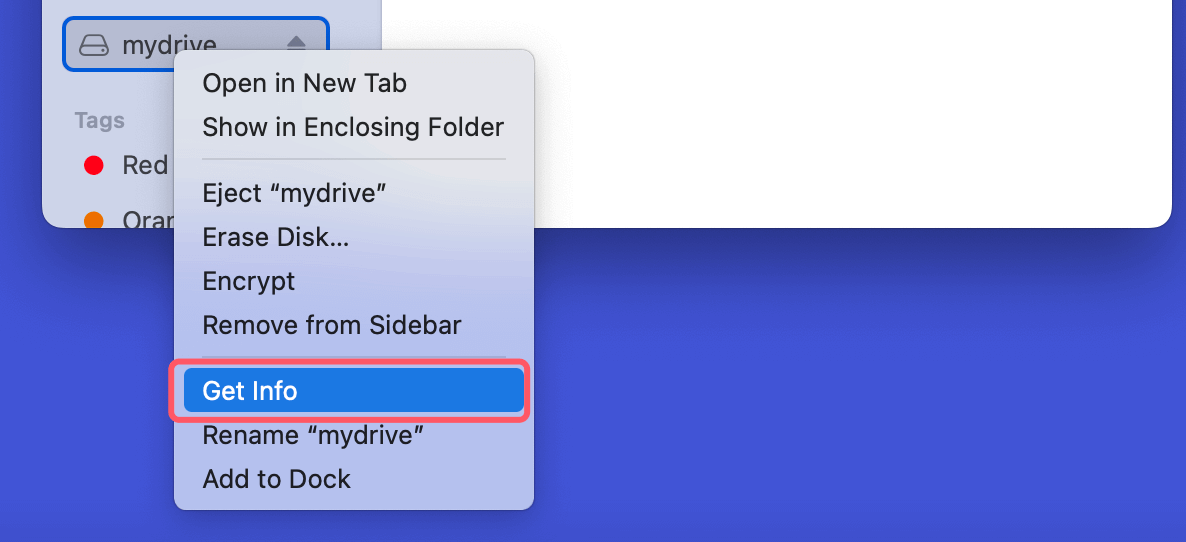
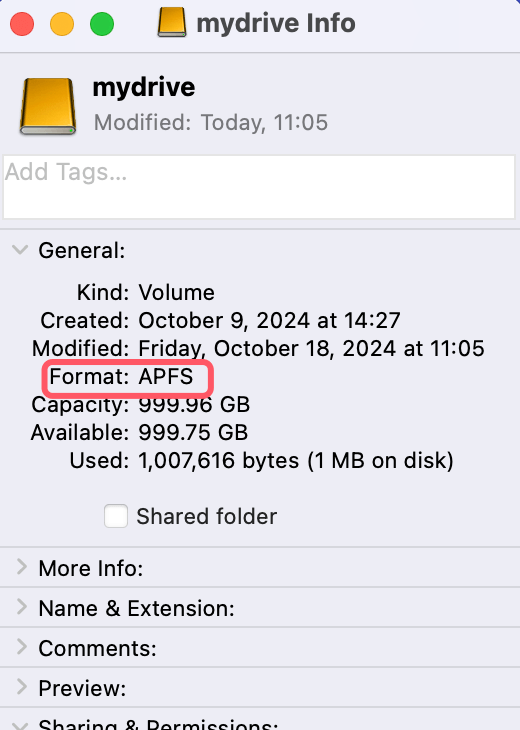
- In the window that appears, look for the file system under the Format section.
![look for the file system under the Format section]()
If your external drive is not in a compatible format, you can reformat it using Disk Utility.
How to Format the External Hard Drive for Mac:
If your external hard drive is not formatted correctly for your Mac, you may need to reformat it. Formatting a drive erases all its contents, so make sure to back up any important data before proceeding.
Steps to Format Your External Hard Drive:
- Attach your Mac to the external drive.
- Launch Disk Utility by going to Utilities via Applications or searching for it in Spotlight.
- Choose your external drive in Disk Utility by selecting it from the left-hand column.
- Select the Erase tab located at the window's top.
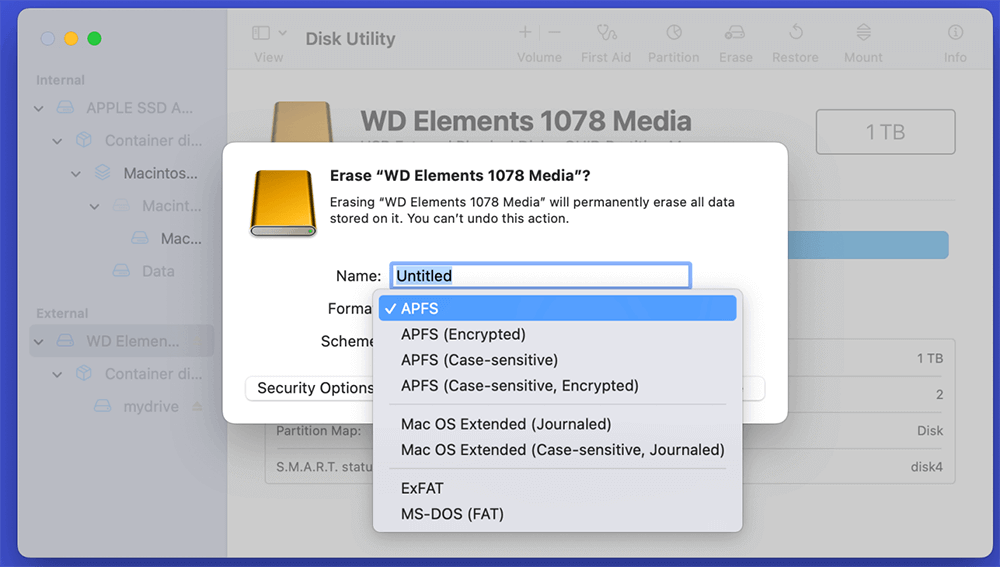
- In the Format dropdown menu, choose the appropriate file system (APFS, HFS+, or ExFAT, depending on your needs).
![choose the appropriate file system]()
- Give your drive a name, then click Erase to format the drive.
Once the process is complete, your drive will be ready to use on your Mac. If you plan to use the drive with both Mac and Windows computers, ExFAT is usually the best format option.
Connect the External Hard Drive to Your Mac and Use It
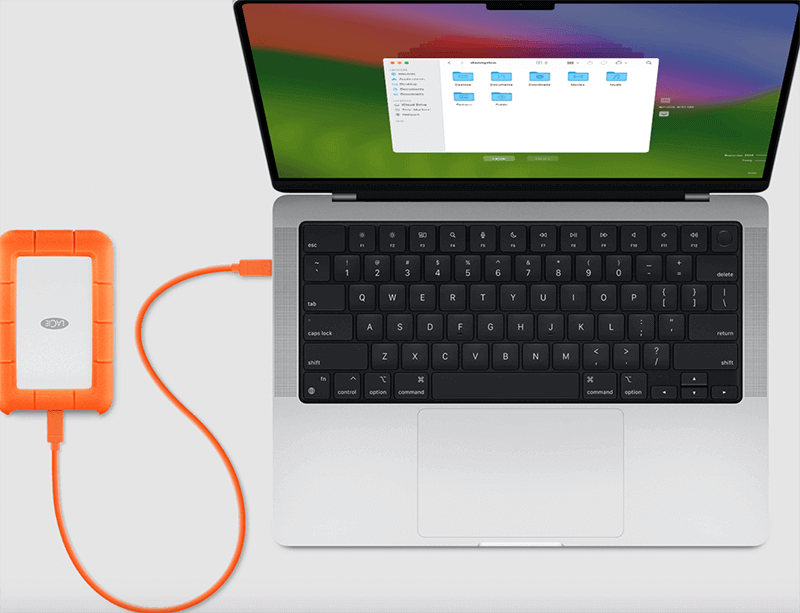
Physically connecting your external hard drive to your Mac is simple, but it's important to ensure you're using the right cables or adapters. Macs have shifted from using traditional USB-A ports to USB-C or Thunderbolt 3 ports, which means you might need an adapter if your external hard drive uses a standard USB-A connection.
Connecting via USB-C or Thunderbolt 3
Most modern Macs come with USB-C or Thunderbolt 3 ports. These ports offer fast data transfer speeds, but older external hard drives that use USB-A may require a USB-C to USB-A adapter.
The external hard disk ought immediately mount and show up on your desktop instantly as soon as it is attached. If it doesn't, refer to the next section on mounting the drive.
Mounting the External Hard Drive on Mac
Once you've connected the external hard drive to your Mac, it should automatically appear on the desktop and in Finder. However, if your drive doesn’t mount, there are a few steps you can take to resolve the issue.
Check Finder Preferences or Finder Settings:
- Open Finder.
- In the top menu, click Finder > Preferences or Finder > Settings.
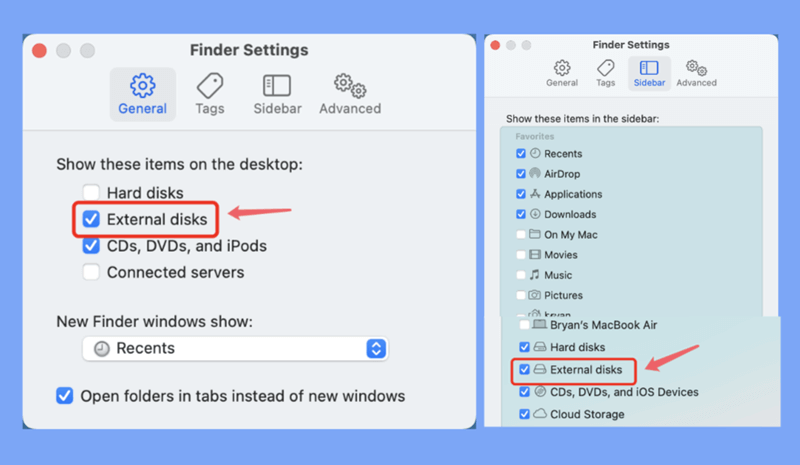
- In the General tab, ensure that External disks is checked under "Show these items on the desktop."
- Next, go to the Sidebar tab and make sure External disks is checked here as well.
![Check Finder Preferences or Finder Settings]()
Verify in Disk Utility:
If the drive still doesn't appear, check Disk Utility:
- Open Disk Utility from Utilities via Applications.
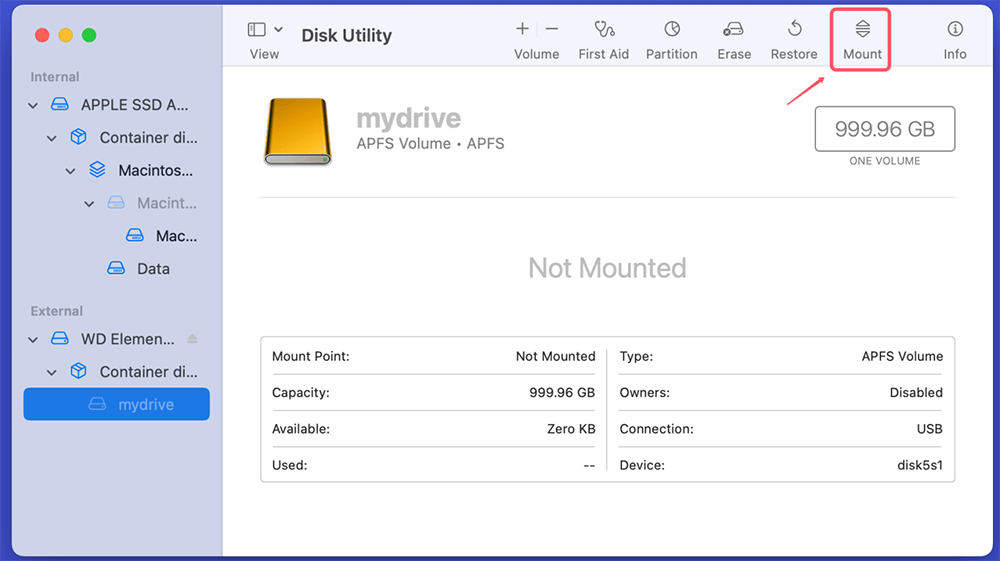
- In the left-hand panel, check if your external drive appears. If it does, select the drive and click Mount.
![Verify in Disk Utility]()
If the drive still doesn't mount, it could be a problem with the cable or port. Try using a different cable or plugging the drive into a different port on your Mac. If the drive continues to fail to mount, proceed to the troubleshooting section.
Using the External Hard Drive
Once your external hard drive is mounted and ready to go, you can begin transferring files, setting up backups, or organizing your data.
Copying and Transferring Files:
Transferring files to and from an external hard drive on a Mac is as simple as dragging and dropping files in Finder. You can also use the copy and paste function by right-clicking on files or folders and selecting Copy, then Paste into the external drive's window.
Setting Up Time Machine Backups:
A built-in feature of macOS is Time Machine, which lets you backup your whole system to an external hard drive.
- To configure the Time Machine:
- Attach your Mac to the external hard drive.
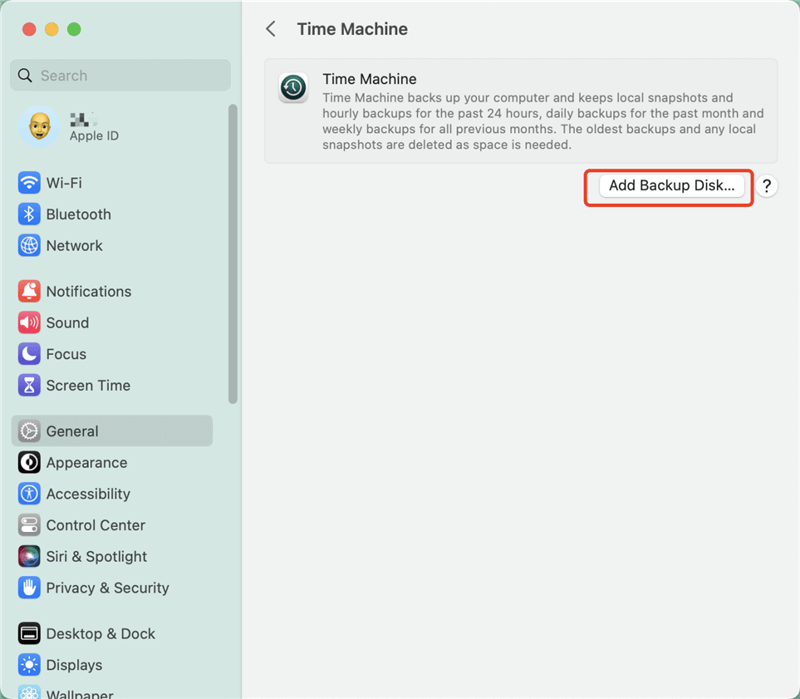
- Click on Time Machine after navigating to System Preferences or System Settings > General > Time Machine.
- Click Add Backup Disk, add the external hard drive as the backup disk.
![Setting Up Time Machine Backups]()
- Time Machine will automatically back up your system at regular intervals. You can also manually initiate a backup by clicking Back Up Now from the Time Machine menu in the status bar.
Note: If you have disk cloning software installed on your Mac, you can use the external hard drive as the destination drive. Then clone all data from the Mac's internal drive to the external hard drive, creating a full bootable clone backup for your Mac.
Organizing and Managing Files:
Organizing your external drive so that files are easy to discover and manage is a smart idea. To ensure peak performance, create folders for various categories (documents, photos, videos, etc.) and delete unnecessary items on a regular basis.
Ejecting the External Hard Drive Safely
Before physically disconnecting your external hard drive from your Mac, it's important to safely eject it to avoid data corruption.
Steps to Safely Eject the Drive:
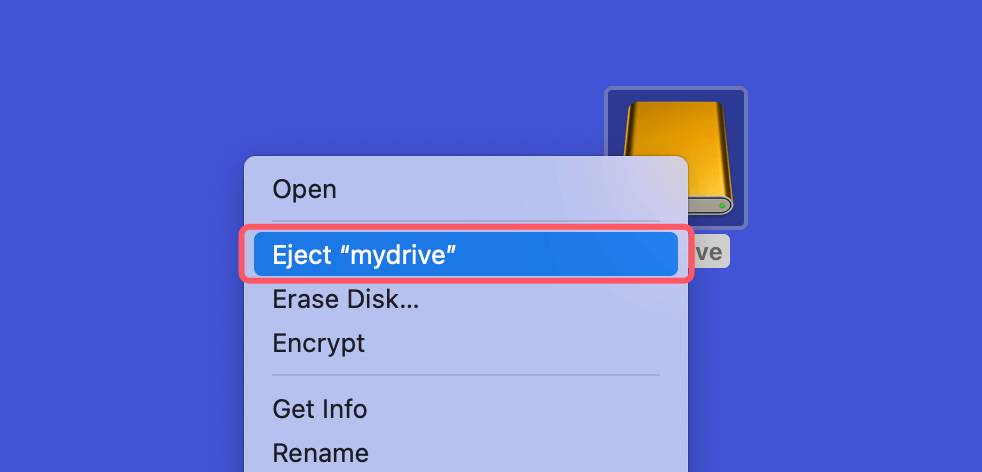
- To eject a disk, right-click on its desktop icon and choose Eject.
![Steps to Safely Eject the Drive]()
- Alternatively, you can drag the drive icon to the Trash, which will change to an Eject symbol.
- Once the drive disappears from the desktop and Finder, you can safely unplug it.
If the drive won't eject, ensure that no files or applications are currently using data from the drive. If necessary, you can force eject by holding down the Option key while clicking Eject in Finder.
Using External Hard Drive on Mac Troubleshooting Common Issues
While using an external hard drive on a Mac is usually straightforward, some users may encounter issues. Here are solutions to common problems.
Drive Not Recognized:
If your external hard drive isn't recognized by your Mac:
- Try a different cable or port.
- Restart your Mac, then plug the drive back in.
- Open Disk Utility to check if the drive is detected. If it is, attempt to mount the drive.
- Run First Aid in Disk Utility to repair any potential issues with the drive.
Read-Only Drives:
If your drive is formatted in NTFS (Windows format), you won't be able to write to it on a Mac without third-party software. To resolve this, reformat the drive to ExFAT, or use NTFS drivers for macOS to enable write functionality.
Step 1. Download and install the best NTFS for Mac tool on your Mac. Donemax NTFS for Mac is a reliable NTFS for Mac tool, it can help you quickly enable writable for NTFS drive on Mac.
Step 2. Open Donemax NTFS for Mac, then select the NTFS external hard drive, click on Enable Writable button.

Slow Drive Performance:
If your external hard drive is slow or not functioning properly, try running First Aid in Disk Utility. Additionally, ensure the drive is connected to a high-speed USB or Thunderbolt port, and avoid using hubs that may reduce data transfer speeds.
Data Loss:
If you have lost data from your external hard drive, you can use Mac data recovery software to get the lost data back.
Step 1. Download and install Donemax Data Recovery for Mac, and connect the external hard drive to your Mac.
Step 2. Open Donemax Data Recovery for Mac, select the external hard drive to start data recovery.

Step 3. Click on Scan button to deeply scan the external hard drive to find all recoverable files.

Step 4. Once the scan is completed, you can preview all recoverable files. Then select the wanted files, click on Recover button to save them.

Conclusion
Using an external hard drive on a Mac is an efficient way to expand your storage, back up important data, and transfer files between devices. You can make sure that your drive is correctly connected, formatted, and operational by following the instructions provided in this article. Remember to safely eject your drive to prevent data corruption and run regular maintenance checks to keep it in top condition.
Whether you're using your external hard drive for backup, work, or media storage, Macs provide robust support for external drives, making it easy to manage and protect your data.
FAQs About Using External Hard Drive on Mac
1. How to format an external hard drive for Mac?
Disk Utility can help you easily and quickly format an external hard drive for Mac:
Make a backup of your important data since formatting will delete everything from the external hard drive.
- Open Disk Utility.
- Select the external hard drive.
- Click Erase.
- Select a file system such as ExFAT, APFS or Mac OS Extended.
- Click Erase again.
2. External hard drive is not showing up after connecting it to the Mac, how to fix it?
Open Disk Utility, find the external hard drive and click on Mount button. If it is still not showing up, check the Finder Settings:
- Open a Finder on Mac.
- Click Finder on Apple menu, choose Settings.
- Open Finder Settings, click General and Sidebar, make sure External disks is selected.
3. Can I use NTFS external hard drive on Mac?
Yes, your Mac can read external hard drive which has been formatted to NTFS file system. If you want to write data to the NTFS external hard drive, you can install an NTFS driver on your Mac.
- Download and install Donemax NTFS for Mac.
- Open Donemax NTFS for Mac, select the NTFS external hard drive.
- Click on Enable Writable button.
- Then you can read-write the NTFS external hard drive without any limitation.
Donemax NTFS for Mac also can help you format an external hard drive to NTFS on Mac.
4. How to wipe an external hard drive on Mac?
Disk wipe software, such as Donemax Data Eraser for Mac, can help you wipe an external hard drive on Mac. All data stored on the external hard drive will be erased permanently, cannot be recovered by any method.
Related Articles
- Oct 18, 2024How to Empty or Force Empty Trash on Mac?
- Mar 06, 2025[7 Fixes] Fix "Your Computer Was Restarted Because of a Problem" on Mac
- Mar 19, 2025Fix The Disk You Attached Was Not Readable by This Computer on Mac
- Oct 11, 2024How to Fix Corrupted APFS Container on Mac Without Losing Data?
- Jul 19, 2024Only Can Select APFS Format When Erasing A Drive on Mac? Fix It Now
- Oct 18, 2024Check Free Disk Space on Mac: A Comprehensive Guide

Maria
Maria is one of the senior writers & editors of Donemax who lives and works in Sydney, Australia. She loves PC, Mac and Internet Technology. She has 6 years of writing articles about data recovery on PC/Mac, disk cloning solution, data eraser and computer OS optimization, etc. She is also interested in testing various software and digital products.

Gerhard Chou
In order to effectively solve the problems for our customers, every article and troubleshooting solution published on our website has been strictly tested and practiced. Our editors love researching and using computers and testing software, and are willing to help computer users with their problems
