PAGE CONTENT:
macOS has always been renowned for its user-friendly interface and powerful utilities that help maintain the health of the system. One such essential tool is the Disk Utility, and within Disk Utility lies a particularly useful feature called First Aid. First Aid is a built-in utility designed to check your Mac’s storage for errors and repair them when needed, ensuring your system runs smoothly and that your data remains secure.
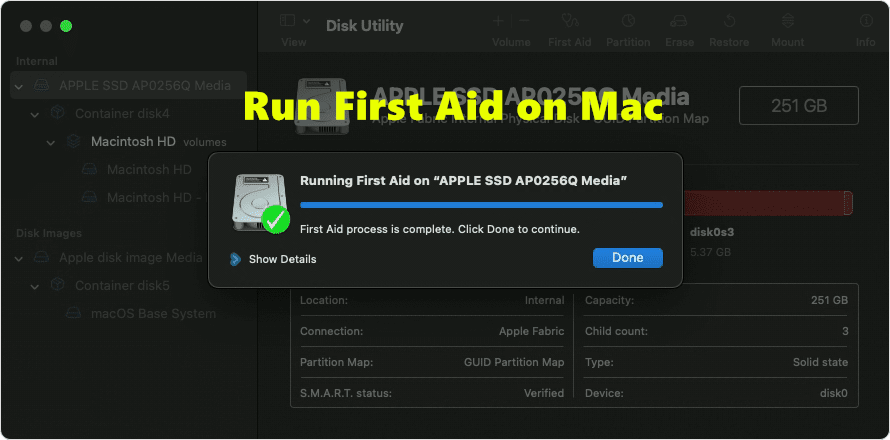
Whether your Mac is experiencing performance issues, or your external drive isn't mounting properly, running First Aid can often help fix these problems. In this article, we'll explore what exactly First Aid is, how it works, and the steps to use it effectively to repair your Mac's disk.
What is First Aid in Disk Utility?
First Aid is a component of Disk Utility, a powerful macOS application used for managing and maintaining disks and storage volumes. First Aid is specifically designed to verify the integrity of a disk or volume and attempt to repair any issues it finds. These errors can include problems with the file system structure, directory issues, or volume headers. It essentially runs a series of checks and repairs on the disk, ensuring that all file systems are functioning as intended.
🔖How Does First Aid Work?
First Aid operates by performing the following tasks:
- Scanning for Disk Errors: It examines the disk for corrupted files, improper disk partition information, and other common errors that could lead to performance issues or prevent access to your data.
- Attempting Repairs: When errors are found, First Aid attempts to repair them automatically. If successful, this helps restore your disk or volume back to proper working order.
🔖When Should You Use First Aid?
First Aid is useful in a variety of scenarios:
- If you experience frequent crashes or system freezes.
- When your disk fails to mount, either internal or external.
- You encounter slow performance or unusual behavior from your Mac.
- The Disk Utility tool itself prompts you to run First Aid when issues are detected.
Using First Aid is a proactive way of ensuring your disk is not at risk, thereby minimizing data corruption and unexpected hardware issues.
How to Run First Aid to Repair a Disk on Mac?
Running First Aid to repair a disk or volume on your Mac is quite simple. Let's go through the step-by-step process to make sure you can perform the operation smoothly.
Step-by-Step Guide to Running First Aid:
1.Open Disk Utility
- Go to Finder > Applications > Utilities > Disk Utility. You can also press Command + Space and type "Disk Utility" to quickly access it via Spotlight.
![Open Disk Utility]()
2.Select the Disk or Volume
- Once Disk Utility is open, you will see a list of all the available disks and volumes on your Mac, including internal and external drives.
- Select the disk or volume you want to repair. Note that disks are the physical devices, whereas volumes are the partitions or sections of the disks.
3.Run First Aid
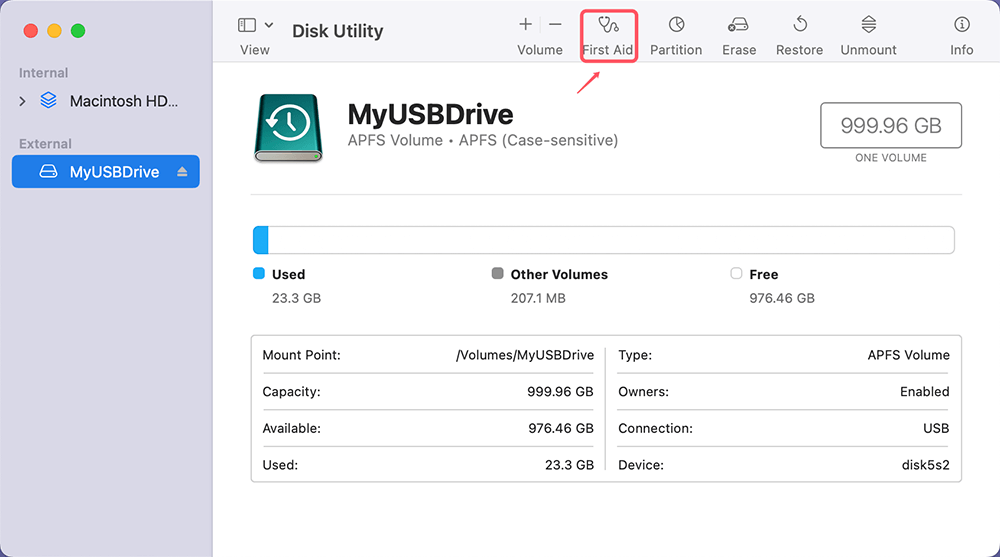
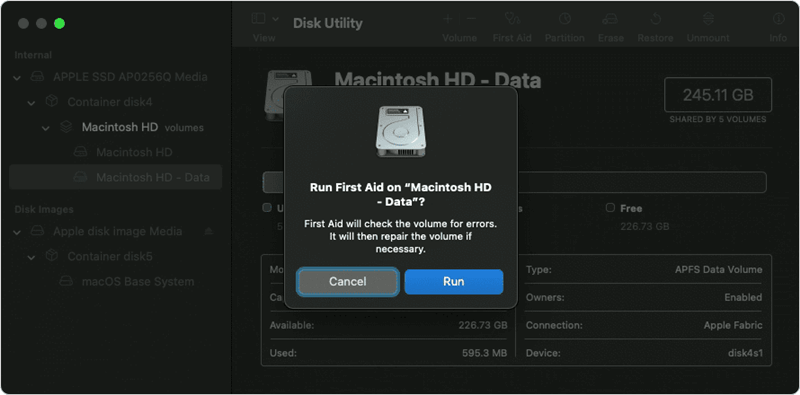
- With the appropriate disk or volume selected, click on the First Aid button located at the top of the window.
![click on the First Aid button]()
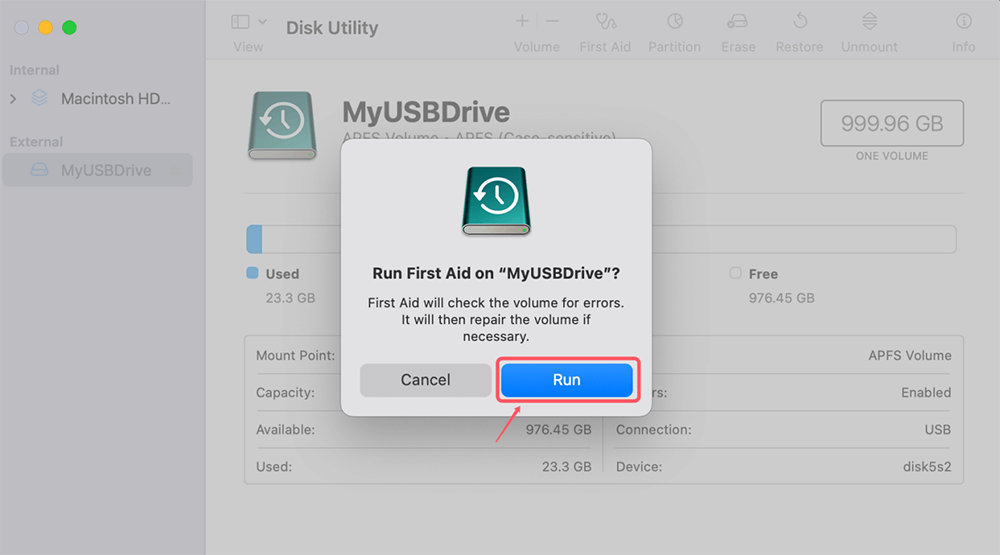
- A pop-up message will appear, informing you that First Aid will check and repair any issues. Click Run to proceed.
![Click Run to proceed]()
4.Monitor the Process
- First Aid will begin checking for errors and attempting repairs. The time it takes will depend on the size of the disk and the extent of any issues found.
- You may see different messages during the process, such as "The volume appears to be OK" or "The volume could not be repaired." Make sure to carefully read the messages, as they indicate what actions you might need to take next.
🔖Running First Aid on Different Types of Disks:
- Internal Disk: Running First Aid on an internal disk may require a restart of your system if the disk is being actively used by macOS.
- External Disk: When running First Aid on an external disk, ensure it is securely connected, as sudden disconnection can lead to further damage.
🔖Understanding the Results of First Aid:
After First Aid completes the check, you will receive a summary of the results. Let's break down the most common outcomes and what they mean:
Common Outcomes:
- "The volume appears to be OK": This means that First Aid did not find any issues, and your disk is functioning properly. No further action is needed.
- "File system was modified": This indicates that errors were detected and successfully repaired. It is a good idea to run First Aid again to verify that no further issues remain.
- "The volume could not be repaired": This is the most concerning message, as it means that First Aid was unable to fix the errors. In such cases, you may need to consider other repair options or even reformatting the disk.
Actions to Take Based on the Results:
- If First Aid repaired the disk successfully, it is recommended to keep monitoring the disk's performance. Back up your data to prevent future data loss.
- If First Aid could not repair the disk, consider using macOS Recovery Mode to attempt repairs, or using Terminal commands like fsck. If the disk still isn't repaired, you might need to reformat the disk or use third-party software for data recovery.
🔖Troubleshooting Issues with First Aid
While First Aid is an efficient utility, there are instances where it might not be able to completely resolve disk issues. Understanding what to do next is crucial in such scenarios. This section will explore the troubleshooting steps that you can take if First Aid fails to repair your disk or volume.
What to Do If First Aid Fails:
1. Run First Aid in Recovery Mode: Sometimes, running First Aid from the macOS environment can be limiting if the disk is in use. Booting into macOS Recovery Mode can provide a more comprehensive repair process.
- Restart your Mac and hold Power button (if you are using an Intel-based Mac, press and hold Command+R keys) until you see macOS Recovery screen.
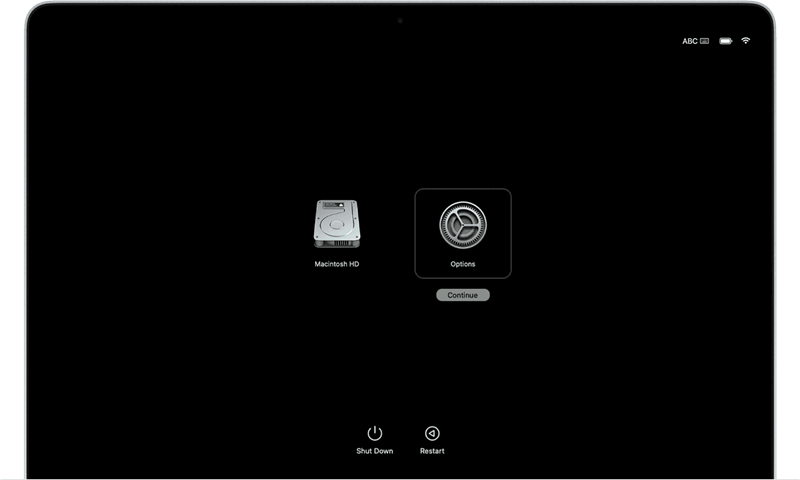
- Select Options and click on Continue button. Then choose a user account and enter login password.
![Select Options and click on Continue button]()
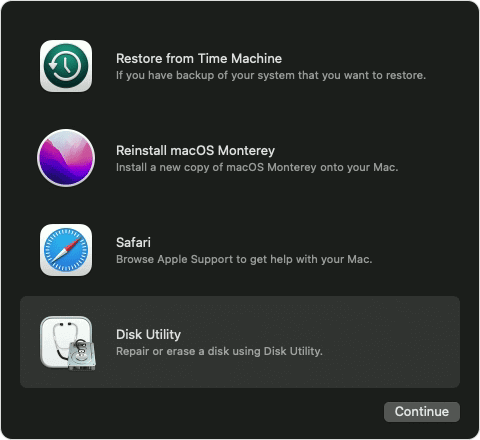
- In recovery app, choose Disk Utility and click on Continue button.
![choose Disk Utility and click on Continue button]()
- Select the target disk and volume, click on First Aid button to repair the disk or volume.
![click on First Aid button to repair the disk or volume]()
2. Use the Terminal to Run fsck:
Another powerful way to troubleshoot disk issues is to use the Terminal to run the fsck command, which stands for File System Consistency Check. This command provides a more detailed and low-level repair of the file system.
Steps to Run fsck via Terminal:
Restart Your Mac in Single User Mode: Hold down Command + S during startup. This will boot your Mac into Single User Mode, which is essentially a minimal version of macOS that doesn't load the full graphical user interface.
Run fsck Command: When you see a black screen with white text, type the following command and press Enter:
/sbin/fsck -fy
The -f flag forces a check, while the -y flag automatically agrees to repair issues that are found.
Review the Results: After running the command, the Terminal will display the status of the check. If fsck finds errors and repairs them, it will indicate that the "file system was modified." If errors were found and repaired, it's recommended to run the command again until it reports that "The volume appears to be OK."
Restart Your Mac: Once the disk has been successfully checked and repaired, type reboot to restart your Mac and return to normal operation.
3. Use Third-Party Disk Repair Software: There are numerous third-party tools available that can help when First Aid is unsuccessful. Some popular options include:
- Donemax Data Recovery for Mac
- DiskWarrior
- TechTool Pro
- Drive Genius
🔖Reformatting the Disk
If all else fails, reformatting the disk might be your only option. Reformatting will erase all data, so ensure you have a backup before proceeding:
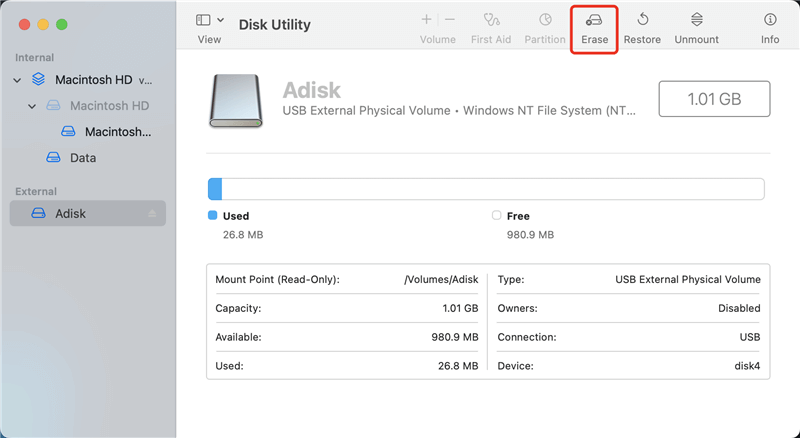
- Open Disk Utility, select the disk, and click Erase.
![select the disk and click Erase]()
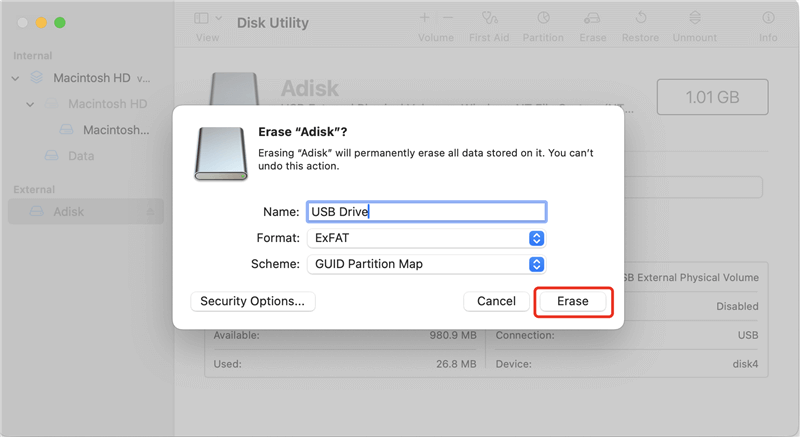
- Choose the appropriate file system format (e.g., ExFAT, APFS or Mac OS Extended).
- Click Erase and then set up the disk again.
![Click Erase and then set up the disk again]()
Preventive Measures for Disk Health
Keeping your disks healthy can minimize the need for repair tools like First Aid. Here are some tips for preventive maintenance:
Regular Disk Checks:
Running First Aid regularly, even if you don't notice any issues, can help catch and fix problems early. Set a reminder to run it monthly, especially for external drives that are frequently used.
Backup Strategies:
Always maintain a backup of your important data. Use Time Machine or a cloud backup service to ensure you have a copy of your data in case something goes wrong.
Avoiding Common Causes of Disk Errors:
- Properly Eject External Drives: Always eject external drives before disconnecting them to avoid file corruption.
- Avoid Sudden Shutdowns: Shutting down your Mac improperly can lead to disk issues, particularly if files are being written at the time.
Conclusion
First Aid is an essential tool in macOS that helps maintain your disk's health and ensure your Mac runs smoothly. Whether you're experiencing minor performance issues or major disk errors, First Aid can often be the first line of defense. It's user-friendly, built into macOS, and can potentially save you from more complex repair needs or data loss.
If First Aid isn't able to resolve the issue, remember there are additional steps you can take, such as running fsck in Terminal, using third-party utilities, or reformatting your disk. And above all, maintaining regular backups and proactively checking your disk's health are the best ways to keep your Mac running optimally.
FAQs About Running First Aid on Mac
1. How to use First Aid to repair an HDD/SSD/USB/SD card on Mac?
Follow the steps below to repair an external device on Mac:
- Go to Launchpad > Other > Disk Utility, open Disk Utility.
- Select the external device, click First Aid.
- Click Run to repair the external disk.
2. How to run First Aid on startup disk on Mac?
If you want to repair the Mac's startup disk with Disk Utility, you may need to start the Mac into recovery mode:
- Shut down the Mac.
- Press and hold the Power button (if you are using the Intel-based Mac, turn on the Mac, press and hold Command+R keys) until it boots into macOS Recovery mode.
- Choose Options, click on Continue button.
- Choose Disk Utility, click on Continue button.
- Select the startup disk (such as Macintosh HD) and click on First Aid button.
- Click on Run button to start repairing the startup disk of the Mac.
3. How long does running First Aid take?
It depends on the disk's size and the condition of the disk. Normally, it takes only 1-5 minutes to run First Aid on a disk. However, if there are errors and bad sectors on the disk, it takes more time to complete the scanning & repairing process.
4. Besides Disk Utility's First Aid, any other tool can repair disk on Mac?
Yes, there are many tools can help in repairing disk on Mac, such as:
- Donemax Data Recovery for Mac
- Donemax Data Eraser for Mac
- DMmenu for Mac
Related Articles
- Jul 04, 2025Create a Bootable USB Installer for macOS Mojave
- Jul 15, 2025Does Mac Have BIOS Mode or Similar Boot Mode?
- Dec 16, 2024XProtectRemediatorSheepSwap: What Is It and How to Fix It on Mac?
- Jul 18, 2025Fix External Hard Drive Read-Only on macOS Tahoe 26
- Aug 10, 2025How to Set Default Browser on Mac?
- Apr 18, 2025How to Fix MacBook Screen Flickering?

Maria
Maria is one of the senior writers & editors of Donemax who lives and works in Sydney, Australia. She loves PC, Mac and Internet Technology. She has 6 years of writing articles about data recovery on PC/Mac, disk cloning solution, data eraser and computer OS optimization, etc. She is also interested in testing various software and digital products.

Gerhard Chou
In order to effectively solve the problems for our customers, every article and troubleshooting solution published on our website has been strictly tested and practiced. Our editors love researching and using computers and testing software, and are willing to help computer users with their problems


