Written byChristinaUpdated on Jul 04, 2025
Create a Bootable USB Installer for macOS Mojave
Approved byGerhard Chou
Before we start: With Terminal commands, it's able to make a bootable USB installer for macOS Mojave. To make the process easier, you can also use Donemax Disk Clone for Mac. The software can create macOS installer quickly.
PAGE CONTENT:
Creating a bootable USB installer for macOS Mojave can be useful. You may need to reinstall macOS, clean install macOS Mojave, or troubleshoot your Mac. A bootable USB installer can upgrade or restore your system easily. This guide walks you through the process to successfully create a bootable USB installer for macOS Mojave.
macOS Mojave is an older version of macOS. But it's still a great choice for users with older Mac devices. These devices may not support newer macOS versions. One of the best ways to install or reinstall macOS Mojave is by using a bootable USB installer.
What Needed for Creating macOS Mojave Bootable USB Installer?
Before we begin, ensure that you have the following items in place:
- A USB Drive (at least 8GB in size): The USB drive will be used to store the macOS Mojave installer. It must be empty, as the process will erase all data on it. You can use Disk Utility to erase the USB flash drive to Mac OS Extended or APFS (recommended).
- A Mac with macOS Mojave or later: You need a Mac to download the installer and create the bootable drive.
- macOS Mojave Installer: You need to download the macOS Mojave installer from the Mac App Store. If you can't find it there, Apple still provides it through their support website.
- Internet Connection: You'll need an internet connection to download the installer, which can be several gigabytes in size.
Steps to Make Bootable USB Installer for macOS Mojave
Once you have all the necessary tools, you're ready to begin the process.
Method 1. Use system built-in tool
Step 1: Download macOS Mojave
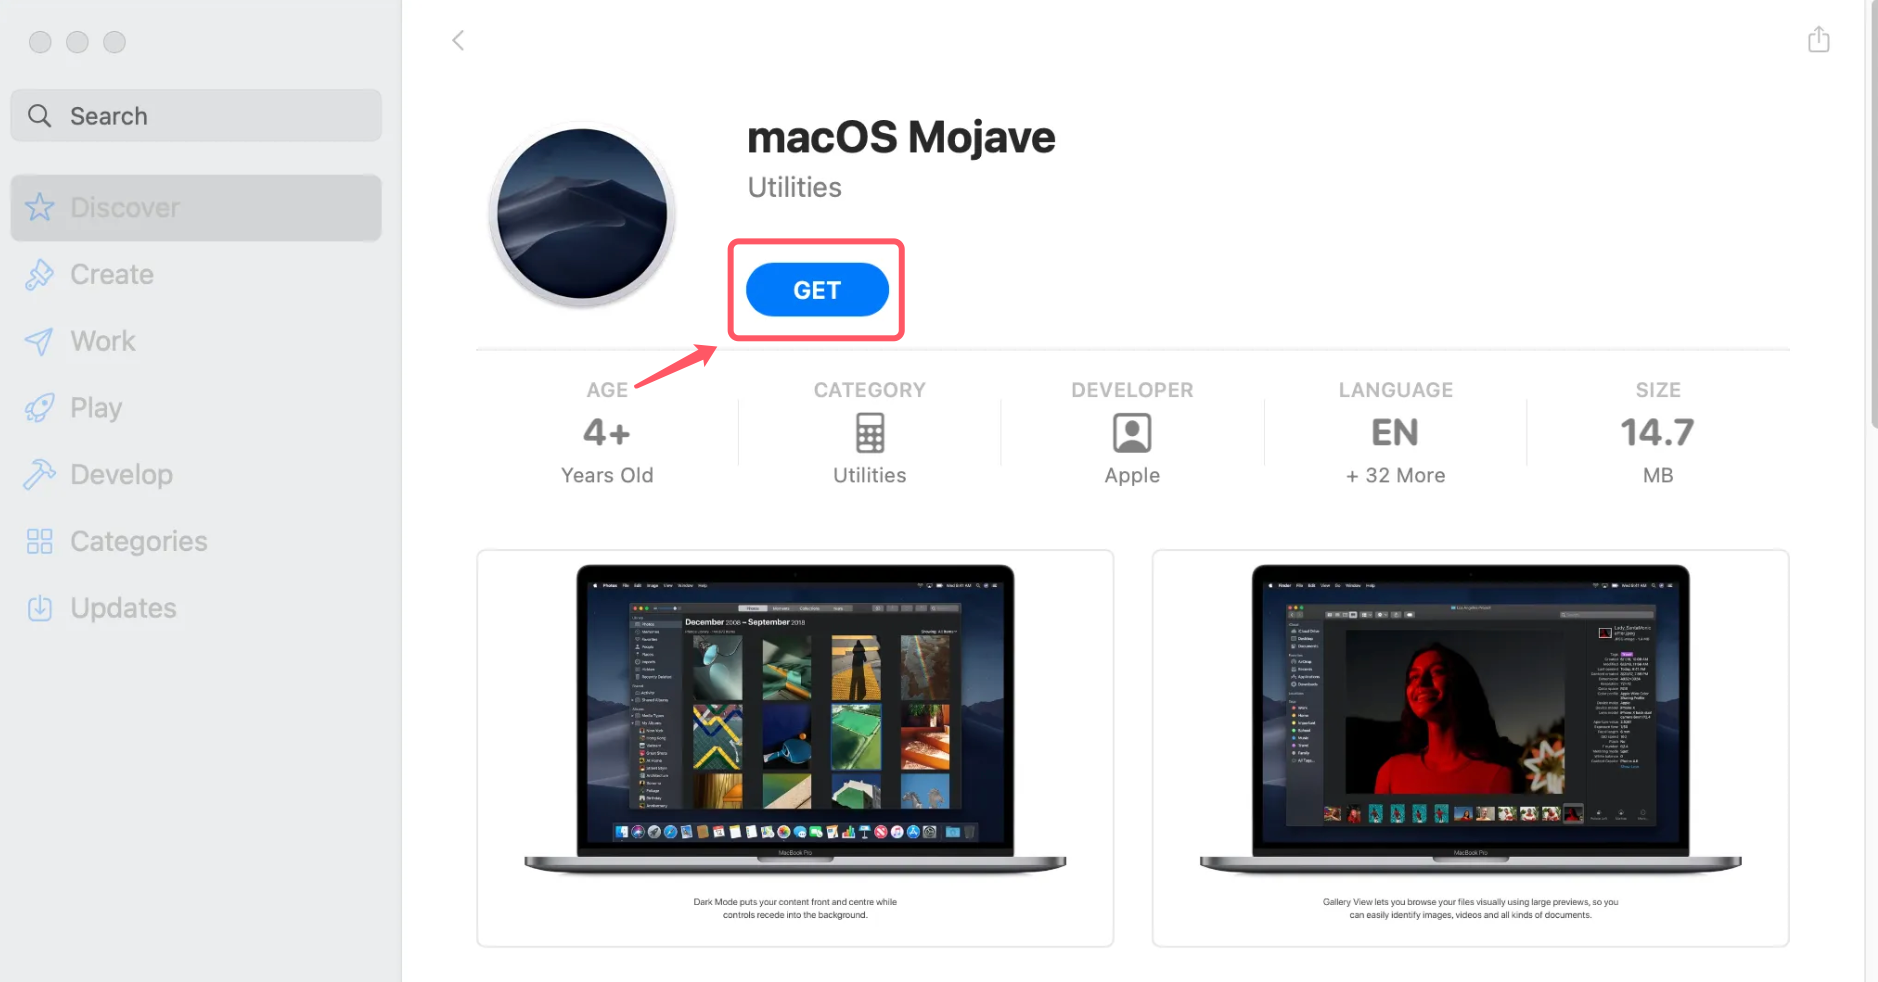
First, download the macOS Mojave installer from the Mac App Store. This process may take some time, depending on your internet connection speed, so be patient.
- Open the Mac App Store: Click on the App Store icon in the Dock or use Spotlight search to find the App Store.
- Search for macOS Mojave: Use the search bar at the top-left corner of the App Store window to search for "macOS Mojave."
- Download macOS Mojave: Click on the "Get" button next to macOS Mojave. This will start the download process. The system will download the installer to your Applications folder once complete.
Step 2: Prepare the USB Drive
Once the macOS Mojave installer has been downloaded, it's time to prepare the USB drive for the bootable installer.
Before using the USB drive to create the bootable installer, you must format it. Before using the USB drive to create the bootable installer, you must format it. Formatting ensures to set up USB drive correctly for macOS. Here's how:
- Insert the USB drive into your Mac.
- Open Disk Utility: You can find this by using Spotlight search or navigating to Applications > Utilities > Disk Utility.
- Select the USB drive: In Disk Utility, select the USB drive from the left sidebar.
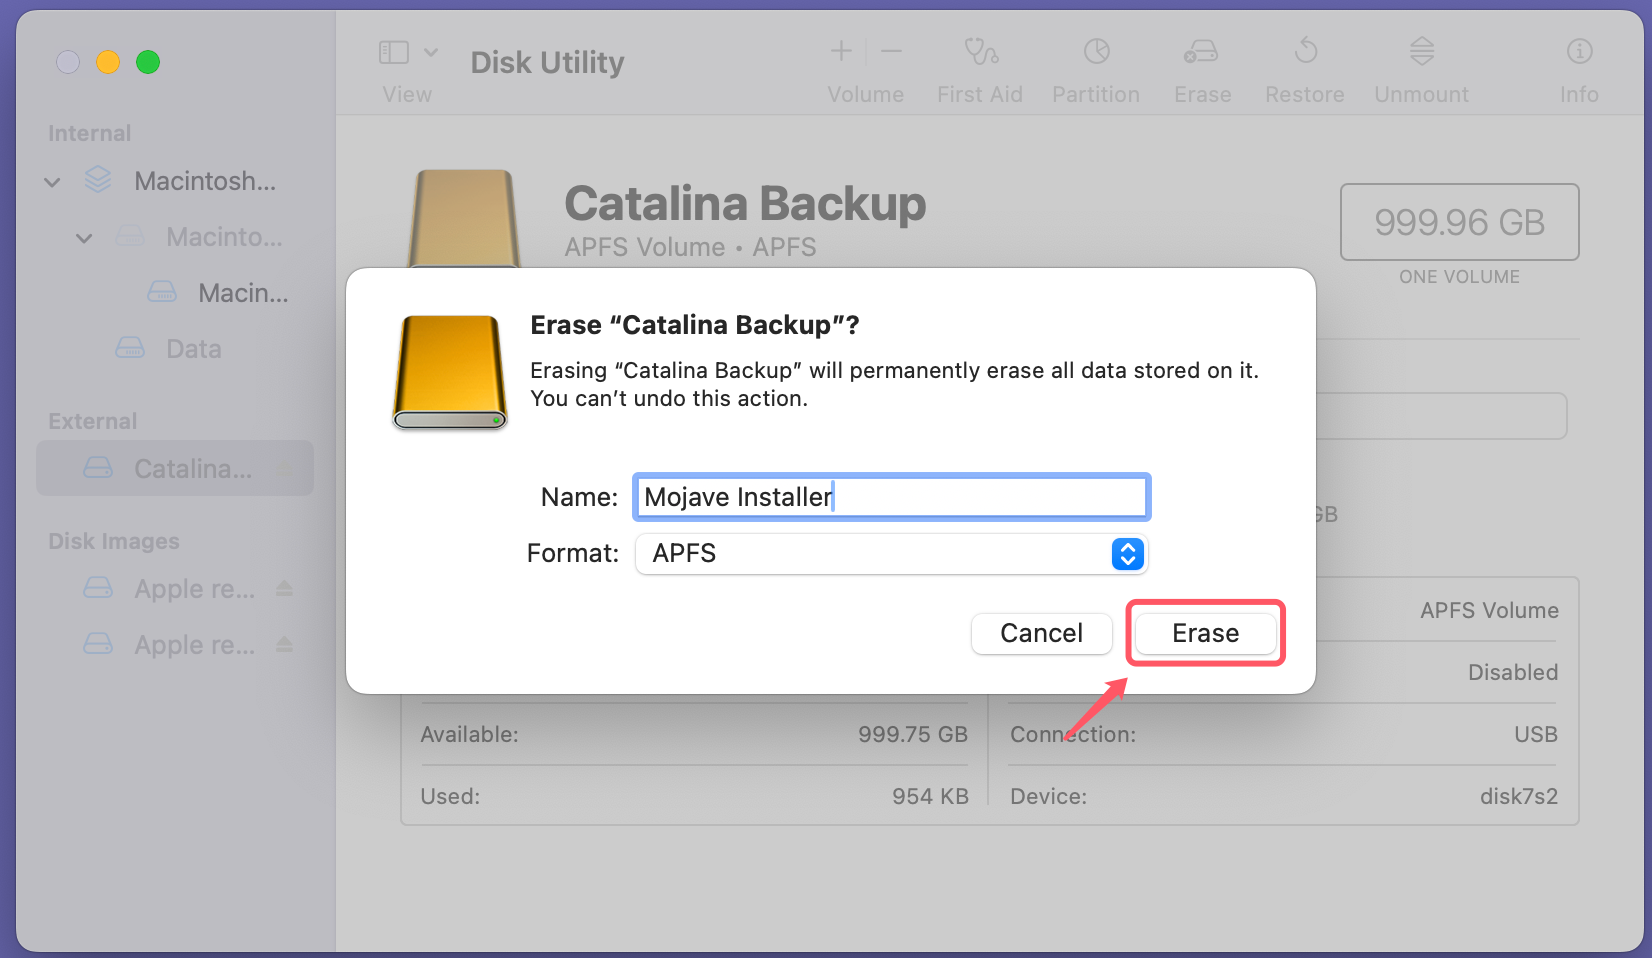
- Erase the USB drive: Click on the "Erase" button at the top of the Disk Utility window. You will be prompted to select a format for the drive:
Name: You can name the drive anything you like (e.g., "Mojave Installer").
Format: Choose APFS or Mac OS Extended (Journaled).
Scheme: Select GUID Partition Map. - Erase and format: Click the "Erase" button to format the drive. This will erase all data on the drive, so make sure you back up any important files beforehand.
After formatting, the USB drive will be ready for the next step.
Step 3: Create the Bootable USB Drive
Now that your USB drive is formatted, it's time to create the bootable USB installer. This process uses the Terminal app to copy the macOS Mojave installer to the USB drive. Also, it maks the USB drive bootable. Follow these steps:
- Open Terminal: You can find Terminal by searching for it in Spotlight or by navigating to Applications > Utilities > Terminal.
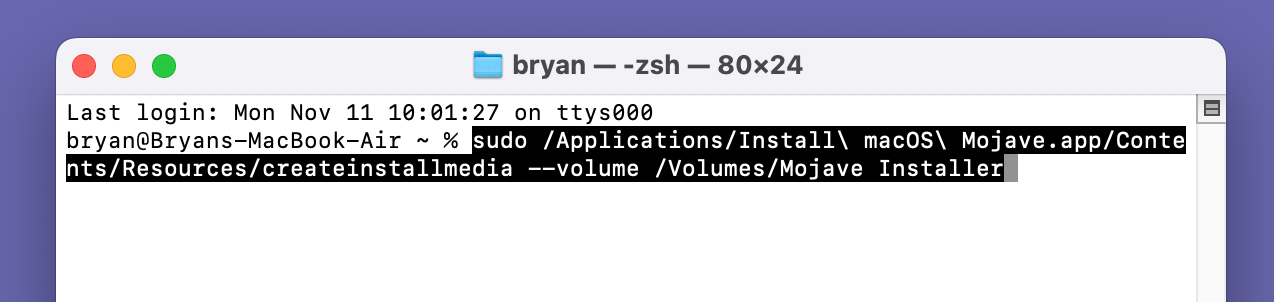
- Enter the Command: In Terminal, you'll need to enter a specific command to copy the macOS Mojave installer to your USB drive. The command is as follows:
sudo /Applications/Install\ macOS\ Mojave.app/Contents/Resources/createinstallmedia --volume /Volumes/MyVolume
Replace MyVolume with the name of the USB drive, for example:
![Creating a bootable USB installer for macOS Mojave]()
- Authenticate with your password: After entering the command, you'll be prompted to enter your Mac's administrator password to proceed.
- Wait for the process to complete: The process of creating the bootable USB installer will take some time. The Terminal will display progress as it copies files to the USB drive. Once finished, you'll see a message that says, "Copy Complete" and that the drive is now ready.
Method 2. Use Donemax Disk Clone for Mac
For some users, it's not easy to creating the USB bootable installer via Terminal commands. Donemax Disk Clone for Mac is a better choice. The software offers user-friendly interface. It's easy to create the bootable USB installer for macOS Mojave.
Donemax Disk Clone for Mac
- Top and reliable disk cloning software for Mac
- Simple steps to clone data from one disk to another.
- Create bootable clone backup and macOS USB installer.
Download and install the software on your Mac. Then follow the below steps to create a bootable USB installer quickly:
- Launch the software and change to Make Installer.
- Select "macOS Mojave" from the drop-down list.
- Select the USB drive to make the USB installer.
- At last, click the button Create a macOS installer to continue.
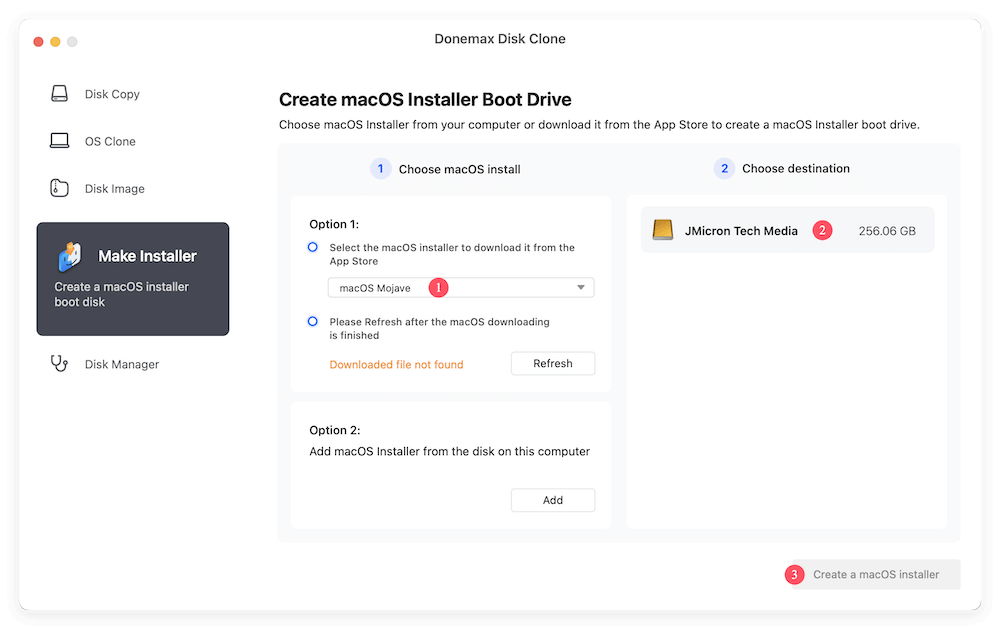
Once the process is complete, you will get a bootable USB installer for macOS Mojave.
How to Use macOS Mojava Bootable USB installer?
Now that your bootable USB drive is ready, it's time to use it to boot your Mac and install macOS Mojave. Here's how:
- Shut down your Mac.
- Insert the USB drive into one of the USB ports on your Mac.
- Turn on your Mac and immediately press and hold the Option key (also known as the Alt key) on your keyboard.
- After a few moments, you should see the boot menu. Use the arrow keys to select your USB drive and press Enter.
- Once your Mac boots from the USB drive, you'll see the macOS Utilities window. You can install macOS Mojave, use Disk Utility to format the drive, or access other recovery options.
Troubleshooting Tips
While the process is generally straightforward, you might encounter a few issues. Here are some common problems and their solutions:
- USB drive doesn't show up in the boot menu: Ensure that the USB drive is properly formatted and that the bootable installer was created successfully. Try reinserting the USB drive or using a different USB port.
- Error during the createinstallmedia command: Double-check that you've entered the Terminal command correctly, particularly the path to the macOS installer and the name of the USB drive. Also, make sure that the installer is located in the /Applications folder.
- Installer freezes or stops: If the installer freezes or crashes during installation, restart the Mac and try again. If the issue persists, you may need to re-create the bootable USB drive.
Conclusion
Creating a bootable USB installer for macOS Mojave is a simple yet powerful way to ensure that you can reinstall or troubleshoot your system whenever needed. By following the steps outlined in this guide, you can have a portable macOS Mojave installer ready to go in just a few simple steps. Whether you’re performing a clean installation, upgrading an older system, or troubleshooting a Mac that refuses to boot, having a bootable USB drive can save you time and effort.
With this tool in hand, you're ready to handle a variety of situations that require macOS Mojave, from system recovery to fresh installs. Keep the bootable USB installer safe, and you'll have a reliable solution whenever you need it.
💡 Note: Before or after installing macOS Mojave on your Mac, you'd better make a full backup of your important data. Mac disk cloning software like Donemax Disk Clone for Mac, can help you clone everything including operating system, apps, settings, user data from the internal HDD/SSD to the external hard drive and make a full bootable clone backup for your Mac.
Donemax Disk Clone for Mac
An award-winning disk cloning program to help Mac users clone HDD/SSD/external device. It also can create full bootable clone backup for Macs.
Related Articles
- Jul 04, 2025Fix Mac Won't Restart or Restart Not Working: Complete Guide
- Oct 11, 2024What is First Aid? How to Run First Aid to Repair Disk on Mac?
- Nov 21, 2024Change Permissions on Mac: A Comprehensive Guide
- Oct 18, 2024Check Free Disk Space on Mac: A Comprehensive Guide
- Dec 12, 2024How to Mount External Hard Drive or USB Drive Using Terminal on Mac?
- Jul 22, 2025Troubleshoot and Fix common macOS Tahoe 26 Beta Issues

Contributing Writer
Christina
Christina is the senior editor of Donemax software who has worked in the company for 4+ years. She mainly writes the guides and solutions about data erasure, data transferring, data recovery and disk cloning to help users get the most out of their Windows and Mac. She likes to travel, enjoy country music and play games in her spare time.

Editor in chief
Gerhard Chou
In order to effectively solve the problems for our customers, every article and troubleshooting solution published on our website has been strictly tested and practiced. Our editors love researching and using computers and testing software, and are willing to help computer users with their problems