Written byStevenUpdated on Apr 10, 2025
[9 Fixes] Fix Macintosh HD Not Mounting on Mac or Not Showing Up in Disk Utility
Approved byGerhard Chou
PAGE CONTENT:
Macintosh HD is the primary storage drive of your Mac, where the macOS system files and your personal data reside. However, there are times when users encounter an issue where Macintosh HD does not mount, or worse, does not show up in Disk Utility. This problem can be alarming because it prevents access to files, applications, and even the operating system itself.
There are several reasons why Macintosh HD might not be mounting or appearing in Disk Utility, including:
- Software issues such as macOS bugs, system corruption, or incorrect settings.
- File system corruption caused by an improper shutdown, interrupted updates, or malware.
- Disk-related problems such as bad sectors, hardware failure, or physical damage.
- Incorrect disk configurations or accidental deletion of Macintosh HD partitions.
In this guide, we will walk through step-by-step solutions to resolve the issue and restore access to your drive.
How to Fix Macintosh HD Not Mounting or Not Showing Up on Mac?
Fix 1. Check Physical and Basic Issues
Before diving into complex troubleshooting, let's start with the basics.
Start Your Mac Again
A simple restart can sometimes resolve minor software glitches. To restart:
- In the upper-left corner, click the Apple Menu.
- Select Restart and wait for the system to reboot.
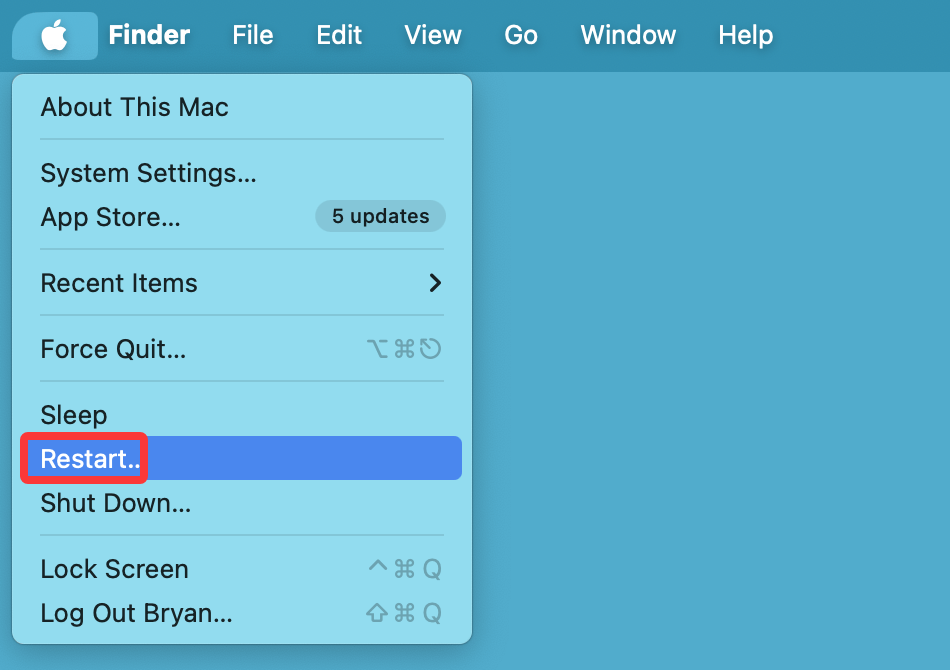
If your Mac is unresponsive, perform a force to restart, hold down the Power button until it shuts off, then press it again to turn it on.
Check if the Disk is Recognized in System Information
Even if Macintosh HD is not appearing in Finder or Disk Utility, it's useful to check if your Mac detects it at a hardware level:
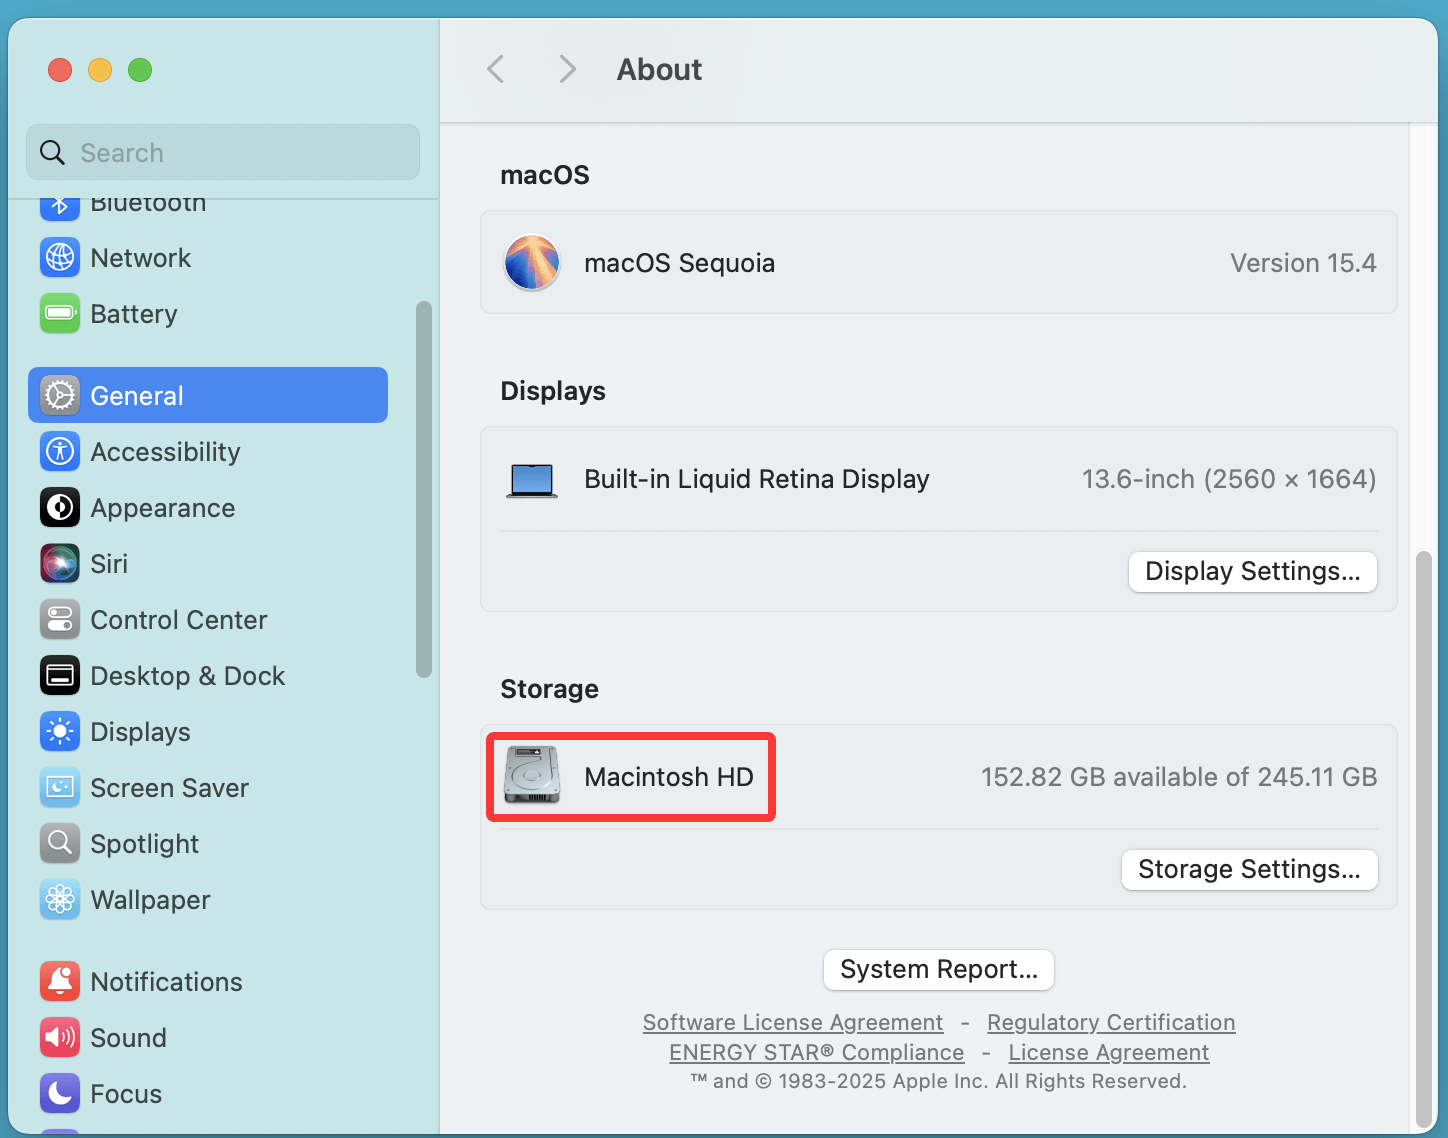
- Select "About This Mac" after clicking on the Apple Menu.
- Click More Info > Storage to see if Macintosh HD is listed.
![Fix Macintosh HD Not Mounting on Mac]()
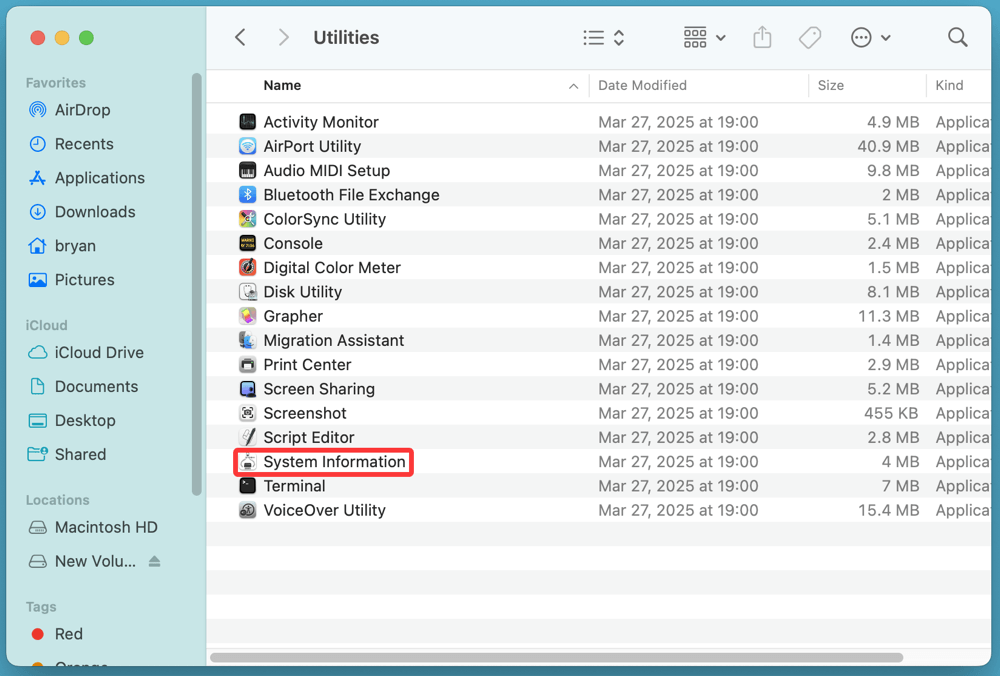
- If it doesn't appear, try System Information:
- Open System Information from Utilities via Applications.
![Fix Macintosh HD Not Mounting on Mac]()
- Click on Storage or SATA/NVMe to check if your disk is detected.
![Fix Macintosh HD Not Mounting on Mac]()
- Open System Information from Utilities via Applications.
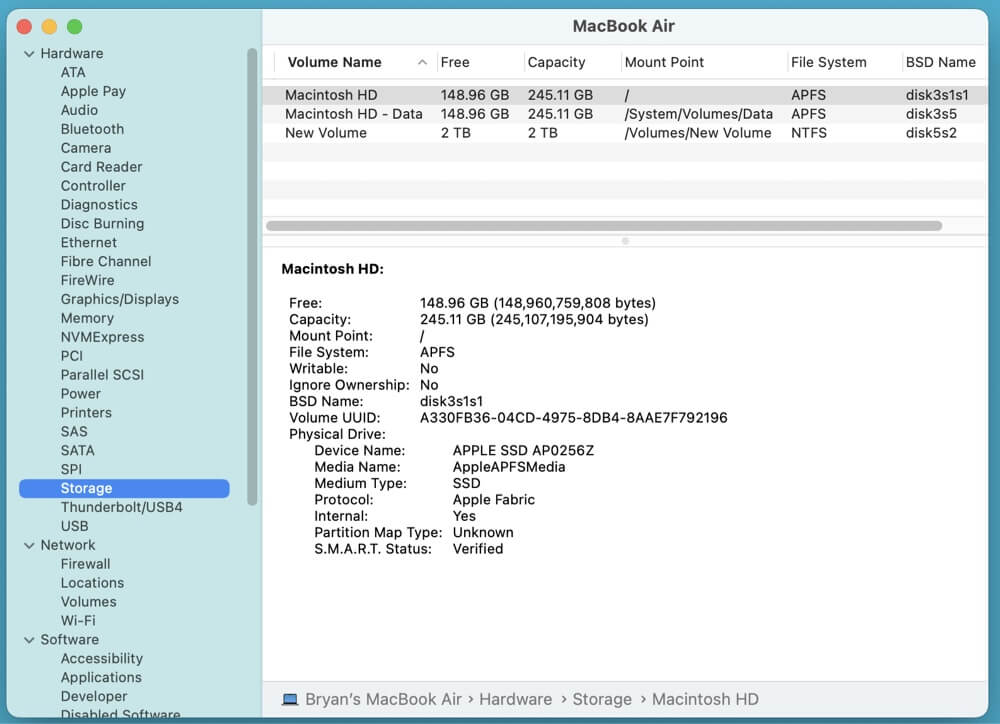
If the disk is not recognized here, it may indicate a hardware failure.
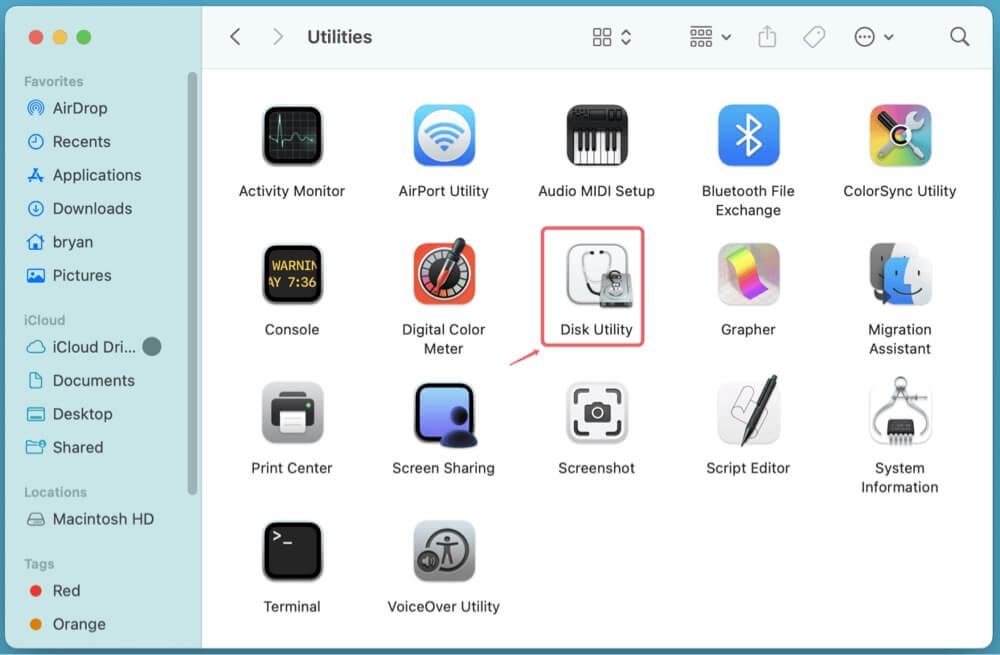
Fix 2. Use Disk Utility to Locate and Mount Macintosh HD
Disk Utility is macOS's built-in tool for managing disks and partitions.
Steps to Check and Mount the Disk
- Open Disk Utility: Go to Disk Utility from Utilities via Applications.
![Fix Macintosh HD Not Mounting on Mac]()
- Look for Macintosh HD under the Internal section.
- If it appears but is not mounted, select it and click Mount at the top.
![Fix Macintosh HD Not Mounting on Mac]()
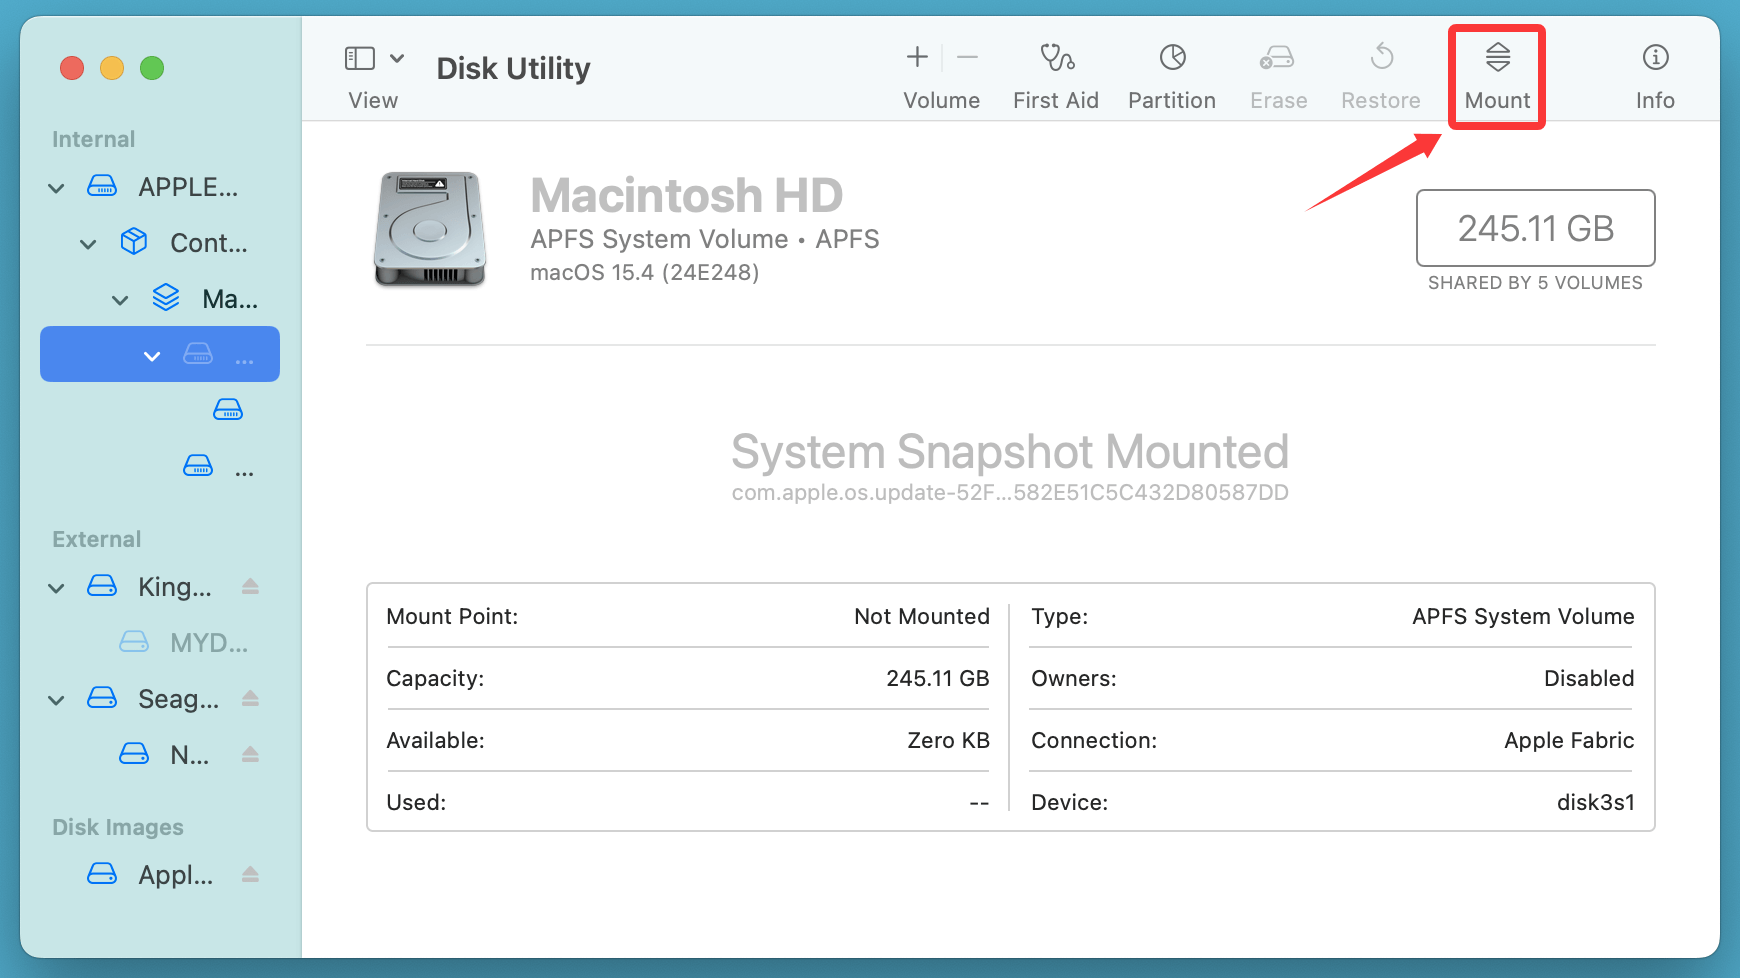
If you don't see Macintosh HD at all, proceed to the next section.
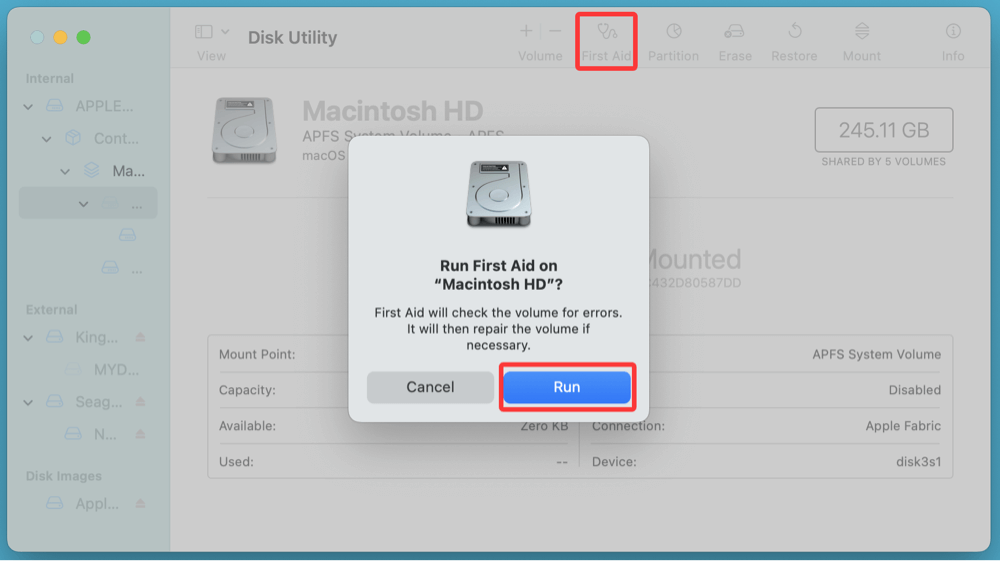
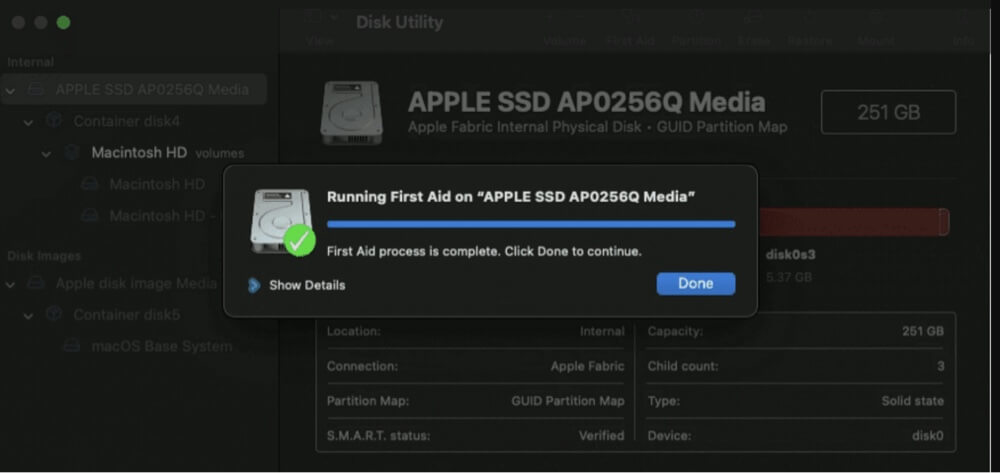
Fix 3. Run First Aid in Disk Utility
First Aid scans and repairs disk errors, which might resolve the issue if Macintosh HD is corrupted.
How to Run First Aid:
- Open Disk Utility.
- Select Macintosh HD (if visible).
- Click First Aid > Run.
![Fix Macintosh HD Not Mounting on Mac]()
- Wait for the scan to complete and note any error messages.
- If First Aid fixes the issue, restart your Mac and check if Macintosh HD is accessible.
- If First Aid fails, proceed to the next step.
Fix 4. Boot into Safe Mode and Check the Disk
Safe Mode loads macOS with minimal drivers and disables third-party extensions that could interfere with the disk.
How to Boot into Safe Mode?
On Intel Macs:
- Turn Off your Mac.
- Turn it on while holding the Shift key.
- Release the key when you see the login screen.
On Apple Silicon (M-chip) Macs:
- Shut down your Mac.
- Press and hold the Power button until "Loading startup options" appears.
- Click Continue in Safe Mode after selecting your startup disk and holding Shift.
![Fix Macintosh HD Not Mounting on Mac]()
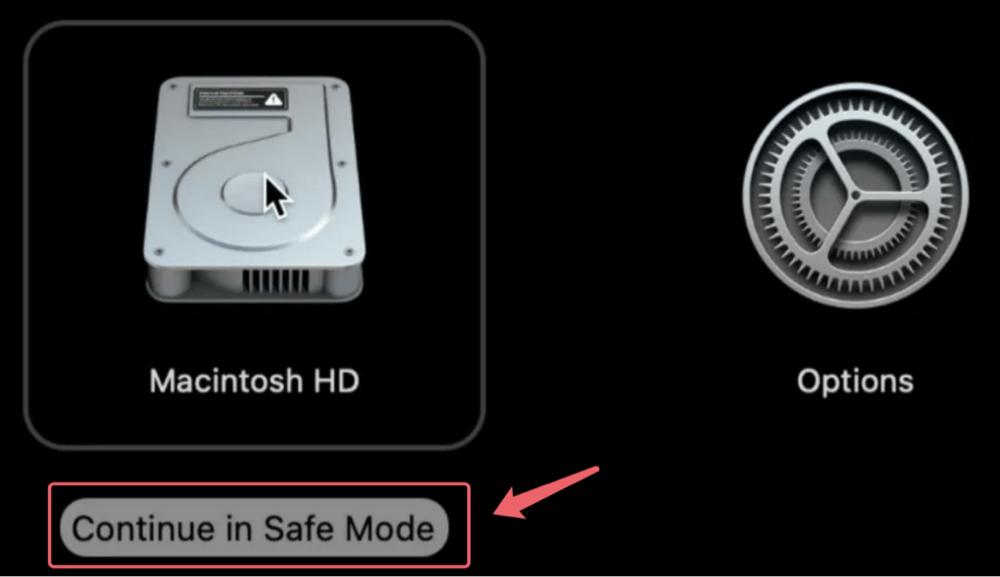
Once in Safe Mode, open Disk Utility and try mounting or running First Aid again.
Fix 5. Reset NVRAM and SMC
NVRAM and SMC store system settings that might affect disk recognition. Resetting them can sometimes resolve the issue.
Reset NVRAM (Intel Macs Only):
- Turn Off your Mac.
- For ten seconds, press Shift + Control + Option + Power.
- Let go of the keys and switch your Mac on.
Reset SMC (for Intel Macs):
- Turn Off your Mac.
- On the left side of the keyboard, press Shift + Control + Option. Then, for ten seconds, push the Power button.
- Turn the Mac back on after releasing all the keys.
For Apple Silicon Macs, SMC resets automatically during a restart.
Fix 6. Use Terminal to Mount Macintosh HD
If Macintosh HD is not mounting in Disk Utility, using Terminal can provide a direct way to check disk status and attempt to mount it manually. Terminal allows you to interact with macOS at a deeper level, which can be useful if the graphical interface of Disk Utility fails.
Step 1: Open Terminal in macOS or Recovery Mode
If your Mac is still functional and you can access macOS: Go to Terminal from Utilities via Applications.
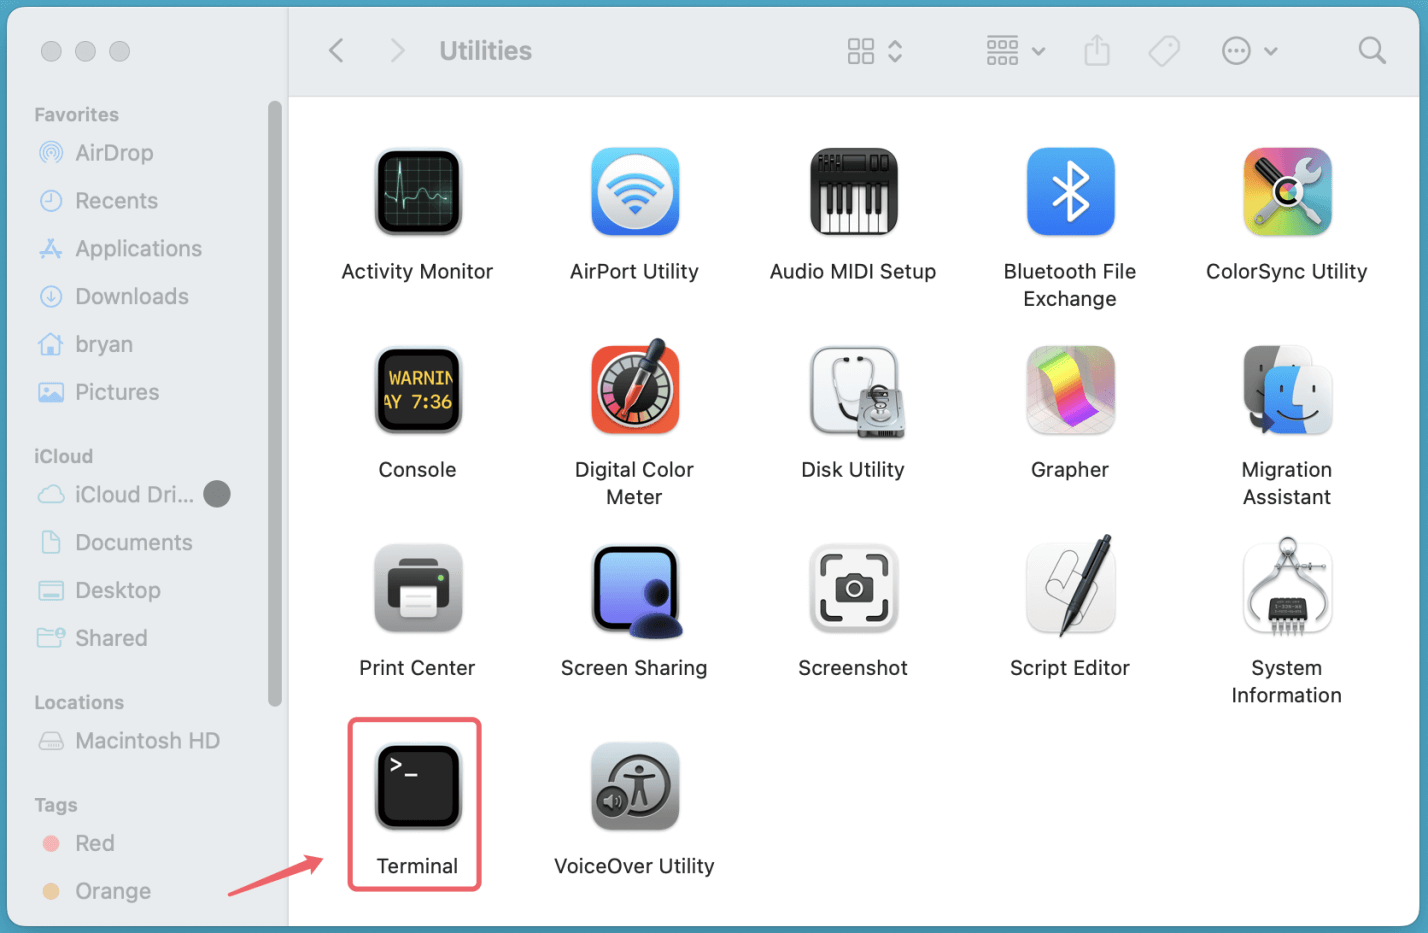
If your Mac cannot boot properly, access Terminal via macOS Recovery Mode:
- Restart your Mac and enter Recovery Mode:
- On Intel Macs: Hold Command (⌘) + R while booting.
- On Apple Silicon (M-chip) Macs: Hold the Power button until "Loading startup options" appears, then select Options > Continue.
- Select Utilities > Terminal from the top menu.
Step 2: Identify the Disk and Partition
Once Terminal is open, list all available drives by running:
diskutil list
This command will output a list of connected disks. Look for Macintosh HD in the results. It should be labeled something like:
/dev/disk1 (internal, physical)
/dev/disk1s1 - APFS Volume Macintosh HD
/dev/disk1s2 - APFS Volume Preboot
/dev/disk1s3 - APFS Volume Recovery
- The disk identifier (e.g., /dev/disk1) is what you'll use in the next commands.
- If Macintosh HD is missing, your disk may have been erased or failed completely.
Step 3: Try to Manually Mount the Disk
To manually mount the drive, use:
diskutil mountDisk /dev/diskX
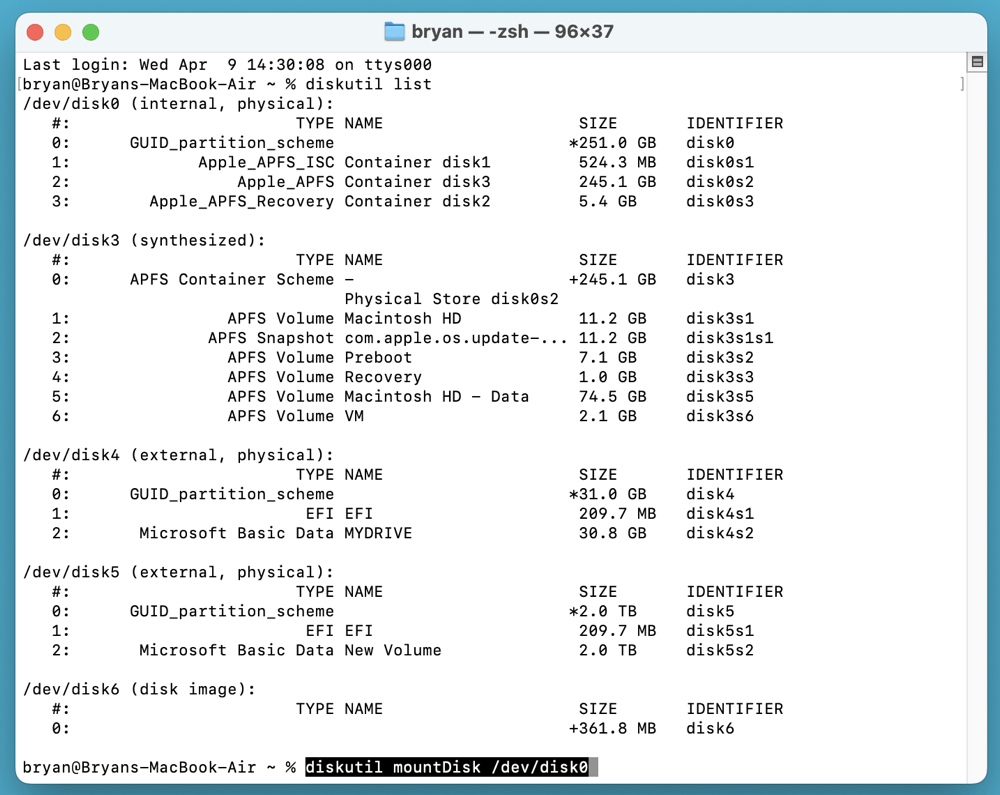
Replace /dev/diskX with your actual disk identifier (e.g., /dev/disk0).
If that doesn't work, try mounting the specific APFS volume instead:
diskutil mount /dev/diskXs1
If successful, Macintosh HD should now be accessible in Finder and Disk Utility.
Step 4: Repair the Disk with First Aid in Terminal
If mounting fails, the disk might be corrupted. Try repairing it with:
diskutil repairVolume /dev/diskX
If that doesn't work, attempt a broader repair:
fsck_apfs -y /dev/diskX
- fsck_apfs (File System Consistency Check) scans for file system issues and attempts to fix them.
- The -y flag tells it to automatically apply recommended fixes.
If repairs are successful, restart your Mac and check if Macintosh HD is accessible.
Step 5: Force Mount the Drive (If Necessary)
If standard mounting commands don't work, try forcing macOS to recognize the drive:
sudo diskutil unmountDisk force /dev/diskX
sudo diskutil mountDisk /dev/diskX
- The unmountDisk force command forces the system to release any stuck processes using the disk.
- The mountDisk command attempts to reattach the disk after resetting it.
Step 6: Check for CoreStorage or APFS Issues
Some Macs use CoreStorage instead of APFS, especially those upgraded from older macOS versions. Check if your disk is a CoreStorage volume:
diskutil cs list
If the command lists a CoreStorage volume, try:
diskutil cs unlockVolume /dev/diskX
For APFS drives, check for container issues:
diskutil apfs list
If the APFS container is missing or damaged, you may need to reformat the drive (see Section 8).
What If Terminal Cannot Mount the Drive?
If none of these steps work, it indicates:
- Severe file system corruption
- Disk encryption issues (e.g., FileVault locking the drive)
- A failing or physically damaged SSD/HDD
If you still need access to your data, proceed to data recovery solutions (Section 8) before attempting to erase and format the disk.
Fix 7. Reinstall macOS Without Data Loss
If macOS is corrupted, reinstalling it can restore access to Macintosh HD without erasing data.
How to Reinstall macOS:
- Boot into macOS Recovery Mode:
- Intel Macs: Restart and hold Command + R.
- Apple Silicon Macs: Hold the Power button until startup options appear.
- Select Reinstall macOS and follow the prompts.
![Fix Macintosh HD Not Mounting on Mac]()
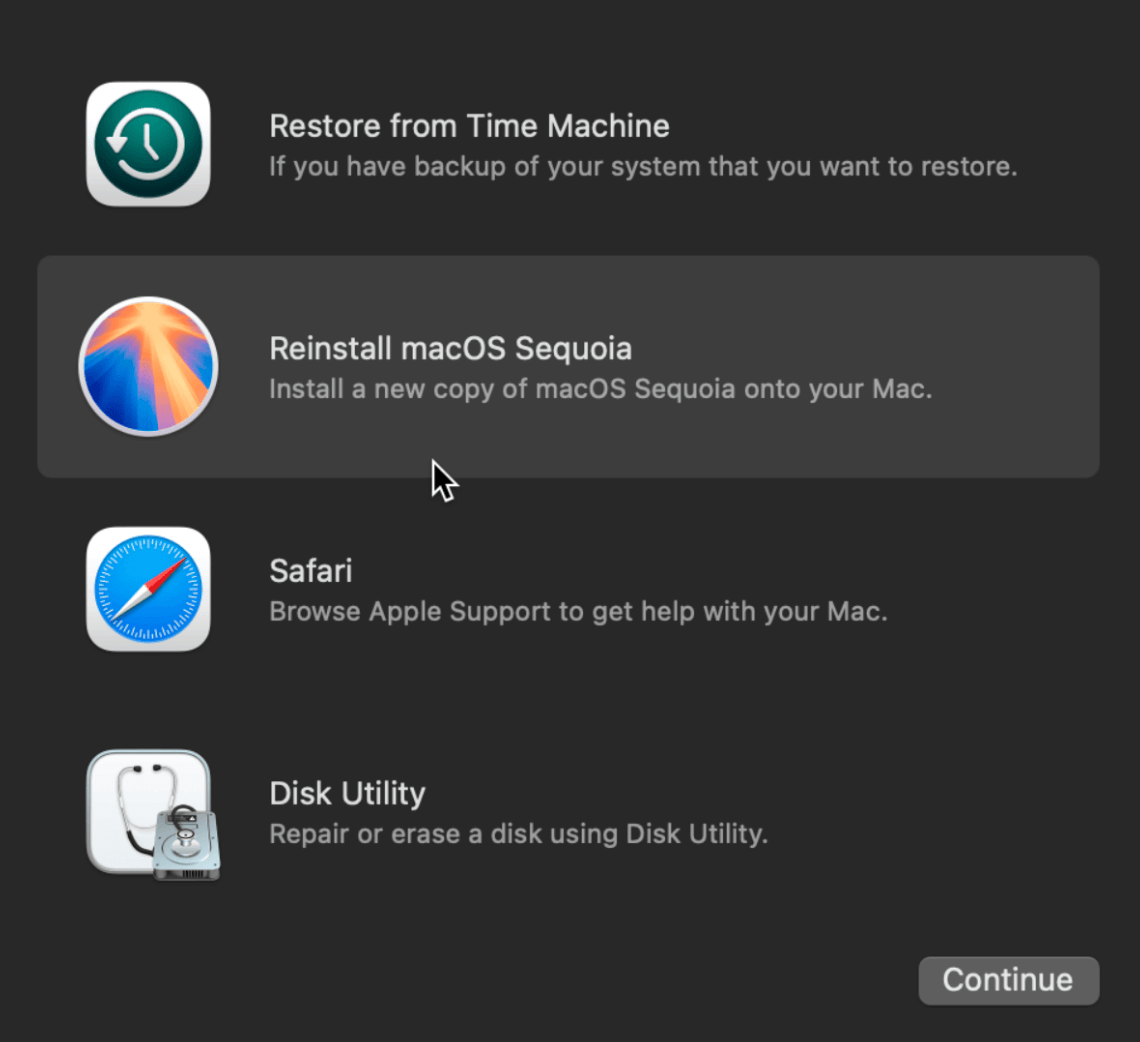
After installation, check if the drive is accessible.
Fix 8. Recover Data and Format the Drive
If the above steps fail, you may need to recover data and reformat the drive.
Recover Data Using Third-Party Software
Donemax Data Recovery for Mac is a powerful Mac data recovery program. It supports to easily and completely recover lost data from Macintosh HD.
Step 1. Download and install Donemax Data Recovery for Mac.
Step 2. Open Donemax Data Recovery for Mac, select Macintosh HD to start data recovery.

Step 3. Click on Scan button to deeply scan the internal disk and find all recoverable files.

Step 4. Once the scan is completed, you can preview all recoverable files. Then select the wanted files, click on Recover button.

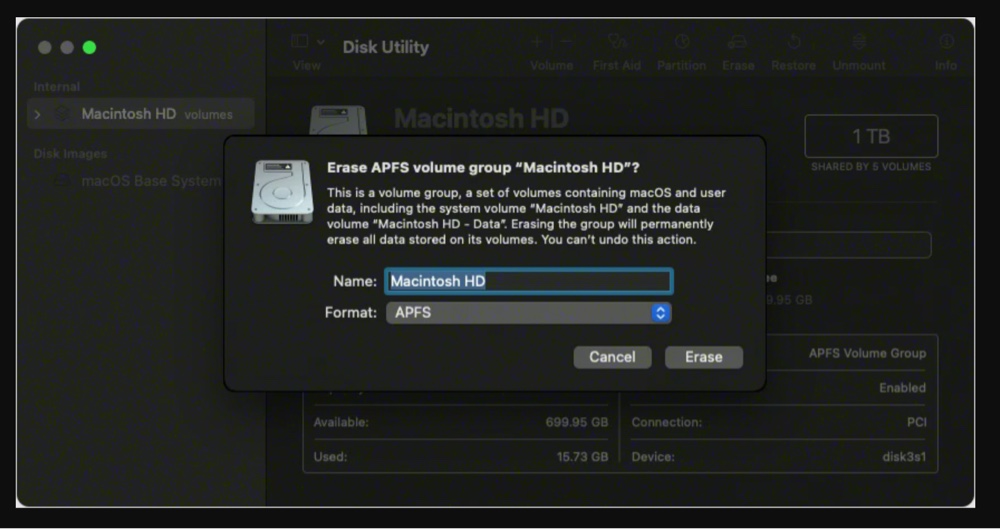
Format and Reinstall macOS
- Boot into macOS Recovery Mode.
- Open Disk Utility and select Macintosh HD.
- Click Erase, choose APFS or Mac OS Extended (Journaled), and confirm.
![Fix Macintosh HD Not Mounting on Mac]()
- Reinstall macOS using Reinstall macOS option.
Fix 9. Seek Professional Help
If your Mac still doesn't recognize the disk, the issue could be hardware-related. In this case:
- Contact Apple Support for diagnostics.
- Visit an Apple Store or authorized service provider for repairs.
- If your Mac is under warranty, check for AppleCare+ coverage.
Conclusion
Macintosh HD not mounting or showing in Disk Utility can be frustrating, but in most cases, software troubleshooting can resolve the issue. Here's a recap of the key steps:
- Restart and check for basic issues.
- Use Disk Utility and First Aid to fix minor errors.
- Boot into Safe Mode or use Terminal for advanced troubleshooting.
- Reinstall macOS or format the drive if necessary.
- Recover important data before erasing the disk.
- Seek professional help for possible hardware failures.
To prevent future issues, keep your macOS updated and use Time Machine or cloud backups. If you experience similar problems frequently, consider upgrading to a more reliable SSD.
Donemax Data Recovery for Mac
Donemax Data Recovery for Mac is one of the best Mac data recovery software. It is easy-to-use and can help in recovering deleted, formatted, inaccessible or lost data from Mac HDD/SSD, external disk, USB drive, SD card, camera or other storage devices.
Related Articles
- Nov 18, 2025Best 5 Methods to Format USB Flash Drive on Mac
- Apr 07, 2025Troubleshoot The Volume is Not Compatible with This Update on Mac [7 Fixes]
- Jul 01, 2025How to Restart and Force Restart Mac?
- Dec 23, 2024Fix LaCie External Hard Drive Read-Only on Mac: Comprehensive Guide
- Jul 22, 2025Troubleshoot and Fix common macOS Tahoe 26 Beta Issues
- Oct 18, 2024How to Upgrade to macOS Sequoia (for Intel-based/T2/Apple silicon Macs)?

Contributing Writer
Steven
Steven has been a senior writer & editor of Donemax software since 2020. He's a super nerd and can't imagine the life without a computer. Over 6 years of experience of writing technical solutions and software tesing, he is passionate about providing solutions and tips for Windows and Mac users.

Editor in chief
Gerhard Chou
In order to effectively solve the problems for our customers, every article and troubleshooting solution published on our website has been strictly tested and practiced. Our editors love researching and using computers and testing software, and are willing to help computer users with their problems