
Written byMariaUpdated on Apr 30, 2025
What is fsck and How to Use It to Check and Repair a Disk on Mac?
Approved byGerhard Chou
PAGE CONTENT:
Maintaining the health of your Mac's storage disks is crucial for optimal performance and data integrity. Over time, disks can develop errors due to unexpected shutdowns, software crashes, or hardware issues. macOS offers a powerful built-in utility called fsck (File System Consistency Check) that helps diagnose and repair such disk problems. This article delves into what fsck is, when and how to use it, and precautions to consider during its operation.
What is fsck?
fsck stands for File System Consistency Check, a powerful command-line utility available in Unix and Unix-like operating systems, including macOS. Its primary function is to scan, verify, and repair file systems that may have become corrupted due to unexpected shutdowns, crashes, or other disk-related issues.
When your Mac experiences an abrupt power loss or a forced restart, the file system can become inconsistent, leading to symptoms such as sluggish performance, frequent application crashes, inability to boot, or files becoming unreadable. In such cases, fsck plays a critical role in diagnosing the underlying problems and performing the necessary repairs to restore the disk's health.
Unlike Disk Utility's graphical interface, fsck operates at a lower level, directly interacting with the disk structure. It thoroughly checks metadata, file allocations, and volume information, ensuring the overall integrity of the file system and preventing further data corruption or loss.
When Should You Use fsck on Mac?
While macOS includes user-friendly tools like Disk Utility for routine disk maintenance, there are scenarios where fsck becomes essential:
- Startup Issues: If your Mac fails to boot properly, gets stuck on the loading screen, or displays a prohibitory symbol, it may indicate file system corruption.
- Disk Errors: Receiving error messages about disk operations or noticing that external drives aren't recognized can signal the need for a file system check.
- Performance Problems: Unusual slowness, frequent application crashes, or files becoming inaccessible might be due to underlying disk issues.
Before proceeding with fsck, it's advisable to try Disk Utility's First Aid feature. If Disk Utility cannot repair the disk, using fsck in Single User Mode is the next step.
Precautions Before Using fsck
Before running fsck, consider the following precautions:
- Backup Important Data: Although fsck aims to repair disk issues, there's a risk of data loss during the process. Ensure you have current backups of essential files.
- Power Supply: If you're using a MacBook, connect it to a power source to prevent it from shutting down during the repair process.
- Understand the Command: fsck operates at a low level, directly interacting with the file system. Incorrect usage can lead to data loss. Familiarize yourself with the command and its options before execution.
How to Use fsck to Check and Repair a Disk on Mac
Using fsck requires accessing your Mac's command-line interface, which might seem intimidating at first, but this step-by-step guide ensures a smooth process. Below is a detailed explanation of each step involved, including troubleshooting and additional insights.
1. Boot into Single User Mode
Single User Mode is a special startup mode on macOS that provides you with direct access to the system's command line without launching the full graphical interface or other background services. This mode is essential when performing maintenance tasks like using fsck.
Why Single User Mode?
- Ensures no files are being accessed while the disk is being checked.
- Provides root access, which is necessary to run system-level commands like fsck.
- Reduces the risk of data corruption during disk repairs.
Steps to Boot into Single User Mode:
- Restart Your Mac: Click the Apple logo in the top-left corner of your screen and select Restart.
- Press the Correct Keys: As soon as your Mac begins to restart, hold down the Command (⌘) and S keys simultaneously.
- Wait for the Command Line Interface: Release the keys when you see white text scrolling on a black background. This text indicates that you've successfully entered Single User Mode.
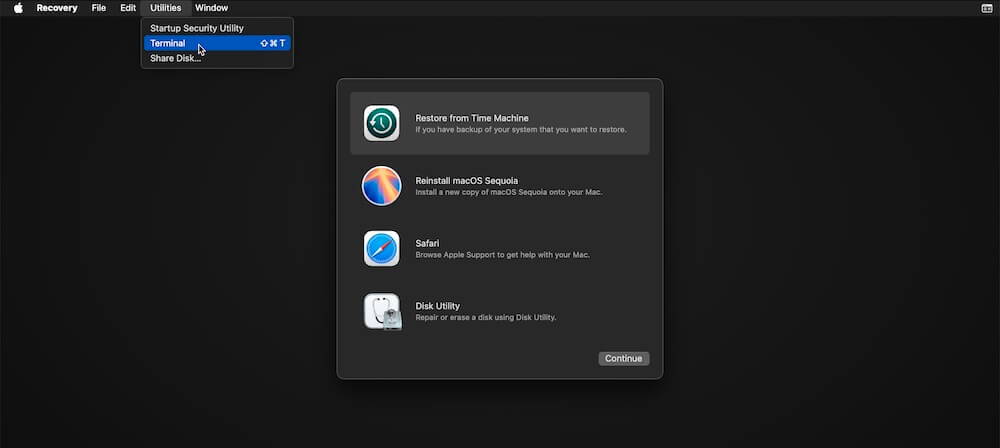
💡 Note: On newer Macs with Apple Silicon (M1, M2, M3, M4 chips), Single User Mode is replaced by macOS Recovery. You can access the Terminal through Recovery Mode by holding down the Power button during startup until you see "Options," then selecting Terminal from the Utilities menu.
2. Run the fsck Command
With your Mac in Single User Mode, you're ready to run fsck to check and repair your disk.
Understanding the fsck Command:
The command used most often is:
/sbin/fsck -fy
Here's what each part of the command means:
- /sbin/fsck: This specifies the exact path to the fsck utility on your Mac.
- -f: Forces a check, even if the file system appears clean. This is useful because sometimes errors may not be detected during a routine check.
- -y: Automatically answers "yes" to any prompts. Without this, fsck would ask for confirmation before making any repairs.
Step-by-Step Execution:
- At the Command Prompt: You'll see a # symbol indicating the root user. Type the command:
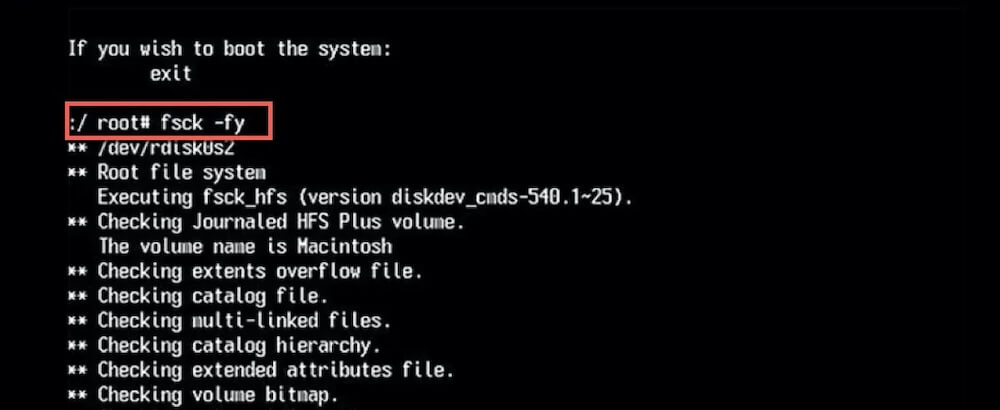
/sbin/fsck -fy
- Press Return: This initiates the disk check and repair process.
- Observe the Output: The screen will display messages as fsck goes through several checks, such as:
- Checking the disk structure.
- Verifying volume headers and extents.
- Repairing invalid entries, if any.
💡 Tip: The process may take anywhere from a few minutes to an hour, depending on your disk's size and the number of errors found.
3. Interpret the Results
After the check is complete, fsck will provide one of the following messages:
Message 1: "The volume [name] appears to be OK."
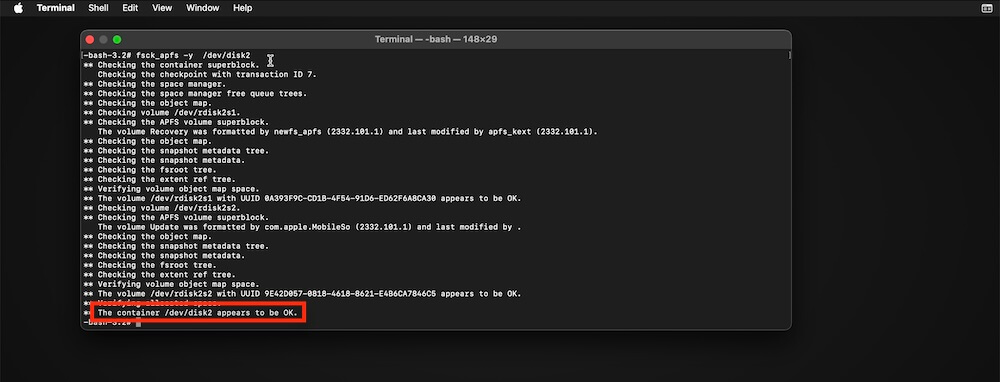
- What It Means: No issues were found, or all detected errors have been repaired.
- Next Step: You can safely reboot your Mac.
Message 2: "FILE SYSTEM WAS MODIFIED."
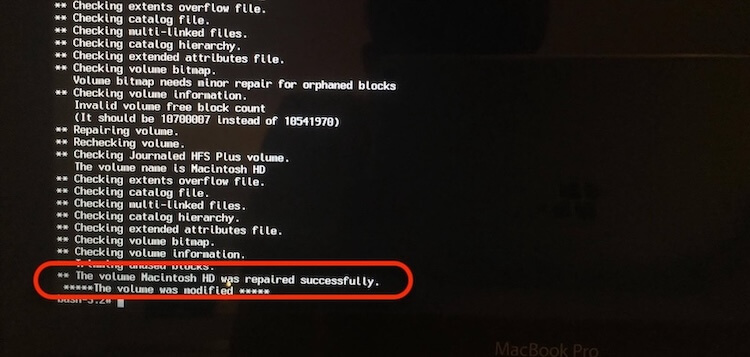
- What It Means: fsck found and fixed some issues, but it's a good practice to run the command again.
- Next Step: Repeat the command until you receive the "appears to be OK" message. This ensures that no lingering issues remain.
Message 3: "The volume [name] could not be repaired."
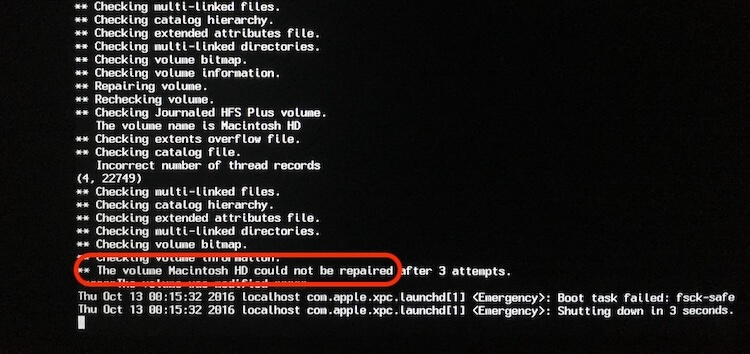
- What It Means: fsck encountered severe corruption that it could not fix.
- Next Step:
- Run fsck multiple times.
- Use Disk Utility in Recovery Mode.
- Seek professional help if the issue persists.
Common Issues:
- If you see an error like bad superblock, it indicates damage to the file system's metadata. Running fsck with specialized options or seeking expert assistance may be necessary.
4. Reboot Your Mac
Once fsck has completed its task, you need to restart your Mac to return to normal operations.
Reboot Command:
- Simply type reboot at the command prompt and press Return.
reboot
Troubleshooting Tips During fsck Use
- Stuck in Single User Mode?
If you can't exit Single User Mode after running fsck, try:
exit
or simply press Control + D to continue the boot process.
- fsck Freezes Mid-Check:
- Ensure your Mac is connected to power.
- Reboot and attempt again.
- Run diskutil list in Terminal to check disk status.
- fsck Fails Repeatedly:
- Use Disk Utility from Recovery Mode for a graphical approach.
- Consider using a third-party disk repair tool if fsck and Disk Utility both fail.
- Backup immediately and consider reformatting the disk as a last resort.
Additional fsck Commands and Options
fsck offers various options tailored to specific needs:
- Specify File System Type: If you're working with a non-startup disk or an external drive, determine its file system type (HFS+, APFS, etc.) and use the corresponding fsck command:
- For HFS+:
/sbin/fsck_hfs -fy /dev/diskXsY
- For APFS:
/sbin/fsck_apfs -fy /dev/diskXsY
Replace /dev/diskXsY with the appropriate disk identifier, which you can find using:
diskutil list
- For HFS+:
- Non-Interactive Mode: To run fsck without any prompts, use the -y flag. Conversely, the -n flag answers "no" to all prompts, performing a read-only check.
- Force Check: The -f flag forces a check, even if the system believes the file system is clean.
Troubleshooting fsck Issues
If fsck reports that it cannot repair the disk:
- Run fsck Multiple Times: Sometimes, running fsck several times can progressively fix issues.
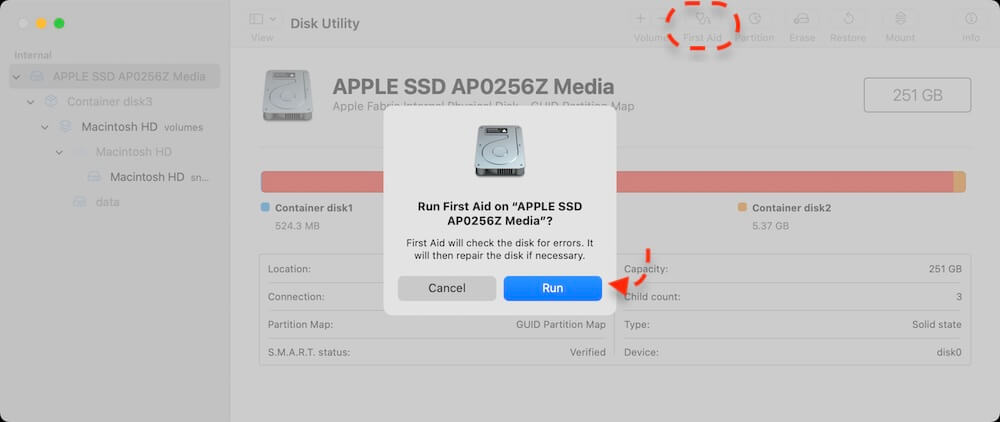
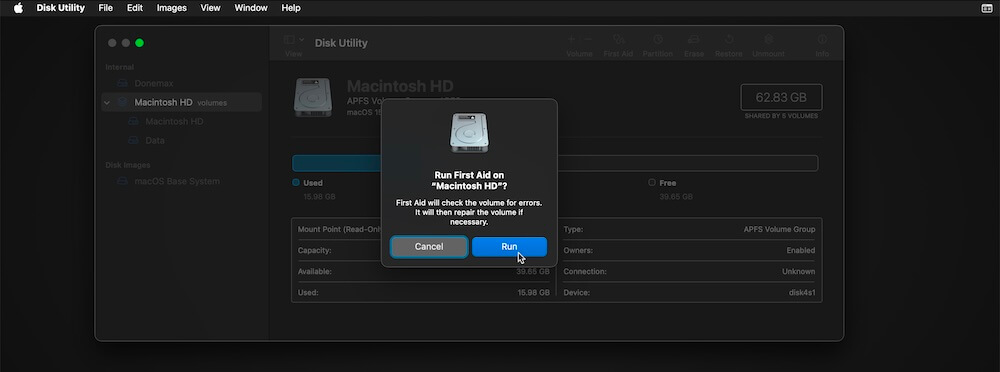
- Use Disk Utility: Boot into Recovery Mode (press Power button or Command (⌘) + R during startup) and use Disk Utility's First Aid. It offers a graphical interface for disk repair.
![how to use fsck on Mac]()
- Seek Professional Help: Persistent issues may indicate hardware problems. Contact Apple Support or a certified technician for assistance.
Recover Data from Problem Drive on Mac
If there are issues with the hard drive on Mac and cannot be repaired with fsck command, you can try to recover the data from the hard drive before further actions. If you can still access the drive and files on the drive, you can try to manually copy the files to another drive. If the drive or files are not accessible, you can then try to recover the files with a Mac data recovery software.
Donemax Data Recovery for Mac is professional at data recovery for macOS. It can recover the lost data from inaccessible drive or any other kind of drives. Here is how to recover the lost data from a problem drive on Mac with the software:
Step 1. Download and install the software.
Download the software first, then double click the downloaded installation file to install the software to the Mac.
Step 2. Select the drive to scan.
Run the software from launchpad and it will show you all the connected drives. Check and select the drive which you want to recover data.

Step 3. Scan the drive for lost data.
Click the Scan button and then the software will start to scan the drive. It will deeply scan the drive to find any possible lost files on the drive.

Step 4. Preview and recover the files.
After the scanning process is done, all the found files will be list. Preview the files to locate the wanted files. At last, select the wanted files and click the Recover button to save the files to another drive.

After recovering the files successfully from the problem drive, you can then try further actions to fix the drive, such as formatting the drive, etc.
Conclusion
Regular maintenance of your Mac's disks ensures smooth performance and data safety. While Disk Utility suffices for routine checks, fsck provides a deeper level of repair for more serious issues. Always ensure you have a current backup before performing disk repairs, and familiarize yourself with the commands to prevent unintended data loss.
Donemax Data Recovery for Mac
Donemax Data Recovery for Mac is one of the best Mac data recovery software. It is easy-to-use and can help in recovering deleted, formatted, inaccessible or lost data from Mac HDD/SSD, external disk, USB drive, SD card, camera or other storage devices.
Related Articles
- Feb 09, 2025[7 Solutions] Fix Storage System Verify or Repair Failed 69716 Error on Mac
- Jul 27, 2025How to Lock and Unlock a USB Flash Drive on Mac?
- May 12, 2025Purple/Blue/Pink/Black/Green Lines on Mac Screen: Why & Fixes
- Jul 19, 2025How to Disable Startup Items/Programs on Mac? [4 Methods]
- Mar 11, 2025How to Use Seagate Expansion Desktop Hard Drive on Mac?
- Apr 17, 2026Easy Steps to Back Up Your Mac Data to iCloud (Tutorial)

Contributing Writer
Maria
Maria is one of the senior writers & editors of Donemax who lives and works in Sydney, Australia. She loves PC, Mac and Internet Technology. She has 6 years of writing articles about data recovery on PC/Mac, disk cloning solution, data eraser and computer OS optimization, etc. She is also interested in testing various software and digital products.

Editor in chief
Gerhard Chou
In order to effectively solve the problems for our customers, every article and troubleshooting solution published on our website has been strictly tested and practiced. Our editors love researching and using computers and testing software, and are willing to help computer users with their problems