Before we start:: Donemax Data Recovery for Mac can help you get all lost data back before or after you fix the RAW external hard drive, USB flash drive, SD card on your Mac. It also can help you fix RAW drives, mount NTFS drives, reformat external devices on Mac, etc.
PAGE CONTENT:
In our increasingly digital world, external storage devices like hard drives, USB drives, and SD cards are essential for data storage and transfer. However, encountering a RAW file system can be a frustrating experience for Mac users. A RAW drive is one that the operating system cannot recognize due to a corrupted file system, making it impossible to access the stored data. In this article, we will explore how to identify, understand, and fix RAW drives on a Mac, ensuring you can recover your valuable data without hassle.
About RAW Drives (External HDD/SSD/USB Drive/SD Card) on Mac
Signs of a RAW Drive:
Identifying a RAW drive is crucial to addressing the problem effectively. Some common signs that indicate a drive is in RAW format include:
- Inaccessible Data: When you attempt to access the drive, you may receive an error message stating that the drive needs to be formatted.
- Unrecognized File System: The drive may appear with a label of "RAW" in Disk Utility, indicating that the file system is unrecognized.
- Missing Drive Icon: The drive may not appear in Finder or on the desktop, even though it is physically connected.
- Error Messages: You might encounter various error messages like "The disk you inserted was not readable by this computer," which is a clear indication of a RAW drive.
To identify if a drive is RAW using Disk Utility, follow these steps:
- Open Disk Utility (found in Applications > Utilities).
- Locate your external drive, USB, or SD card in the left sidebar.
- Check the information provided at the bottom of the Disk Utility window. If it states "RAW" under the format, you're dealing with a RAW drive.
Causes of RAW Drives:
Understanding the causes of RAW drives can help prevent future occurrences. Some common causes include:
- Corrupted File Systems: Improper shutdowns, power failures, or software crashes can corrupt the file system, rendering the drive RAW.
- Improper Ejection: Failing to safely eject a drive can lead to data corruption and file system errors.
- Virus or Malware Infections: Malicious software can cause significant damage to the file system, turning a drive RAW.
- Physical Damage: Damage to the hardware components of the drive can result in data inaccessibility.
Backup Important Data (if possible)
Before attempting to fix a RAW drive, it's essential to back up any critical data, if accessible. Data recovery should be your first priority, especially if the data is irreplaceable. Here are some methods to back up your data:
- Check for Readable Data: If the drive is partially accessible, try copying files to another device.
- Use Data Recovery Software: If the drive isn't accessible at all, consider using data recovery software. Applications like Donemax Data Recovery for Mac or EaseUS Data Recovery Wizard can help retrieve data from RAW drives.
Step 1. Download and install the reliable Mac data recovery software - Donemax Data Recovery for Mac. Make sure the RAW drive is connected to the same Mac.
Step 2. Open Donemax Data Recovery for Mac, then find and select the RAW drive.

Step 3. Click on Scan button. It will deeply scan the RAW drive and find all recoverable files including existing files, inaccessible files, deleted/formatted/erased files, etc.

Step 4. Once the scan is completed, you can preview all recoverable files. Then select the wanted files, click on Recover button to save them.

Donemax Data Recovery for Mac also can help you:
- Mount external hard drive, USB drive, SD card on Mac.
- Fix RAW HDD/SSD/USB drive/SD card on Mac.
- Reformat APFS, NTFS, ExFAT, FAT32 drive, HFS+ drive on Mac.
3. Seek Professional Help: If you are unsure about recovering the data yourself, consult a professional data recovery service.
Methods to Fix RAW External Drives, USB Drives, SD Cards on Mac
Once you've backed up your data (if possible), you can proceed with fixing the RAW drive. Here are the primary methods to address this issue on a Mac, each accompanied by detailed instructions and considerations.
Method 1. Use Disk Utility
Disk Utility is a built-in tool in macOS designed to help manage disks and volumes. It can be particularly useful for diagnosing and repairing RAW drives.
Step 1: Run First Aid
First Aid is a feature in Disk Utility that scans your drive for errors and attempts to repair any issues it finds.
- Open Disk Utility: You can find this by navigating to Disk Utility from Utilities or by using Spotlight Search (Command + Space) and typing "Disk Utility."
- Select Your RAW Drive: In the left sidebar, you will see a list of all connected drives. Click on your RAW drive to select it.
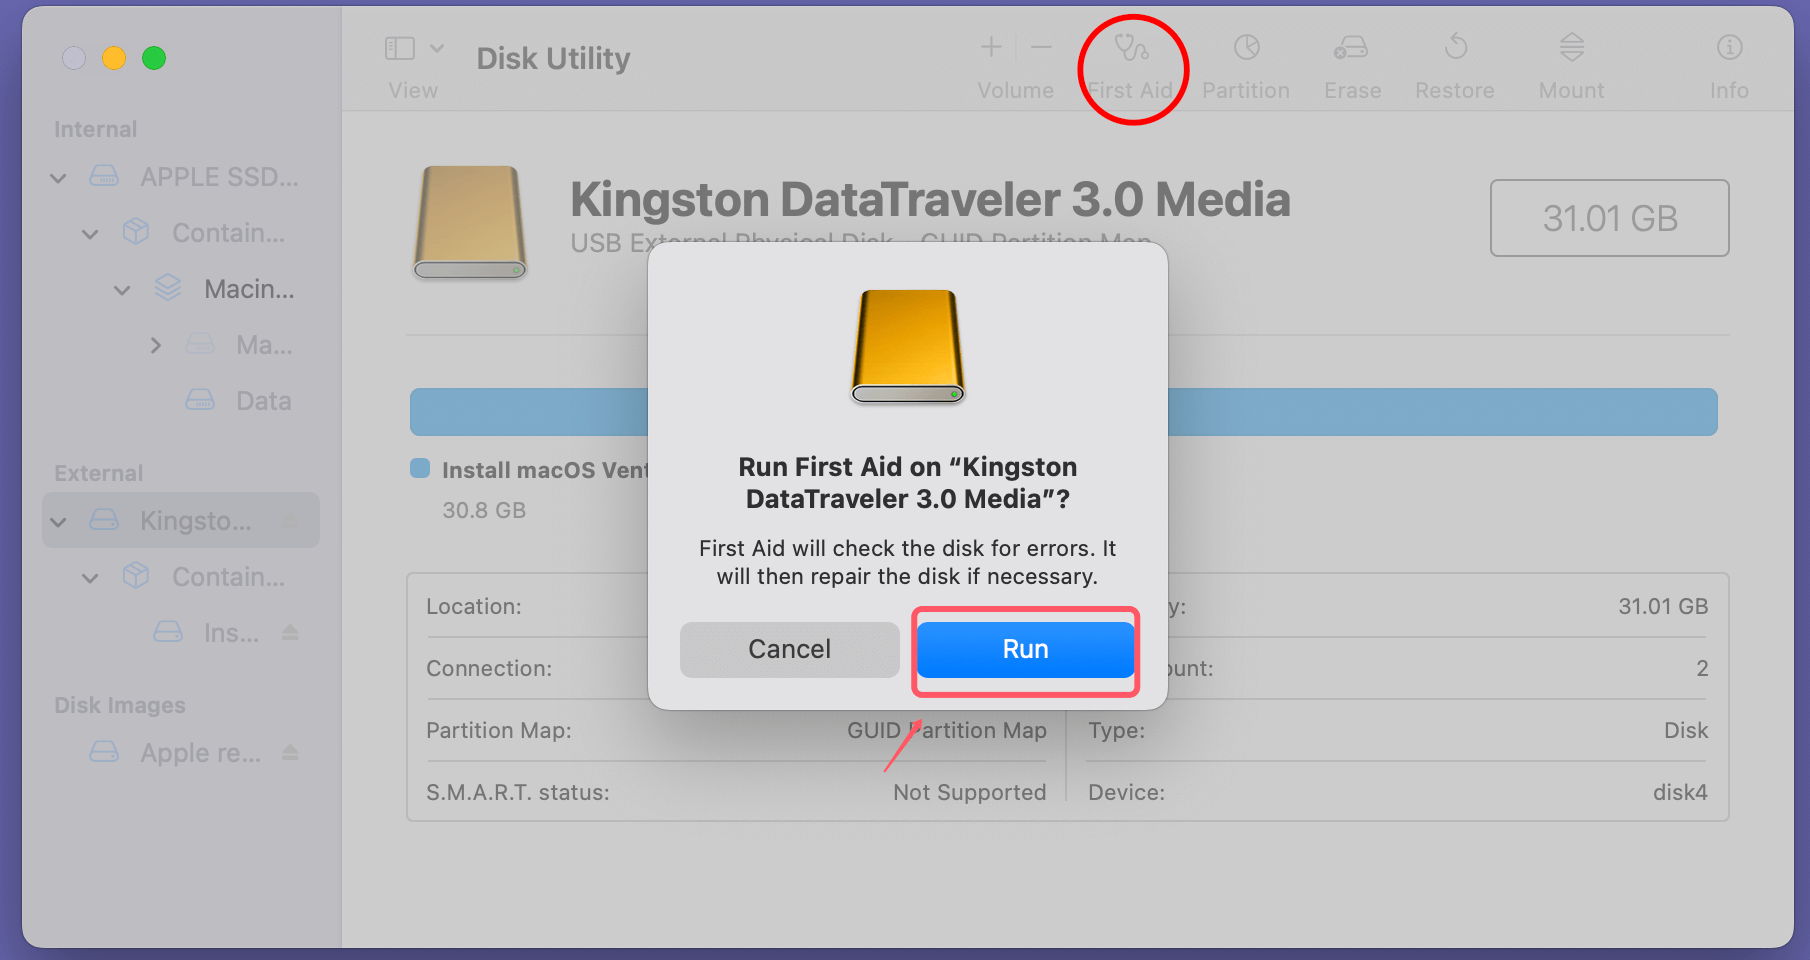
- Click on First Aid: In the toolbar at the top, you will find the First Aid button. Click it to initiate the process.
- Run the Process: A prompt will appear asking if you want to run First Aid on the selected drive. Click Run to proceed.
![fix RAW drives on a Mac]()
- Review the Results: After First Aid completes, review the results. If it states that errors were found and repaired, try accessing the drive again. If it states that the disk cannot be repaired, consider proceeding to reformat the drive.
💡 Important Note: Always make sure that no applications are using the drive while running First Aid, as this can interfere with the repair process.
Step 2: Reformatting the Drive
If First Aid is unable to resolve the issue, reformatting the drive is the next step. However, this process will erase all data on the drive, so ensure that you have backed up any important files before proceeding.
- Open Disk Utility: If you've closed Disk Utility, open it again as described above.
- Select the RAW Drive: In the left sidebar, select your RAW drive.
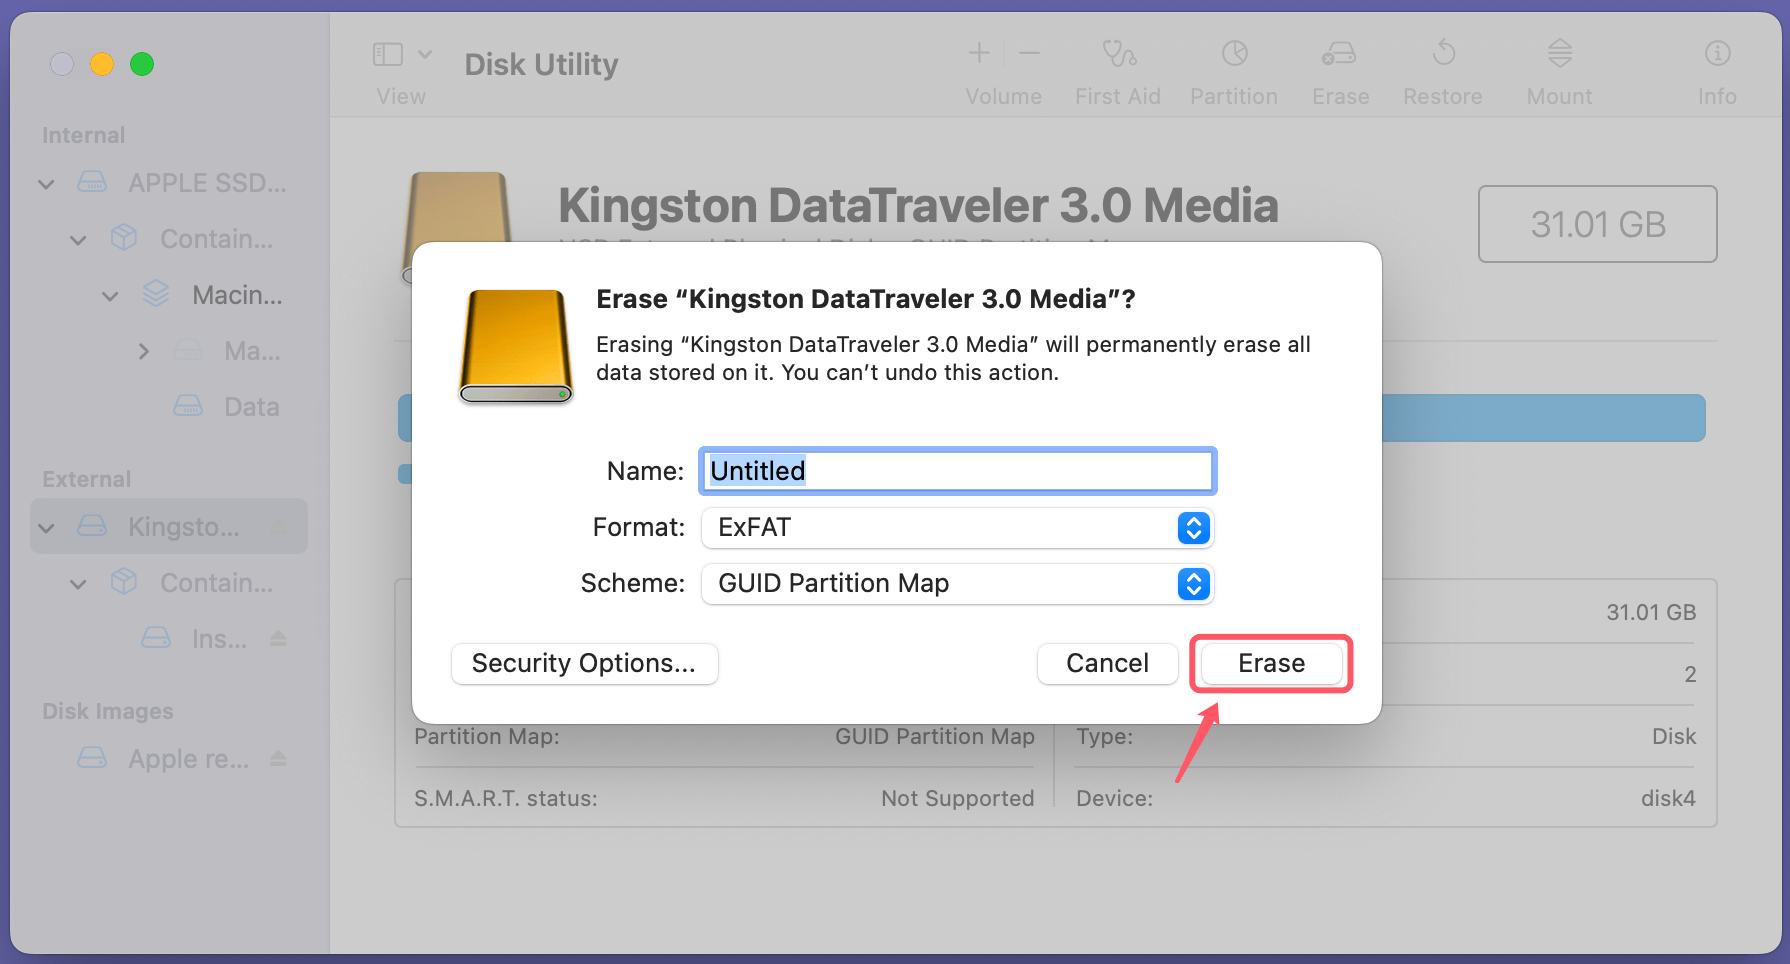
- Click the Erase Button: In the toolbar, click on the Erase button. This action will prepare the drive for reformatting.
- Choose Format Type: You'll need to select a format for your drive. Common options include:
- Mac OS Extended (Journaled): Best for drives used solely with macOS.
- APFS (Apple File System): Suitable for SSDs and newer macOS versions.
- ExFAT: A good choice if you need compatibility with both Mac and Windows systems.
- MS-DOS (FAT): Another option for compatibility but with file size limitations.
- Name the Drive: Enter a name for your drive that you'll easily recognize.
- Erase the Drive: Click the Erase button to begin the formatting process. After it completes, your drive should be ready for use again.
![fix RAW drives on a Mac]()
- Verify Functionality: Once formatted, check if you can access the drive and if it appears in Finder.
Method 2. Using Terminal Commands
For advanced users, Terminal offers a command-line approach to manage and repair RAW drives on Mac. This method can be particularly effective if Disk Utility does not resolve the issue.
Step 1: Open Terminal
- Access Terminal: Open Terminal by going to Applications > Utilities > Terminal or by using Spotlight Search.
Step 2: Use diskutil Command
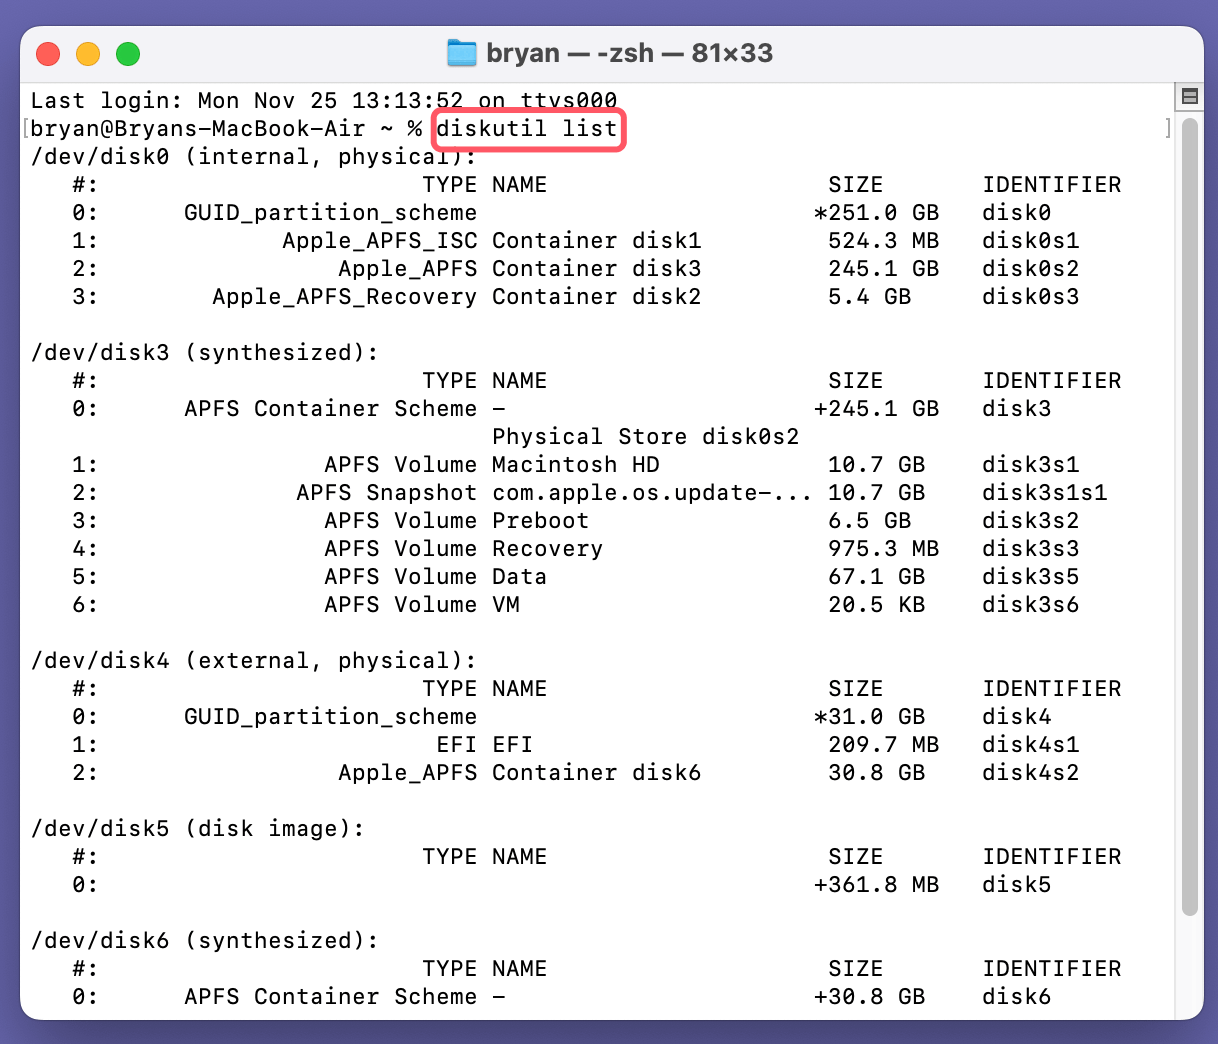
- List Connected Drives: To identify your drives, type the following command and hit Enter:
diskutil list
This command will display all connected drives, their identifiers, and their formats.
- Identify Your RAW Drive: Look for your RAW drive in the list and note its identifier (e.g., /dev/disk6).
![fix RAW drives on a Mac]()
- Verify the Volume: To check the file system and identify any issues, type the following command:
diskutil verifyVolume /dev/disk6
Replace /dev/disk6 with your drive's identifier. This command will verify the integrity of the file system.
- Repair the Volume: If errors are detected, you can attempt to repair the drive with the following command:
diskutil repairVolume /dev/disk6
- Check the Status: After running the repair command, check if the drive is now accessible in Finder.
Step 3: Using fsck Command
If the above commands do not fix the issue, the fsck (file system consistency check) command can be a last resort.
This command checks the file system for errors and attempts to repair them.
- Reboot Your Mac: Restart your Mac and hold down Command + S during startup to enter Single User Mode. This mode provides a minimal environment where you can run repair commands.
- Run fsck Command: Once in Single User Mode, you’ll see a command prompt. Type the following command and press Enter:
fsck -fy
- Repeat If Necessary: If the system reports that the file system has been modified, repeat the fsck -fy command until it indicates that no issues are found.
- Reboot the System: Once the repairs are complete, type reboot and press Enter to restart your Mac normally.
Method 3. Third-Party Data Recovery Software
If built-in tools fail to resolve the issue, third-party data recovery software can help recover data from RAW drives. Here are some recommended options:
1. Donemax Data Recovery for Mac: A highly regarded data recovery tool that supports various file formats and storage devices.
- To Use Donemax Data Recovery for Mac:
- Download and install the software from the official website.
- Open Donemax Data Recovery for Mac and locate your RAW drive in the interface.
- Click the Scan button next to the drive. Donemax Data Recovery for Mac will scan the drive for recoverable files.
- After the scan, preview the recoverable files and select the ones you wish to restore.
- Click Recover to save the selected files to another location on your Mac.
2. EaseUS Data Recovery Wizard: Another reliable software that offers a user-friendly interface for recovering lost data from RAW drives.
- To Use EaseUS:
- Download and install EaseUS Data Recovery Wizard from their website.
- Launch the program and select your RAW drive from the list.
- Click the Scan button to begin searching for lost files.
- Once the scan completes, review the results and select files to recover.
- Click Recover to restore your files to a safe location.
3. PhotoRec: A free and open-source data recovery tool that works well for recovering lost files from various storage media, including RAW drives.
- To Use PhotoRec:
- Download PhotoRec (part of the TestDisk package) from the official website.
- Run the application and select the RAW drive you want to recover files from.
- Choose the file formats you want to recover, or select all formats.
- Start the scanning process and wait for it to complete.
- Follow the prompts to save the recovered files to a different storage location.
Method 4. Professional Data Recovery Services
If all else fails and the data on the RAW drive is critical, consider seeking professional data recovery services. These services have specialized tools and expertise to recover data from severely damaged or corrupted drives.
- Research Recovery Services: Look for reputable data recovery companies with good reviews and a solid track record.
- Evaluate Costs: Professional data recovery can be expensive, so evaluate the costs involved and compare different service providers.
- Consultations: Many companies offer free consultations or diagnostics to determine the feasibility of recovery. Take advantage of this to get an estimate before proceeding.
- Data Security: Ensure that the chosen service prioritizes data security and confidentiality, especially if you are recovering sensitive information.
Preventative Measures
Once you've fixed your RAW drive, it's crucial to take preventative measures to avoid similar issues in the future. Here are some tips:
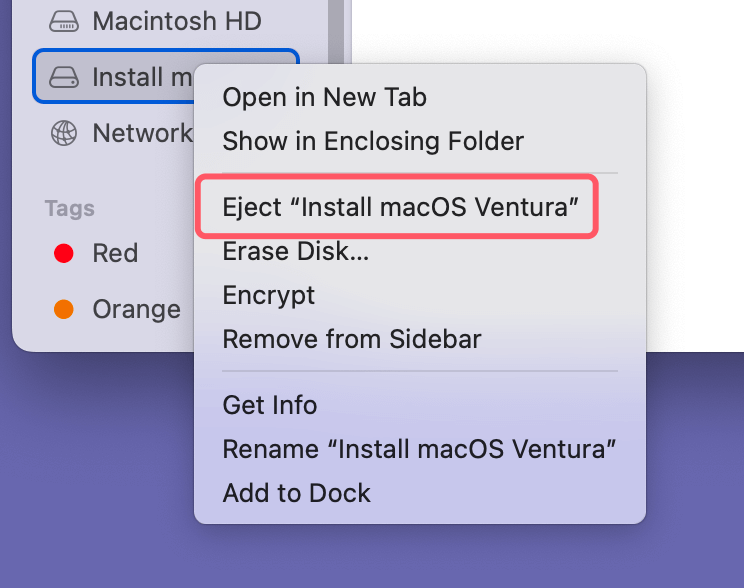
- Safely Eject Drives: Always use the "Eject" option before physically disconnecting any external drives, USB drives, or SD cards. This helps prevent file system corruption.
![fix RAW drives on a Mac]()
- Regular Backups: Maintain a routine for backing up important data. Utilize tools like Time Machine for Mac or other backup software.
- Antivirus Software: Install reliable antivirus software to protect against malware and viruses that could harm your drives.
- Physical Care: Handle external drives carefully to avoid physical damage. Use protective cases and keep them away from extreme temperatures and moisture.
- Keep Software Updated: Ensure your macOS and all relevant applications are up to date to benefit from the latest security patches and improvements.
Conclusion
Encountering a RAW external hard drive, USB drive, or SD card can be a stressful experience, but understanding how to identify and fix these issues can save you time and data. Utilizing tools like Disk Utility, Terminal commands, or third-party recovery software can help you restore access to your files effectively. Always remember the importance of regular backups and safe handling practices to prevent future data loss. By following the steps outlined in this article, you can confidently tackle RAW drive issues on your Mac and ensure your data remains secure.
FAQs About Fixing RAW External Drive/USB Drive/SD Card on Mac
1. How to fix a RAW drive on Mac?
Disk Utility can help you quickly fix a RAW drive on Mac:
- Go to Launchpad > Other > Disk Utility, open Disk Utility.
- Select the RAW drive, click First Aid.
- Click Run to repair the drive.
If First Aid can't fix the RAW drive, click Erase to reformat the RAW drive to APFS, Mac OS Extended or ExFAT.
2. How to recover lost data from RAW drive on Mac?
Data recovery software can help you export/recover data from a RAW drive on Mac:
- Download and install Donemax Data Recovery for Mac.
- Open this Mac data recovery software, select the RAW drive.
- Click on Scan button to deeply scan the RAW drive.
- Preview and recover files after scanning.
3. Which tool can help fix RAW drive on Mac?
Here is the list of top 5 disk repair tool can help in fixing RAW drive on Mac:
- Disk Utility
- Terminal
- Donemax Data Recovery for Mac
- Donemax Data Eraser for Mac
- Disk Drill


Donemax Data Recovery for Mac
Donemax Data Recovery for Mac is one of the best Mac data recovery software. It is easy-to-use and can help in recovering deleted, formatted, inaccessible or lost data from Mac HDD/SSD, external disk, USB drive, SD card, camera or other storage devices.
Related Articles
- Feb 11, 2025How to Repair an xD Card: A Comprehensive Guide
- Feb 07, 2025How to Fix Can't Read SD Card on Mac? [8 Methods]
- Feb 12, 2025USB Drive Keeps Disconnecting and Reconnecting: 6 Causes and 8 Solutions
- Feb 18, 2024How to Solve Samsung Portable SSD T9 Is Read-Only on Mac?
- Jan 26, 2025USB Drive or SD Card Shows 0 Bytes: How to Fix It and Get Your Data Back
- Nov 09, 2024(Solved) Fix macOS Sequoia Keeps Crashing or Freezing When Starting

Christina
Christina is the senior editor of Donemax software who has worked in the company for 4+ years. She mainly writes the guides and solutions about data erasure, data transferring, data recovery and disk cloning to help users get the most out of their Windows and Mac. She likes to travel, enjoy country music and play games in her spare time.

Gerhard Chou
In order to effectively solve the problems for our customers, every article and troubleshooting solution published on our website has been strictly tested and practiced. Our editors love researching and using computers and testing software, and are willing to help computer users with their problems
Hot Donemax Products

Clone hard drive with advanced clone technology or create bootable clone for Windows/Mac OS.

Completely and easily recover deleted, formatted, hidden or lost files from hard drive and external storage device.

Certified data erasure software - permanently erase data before selling or donating your disk or any digital device.
