Hi, I bought a new Samsung Portable SSD T9, but when I connected it to my Mac, I found I couldn’t move files from my Mac to it. What is wrong? Should I format it?
- Linnte
PAGE CONTENT:
Going on a digital adventure with your Samsung SSD T9 can be exciting until you run into the annoying problem of it becoming a read-only mystery on your trusted Mac. Don't let this glitch ruin your tech trip! You want to upload photos and change papers, but the SSD says, "Read-only, no changes allowed." Don't worry - we're here to help you navigate the many options.
This easy-to-follow guide will help you determine why your Samsung Portable SSD T9 is showing "read-only" and give you simple, step-by-step fixes. Let's turn that bump into a smooth highway for your data so your SSD and Mac can work together again without any problems. Are you ready to learn how to fix things? We should start this trip together!

How to Understand the Read-Only Problem?
You need to know why the Samsung SSD T9 might become read-only on a Mac before you can look at the options. Several things could cause this trouble:
✦ Permissions for the file system: The HFS+ (Hierarchical File System) or APFS (Apple File System) file system is what Macs use. The Samsung Portable T9 can become read-only if the file system permissions are not set up properly.
✦ Formatting an external drive: The external drive may be set up so that macOS can read but not write to (for example, it has been formatted to NTFS). It could happen if the drive were used with a different operating system.
✦ Bad wire or connection: If the USB-C cable or link between the Samsung SSD T9 and the Mac is broken, you may only be able to read the data.
✦ Switch for Write Protection: There may be a physical write security switch on some external drives, like the Samsung SSD T9. If this switch is turned on, it can stop people from writing to the drive.
How to Fix the Samsung SSD T9 Read-Only Problem?
1. Check the switch for write protection:
Check to see if the Samsung SSD T9 has a switch that stops writing to it. As long as it does, make sure the switch is not locked. Most of the time, this button is small and on the side of the drive. If it's turned on, it will stop any writing activities.
2. Switch to a different USB-C cable:
The Samsung SSD T9 is connected to the Mac by a USB-C cord that needs to be changed. If the cable is broken or not working right, it can cause communication problems and read-only access. Try the drive with a different cable to ensure this isn't the case.
3. Check it out on a different Mac or PC running Windows:
To find out if the problem is only with the Mac being used, connect the Samsung SSD T9 to a Windows PC or another Mac. If the drive works well on another computer, the issue may be how the Mac is set up or configured.
4. Check the read-write permissions of the SSD:
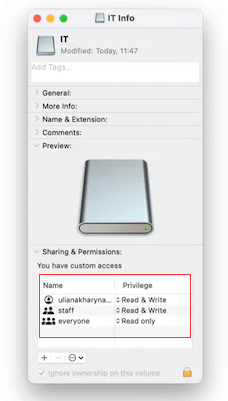
If the Samsung Portable T9 has been set to read-only, you can reset it to read-write. Just right-click the Samsung Portable T9 on desktop, then choose Get Info, you can check if the Samsung Portable T9 has been set to read-only. If so, change it to read-write.

5. Format the Samsung SSD T9 for Mac:
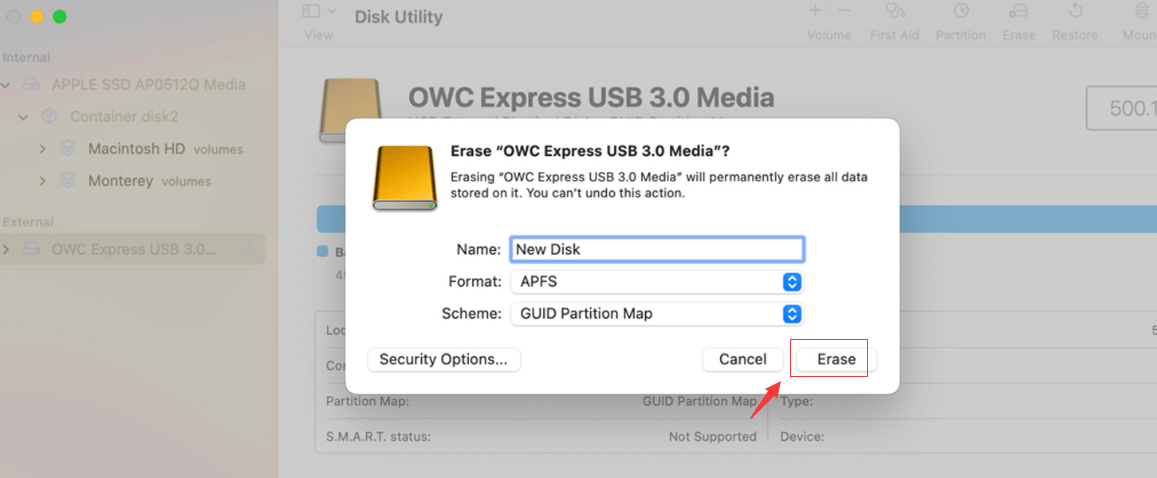
If used with a different OS, the drive may have a file system that macOS can read but not write to. Make a copy of your files, then use Disk Utility to prepare the Samsung SSD T9 with either the APFS, Mac OS Extended (Journaled) or ExFAT format.
- Step 1. Connect the Samsung Portable SSD T9 to your Mac, then open Disk Utility.
- Step 2. Select the Samsung Portable SSD T9 and click Erase.
- Step 3. Select a file system, then click Erase again.
![fix Samsung Portable SSD T9 read-only on Mac]()
- Step 4. Once the process gets finished, click on Done button.
Other methods to fix Samsung Portable SSD T9 on Mac using Disk Utility:
If the Samsung Portable SSD T9 is not mounting on your Mac, click on Mount button.
If it gets damaged, just click on First Aid button to repair the Samsung Portable SSD T9.
6. Turn off the journal:
If the drive is set up with Mac OS Extended (Journaled), turn off journaling. Right-click on the drive in Disk Utility and select "Disable Journaling" from the File menu. It might fix any problems that were caused by journaling stopping write access.
7. Clear the NVRAM or PRAM:
Sometimes, problems with hardware settings can be fixed by clearing the non-volatile RAM (NVRAM) or parameter RAM (PRAM). Hold down the Option, Command, P, and R keys while restarting your Mac until you hear the opening chime twice. It will clear the NVRAM and PRAM.
8. Update the firmware:
See if the Samsung SSD T9 has any firmware changes that you can get. Manufacturers often make Firmware changes to fix compatibility problems and make things run better.
How to Use NTFS Samsung SSD T9 on Mac without Formatting?
If the Samsung Portable SSD T9 has been formatted to NTFS, a native file system for windows OS, it won’t be compatible with macOS. The NTFS Samsung Portable SSD T9 will become read-only on Mac. To solve this issue without formatting the SSD, you can try NTFS for Mac tool.
Step 1. Download and install Donemax NTFS for Mac tool on your Mac, then just open it from Launchpad.
Step 2. Connect the Samsung Portable SSD T9 to your Mac, then select it, click on Enable Writable button so that you can read-write it on your Mac without any limitation.

FAQs About Using Samsung Portable SSD T9 on Mac
1. How to format Samsung Portable SSD T9 for both Windows and macOS?
- Open Disk Utility.
- Select the Samsung Portable SSD T9.
- Click Erase.
- Select ExFAT as the file system.
- Click Erase again, then click Done.
- You can use Samsung Portable SSD T9 on your Windows and macOS.
2. How to recover lost data from erased Samsung Portable SSD T9 on Mac?
It is strongly recommended to back up your data before you format the Samsung Portable SSD T9 using Disk Utility.
However, if you’ve lost data from the Samsung Portable SSD T9, you can use a data recovery app to unformat the Samsung Portable SSD T9. For example, Donemax Data Recovery for Mac can help you completely recover lost data from a Samsung Portable SSD T9 on Mac.
3. How to use a Samsung Portable SSD T9 with NTFS file system on Mac?
First of all, you can reformat the NTFS Samsung Portable SSD T9. If you don’t want to reformat it, just use a NTFS for Mac tool to add NTFS read-write support on Mac so that you can read-write the NTFS Samsung Portable SSD T9 on your Mac.
Conclusion:
To summarize, fixing the read-only problem on a Samsung Portable SSD T9 requires a systematic approach that checks hardware and program factors. Users can figure out what's wrong by checking the write protection switch, using a different cable, looking at the file system rights, and thinking about reformatting. If the problem still exists after taking these steps, you might get more information by calling Samsung's customer service or going to Apple's support forums. Remember to back up your data before making big changes, or you could lose them.
If the Samsung Portable SSD T9 has been formatted to NTFS, you can use a NTFS for Mac tool to help you enable read-write for the SSD. You don’t need to format it, NTFS for Mac software can allow you to read-write any NTFS drive on Mac.
Related Articles
- Jan 17, 2025Fusion Drive Appears as Two Drives in Finder: How to Fix It on Mac?
- Feb 12, 2025[6 Solutions] Fix There's a Problem with This Drive Error Without Losing Data
- Feb 12, 2025Fix The Semaphore Timeout Period Has Expired Error Without Losing Data
- Feb 12, 2025USB Drive Keeps Disconnecting and Reconnecting: 6 Causes and 8 Solutions
- Feb 11, 2025Fix RAW SD Card: A Complete Guide to Repair & Recover Data
- Feb 20, 2024How to Fix External SSD Not Mounting on Mac?

Steven
Steven has been a senior writer & editor of Donemax software since 2020. He's a super nerd and can't imagine the life without a computer. Over 6 years of experience of writing technical solutions and software tesing, he is passionate about providing solutions and tips for Windows and Mac users.

Gerhard Chou
In order to effectively solve the problems for our customers, every article and troubleshooting solution published on our website has been strictly tested and practiced. Our editors love researching and using computers and testing software, and are willing to help computer users with their problems
Hot Donemax Products

Clone hard drive with advanced clone technology or create bootable clone for Windows/Mac OS.

Completely and easily recover deleted, formatted, hidden or lost files from hard drive and external storage device.

Certified data erasure software - permanently erase data before selling or donating your disk or any digital device.
