Written byStevenUpdated on Feb 12, 2025
Fix The Semaphore Timeout Period Has Expired Error Without Losing Data
Approved byGerhard Chou
Before we start: The semaphore timeout period has expired error usually means that you can access the data stored on the drive. Follow this guide to fix The semaphore timeout period has expired error and use special tool - such as Donemax Data Recovery to recover lost data.
PAGE CONTENT:
- What is the Error "The semaphore timeout period has expired"?
- Quick Fixes for The semaphore timeout period has expired
- Recover Lost or Inaccessible Data When Encountering "The semaphore timeout period has expired" Error
- Advanced Troubleshooting Steps to Fix "The semaphore timeout period has expired"
- Preventing Future "Semaphore timeout period has expired" Errors
- Conclusion
The "Semaphore timeout period has expired" error is a frustrating issue that can disrupt your workflow, prevent data transfers, and even lead to potential data loss. This error is commonly associated with Windows systems, external drives, network connections, and storage devices. Whether you're encountering it during file transfers, accessing an external device, or troubleshooting a network, understanding its causes and solutions is critical. This guide provides a comprehensive explanation of the issue, its root causes, and detailed steps to resolve and prevent it.
What is the Error "The semaphore timeout period has expired"?
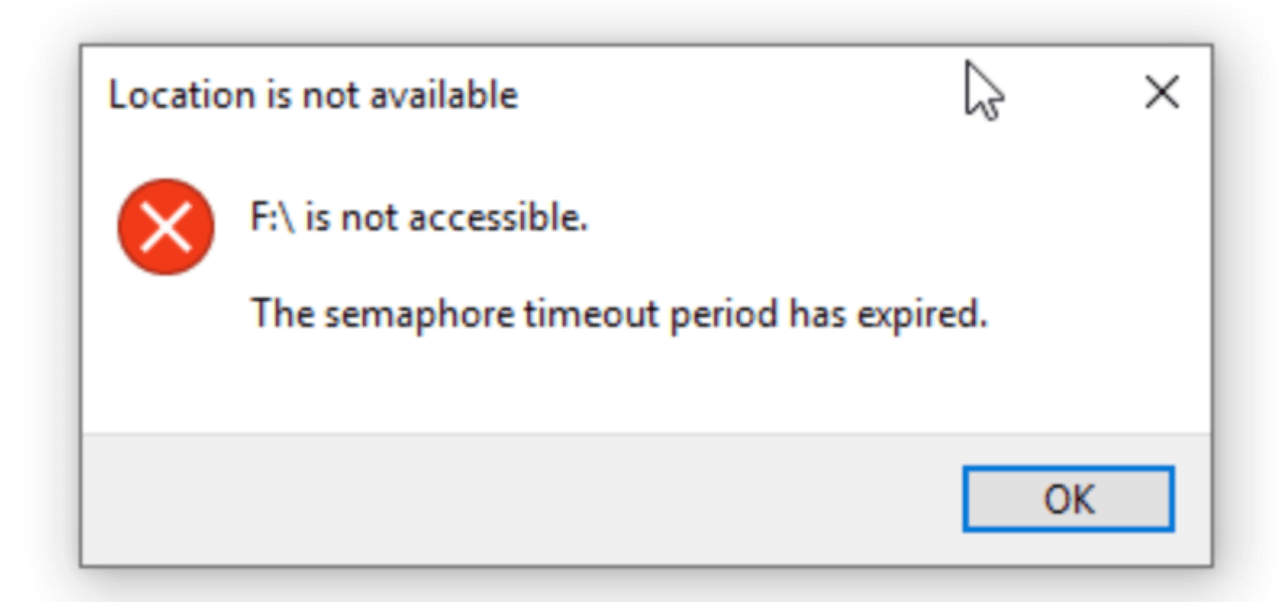
The "Semaphore timeout period has expired" error is a system-level message that typically occurs when the system fails to communicate effectively with an external device or network resource. A semaphore is a synchronization mechanism in computer systems, and its timeout period signifies how long the system waits before terminating an unresponsive process. When this timeout is exceeded, the error is triggered.
Why Does This Error Matter?
This error is not just a minor inconvenience; it can have serious implications:
- Data Transfer Interruptions: If the error occurs during file transfers, your files may become corrupted or inaccessible.
- Potential Data Loss: Persistent issues with external drives or storage devices could lead to irreversible data loss.
- Hardware Damage Risks: Delayed resolutions might worsen hardware issues, causing permanent damage.
- Network Connectivity Problems: For those encountering the error in network operations, it can disrupt business workflows or online activities.
Common Causes of the Error
- Corrupted or Failing Hardware: External drives, USB devices, or hard disks that are physically damaged or nearing the end of their lifespan may cause communication errors.
- Driver Issues: Outdated, incompatible, or missing drivers are a leading cause of the "Semaphore timeout period has expired" error.
- Connection Problems: Faulty cables, unstable USB ports, or poor-quality adapters can lead to intermittent connectivity, triggering the error.
- Software Conflicts: Background applications or antivirus programs interfering with file access and communication can contribute to the problem.
- System Configuration Errors: Misconfigured network or storage settings may disrupt communication between the system and external resources.
Quick Fixes for The semaphore timeout period has expired
Before diving into advanced troubleshooting, attempt these simple solutions:
1. Restart Your System
Restarting your system can clear temporary glitches and refresh system processes. This might resolve minor communication issues.
2. Reconnect External Devices
Disconnect the problematic external device, check for loose connections, and reconnect it securely. If using a USB port, try a different one.
3. Run the Troubleshooter
Windows provides built-in troubleshooters for hardware and devices:
- Open Troubleshoot from Update & Security via Settings.
- Select Hardware and Devices and follow the prompts.
Recover Lost or Inaccessible Data When Encountering "The semaphore timeout period has expired" Error
Before fixing The semaphore timeout period has expired error, you can use data recovery program to deeply scan the failed drive and find all recoverable files.
Step 1. Download and install the reliable data recovery software - Donemax Data Recovery on your computer.
Step 2. Open Donemax Data Recovery, select the drive which has The semaphore timeout period has expired error.

Step 3. Click on Scan button to deeply scan the drive and find all recoverable files including existing files, inaccessible files, deleted/formatted and lost files.
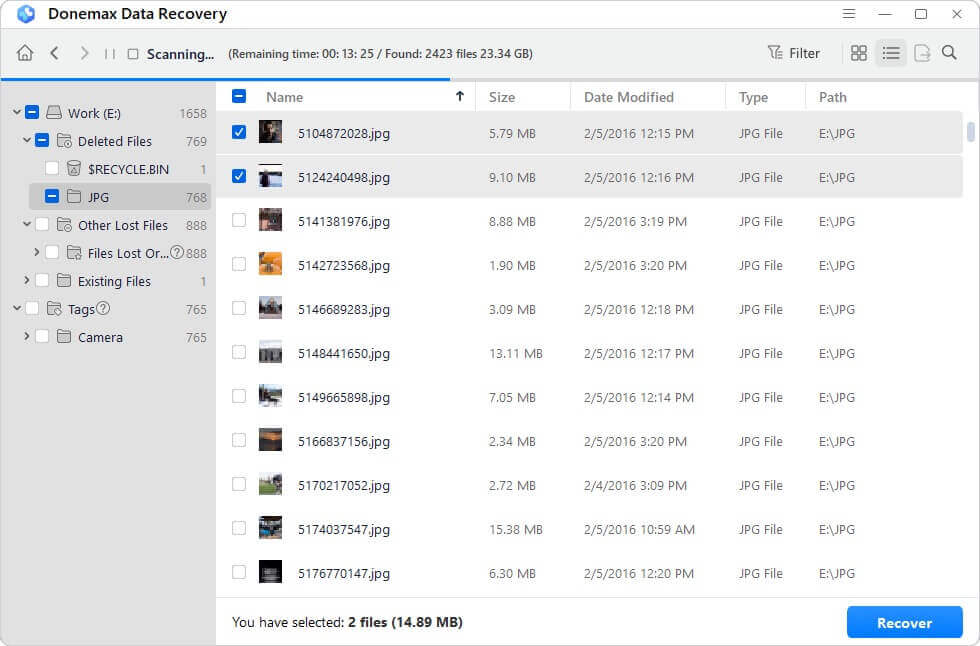
Step 4. After deep scan, you can preview all recoverable files. Then select the wanted files, click on Recover button to save them.

Advanced Troubleshooting Steps to Fix "The semaphore timeout period has expired"
Resolving the "The semaphore timeout period has expired" error often requires more detailed investigation and effort. The steps below go beyond basic fixes and target the root causes of the problem, helping you address the issue comprehensively.
Fix 1. Update Device Drivers
Drivers serve as a bridge between your operating system and hardware. Outdated or incompatible drivers can disrupt communication, leading to errors like this. Here's how to make sure your drivers are up to date:
Using Device Manager
Step 1. Open Device Manager: Choose Device Manager from the list by pressing Windows + X.

Step 2. Locate the Problematic Device: Expand the relevant category. For example:
- Disk Drives for external drives.
- Network Adapters for network-related errors.
Step 3. Update the Driver: Choose Update driver with a right-click on the device.

Select Search automatically for drivers.

Manually Updating Drivers:
- Visit the manufacturer's website for your hardware (e.g., Seagate for external drives, Intel for network cards).
- Download and install the latest driver version specific to your model and operating system version.
Using Driver Update Tools:
For convenience, third-party tools can simplify driver updates:
- Driver Booster: Automatically scans and updates outdated drivers.
- Snappy Driver Installer: A free, offline-capable tool to manage driver updates.
💡 Pro Tip: Always create a restore point before updating drivers to ensure you can roll back in case of issues.
Fix 2. Check and Replace Hardware
Hardware failures are a significant cause of the semaphore timeout error, especially for older or frequently used devices.
Testing Hardware on Another Device
- Disconnect the external drive or cable from the problematic computer.
- Connect it to another computer.
- If the issue persists, the hardware is likely defective.
- If it works fine, the problem may be with your original system.
Inspecting and Replacing Physical Components
- Cables and Ports:
- Examine USB cables for physical damage such as fraying or bent connectors.
- Test using a different USB port or cable.
- External Drives:
- Listen for unusual sounds like clicking, which may indicate a failing drive.
- Use diagnostic tools provided by the manufacturer (e.g., Seagate SeaTools or Western Digital Data Lifeguard Diagnostics) to test drive health.
💡 Pro Tip: If your hardware is under warranty, contact the manufacturer for a replacement or repair.
Fix 3. Adjust Timeout Settings in Windows
If the system timeout period is too short, extending it can help avoid the error. This step involves modifying the Windows registry-a powerful tool that requires caution.
Steps to Modify Timeout Settings:
Step 1. Open the Registry Editor: Press Windows + R, type regedit, and press Enter.

Step 2. Navigate to the Disk Registry Key: Locate the key at: HKEY_LOCAL_MACHINE\SYSTEM\CurrentControlSet\Services\Disk.

Step 3. Create or Edit TimeoutValue:
- Look for a DWORD value named TimeoutValue.
- If it doesn't exist, right-click, select New > DWORD (32-bit) Value, and name it TimeoutValue.
Step 4. Set the Value:
- Double-click TimeoutValue and set its value to 60.
- Click OK and close the Registry Editor.
Step 5. Restart Your Computer: For the changes to take effect, restart your system.
💡 Caution: Incorrect changes to the registry can cause system instability. Always back up your registry before making modifications.
Fix 4. Run CHKDSK and SFC Commands
Windows provides built-in tools to check and repair disk and system file errors.
Using CHKDSK (Check Disk):
CHKDSK is a command-line utility that scans and fixes disk-related errors.
Step 1. Open Command Prompt as Administrator: Type cmd, press Windows + S, and choose Run as Administrator.

Step 2. Run the Command: Type chkdsk X: /f /r and press Enter. (Replace X with the drive letter of the failed device.)

If prompted to schedule a scan on the next restart, press Y and restart your computer.
Step 3. Monitor Results:
- During the reboot, CHKDSK will scan and repair errors.
Using SFC (System File Checker):
SFC scans and restores corrupted system files.
Step 1. Open Command Prompt as Administrator: As before, run cmd with administrative privileges.
Step 2. Run the Command: Press Enter after typing sfc /scannow.

Step 3. Wait for Completion: The scan may take several minutes. If issues are found, SFC will attempt to fix them automatically.
💡 Pro Tip: Combine SFC with the DISM (Deployment Image Servicing and Management) tool for a thorough repair:
- Run DISM /Online /Cleanup-Image /RestoreHealth before running SFC.
Fix 5. Inspect Network Configurations (For Network-Related Errors)
If the error is related to network drives or connections, resetting network configurations may resolve the issue.
Resetting Network Settings:
Step 1. Open Command Prompt as Administrator:
- Press Windows + S, type cmd, and choose Run as Administrator.
Step 2. Reset TCP/IP Stack:
- Type netsh int ip reset and press Enter.
Step 3. Flush DNS Cache (Optional):
- Type ipconfig /flushdns and press Enter.
Step 4. Restart Your Computer:
- Reboot to apply the changes.
Verifying Network Adapter Properties:
Step 1. Open Control Panel > Network and Internet > Network Connections.
Step 2. Right-click your active connection and choose Properties.
Step 3. Select Internet Protocol Version 4 (TCP/IPv4) and click Properties.
Step 4. Ensure both Obtain an IP address automatically and Obtain DNS server address automatically are selected.
💡 Pro Tip: If you're using a static IP address, ensure it is configured correctly to avoid conflicts.
Preventing Future "Semaphore timeout period has expired" Errors
Prevention is always better than cure. Here are steps to avoid the "Semaphore timeout period has expired" error in the future:
1. Regular Maintenance Tips
- Keep drivers updated regularly.
- Use diagnostic tools to monitor hardware health.
2. Proper Device Handling
- Always use the Safe Removal option before disconnecting external drives.
- Avoid using damaged or low-quality cables and adapters.
3. Backup Strategies
Protect your data by implementing reliable backup strategies:
- Use cloud storage services like Google Drive or OneDrive for critical files.
- Create regular system backups on an external drive.
Conclusion
The "Semaphore timeout period has expired" error can be daunting, but with the right approach, it's entirely manageable. Start with quick fixes like reconnecting devices and restarting your system. If the problem persists, dive into advanced troubleshooting methods like updating drivers, running diagnostic commands, and checking hardware.
By understanding the root causes and taking preventive measures, you can ensure this error doesn't disrupt your workflow again. Prioritize regular maintenance and proper device handling to keep your system running smoothly.
If you want to recover inaccessible/lost files from the location which has "Semaphore timeout period has expired" error, you can try data recovery program - such as Donemax Data Recovery.
Donemax Data Recovery
Powerful, safe & easy-to-use data recovery software to easily and completely recover deleted, formatted, inaccessible and lost data from PC, Mac, HDD, SSD, USB drive, camera, SD card, RAID and other storage devices.
Related Articles
- Aug 10, 2023Fixed: External Hard Drive Keeps Disconnecting on Mac
- Dec 17, 2024External Hard Drive Not Mounting on macOS Big Sur, Fix It Now
- Jan 15, 2025Mac Won't Boot After Restoring from Time Machine Backup: Troubleshooting Guide
- Aug 21, 2023How to Fix Toshiba External Hard Drive Not Showing Up?
- Dec 23, 20245 Effective Methods to Fix SD Card Read-only on Mac
- Feb 06, 2024Lexar Portable SSD Is Not Showing Up on Windows PC, Fix It Now

Contributing Writer
Steven
Steven has been a senior writer & editor of Donemax software since 2020. He's a super nerd and can't imagine the life without a computer. Over 6 years of experience of writing technical solutions and software tesing, he is passionate about providing solutions and tips for Windows and Mac users.

Editor in chief
Gerhard Chou
In order to effectively solve the problems for our customers, every article and troubleshooting solution published on our website has been strictly tested and practiced. Our editors love researching and using computers and testing software, and are willing to help computer users with their problems
Hot Donemax Products

Clone hard drive with advanced clone technology or create bootable clone for Windows/Mac OS.

Completely and easily recover deleted, formatted, hidden or lost files from hard drive and external storage device.

Certified data erasure software - permanently erase data before selling or donating your disk or any digital device.