PAGE CONTENT:
If you've encountered the issue of your Mac not booting after restoring from a Time Machine backup, you're not alone. Many Mac users rely on Time Machine to safeguard their files and settings, but occasionally, things can go wrong during the restoration process. Whether it's a minor system glitch or a more severe issue with your Mac's configuration, it's essential to know how to troubleshoot and resolve the problem.
In this article, we will get to know the potential causes of this issue, step-by-step troubleshooting techniques, and preventive measures to ensure smooth restoration from backups in the future. By the end of this guide, you'll have the tools and knowledge to get your Mac back to working order.
Mac Won't Boot After Restoring from Time Machine Backup?
Time Machine is an invaluable tool for Mac users, providing an automatic and effortless way to back up your system, files, and applications. It allows users to recover their system after a crash, upgrade, or any other issue by simply restoring from the backup. However, there are instances when a Mac fails to boot after restoring from a Time Machine backup. This can be extremely frustrating, especially if you depend on your system for work, school, or personal use.
When this happens, don't panic. There are several potential reasons why your Mac might not be booting correctly after a restore. Fortunately, most of these issues can be fixed with some troubleshooting steps and simple procedures.
What Is Time Machine?
Time Machine is Apple's built-in backup utility that allows users to create incremental backups of their macOS systems. It enables you to restore your system to a previous state in case of data loss, hardware failure, or software issues.
Why Does Boot Failure Happen After Restoration?
Several factors can lead to a boot failure after restoring from a Time Machine backup:
- Corrupted Backup: The backup itself may have been corrupted, resulting in an incomplete or problematic restoration.
- Incomplete Restoration: The restoration process may have been interrupted or failed to restore critical system files.
- macOS Compatibility Issues: A mismatch between the macOS version of the backup and the one installed on your system can lead to conflicts.
- Drive or Partition Problems: Issues with the target drive or partition can prevent the system from booting correctly.
Preliminary Checks
Before diving into advanced troubleshooting, start with these essential checks:
- Verify Restoration Completion: Ensure the restoration process was completed successfully without any errors or interruptions.
- Inspect the Backup Source: Connect the Time Machine drive to another Mac, if available, and verify that the backup appears intact.
- Check Hardware:
- For external drives, ensure they are properly connected and functional.
- For internal drives, inspect them using macOS utilities.
Step-by-Step to Fix Mac Not Booting After Restoring from Time Machine
If your Mac still can't boot, follow these steps to fix issues and make it be bootable again.
Step 1: Boot into Safe Mode
Safe Mode restricts macOS to load only essential components and disables third-party software, allowing you to isolate the issue.
- Turn off your Mac.
- For Intel-based Mac: Switch it back on and press the Shift key right away to bring up the login screen or Apple logo.
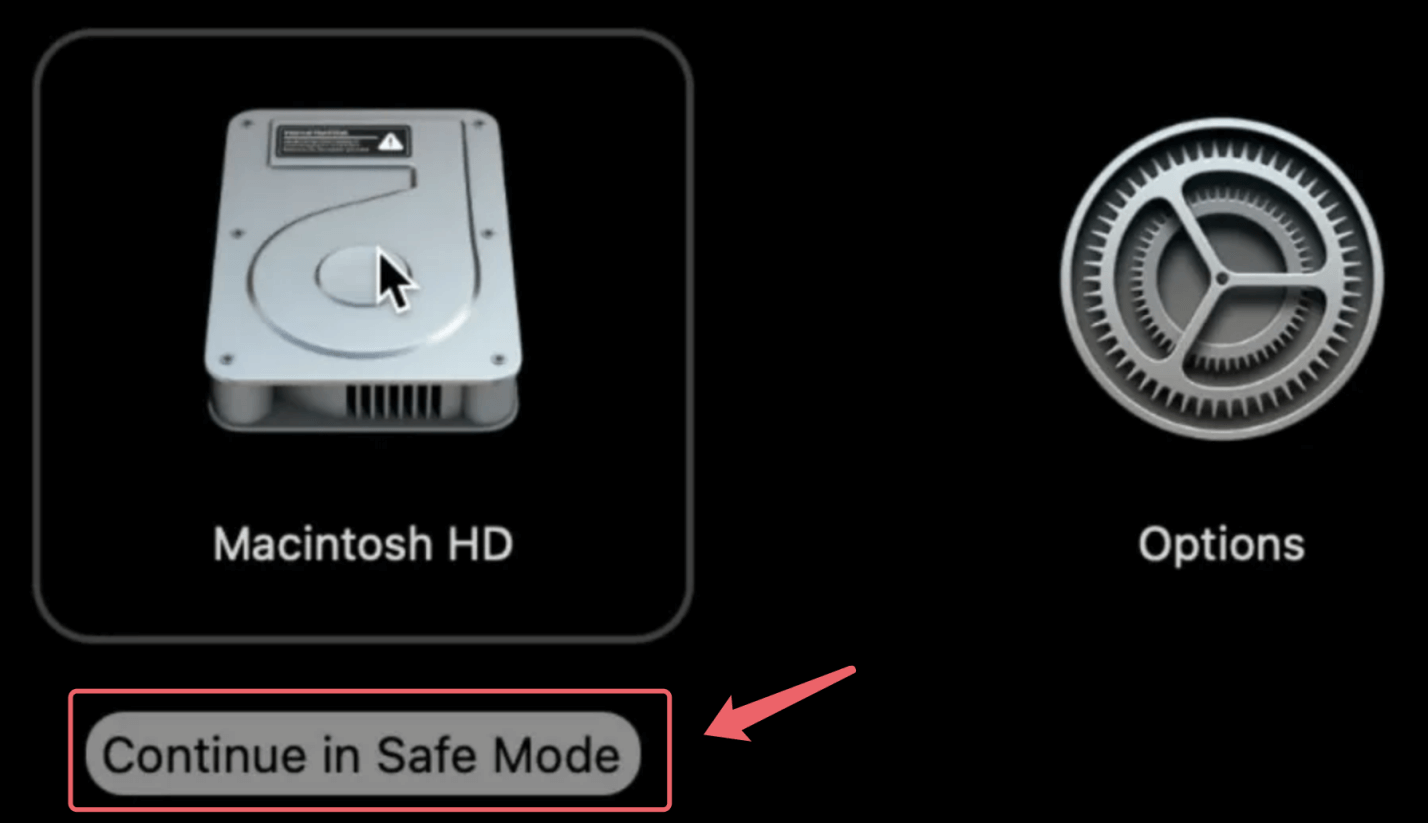
For Apple silicon Mac: Press and hold Power button when restarting your Mac until it boots into macOS Recovery mode. Select Macintosh HD, press and hold Shift key, click Continue in Safe Mode.
![Mac not booting after restoring from a Time Machine backup]()
- Release the key and log in.
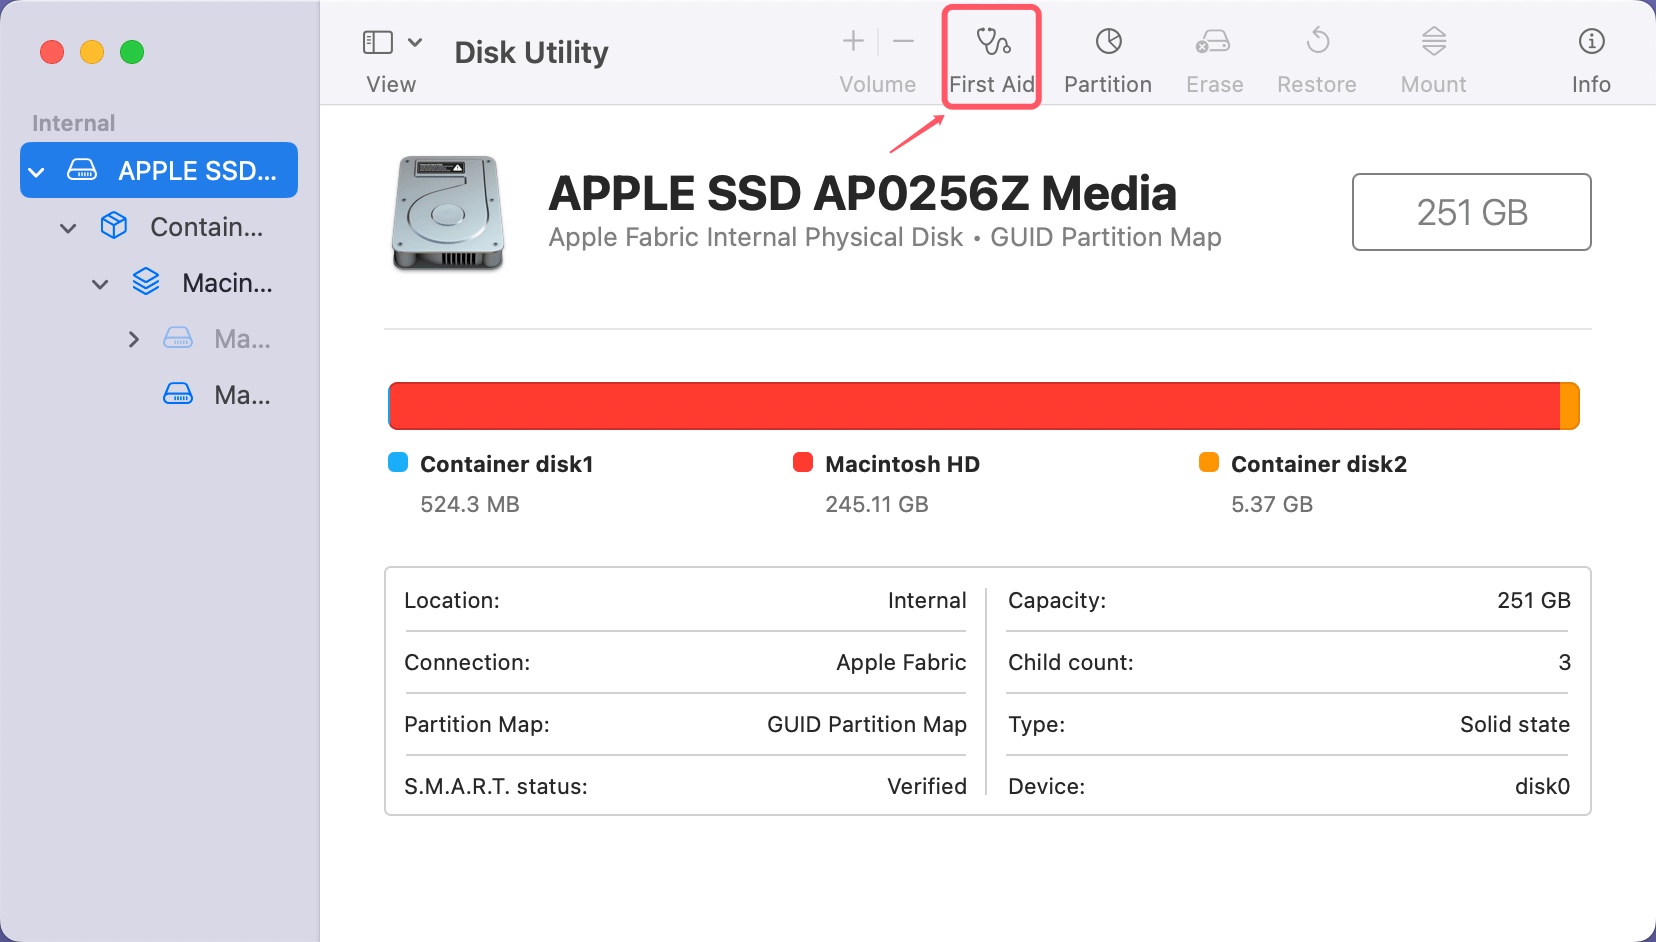
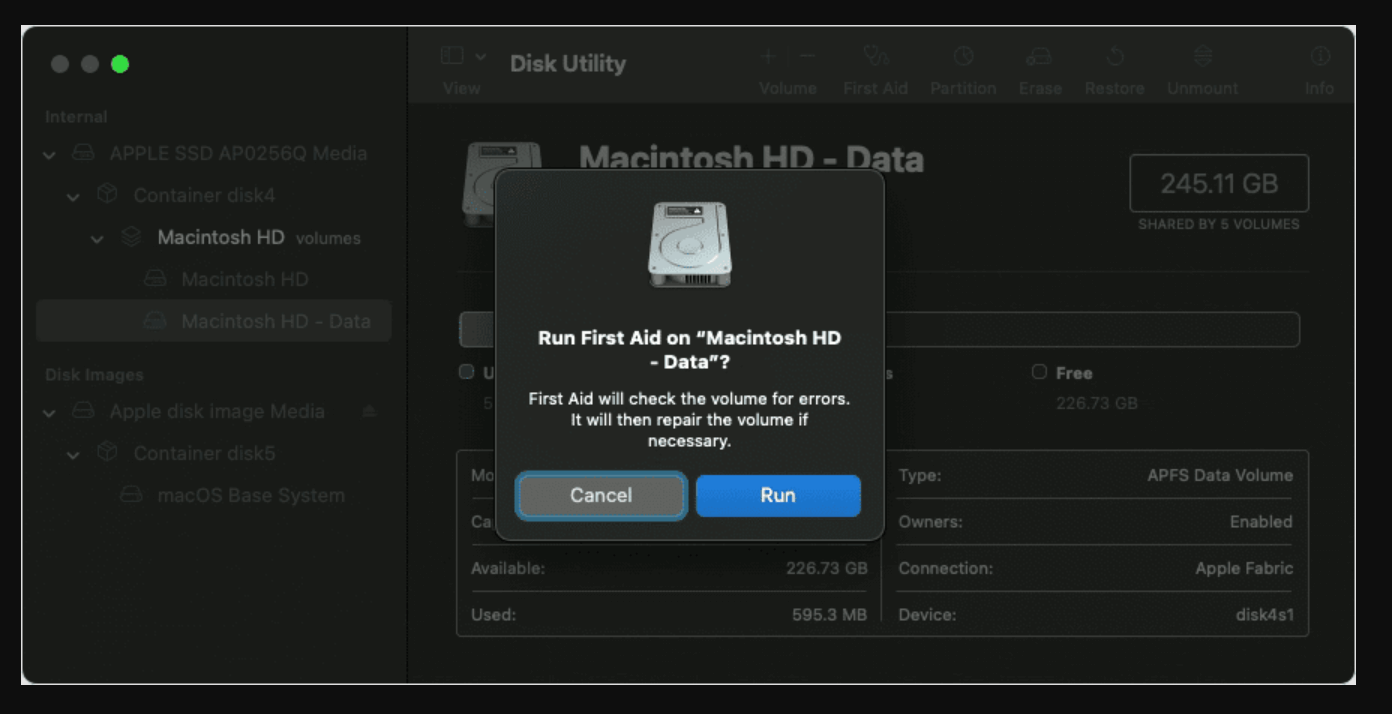
- If the system boots in Safe Mode, to inspect and fix the starting disk, utilize Disk Utility.
- Go to Disk Utility from Utilities via Applications.
- Click First Aid after selecting the startup disk.
![Mac not booting after restoring from a Time Machine backup]()
Step 2: Use macOS Recovery
macOS Recovery is a powerful built-in utility that provides essential tools for troubleshooting, repairing, and restoring your Mac. If your Mac won't boot after restoring from a Time Machine backup, macOS Recovery should be your go-to solution for further diagnostics and resolution. Here's a detailed guide on how to use macOS Recovery effectively.
Accessing macOS Recovery
- Restart Your Mac:
- If your Mac is on, restart it by selecting Apple Menu > Restart.
- Press the power button to switch on your Mac if it is not already turned on.
- Enter Recovery Mode:
- For Intel-based Mac: Hold down Command (⌘) + R as soon as you press the power button. Keep holding the keys until the Apple logo, spinning globe, or a startup progress bar appears.
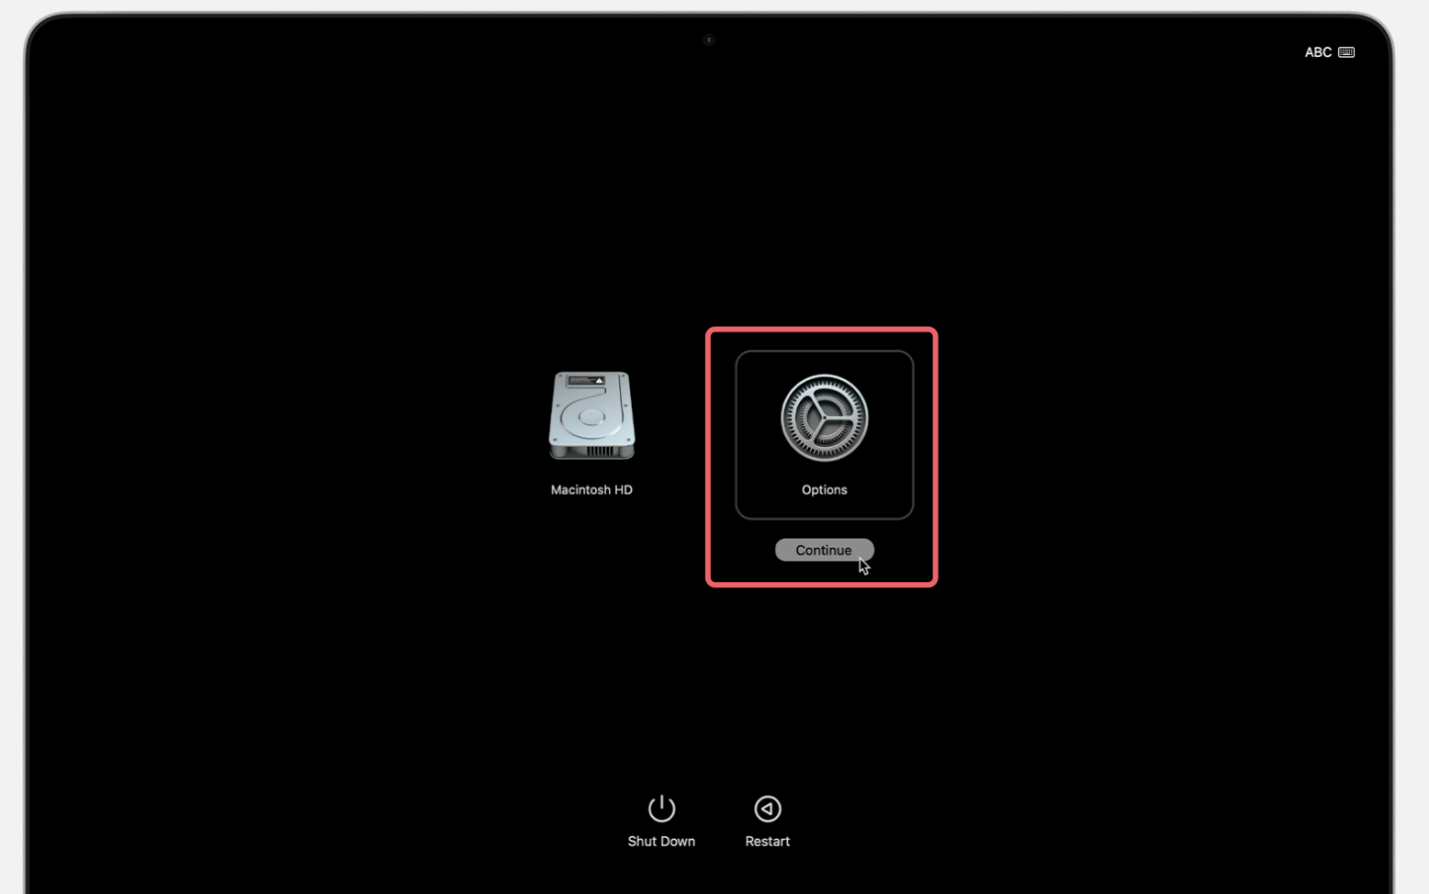
- For Apple silicon Mac: Press and hold Power button until Loading startup option appears, then choose Options, click Continue.
![Mac not booting after restoring from a Time Machine backup]()
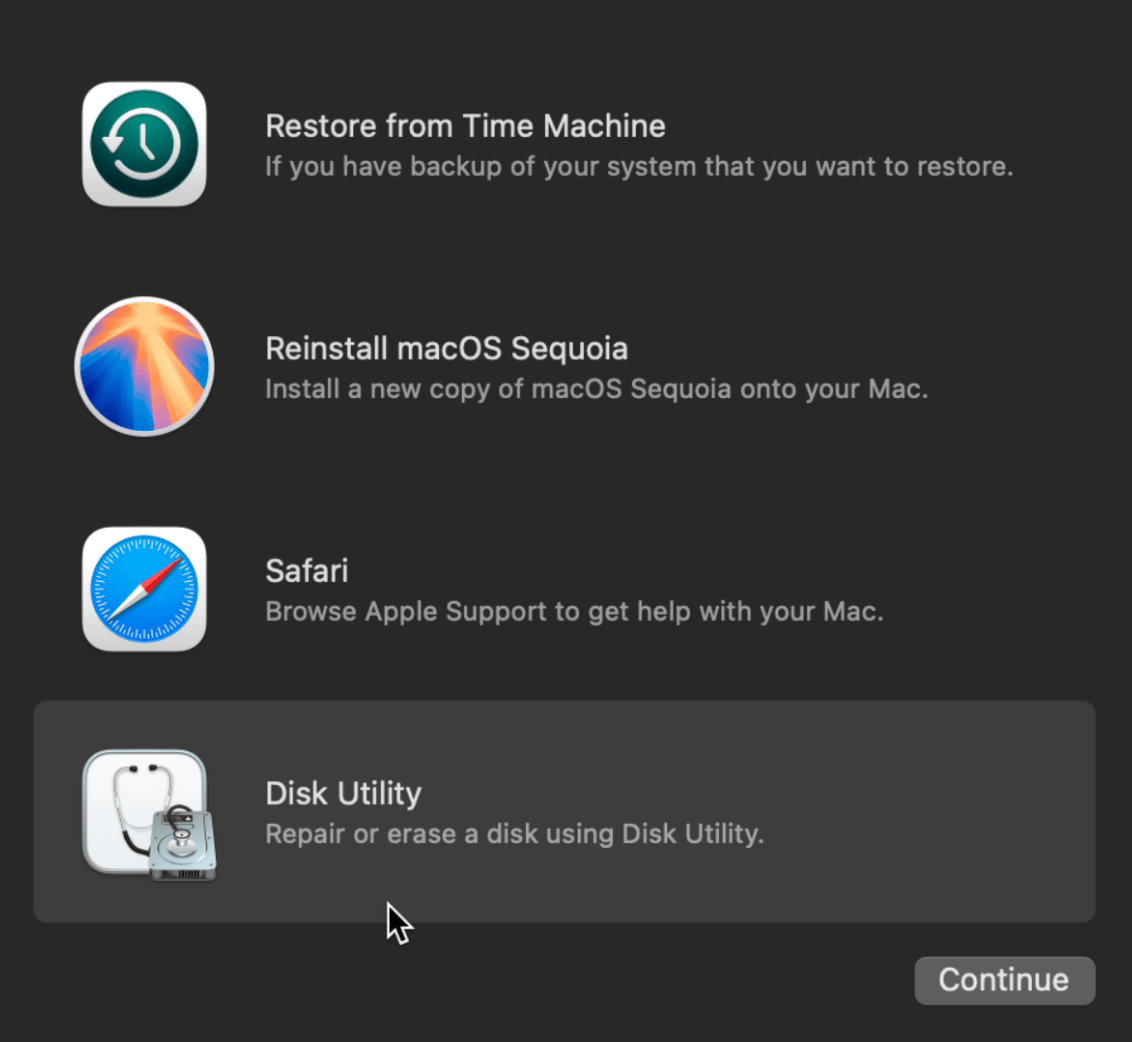
- Select macOS Utilities: Once in macOS Recovery, you'll see the macOS Utilities window with several options:
- Restore from Time Machine Backup
- Reinstall macOS
- Disk Utility
- Get Help Online/Safari
![Mac not booting after restoring from a Time Machine backup]()
Options in macOS Recovery:
1. Restore from Time Machine Backup
- If the initial restoration attempt failed or the wrong snapshot was selected, you can retry this process.
- Select Restore from Time Machine Backup and follow these steps:
- Connect your Time Machine drive, if not already connected.
- Select your backup disk and choose the most recent or appropriate snapshot.
- Carefully review the backup details to ensure it matches the desired macOS version and data.
- Let the restoration process complete fully without interruption.
2. Reinstall macOS
Reinstalling macOS can help if the system files from the Time Machine backup were corrupted or incompatible. This option installs a fresh copy of macOS while preserving your existing data (if the drive is intact).
- Select Reinstall macOS and follow the on-screen instructions.
- Ensure your Mac is connected to a reliable internet connection, as the installer may need to download additional files.
- After installation, check if the system boots correctly before restoring additional data.
3. Disk Utility
Disk Utility is an indispensable tool for diagnosing and repairing drive-related issues.
- Choose your startup disk by selecting Disk Utility.
- To identify and fix disk issues, click First Aid.
- If the disk shows significant errors that cannot be repaired, consider erasing and reformatting it. However, proceed with caution and ensure your backup is intact before taking this step.
4. Get Help Online/Safari
- Use the Get Help Online/Safari option to access Apple Support resources directly from the macOS Recovery interface.
- Troubleshoot specific error codes or issues you encounter during the restoration process.
Advanced Tips for macOS Recovery
1. Accessing Internet Recovery
- If your Mac's local Recovery partition is corrupted or missing, you can use Internet Recovery.
- Hold down Option + Command + R while starting up your Mac to access the latest compatible version of macOS for your device.
2. Using Terminal in Recovery Mode
- For advanced users, the Terminal option in macOS Recovery allows you to run commands to troubleshoot further.
- Commands like diskutil list and fsck can help diagnose disk problems or verify the integrity of the file system.
3. Testing Alternate Snapshots
- If multiple snapshots exist on your Time Machine drive, try restoring from an earlier snapshot to bypass potential corruption in the latest backup.
Step 3: Check Disk Utility
If disk errors are preventing your Mac from booting, Disk Utility can help resolve them.
- Boot into macOS Recovery as described above.
- Select Disk Utility and choose your startup disk.
- Click First Aid and follow the on-screen instructions to repair the disk.
![Mac not booting after restoring from a Time Machine backup]()
- If errors persist, consider erasing and reformatting the drive, but only after ensuring you have a reliable backup.
Step 4: Reset NVRAM/PRAM and SMC
Resetting NVRAM or SMC can resolve low-level issues.
To Reset NVRAM/PRAM:
- Turn off your Mac.
- Holding Option + Command + P + R, turn it back on.
- Hold onto these keys for almost 20 seconds, then let go.
To Reset SMC (For Intel Macs):
- Turn off your Mac.
- For ten seconds, hold down Shift + Control + Option while pressing the power button.
- Turn on your Mac after releasing all the keys.
Step 5: Perform a Clean Installation
If the above steps fail, a clean installation of macOS may be necessary.
- Boot into macOS Recovery.
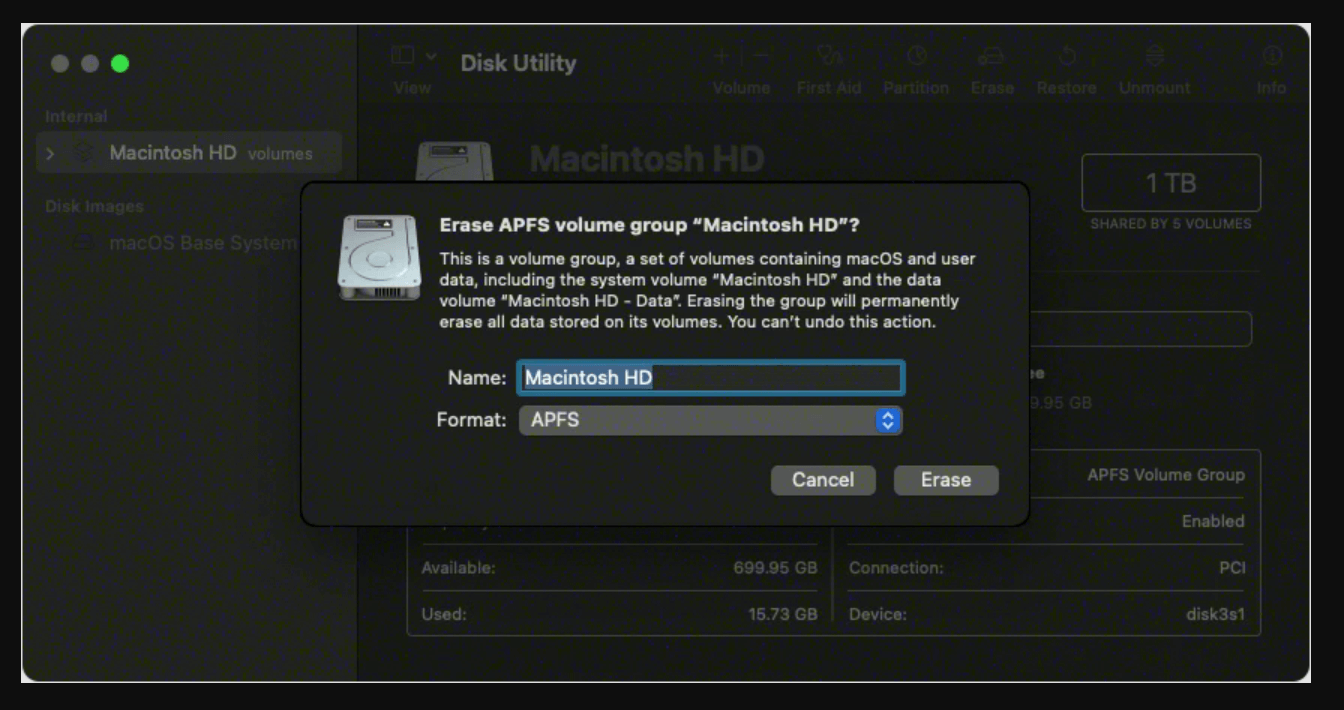
- Select Disk Utility, erase the startup disk, and reformat it as APFS or Mac OS Extended (Journaled).
![Mac not booting after restoring from a Time Machine backup]()
- Return to the macOS Utilities screen and select Reinstall macOS.
- Once the installation is complete, use the Migration Assistant to manually restore data from your Time Machine backup.
Data Recovery
If you have lost data and can't restore lost data from Time Machine backup, you can use Mac data recovery to help you recover lost data from Mac's internal disk.
Step 1. Download and install Donemax Data Recovery on your Mac. It is a reliable and 100% safe data recovery application.
Step 2. Run Donemax Data Recovery from Launchpad, select the Mac internal disk (usually named Macintosh HD).

Step 3. Click on Scan button to deeply scan the internal disk and find all recoverable files.

Step 4. Once the scan is completed, you can preview all recoverable files. Then select the wanted files, click on Recover button to save them.

When to Seek Professional Help
If none of the above steps resolve the issue, it may indicate deeper hardware or software problems. Consider the following:
- Persistent Disk Errors: If the disk remains inaccessible or unrepairable.
- Backup Corruption: If the Time Machine backup cannot be read or restored.
- Hardware Issues: If diagnostics reveal hardware failure.
Contact Apple Support or visit an Apple Authorized Service Provider for professional assistance.
Prevent Future Mac Not Booting Issues
To avoid similar problems in the future, consider these best practices:
1. Create Reliable Backups
- Ensure your Time Machine drive has sufficient storage space.
- Use a high-quality external drive.
- Regularly verify your backups by testing restoration on a secondary device or partition.
2. Maintain a Healthy macOS Environment
- Keep macOS updated to the latest version.
- Avoid installing unverified third-party applications.
- Regularly check your disk health using Disk Utility or third-party tools like DriveDx.
3. Understand Compatibility Requirements
- Ensure the macOS version of the backup is compatible with your current hardware and operating system.
- When upgrading macOS, create a fresh backup before proceeding.
Conclusion
Restoring from a Time Machine backup is typically a seamless process, but issues can arise that prevent your Mac from booting. By following the troubleshooting steps outlined above, you can address most common problems and get your system up and running. If all else fails, professional support is always an option.
To avoid future headaches, regularly maintain your backups and keep your macOS environment stable. With these practices in place, you can trust Time Machine to be the reliable safety net it's designed to be.
If you have lost data due to erasing the startup disk, use data recovery software to help you get the erased or lost data back.


Donemax Data Recovery for Mac
Donemax Data Recovery for Mac is one of the best Mac data recovery software. It is easy-to-use and can help in recovering deleted, formatted, inaccessible or lost data from Mac HDD/SSD, external disk, USB drive, SD card, camera or other storage devices.
Related Articles
- Feb 11, 2025Mac Can't Recognize the Connected SD Card? Fix It Now
- Jan 12, 20256 Solutions to Fix Error Code 50 on Mac: A Comprehensive Guide
- Feb 19, 2025Fix Maxtor External Hard Drive Not Recognized/Not Working on Windows
- Dec 17, 2024Can't Delete Files from USB Drive or SD Card on Mac? Fix It Now
- Jan 22, 2024New SSD Not Recognized By Disk Utility on Mac, Fix It Now
- Feb 18, 2024How to Solve Samsung Portable SSD T9 Is Read-Only on Mac?

Maria
Maria is one of the senior writers & editors of Donemax who lives and works in Sydney, Australia. She loves PC, Mac and Internet Technology. She has 6 years of writing articles about data recovery on PC/Mac, disk cloning solution, data eraser and computer OS optimization, etc. She is also interested in testing various software and digital products.

Gerhard Chou
In order to effectively solve the problems for our customers, every article and troubleshooting solution published on our website has been strictly tested and practiced. Our editors love researching and using computers and testing software, and are willing to help computer users with their problems
Hot Donemax Products

Clone hard drive with advanced clone technology or create bootable clone for Windows/Mac OS.

Completely and easily recover deleted, formatted, hidden or lost files from hard drive and external storage device.

Certified data erasure software - permanently erase data before selling or donating your disk or any digital device.

