PAGE CONTENT:
In this digital world, data is the backbone of everything. Whether you are a casual Mac user storing photos, a professional with important work documents, or someone who enjoys creating multimedia content, your data is invaluable. Losing it can feel catastrophic, and this is where backups come into play. Apple's Time Machine, a built-in macOS feature, provides a seamless and powerful way to ensure that your files, settings, and even entire system are always safely backed up. But what exactly is Time Machine, how does it work, and why should you consider using it? This article will explore every aspect of Time Machine, guiding you through its setup, use, troubleshooting, and alternatives.

How Time Machine Works?
Time Machine is Apple's backup software that simplifies data protection by automating the process of creating backups. What sets Time Machine apart from many other backup solutions is its incremental backup system. Instead of creating an entirely new backup every time you back up your Mac, only files that have changed since the last backup are copied.
Incremental Backups Explained:
The first time Time Machine runs, it creates a complete backup of your entire Mac, including system files, applications, and personal data. This is typically a large file, especially if you have a lot of data stored. After this initial backup, Time Machine only backs up new or modified files, which makes subsequent backups much faster and more space-efficient.
These incremental backups allow you to recover specific versions of files, much like a time-traveling experience - hence the name "Time Machine." If you accidentally delete a file, overwrite a document, or want to revert to an earlier version, Time Machine lets you navigate through time to retrieve exactly what you need.
Automatic and Continuous Backups:
Once set up, Time Machine continuously runs in the background, creating backups hourly, daily, and weekly. Until your backup disk is full, it keeps hourly backups for the last 24 hours, daily backups for the last month, and weekly backups for every month prior. Time Machine automatically removes the older backups to provide room for fresh ones as the disk fills up.
How to Set Up Time Machine?
Setting up Time Machine is a straightforward process, and it only requires an external storage device or network storage. Below is a step-by-step tutorial to get you going.
Step 1: Choose Your Backup Destination
Before configuring Time Machine, you need to select where your backups will be stored. You may utilize a Time Capsule (Apple's specialized backup router), an external hard drive, or a network-attached storage (NAS) device. If using an external drive, ensure that it's connected to your Mac.
Popular options include:
- External hard drives (USB, Thunderbolt, or FireWire)
- Network-attached storage (NAS) drives
- Time Capsule or any other network backup solution
Make sure that the drive is large enough to hold multiple backups of your Mac. A good rule of thumb is to have at least twice the amount of storage on your backup drive as you have on your Mac's internal storage.
Step 2: Enable Time Machine
- Once the drive is connected, open System Settings on macOS.
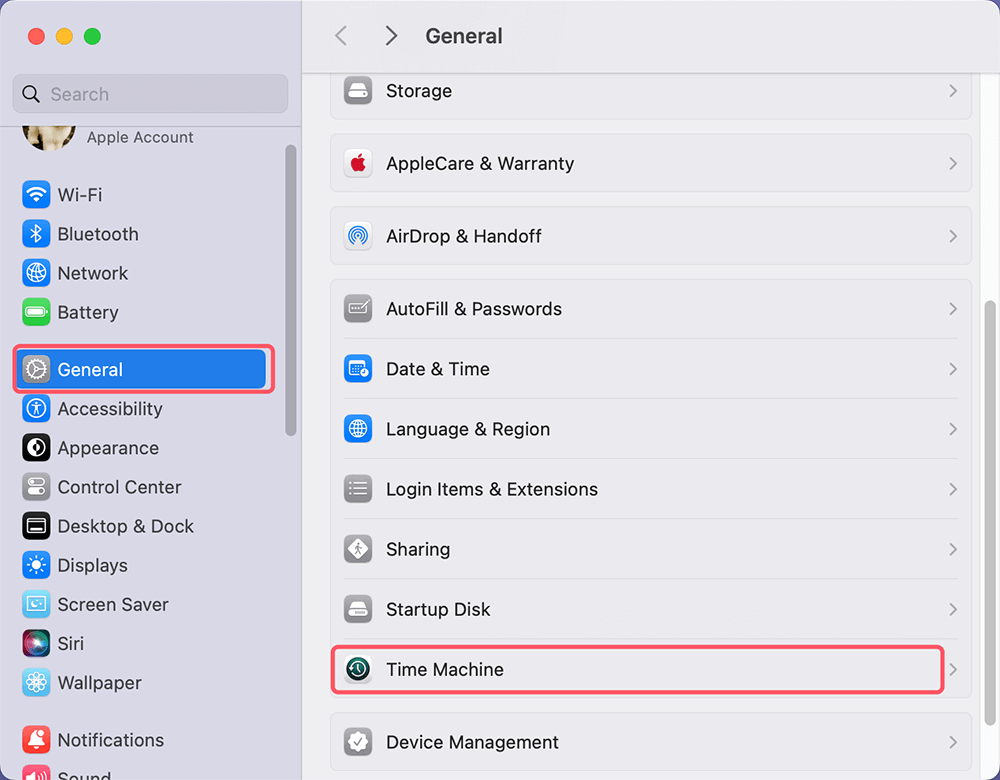
- Click on General and then Time Machine.
![Click on General and then Time Machine]()
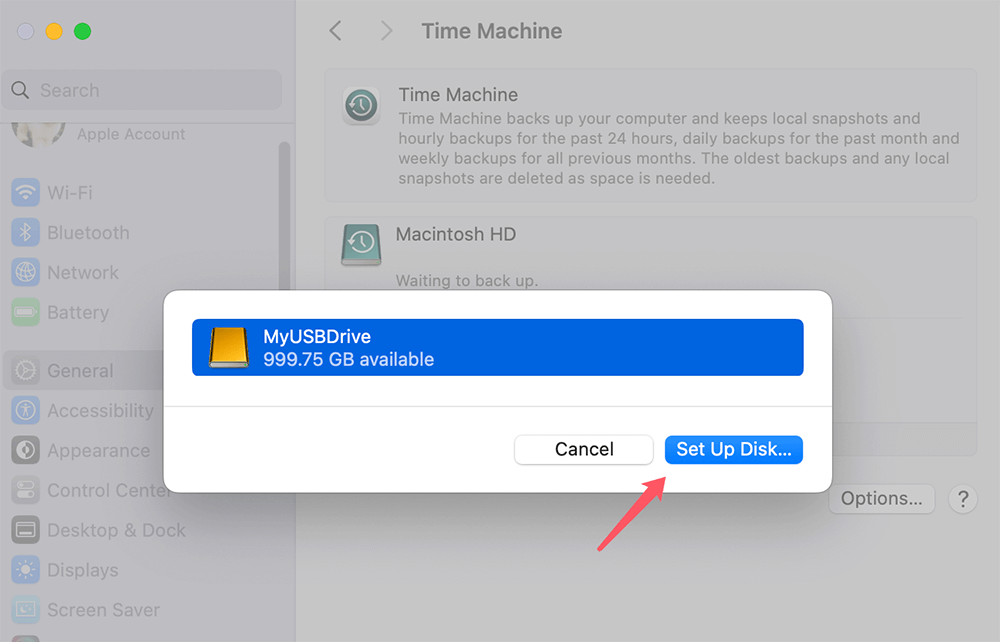
- Click + and choose the drive you want to use for backups and click Set Up Disk.
![choose the drive you want to use and click Set Up Disk]()
- If your backup drive is not formatted in the APFS or macOS Extended (Journaled) format, macOS will prompt you to reformat the drive. (Note: Reformatting will erase all data on the drive, so be sure to use a blank drive or one that you've backed up elsewhere.)
- After selecting the drive, Time Machine will begin its initial full backup.
Step 3: Customize Backup Preferences
Time Machine may be set up to exclude specific files or directories from the backup. This is useful if you want to save space or if you have files that are already stored elsewhere (such as on a cloud service).
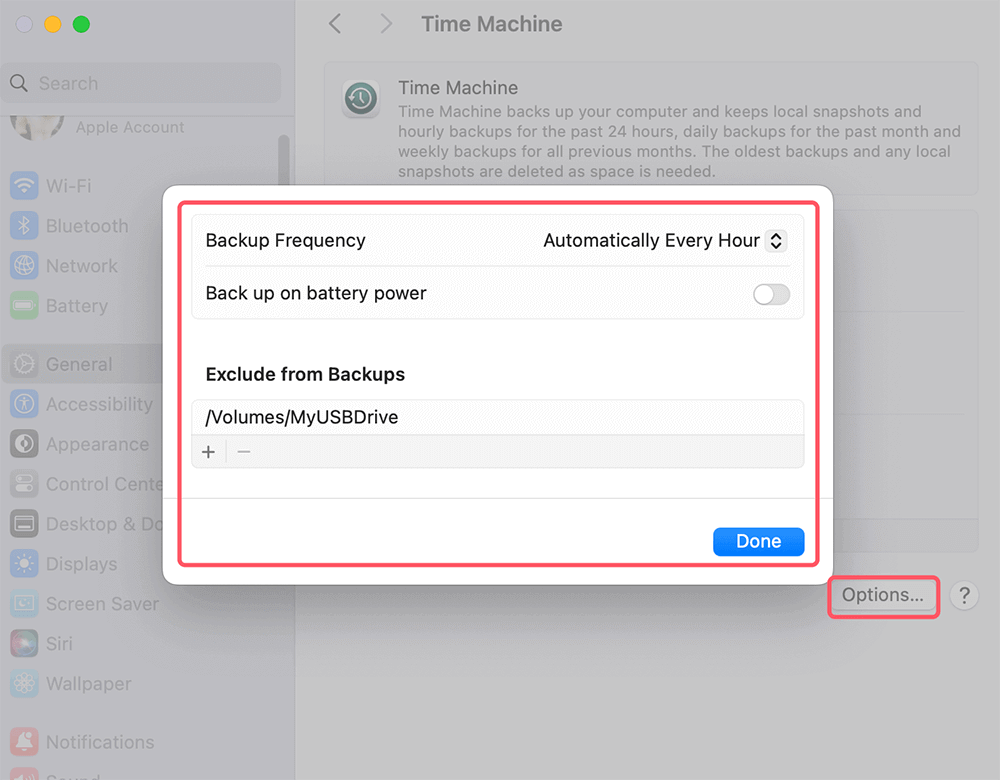
- In the Time Machine preferences window, click Options.
![Customize Backup Preferences]()
- Click the + button to add items you want to exclude from the backup.
- Once you've selected your items, click Done.
You can also decide how often Time Machine backs up your data, though by default, it will create backups hourly.
Restoring from Time Machine
While backing up is critical, the real magic of Time Machine comes into play when you need to restore data. Whether it's a single file or your entire system, Time Machine makes the process smooth and reliable.
Restoring Individual Files:
If you accidentally deleted or modified a file, restoring it with Time Machine is easy:
- Connect your Time Machine backup drive.
- Start by opening the original file's folder.
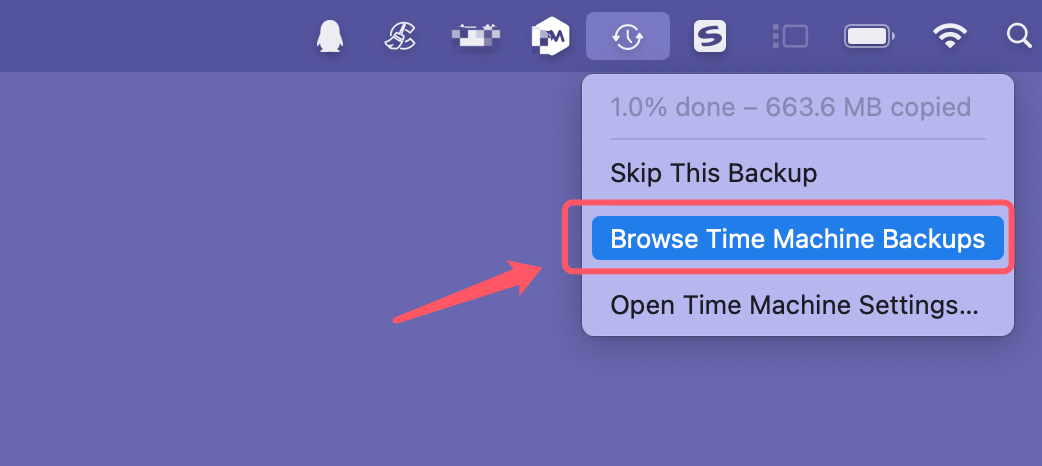
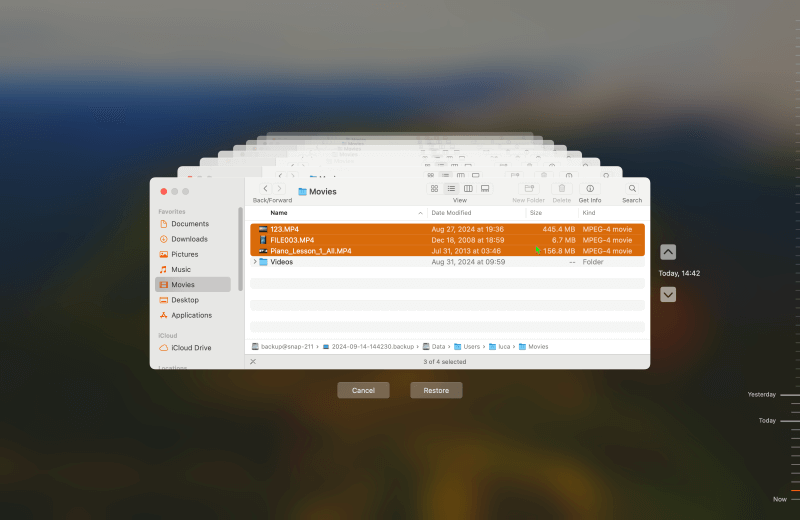
- Select Enter Time Machine or Browse Time Machine Backups after clicking the Time Machine symbol in the navigation bar.
![Select Enter Time Machine or Browse Time Machine Backups]()
- To view your earlier backups, use the timeline on the right side of the screen.
- Once you find the version you want to restore, Click Restore after selecting the file. The file will be put back where it was before.
![Click Restore after selecting the file]()
Restoring an Entire System:
You may restore your complete system, including settings, programs, and files, using Time Machine in the event of a catastrophic system failure or if you recently bought a new Mac.
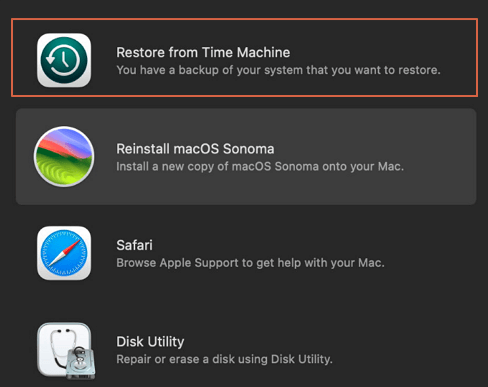
- Press and hold Command + R (for Intel-based Mac) or Power button (for Apple silicon Mac) to boot your Mac into Recovery Mode (for Apple silicon Mac, choose Options and click on Continue button).
- In the macOS Utilities box or Recovery app, choose Restore from Time Machine.
![choose Restore from Time Machine Backup]()
- Follow the on-screen prompts to select your backup drive and the date of the backup you want to restore.
- Depending on the size of your backup and the speed of your disk, the restoration procedure may start slowly and take some time to complete.
Migrating to a New Mac:
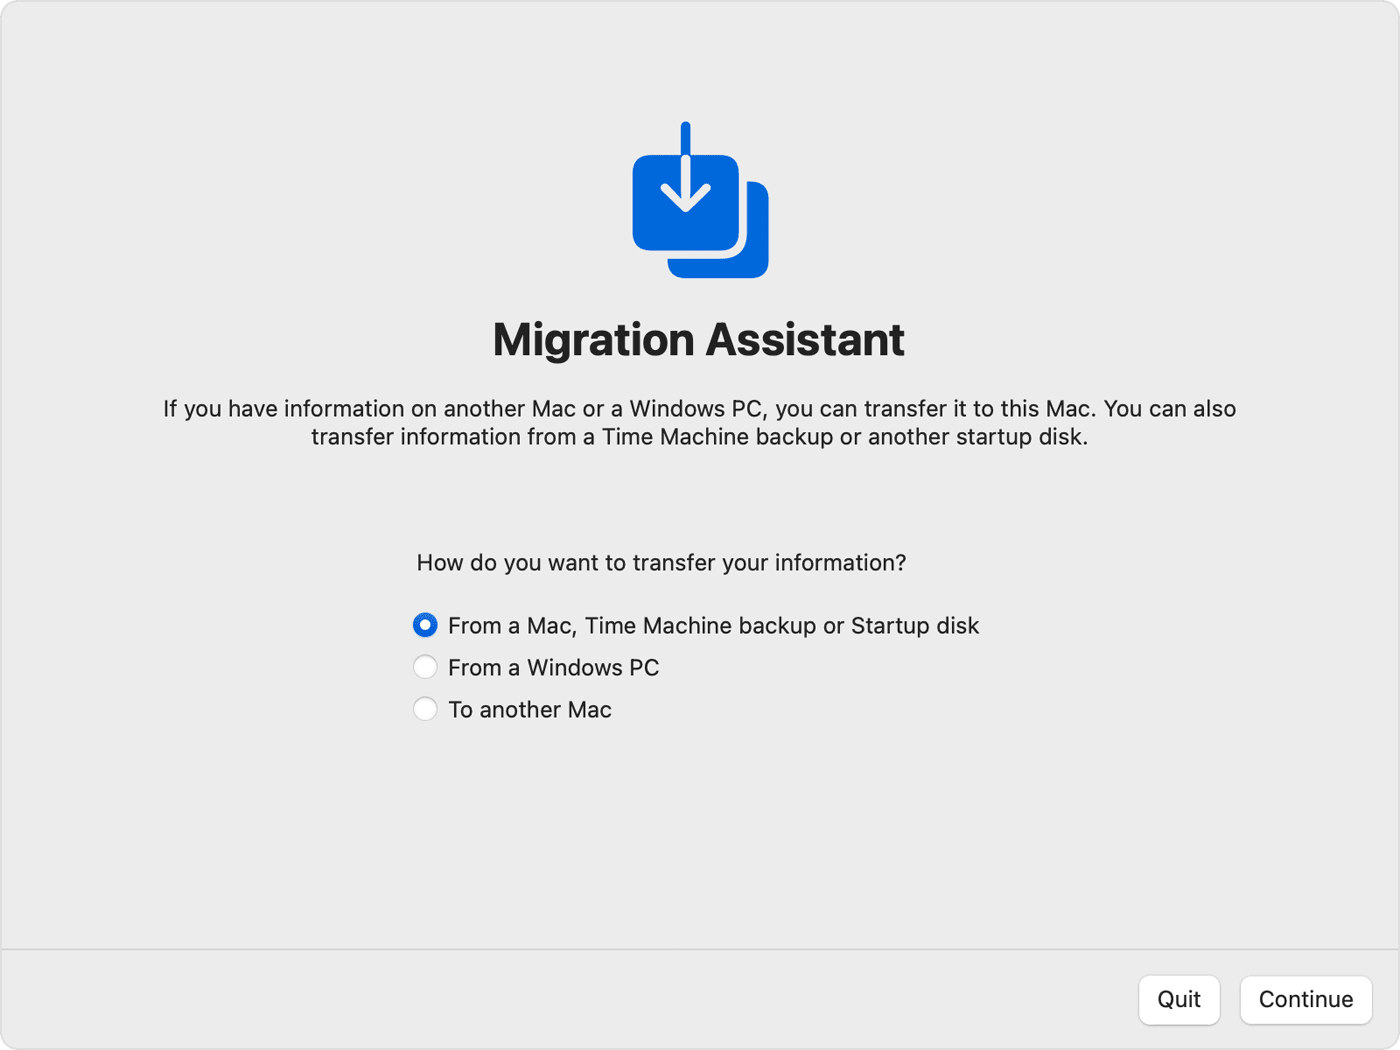
Time Machine is also useful when setting up a new Mac. You can easily move all of your data, apps, and preferences to your new device by having macOS ask you whether you want to restore from a Time Machine backup during the setup process.
Note: If you cannot recover lost files from Time Machine backup, you can use Mac data recovery software to help you recover permanently deleted, formatted or lost files.
Best Practices for Using Time Machine
To get the most out of Time Machine, follow these best practices:
1. Regularly Connect Your Backup Drive
For users relying on external drives, make sure to connect the drive frequently. If you use a network-attached storage device, Time Machine will automatically back up as long as the device is on the same network.
2. Monitor Backup Health
Time Machine backups can sometimes become corrupted, especially if the backup drive is old or has been disconnected improperly. Every so often, verify the health of your backups by checking for any warning messages from Time Machine. You can also periodically browse through your backups to ensure everything is functioning correctly.
3. Choose the Right Drive Size
The larger the drive, the more backup versions you'll be able to keep. This can be helpful for retrieving files from long ago. Choose a backup drive that's at least twice the size of your Mac's internal storage.
4. Exclude Unnecessary Files
Excluding large, non-essential files such as system cache files or large downloads can save backup space. Use the exclusion feature in Time Machine to avoid backing up data you don't need.
Time Machine Common Issues and Troubleshooting
Although Time Machine is relatively hassle-free, there are times when users run into problems. Here are some common issues and their solutions:
1. Time Machine Not Backing Up
If Time Machine fails to start a backup, check the following:
- Ensure your backup drive is connected properly.
- Check for any warning notifications from Time Machine.
- If your backup drive is full, consider deleting older backups or upgrading to a larger drive.
2. Slow Backups
Large or first-time backups can take hours or even days, depending on the size of your data and the speed of your backup drive. You can speed up backups by ensuring your Mac isn't running other heavy tasks during the backup process.
3. Backup Drive Full
Time Machine removes the older backups automatically when your backup disk fills up. However, if you want to keep older backups, consider upgrading to a larger drive or offloading certain files to cloud storage.
Alternatives to Time Machine
Although Time Machine is a robust solution for most users, you may want to consider other backup solutions based on your needs. Here are some alternatives:
1. iCloud Drive
Apple's iCloud service can be a great complement to Time Machine, offering cloud-based backups for files, documents, and settings. While it doesn't replace Time Machine's ability to back up the entire system, it does provide access to your data across all your Apple devices.
2. Donemax Disk Clone for Mac
This is a more advanced alternative to Time Machine that creates bootable clones of your Mac's hard drive. Donemax Disk Clone for Mac is popular among advanced users who need more control over their backups.
Step 1. Download and install Donemax Disk Clone for Mac on your Mac and connect an external hard drive to the Mac.
Step 2. Open Donemax Disk Clone for Mac, choose OS Clone mode. Select the external hard drive as the destination drive, click on Clone Now button.

Step 3. It will securely clone all data including operating system, user data, settings, apps from Mac's internal drive to the external hard drive and create a full bootable clone backup. (You can set the external hard drive as the startup disk.)

3. Backblaze
For users looking for a cloud-based solution, Backblaze offers unlimited cloud storage for backups. It automatically backs up your files to the cloud, which is a good off-site alternative to Time Machine's local backups.
Conclusion
In summary, Time Machine is a powerful, easy-to-use backup solution that can protect you from losing important data due to accidental deletion, hardware failure, or other unforeseen issues. It offers automatic, continuous backups and the ability to restore individual files or even your entire system in the event of a disaster. By following best practices and keeping your backups up to date, you can ensure that your data is safe and secure. While alternatives like iCloud Drive, Mac disk cloning software, or Backblaze offer additional flexibility, Time Machine remains a go-to choice for macOS users due to its deep integration with the operating system.
Related Articles
- Dec 12, 2024How to Use Dock on Mac and Fix Common Dock Issues?
- Dec 06, 2024Learn Everything About Recycle Bin on Windows Computer
- Mar 26, 2025What is the File Explorer on Mac? – All You Need to Know
- Nov 13, 2024What is XProtect on Mac and How Does It Work?
- Mar 31, 2025About Disk Management – How to Open and Use It on Windows 11/10?
- Mar 21, 2025TextEdit Overview on Mac – A Comprehensive Guide

Maria
Maria is one of the senior writers & editors of Donemax who lives and works in Sydney, Australia. She loves PC, Mac and Internet Technology. She has 6 years of writing articles about data recovery on PC/Mac, disk cloning solution, data eraser and computer OS optimization, etc. She is also interested in testing various software and digital products.

Gerhard Chou
In order to effectively solve the problems for our customers, every article and troubleshooting solution published on our website has been strictly tested and practiced. Our editors love researching and using computers and testing software, and are willing to help computer users with their problems
Hot Donemax Products

Clone hard drive with advanced clone technology or create bootable clone for Windows/Mac OS.

Completely and easily recover deleted, formatted, hidden or lost files from hard drive and external storage device.

Certified data erasure software - permanently erase data before selling or donating your disk or any digital device.
