Written byChristinaUpdated on Mar 31, 2025
About Disk Management – How to Open and Use It on Windows 11/10?
Approved byGerhard Chou
PAGE CONTENT:
Windows 11 and 10 come with a built-in tool called Disk Management that assists users in controlling the storage devices on their computers. It enables you to assign drive letters, create, remove, format, expand, and contract partitions, and carry out other crucial disk-related operations. Whether you're setting up a new hard drive, troubleshooting disk space issues, or organizing storage, Disk Management is an essential tool.
In this article, we will learn how to open Disk Management, its features, how to use it for different tasks, and how to troubleshoot common issues.
Introduction to Disk Management
What is Disk Management?
Windows comes with a built-in tool called Disk Management that offers a storage disk management interface. It displays all connected disks, including HDDs, SSDs, USB drives, and SD cards. With this tool, you can perform various disk-related operations without using third-party software.
Why is Disk Management Important?
- It allows users to create, delete, format, and resize partitions.
- Helps in assigning or changing drive letters to keep storage organized.
- Can be used to initialize new hard drives before they can be used.
- Supports basic troubleshooting for common storage-related issues.
How to Open Disk Management in Windows 11/10
There are multiple ways to access Disk Management. Here are the most common methods:
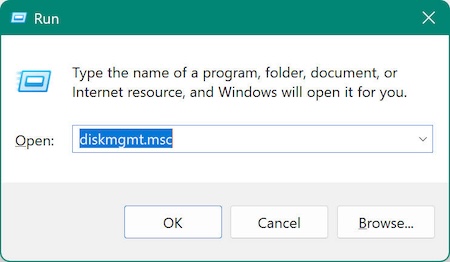
Method 1: Using the Run Command
- To launch the Run dialog box, press Win + R.
- After typing diskmgmt.msc, hit Enter.
- The window for disk management will open.
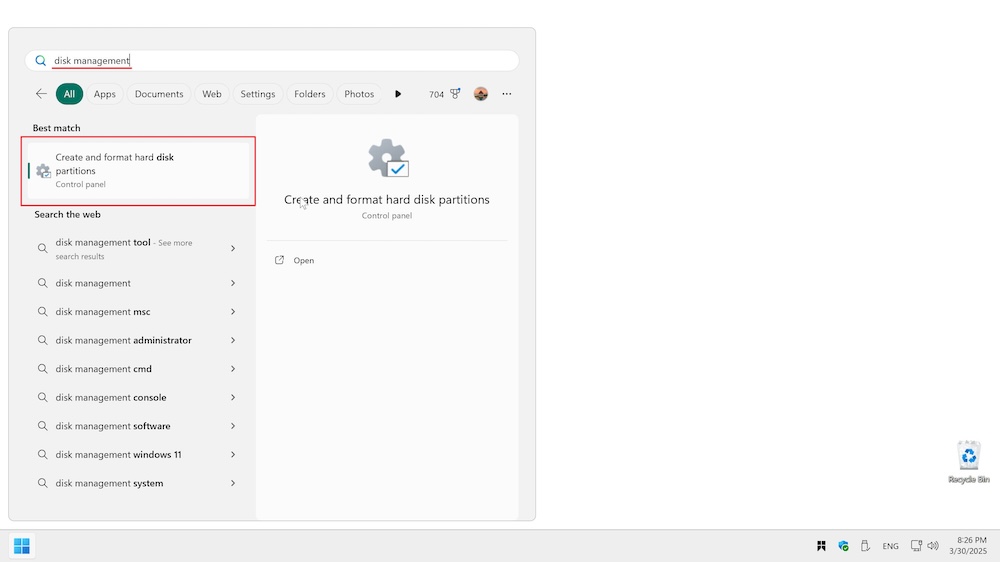
Method 2: Via the Start Menu
- Click the Windows symbol for the Start Menu.
- In the search bar, type disk management.
- Click "Create and format hard disk partitions" from the search results.
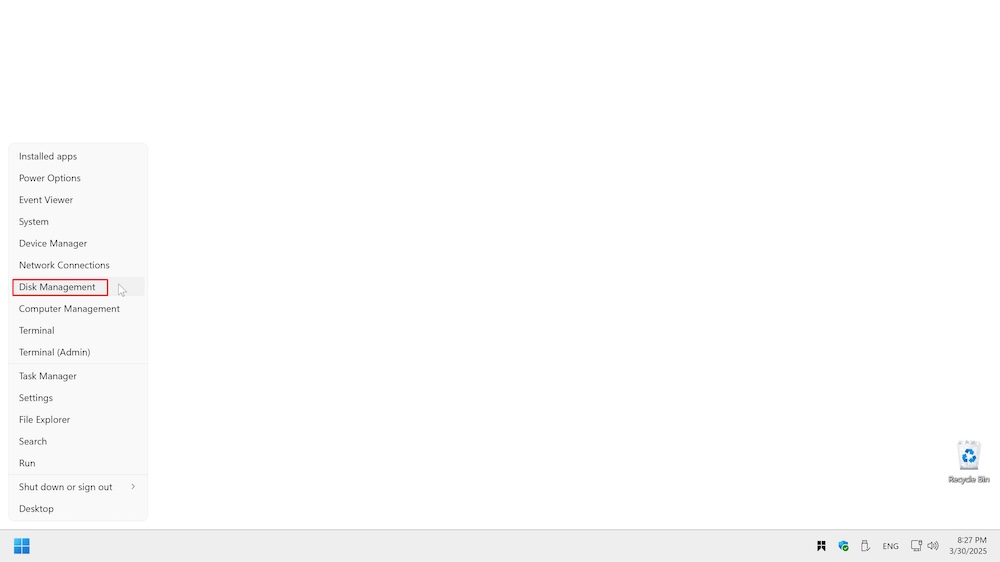
Method 3: Using Computer Management
- Right-click on the Start Menu and select Disk Management.
Method 4: Using Command Prompt or PowerShell
You can also open Disk Management using the command line:
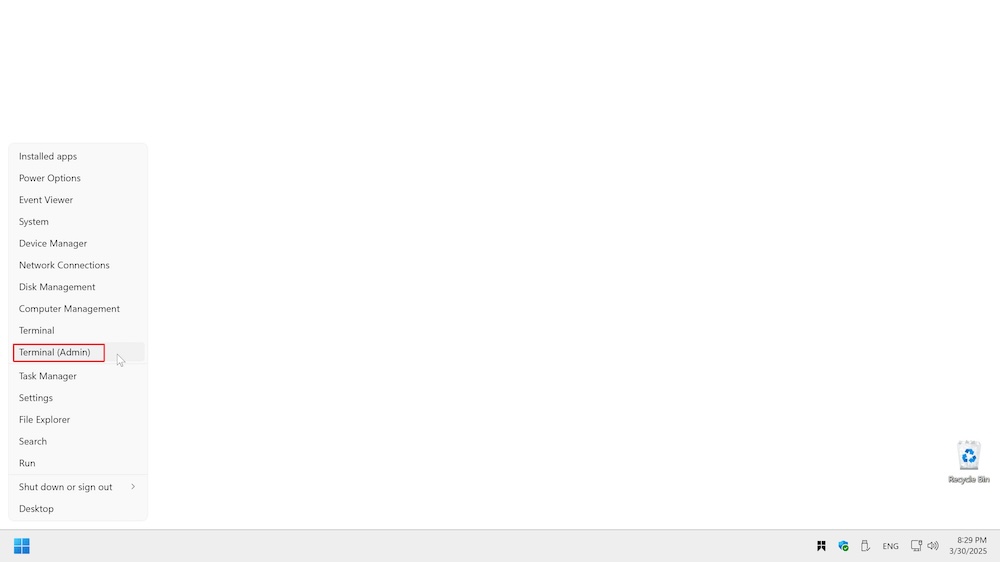
- Open Command Prompt or PowerShell by pressing Win + X and selecting your preferred Terminal.
![how to open and use Disk Management on Windows]()
- Type the following command and press Enter. This will launch Disk Management.
diskmgmt
![how to open and use Disk Management on Windows]()
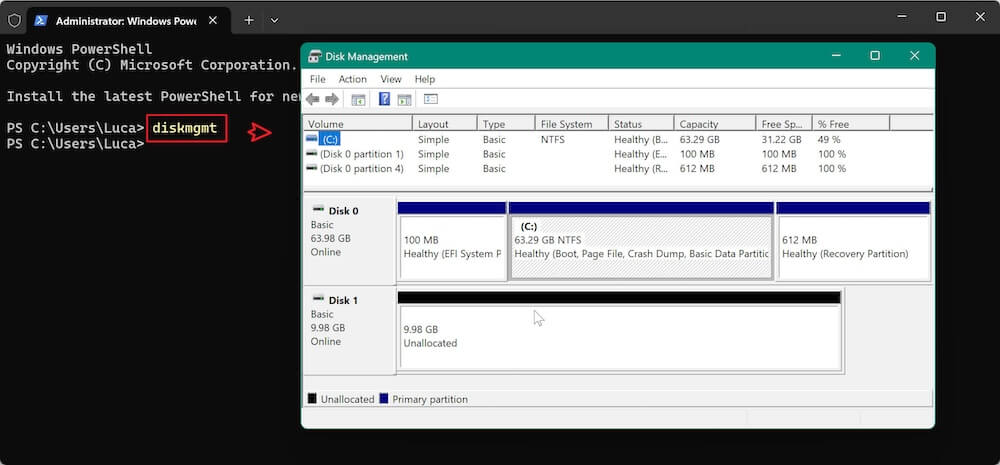
Now that we know how to open Disk Management, let's explore its key features.
Features and Functions of Disk Management
Disk Management provides various options to manage your storage devices effectively. Below are top 10 primary features and how to use them.
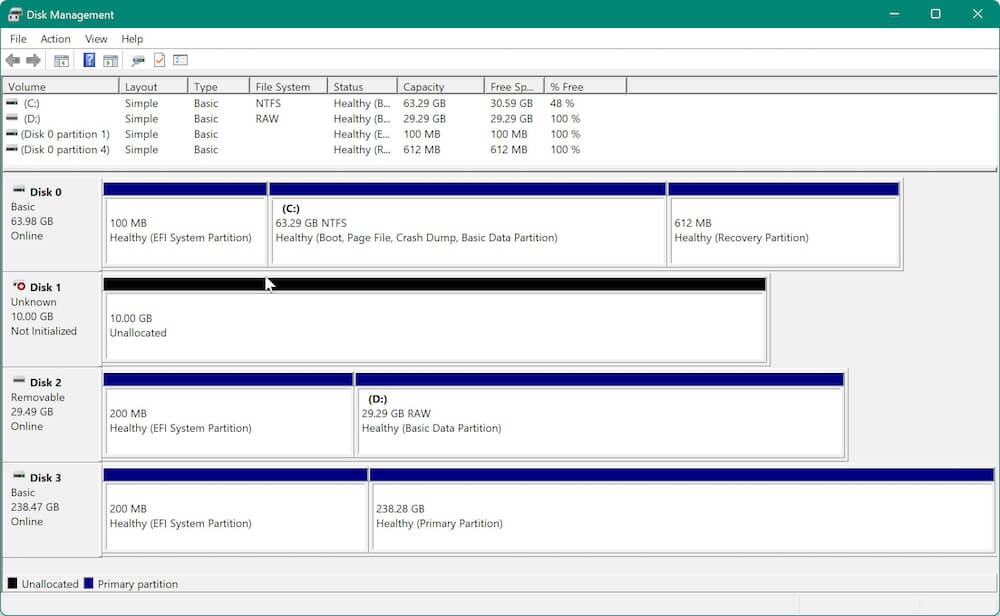
1. Viewing Disk and Partition Details
While opening Disk Management, you will see a graphical representation of all connected storage devices. The tool provides essential details such as disk type (Basic or Dynamic), partition style (MBR or GPT), file system (NTFS, FAT32, or exFAT), total capacity, free space, and the partition status (Healthy, Unallocated, RAW, etc.). This overview helps users understand the structure of their storage drives and take necessary actions based on the available space and configuration.
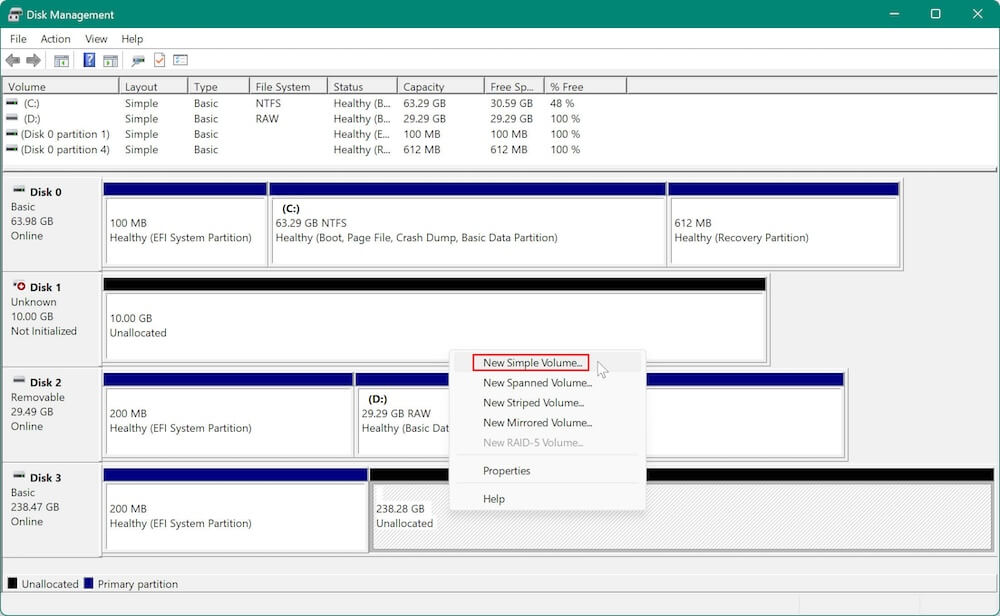
2. Creating a New Partition (Volume)
If you have unallocated space on a hard drive or SSD, you can create a new partition (also called a volume) using Disk Management. This is particularly useful when setting up a new drive. Users must right-click on the unallocated space, select "New Simple Volume," and then proceed with the wizard to format the partition, assign a drive letter, and specify the partition size. Creating partitions helps in organizing data and optimizing storage usage.
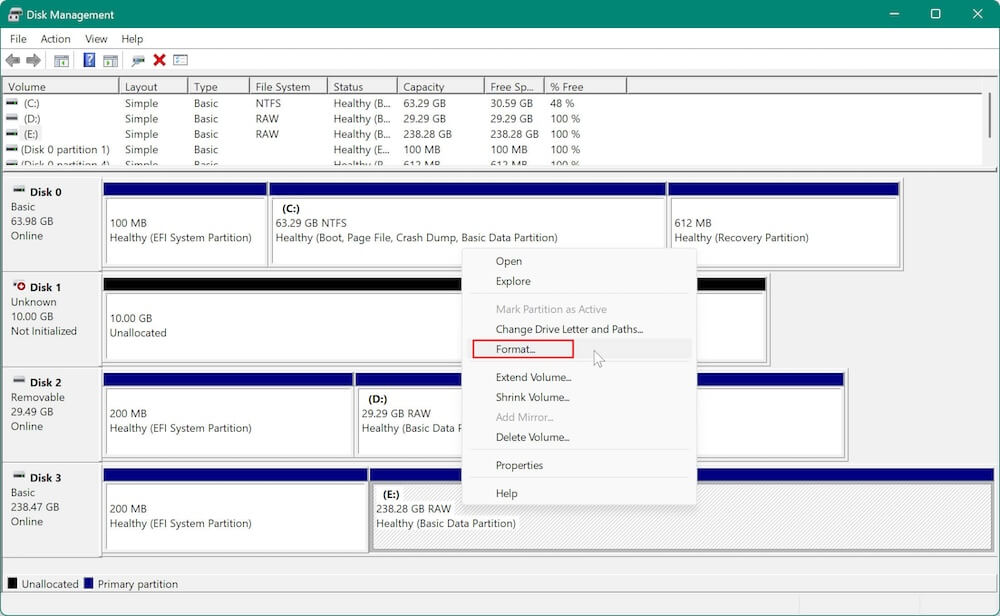
3. Formatting a Partition
Formatting a partition is necessary when setting up a new drive or preparing an existing partition for reuse. Formatting erases all data and configures the file system for compatibility with Windows. Disk Management allows users to format a partition in NTFS, FAT32, or exFAT, depending on their needs. NTFS is the preferred choice for Windows, while FAT32 and exFAT are used for compatibility with other operating systems and external drives.
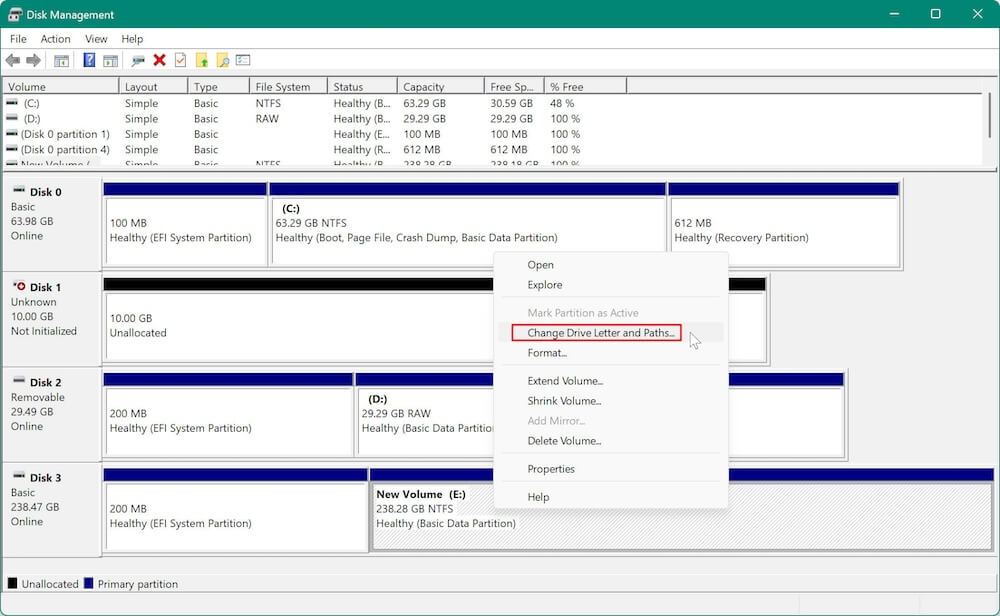
4. Changing Drive Letters and Paths
Each partition is assigned a unique drive letter (such as C:, D:, or E:), which helps the operating system and applications recognize it. Sometimes, users may want to change the drive letter for organizational purposes or to resolve conflicts. Disk Management provides an option to change, assign, or remove drive letters. This can be done by right-clicking the partition and selecting "Change Drive Letter and Paths." However, changing the letter of a drive with installed applications may cause software issues, so it should be done cautiously.
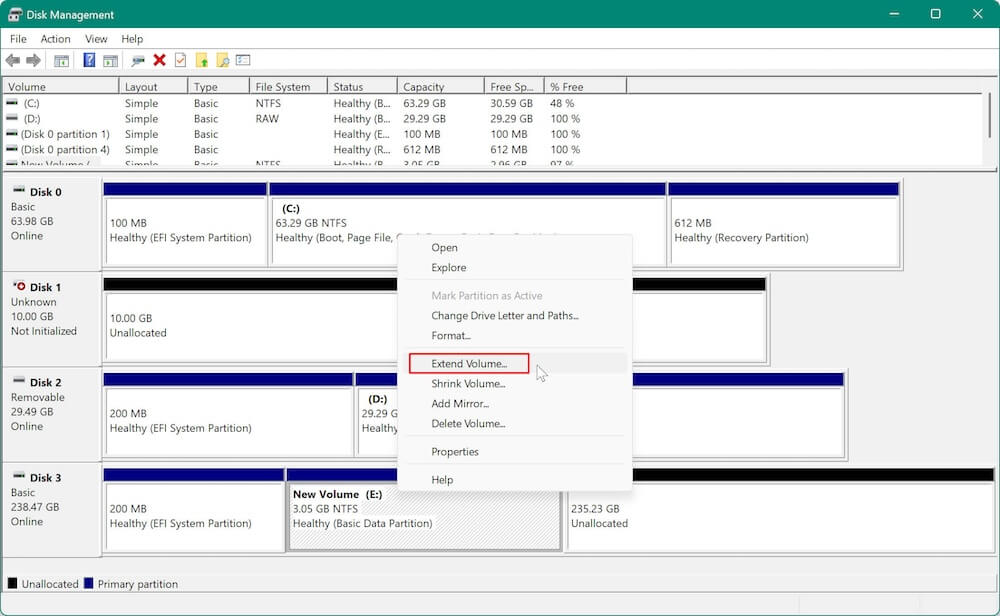
5. Extending a Partition
If a partition is running out of space and there is unallocated space available next to it, Disk Management allows users to extend the partition to utilize that space. This feature is useful when you need more storage in a specific partition without deleting existing data. However, the "Extend Volume" option is only available if unallocated space is adjacent to the partition. If the unallocated space is located elsewhere, third-party software may be needed to move and merge partitions.
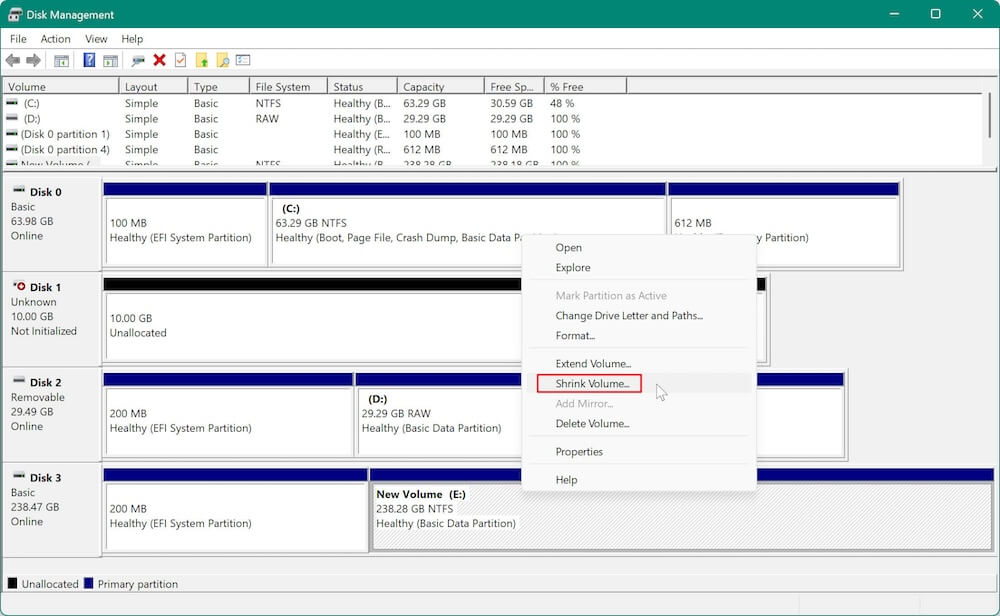
6. Shrinking a Partition
Shrinking a partition is the opposite of extending it. This function allows users to reduce the size of an existing partition and free up unallocated space, which can be used to create new partitions. This is useful when you want to divide a large drive into multiple partitions for better organization. However, shrinking may be limited by unmovable system files, which prevent the partition from being reduced beyond a certain point.
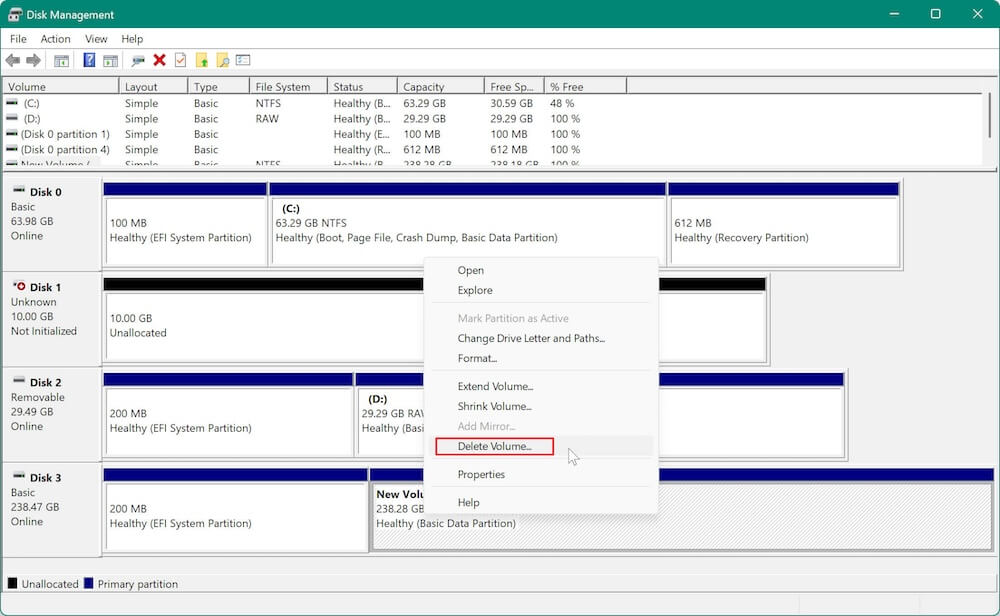
7. Deleting a Partition
If a partition is no longer needed, it can be deleted using Disk Management. Deleting a partition removes all data stored on it and turns it into unallocated space, which can then be used to create a new partition or extend an existing one. To delete a partition, users need to right-click on it and select "Delete Volume."
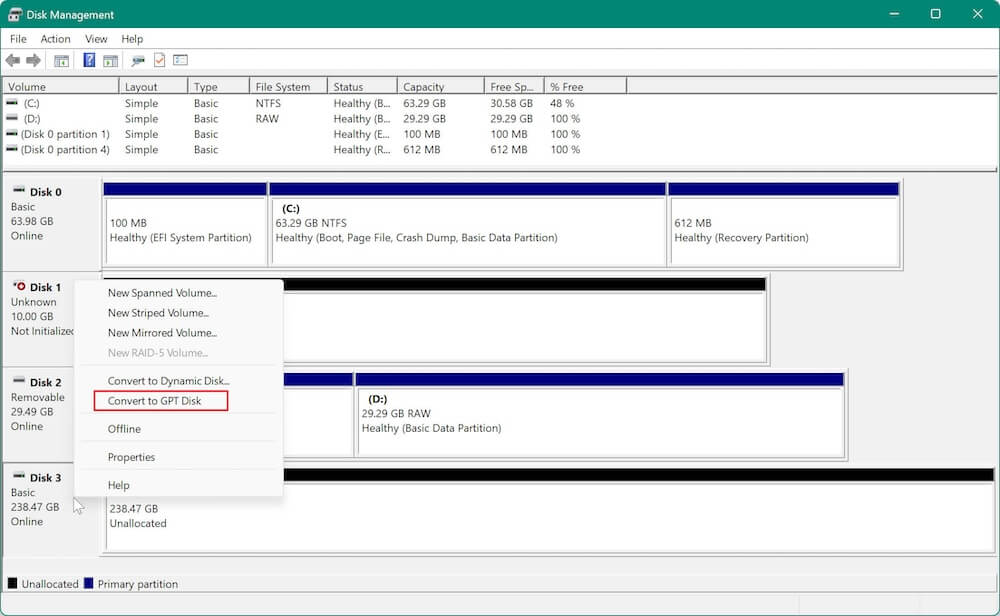
8. Converting Between MBR and GPT Disks
Windows uses two partition styles: MBR and GPT. MBR is older and supports up to 2TB of storage with a maximum of four primary partitions, whereas GPT supports larger storage capacities and more partitions. Disk Management allows users to convert an MBR disk to GPT and vice versa, but this process requires deleting all partitions on the disk first. If a user needs to convert a disk without data loss, third-party software may be required.
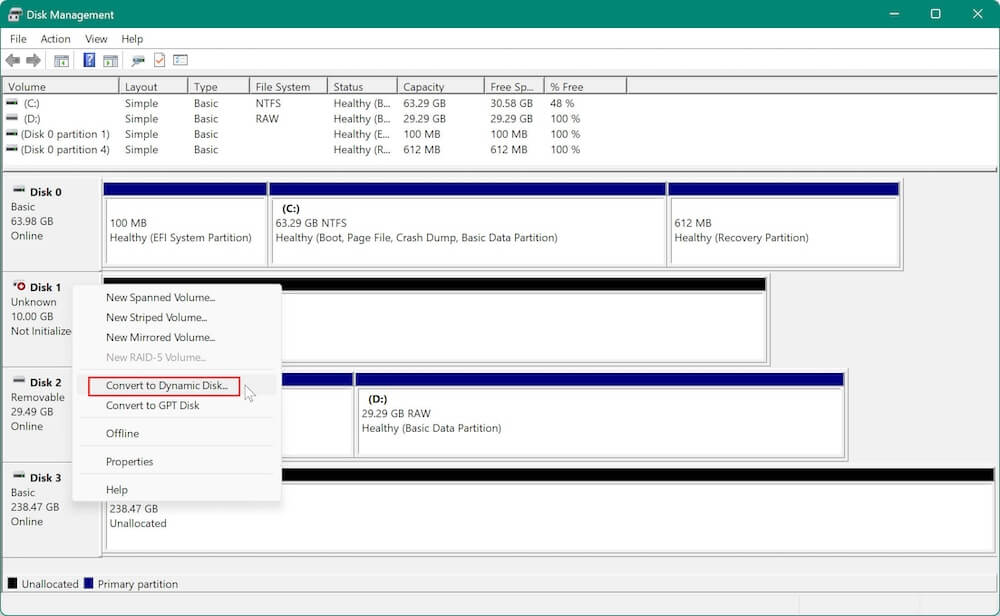
9. Converting Basic Disks to Dynamic and Vice Versa
Windows supports two disk types: Basic and Dynamic. Basic disks are the standard type, suitable for most users, while Dynamic disks allow for advanced storage configurations like spanned, striped, and mirrored volumes. Disk Management provides an option to convert a Basic disk to a Dynamic disk without losing data. However, converting a Dynamic disk back to Basic requires deleting all partitions, so it should only be done when necessary.
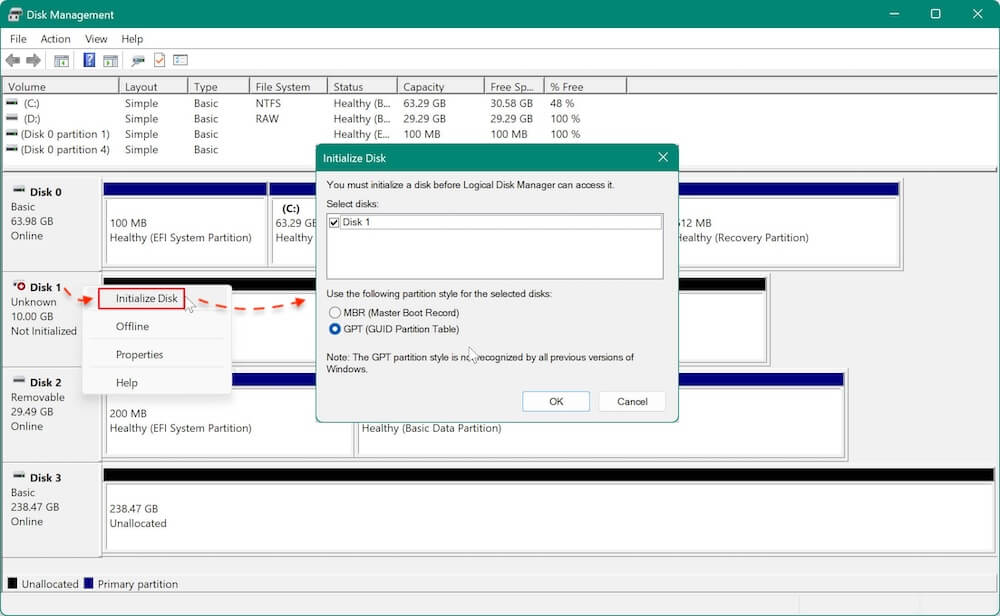
10. Initializing a New Disk
When a new hard drive or SSD is connected to a computer, it may not appear in File Explorer until it is initialized. Disk Management allows users to initialize a new disk by choosing between MBR and GPT partition styles. Once initialized, the disk can be partitioned and formatted for use. If a disk is not detected, users may need to check cable connections, drivers, or disk health.
Basic Issues and Troubleshooting
Below, we explore common Disk Management problems and provide detailed troubleshooting steps to help resolve them.
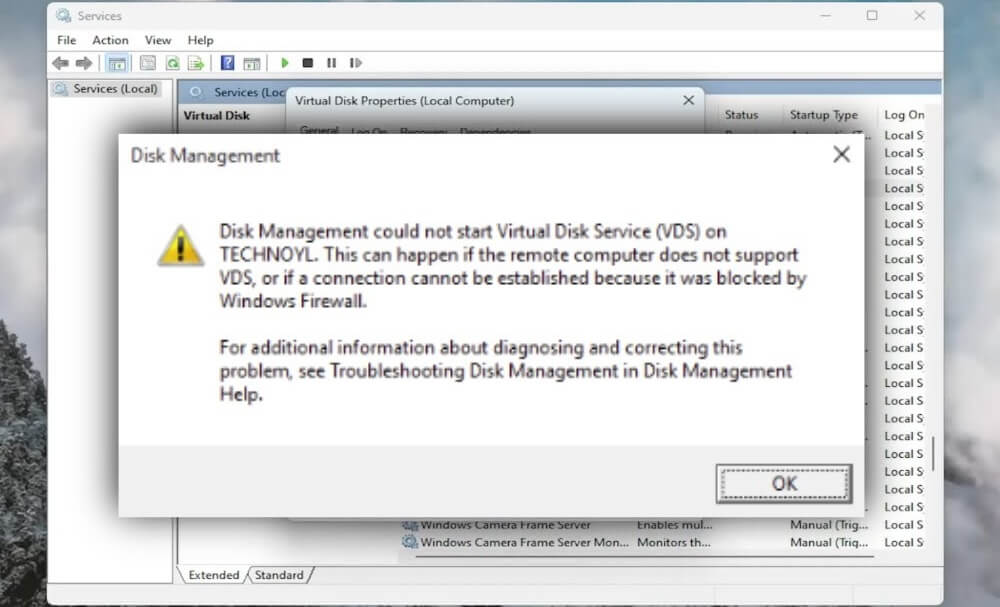
1. Disk Management Not Opening or Not Working
⚠️ Problem:
You try to open Disk Management, but it does not launch, freezes, or closes immediately.
🔎 Possible Causes:
- Corrupted system files.
- Insufficient administrator privileges.
- A Windows system service required by Disk Management is not running.
- Windows updates or software conflicts.
🛠️ Solutions:
Method 1: Restart Your Computer
Method 2: Open Disk Management as Administrator
Method 3: Run System File Checker (SFC) and DISM Scans
Method 4: Ensure Essential Services Are Running
Method 5: Check for Windows Updates
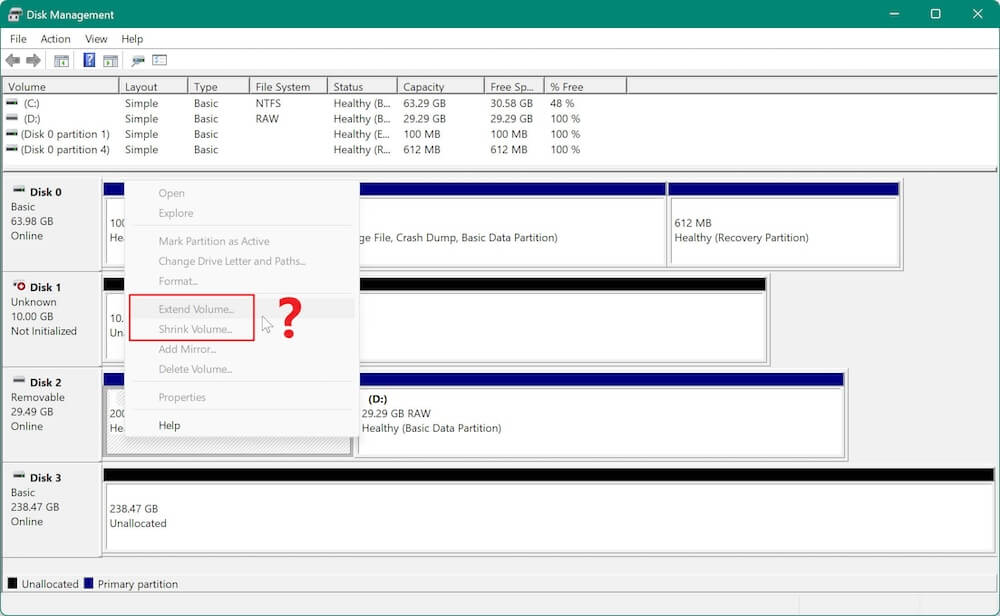
2. Unable to Extend or Shrink a Partition
⚠️ Problem:
- The "Extend Volume" option is grayed out when you try to expand a partition.
- The "Shrink Volume" feature does not allow you to reduce the partition size as expected.
🔎 Possible Causes:
- Extend Volume: Requires unallocated space adjacent to the partition.
- Shrink Volume: System files or unmovable files prevent resizing.
🛠️ Solutions:
Method 1: Ensure There Is Adjacent Unallocated Space
Method 2: Use a Bootable Partition Manager
Method 3: Disable Paging and Hibernation Files
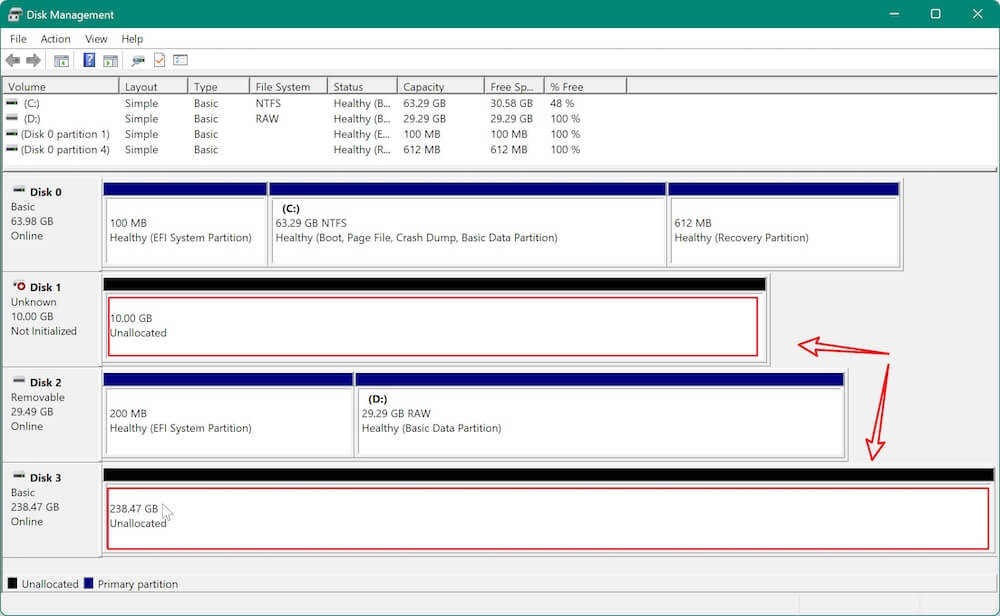
3. Missing or Unallocated Space Issues
⚠️ Problem:
- A connected hard drive or SSD is not showing up in Disk Management.
- Part of the disk appears as Unallocated or has lost its partitions.
🔎 Possible Causes:
- The drive is not initialized.
- The partition is lost or corrupted.
- The drive uses a file system Windows doesn't recognize.
🛠️ Solutions:
Method 1: Rescan Disks
Method 2: Initialize the Drive
Method 3: Assign a Drive Letter
Method 4: Recover Lost Partitions
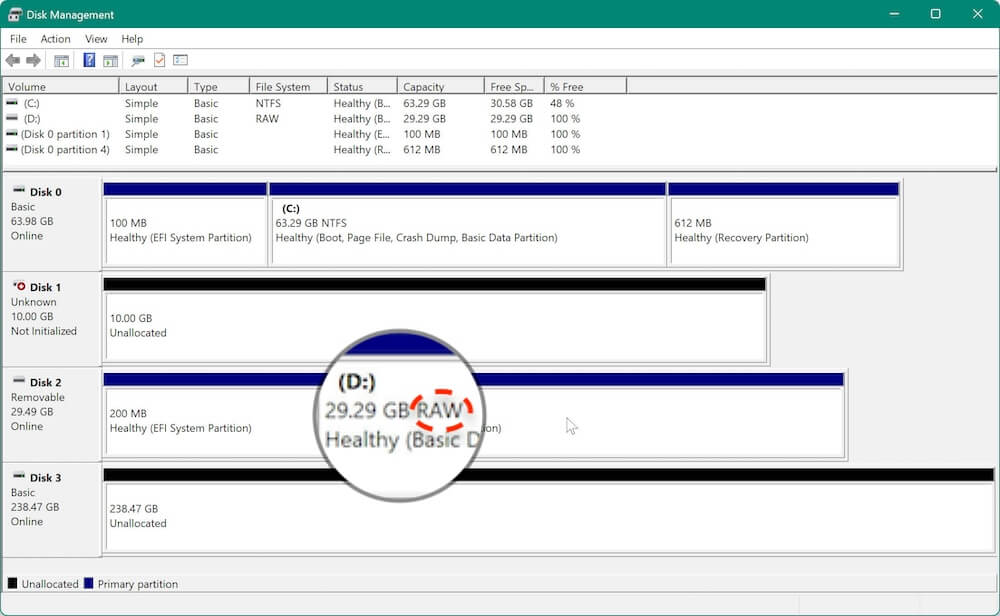
4. Fixing a RAW Partition (Unrecognized File System)
⚠️ Problem:
- A partition appears as RAW instead of NTFS or FAT32.
- The disk is inaccessible, and Windows suggests formatting it.
🔎 Possible Causes:
- The file system is corrupted.
- The disk was improperly removed.
- A virus or malware attack damaged the partition.
🛠️ Solutions:
Method 1: Run CHKDSK
Method 2: Use a Data Recovery Tool
Method 3: Format the Drive
Supplementary Tool for Disk Management
While Disk Management is useful, some tasks may require third-party tools. For example, it's not able to clone hard drive with Disk Management on Windows 11/10. If you need to clone hard drive, you can try the software Donemax Disk Clone – Includes features like OS migration and disk cloning.
Donemax Disk Clone
- Reliable disk copy tool for Windows 11/10/8/7.
- Quickly clone disk or partition as full backup.
- Migrate Windows system from one disk to another one.
Here we can show you how to use the software to clone a disk to another one step by step.
Step 1. Download and install Donemax Disk Clone on your computer. Start the software and then select Disk Clone mode.

Step 2. Select the disk you want to clone as source. Select another disk as destination.
Note:
The disk cloning process will overwrite the destination disk. Ensure to back up the important data first or use an empty disk as destination.

Step 3. Click Next button, and then you can preview the disk layout on the destination disk. if you want, you can also edit and modify the partitions on the destination disk.

Step 4. Click Clone button and the software will start to clone everything from the source disk to the destination disk.

If you use this mode to clone a system disk on Windows, the cloned disk will also be bootable. It's a quick and prefect solution to create a full and bootable backup of Windows system, or migrate the system to another disk or computer.
Conclusion
Disk Management is an essential tool for managing storage on Windows 11 and 10. Whether you need to create, resize, or troubleshoot partitions, this built-in utility provides all the necessary functions.
By complying the procedure outlined in this article, you can efficiently manage your storage drives, optimize disk space, and resolve common disk-related issues. If you need additional features, third-party partition tools can further enhance disk management capabilities.
Donemax Disk Clone
Donemax Disk Clone An award-winning disk cloning program to help Windows users and Mac users clone HDD/SSD/external device. It also can create full bootable clone backup for Windows PCs and Macs.
Related Articles
- Jul 25, 2024Mac Launchpad: App Manager for Mac
- Dec 12, 2024How to Use Dock on Mac and Fix Common Dock Issues?
- Dec 06, 2024Learn Everything About Recycle Bin on Windows Computer
- Oct 28, 2024What Is Winmail.dat & How to Open It on Mac?
- Nov 23, 2024macOS Library Folder: Everything You Need to Know
- Nov 11, 2024Xcode for Mac Overview: What Is Xcode on Mac and Do You Need It?

Contributing Writer
Christina
Christina is the senior editor of Donemax software who has worked in the company for 4+ years. She mainly writes the guides and solutions about data erasure, data transferring, data recovery and disk cloning to help users get the most out of their Windows and Mac. She likes to travel, enjoy country music and play games in her spare time.

Editor in chief
Gerhard Chou
In order to effectively solve the problems for our customers, every article and troubleshooting solution published on our website has been strictly tested and practiced. Our editors love researching and using computers and testing software, and are willing to help computer users with their problems
Hot Donemax Products
Clone hard drive with advanced clone technology or create bootable clone for Windows/Mac OS.

Completely and easily recover deleted, formatted, hidden or lost files from hard drive and external storage device.
Certified data erasure software - permanently erase data before selling or donating your disk or any digital device.