PAGE CONTENT:
USB flash drives are great for saving and sending data, but they can become unreadable for several reasons, such as a damaged file system, a missing driver, or physical damage. If this happens to you on a Mac, don't worry - there are a few things you can try to fix on your USB flash drive that won't read. This detailed guide will help you regain your important data by taking you step by step through the troubleshooting process and covering basic and advanced methods.
This guide shows you how to fix unreadable USB flash drive on Mac step-by-step, from basic tools like Disk Utility and Terminal commands with macOS to more complicated options like data recovery software and professional services. These methods will help you return to your files if you have minor or major damage.
Why is my USB not readable on Mac?
There are several signs that your drive might be broken, and you'll need to recover information that can't be read from a USB drive on your Mac. Here are some common signs that a USB drive can't be read.
- The OS doesn't see the USB drive and doesn't appear in Finder either.
- You can see the drive in Finder but can't access its files and folders.
- The names of files are changed randomly and can't be read.
- Disk Utility shows that the drive is greyed out.
- When you try to open the drive, macOS gives you error messages.
If any of these things happen, your USB drive may be broken. We'll look at how to get back USB files from a Mac drive that has become corrupt and show you some possible solutions.
Fix unreadable USB flash drive on Mac
Solution 1: Use Disk Utility to fix unreadable USB on a Mac
There is an app called Disk Utility that comes with macOS. It should be in the Other folder in Launchpad by default. These steps will show you how to use Disk Utility to fix a broken USB flash drive on a Mac.
Step 1: Open Disk Utility.
Step 2: Select View > Show All Devices.
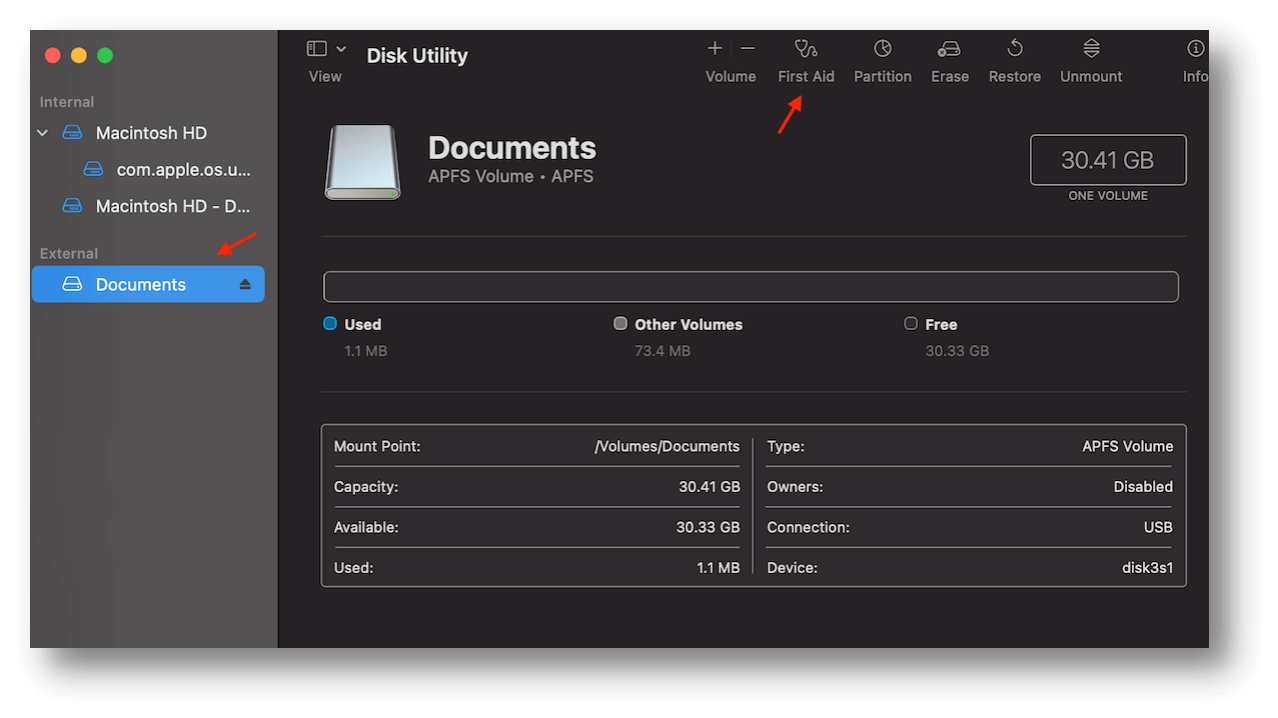
Step 3: Choose the USB from the list on the side, then press the "First Aid" button.
Step 4: Click Run in the First Aid dialog box and follow the on-screen directions.
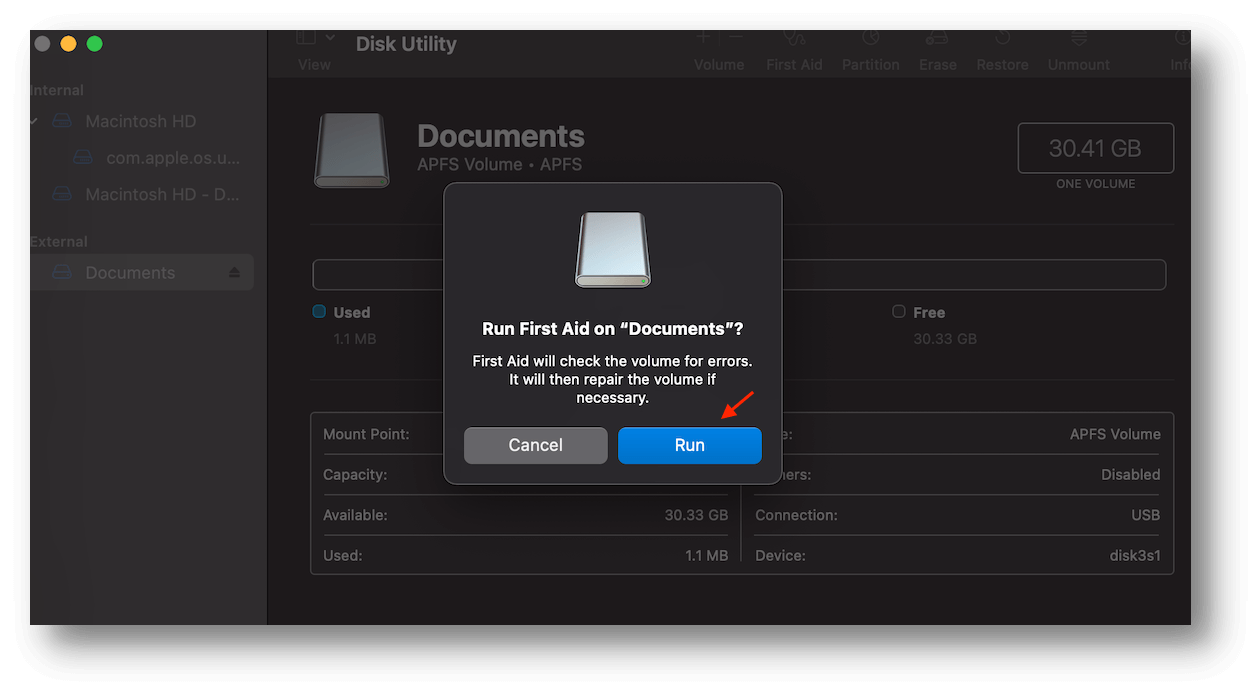
Step 5: When the First Aid process is done, click "Done."
Solution 2: Fix the USB drive on a Mac with Terminal
You can also fix a broken USB drive with Terminal. You have more power over the whole process when you do this instead of using Disk Utility. The first option is better if you don't know how to use Terminal tools.
These steps will show you how to use Terminal to fix a broken USB drive on a Mac.
- Link the flash drive to your Mac.
- Launchpad has a search field at the top that you can use to find the Terminal app. Once you've found it, click the app to open it.
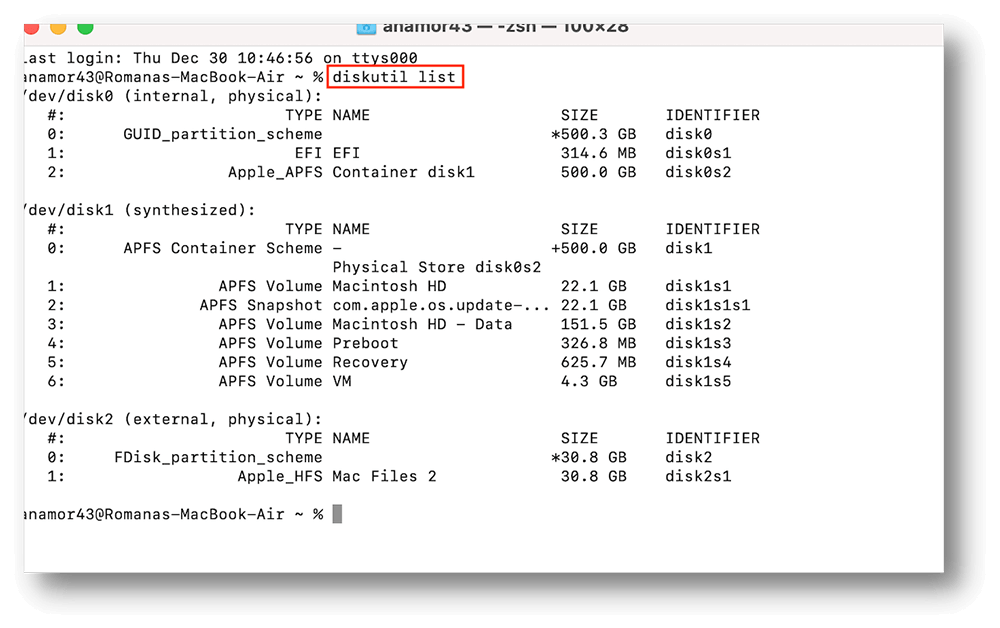
- Type diskutil list into the window and press Return. You'll see a list of all the portable and hard drives tied to your Mac.
![Type diskutil list]()
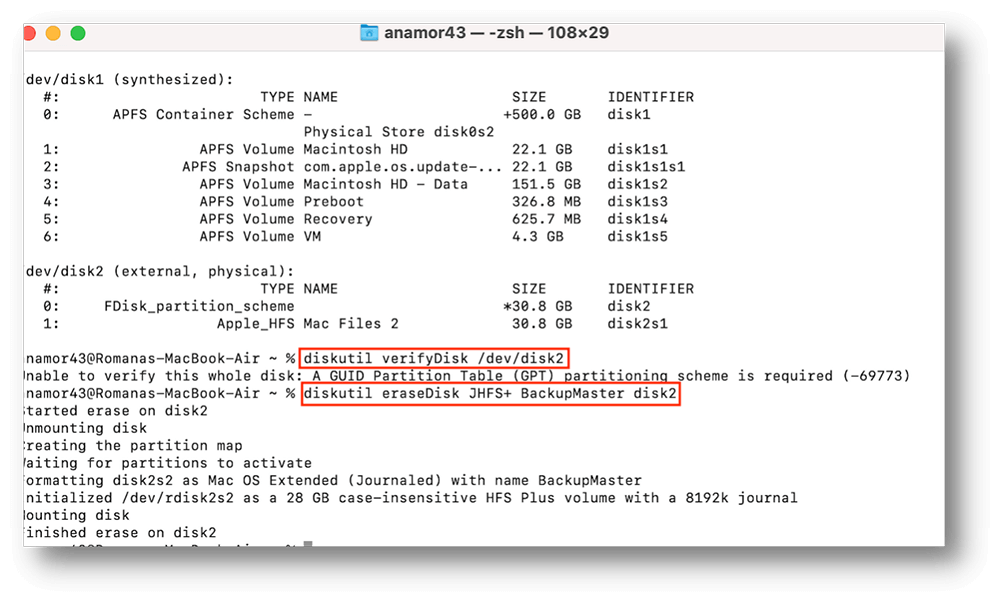
- To check your flash drive, copy and paste diskutil verifyDisk/dev/disk2 (change 2 to the number of the disk you want to check). Then press "Return."
- Once you see the message "GPT partitioning scheme is required," type "diskutil eraseDisk JHFS+ BackupMaster disk2" and press "Return" to format the drive. Then, give the same word again.
![format the drive]()
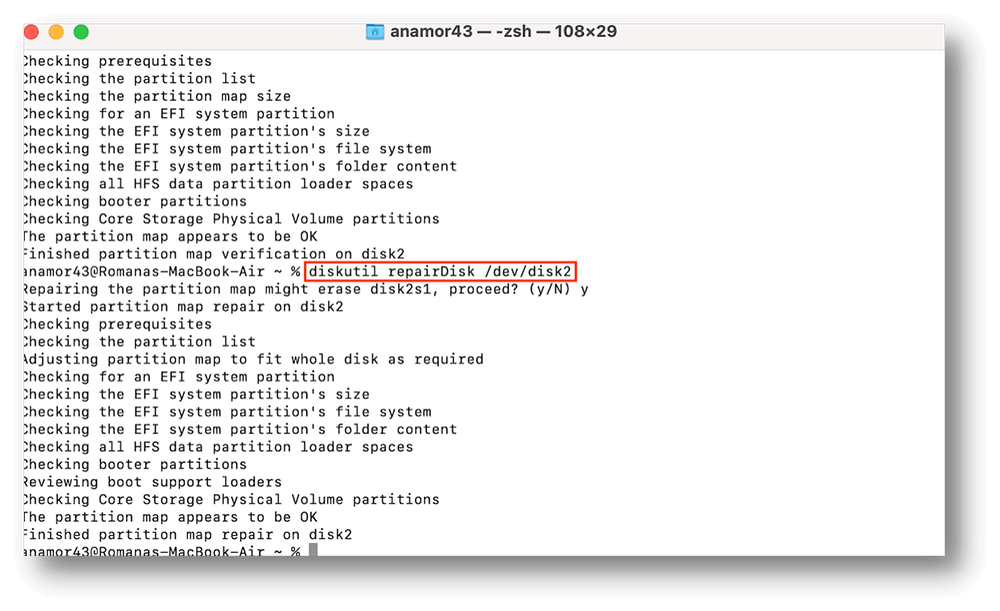
- Replace /dev/disk2 with the path to the disk you want to fix, then press Return to begin the repair.
- You will be told that this could erase your USB drive. To go forward, type "y" and press "Return."
![erase your USB drive]()
- Once "Finished partition map repair on disk2," you can close the terminal and remove the flash drive.
Solution 3: Update the driver for the USB
The USB device driver is always up to date through macOS software changes. Follow these steps to check for changes in your Mac. If there are, install them by hand.
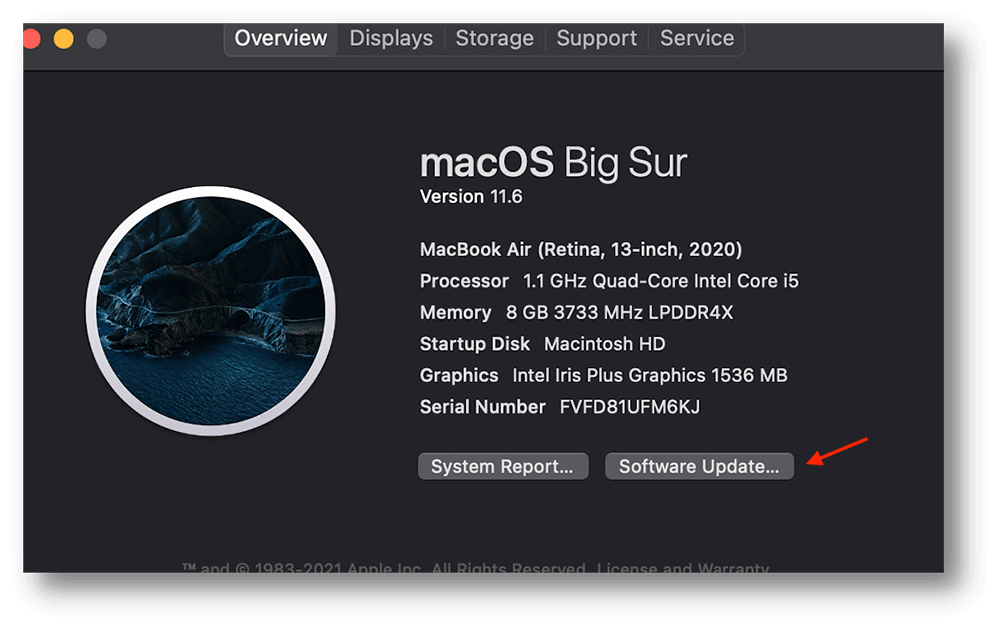
- From the Apple menu, pick About This Mac.
- To see if there are any changes, click on Software Update.
![Update the driver for the USB]()
- If there are changes, click the "Update Now" button. Then, click on "More info" to learn more about the change.
Solution 4: Reset NVRAM/PRAM
Resetting the NVRAM or PRAM can sometimes fix problems with hardware detection.
- Turn off your Mac.
- Start it up: Immediately hold down Option + Command + P + R.
- Tend to it for 20 seconds: After about 20 seconds, let go of the keys and try to connect the USB drive again.
Solution 5: Reset SMC
The (SMC) can change how the USB port works. It might help to reset it.
- Turn off your Mac.
- If you have one, unplug the power adapter.
- For 10 seconds, hold down the Power button, Shift, Control, and Option.
- Let go of all the keys and plug the power adapter back in.
Recover files from unreadable USB flash drive on Mac
If your USB flash drive gets damaged, you can still retrieve papers, photos, music, videos, and emails with Donemax Data Recovery for Mac, which is free USB data recovery software. It can also retrieve data from formatted, unreadable, or unmountable USB flash drives.
Yes, this program can retrieve lost data from hard drives, portable hard drives, SSDs, SD cards, memory cards, pen drives, and more, even if they are mechanical hard drives that "spin."
Donemax Data Recovery for Mac
- Recover permanently deleted files or formatted data.
- Recover lost data from USB drive, pen drive, flash drive, HDD/SSD, SD card, digital camera, etc.
- Recover files from unreadable USB flash drive on Mac.
Step 1. Download and install Donemax Data Recovery for Mac. Make sure the USB flash drive has been connected to your Mac. Open Donemax Data Recovery for Mac, then find and select the USB flash drive to start data recovery.

Step 2. Click on Scan button. Then Donemax Data Recovery for Mac will deeply scan the unreadable USB flash drive and find all recoverable files including existing files, inaccessible files, deleted/formatted/lost files, etc.

Step 3. After deep scan, you can preview the recoverable files. Then select the wanted files, click on Recover button to save them to your Mac.

Conclusion:
Having a USB flash drive that won't read on a Mac can be unpleasant, but if you know what to do, you can fix the drive and get your data back. You can improve your chances of fixing the problem by following the steps in this guide, which cover everything from basic troubleshooting to more complicated methods and data recovery options.
Don't forget to take precautions to keep your info safe in the future. If nothing else works, professional recovery services can be your last chance to regain your important data.
Related Articles
- Aug 07, 2024Fix Time Machine Won't Start Backup
- Dec 26, 2024How to Format an NTFS Drive to APFS, HFS+, ExFAT, or FAT32 on Mac?
- Sep 21, 2024Disk Utility Cannot Repair A Disk, Fix It Now
- Oct 14, 2024Fix Error Code 100006 on Mac: A Complete Guide to Solving the Issue
- Nov 21, 2024Create Bootable USB Installer for macOS Sierra
- Jan 05, 2025How to Disable iPhone Mirroring on Mac?

Steven
Steven has been a senior writer & editor of Donemax software since 2020. He's a super nerd and can't imagine the life without a computer. Over 6 years of experience of writing technical solutions and software tesing, he is passionate about providing solutions and tips for Windows and Mac users.

Gerhard Chou
In order to effectively solve the problems for our customers, every article and troubleshooting solution published on our website has been strictly tested and practiced. Our editors love researching and using computers and testing software, and are willing to help computer users with their problems
