PAGE CONTENT:
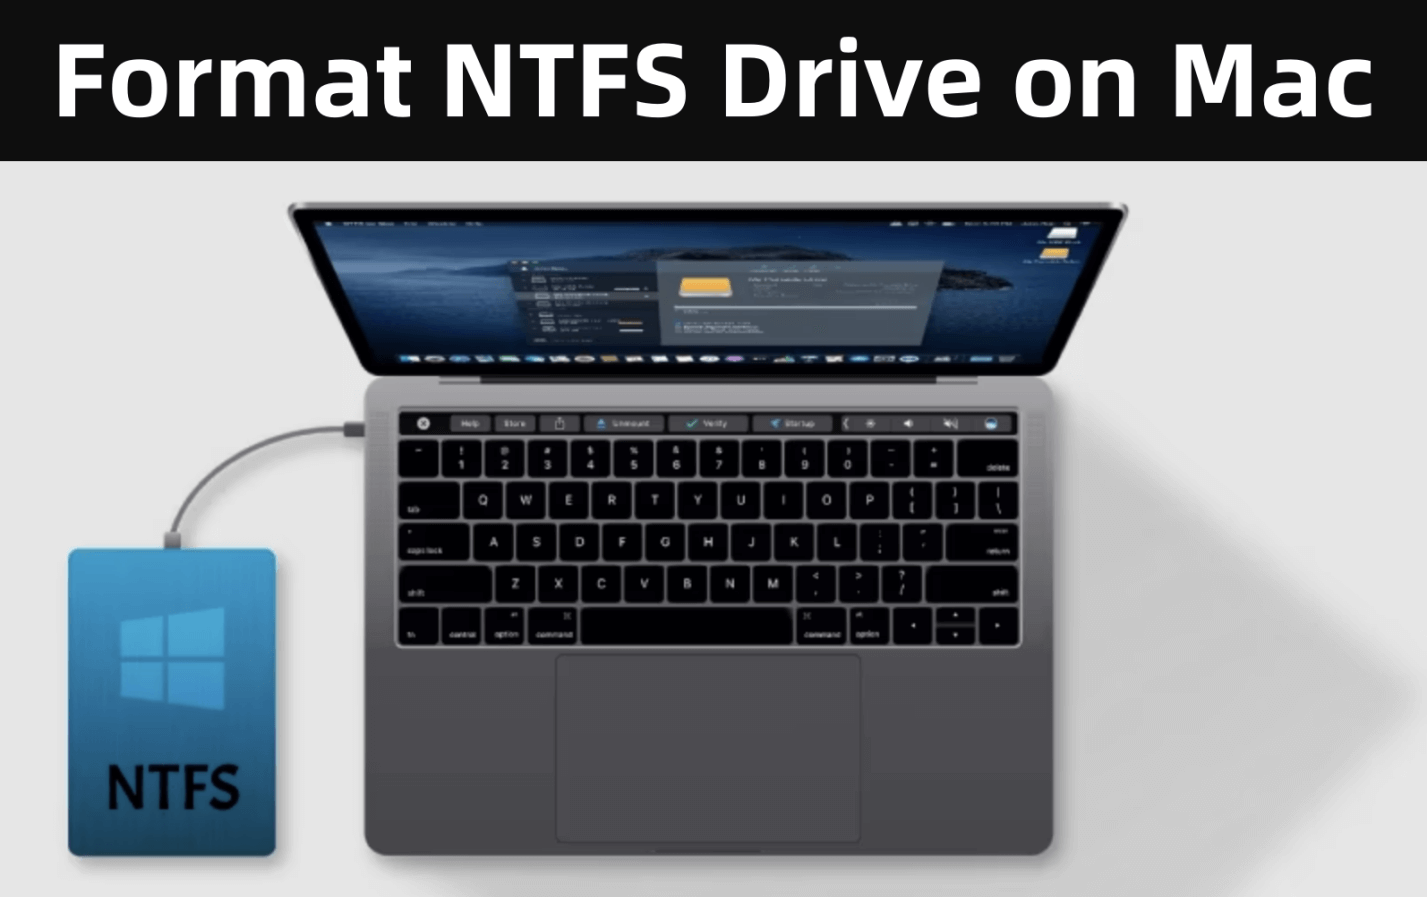
Modern computing often involves transferring and managing data across different devices and operating systems. However, compatibility issues can arise due to the use of different file systems. One common challenge faced by Mac users is working with drives formatted in the NTFS file system, which is primarily used by Windows. On macOS, NTFS drives are often read-only by default, which can be frustrating for users needing full access to their data.
This article will guide you through formatting an NTFS drive to alternative file systems such as APFS, HFS+, ExFAT, or FAT32 on a Mac. It also provides insights into choosing the right file system based on your needs and explains the step-by-step process to ensure smooth operation.
Learn About Common File Systems on Mac
● NTFS: The Default for Windows
NTFS (New Technology File System) was developed by Microsoft and has been the default for Windows systems for years. It offers excellent performance, supports large file sizes, and includes advanced features such as file permissions and encryption. However, macOS has limited native support for NTFS, allowing only read access without third-party tools. This limitation often necessitates reformatting for compatibility with macOS.
● APFS: Optimized for macOS
Apple File System (APFS) is Apple's modern file system, introduced in macOS High Sierra. It is designed for solid-state drives (SSDs) and offers advanced features such as snapshot capability, fast data transfer speeds, and robust encryption. APFS is ideal for macOS-exclusive environments but isn't compatible with older macOS versions or other operating systems.
●HFS+: The Predecessor to APFS
Mac OS Extended, also known as HFS+ (Hierarchical File System Plus), was the primary file system for macOS before APFS. While it lacks some of APFS's advanced features, HFS+ is still useful for compatibility with older Macs and mechanical hard drives.
●ExFAT: The Cross-Platform Solution
ExFAT is a file system designed for compatibility across macOS, Windows, and Linux. It supports large files and partitions, making it an excellent choice for users transferring data between different operating systems.
●FAT32: The Universal Format
FAT32 is one of the most widely supported file systems, compatible with almost all devices, including older computers, cameras, and game consoles. However, its limitations include a maximum file size of 4GB and a maximum partition size of 8TB, which may restrict its usefulness for modern applications.
Before formatting an NTFS drive to APFS/HFS+/ExFAT/FAT32
● Backup Your Data
Before formatting, it's crucial to back up any important data on the NTFS drive, as formatting erases all existing content. You can use macOS tools like Time Machine or third-party backup solutions. Alternatively, transfer the data to an external drive or cloud storage service like iCloud or Google Drive.
● Check Drive Compatibility
Ensure your Mac can detect and interact with the NTFS drive. Open Disk Utility (found via Spotlight or in the Applications > Utilities folder) to confirm the drive's presence. If the drive doesn't appear, check the physical connections or use third-party software to detect and mount the drive.
Methods to Format an NTFS Drive to APFS/HFS+/ExFAT/FAT32 on macOS
Method 1. Using Disk Utility
Step 1: Open Disk Utility: Launch Disk Utility by searching for it in Spotlight or navigating to Applications > Utilities > Disk Utility.
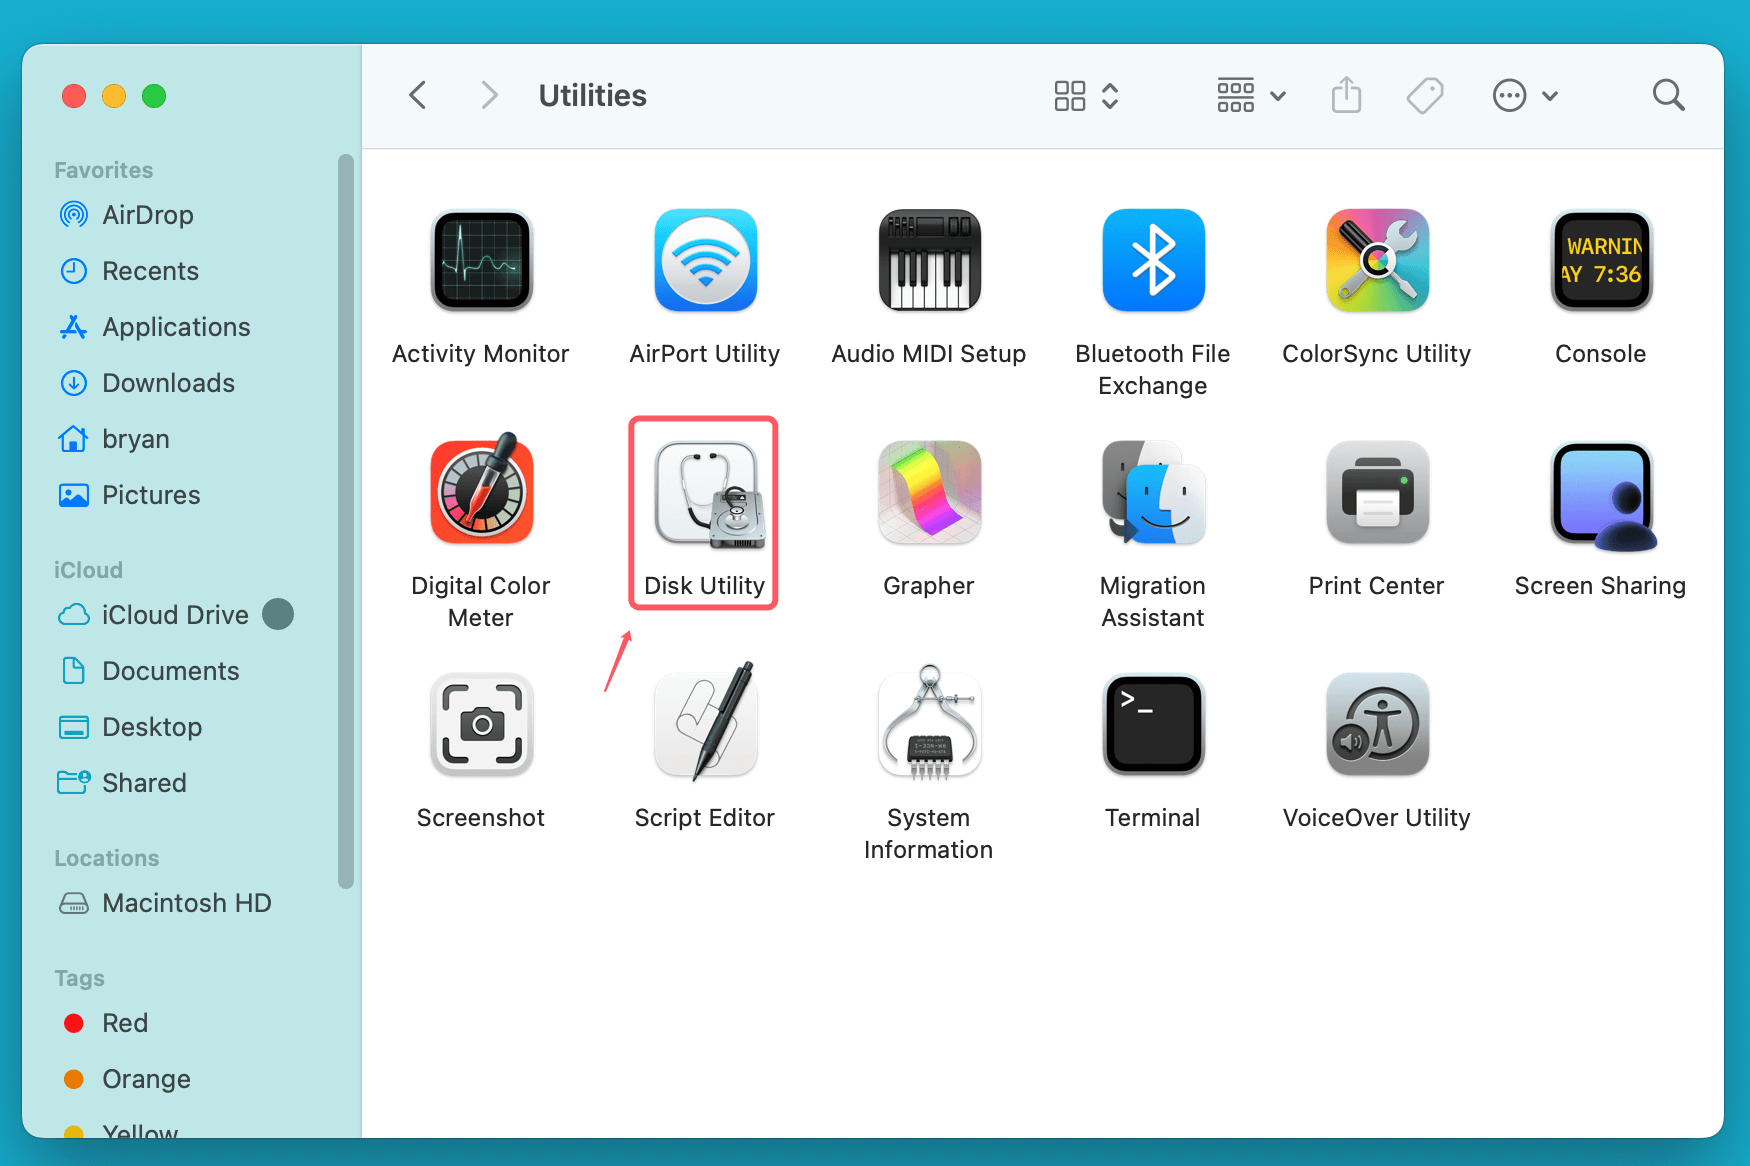
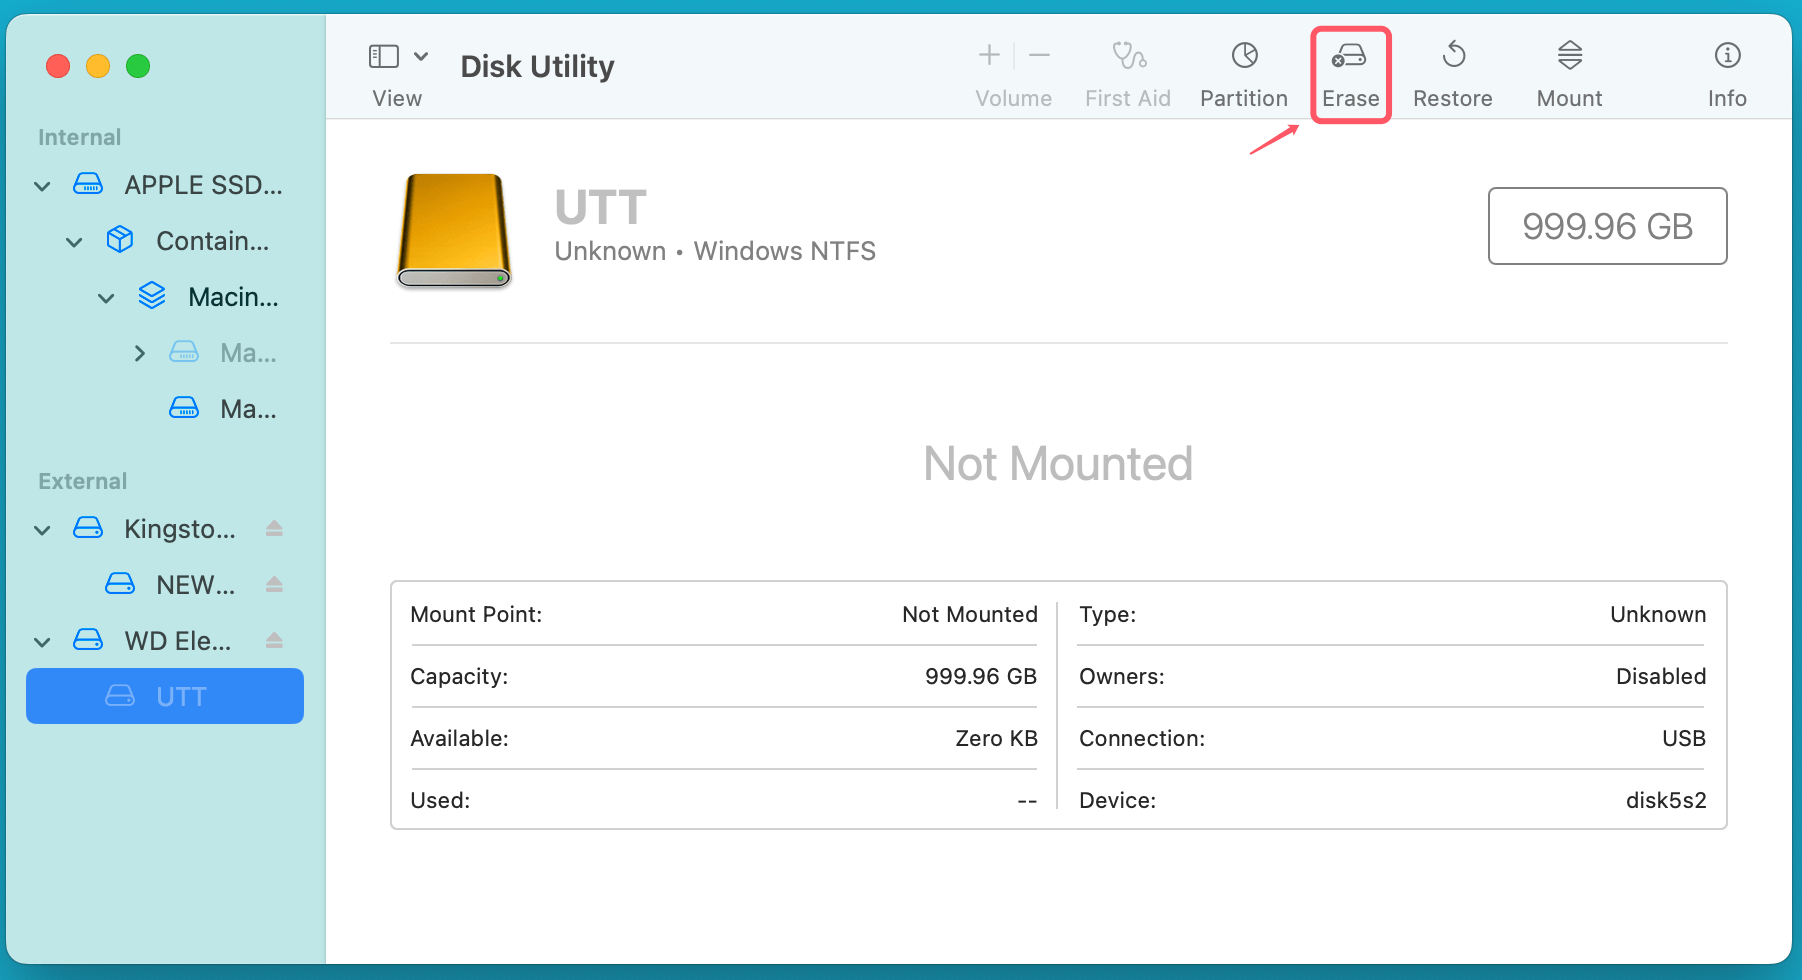
Step 2: Locate the NTFS Drive: In the left sidebar of Disk Utility, locate your NTFS drive. Make sure you identify the correct drive to avoid accidentally formatting the wrong one.
Step 3: Erase the Drive
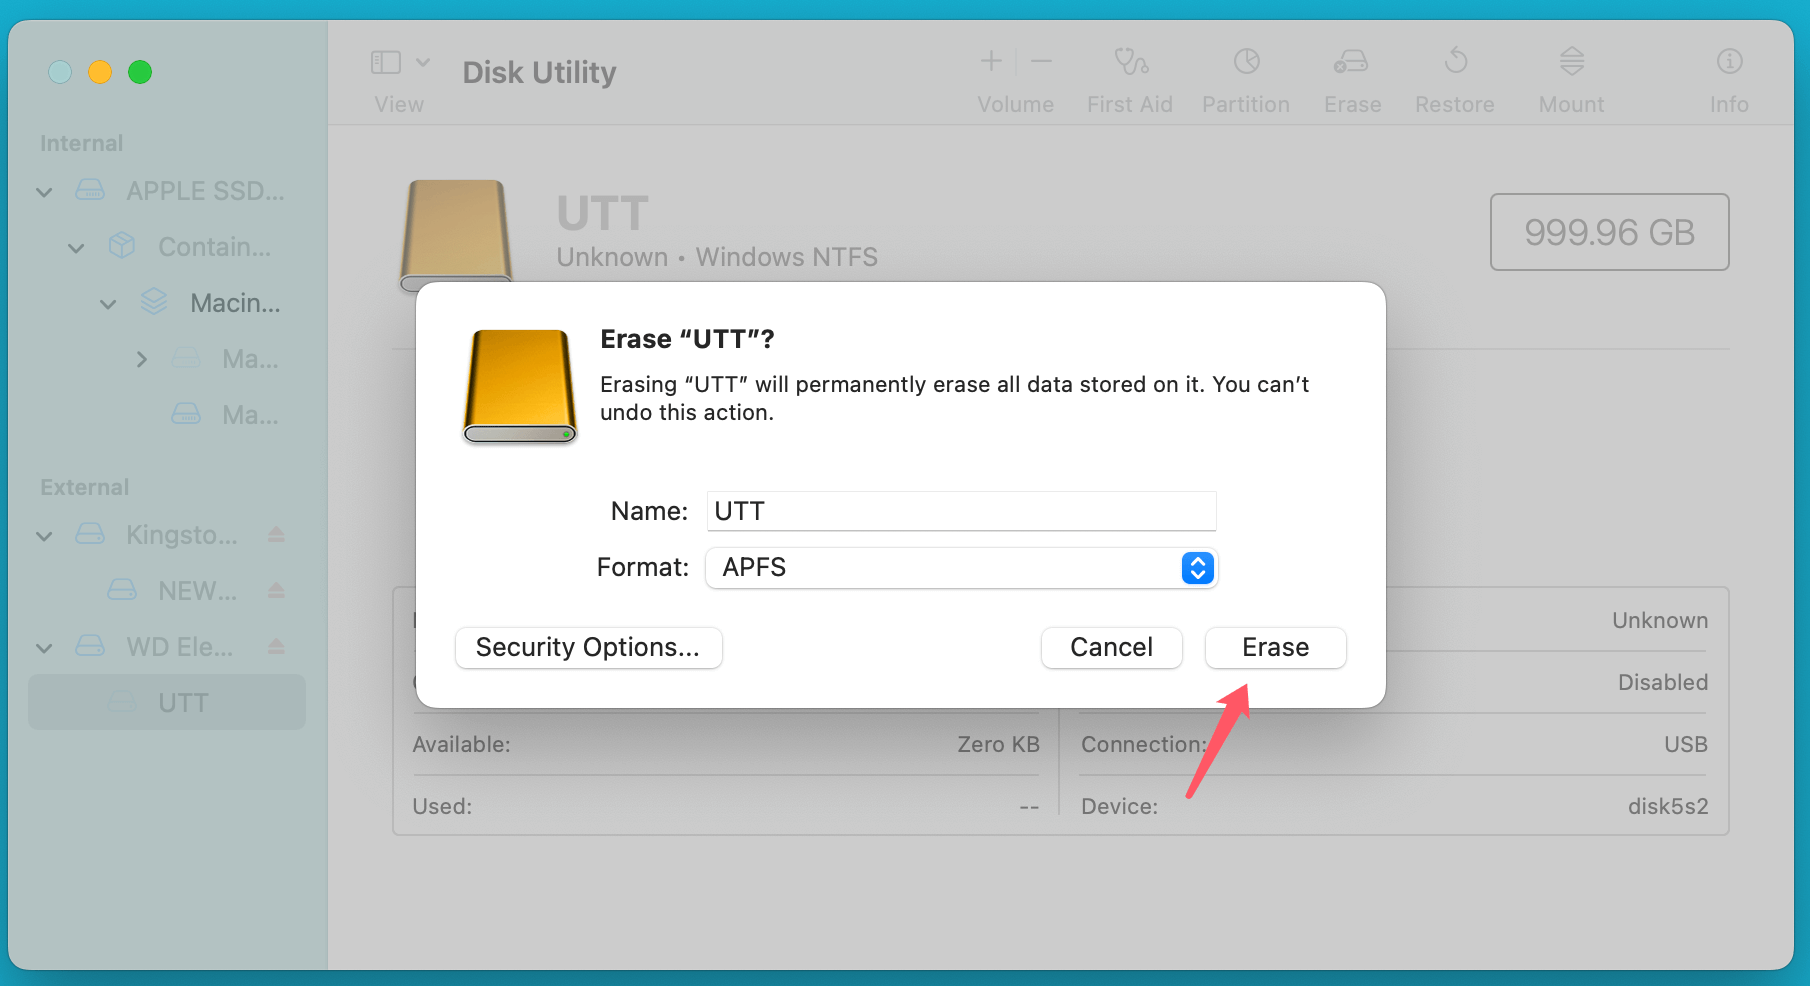
Select the drive and click the Erase button at the top of the window. A new dialog box will appear, prompting you to choose a file system, name the drive, and select a partition scheme (GUID Partition Map is recommended for most uses).
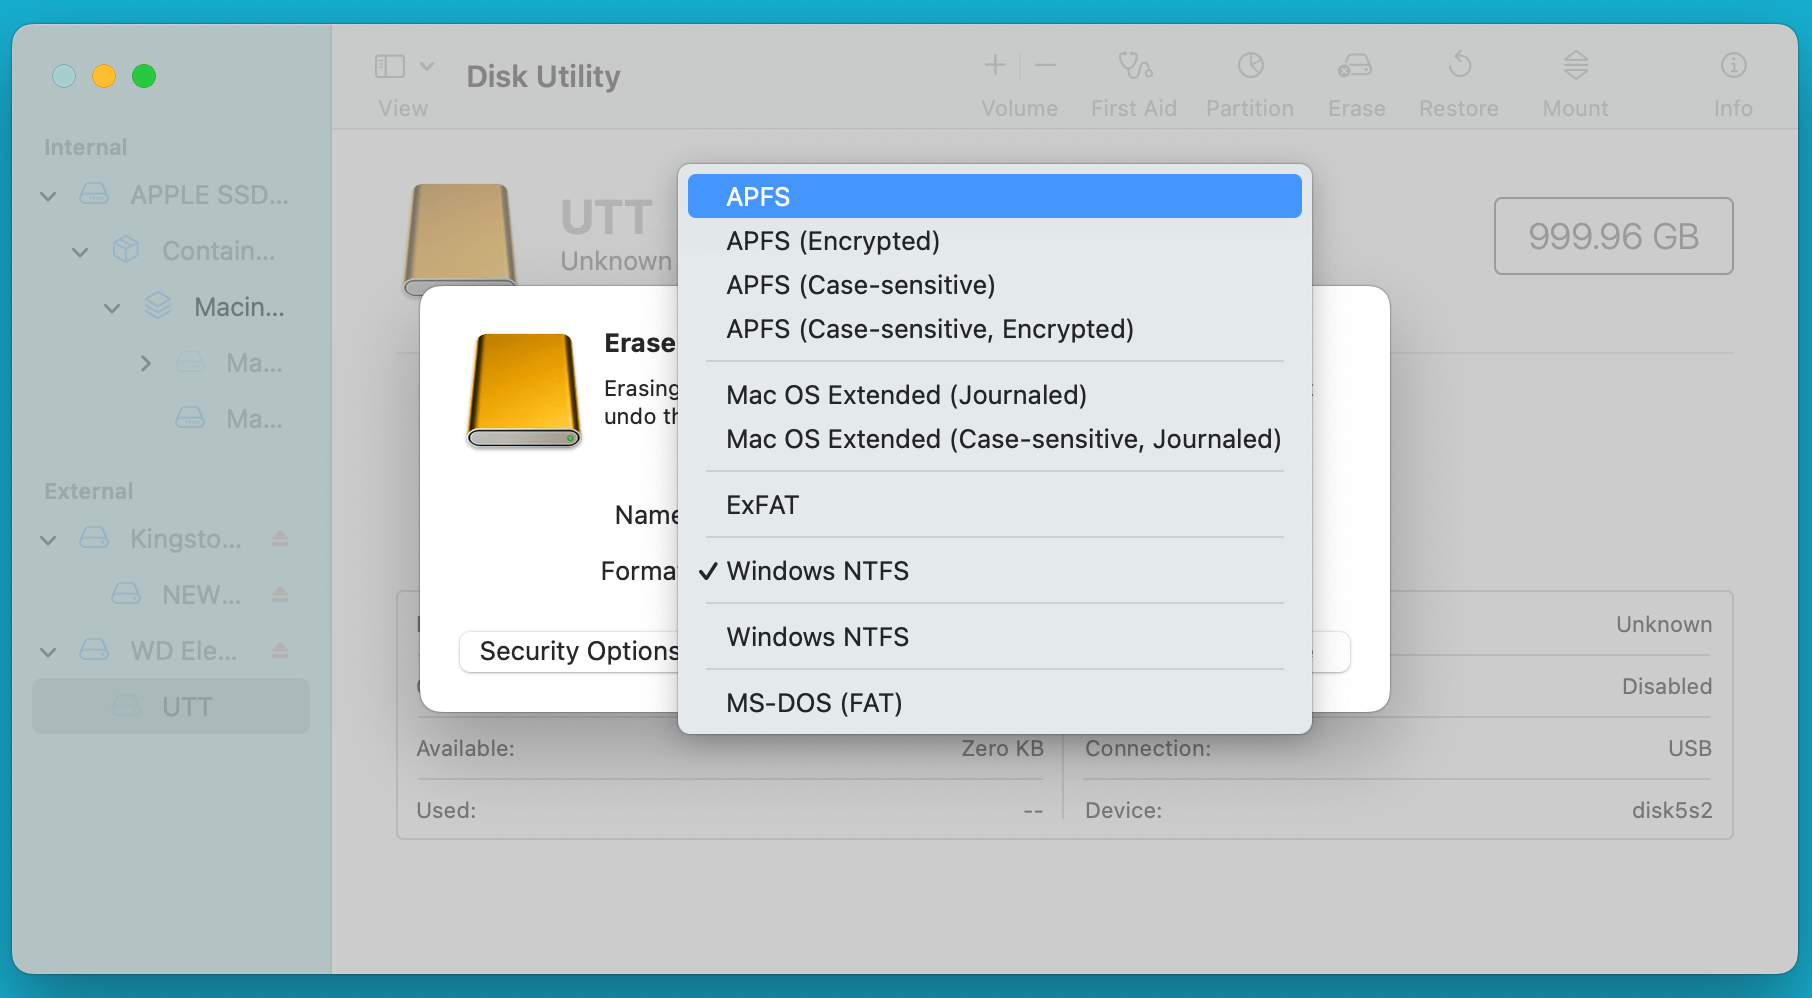
Step 4: Choose the File System
From the Format dropdown menu, select the desired file system:
- APFS for macOS-only use.
- Mac OS Extended (HFS+) for older Macs or mechanical drives.
- ExFAT for cross-platform compatibility.
- FAT32 for universal device support with size limitations.
Step 5: Confirm and Format
Click Erase to start the formatting process. Disk Utility will reformat the drive, which may take a few seconds to a few minutes.
Step 6: Verify the Drive
After the process completes, check the drive's new file system under the drive's details in Disk Utility or Finder.
Method 2. Formatting via Terminal (Advanced Users)
For users comfortable with command-line tools, macOS's Terminal offers an alternative way to format drives.
Step 1: Identify the Drive
Open Terminal and type: diskutil list
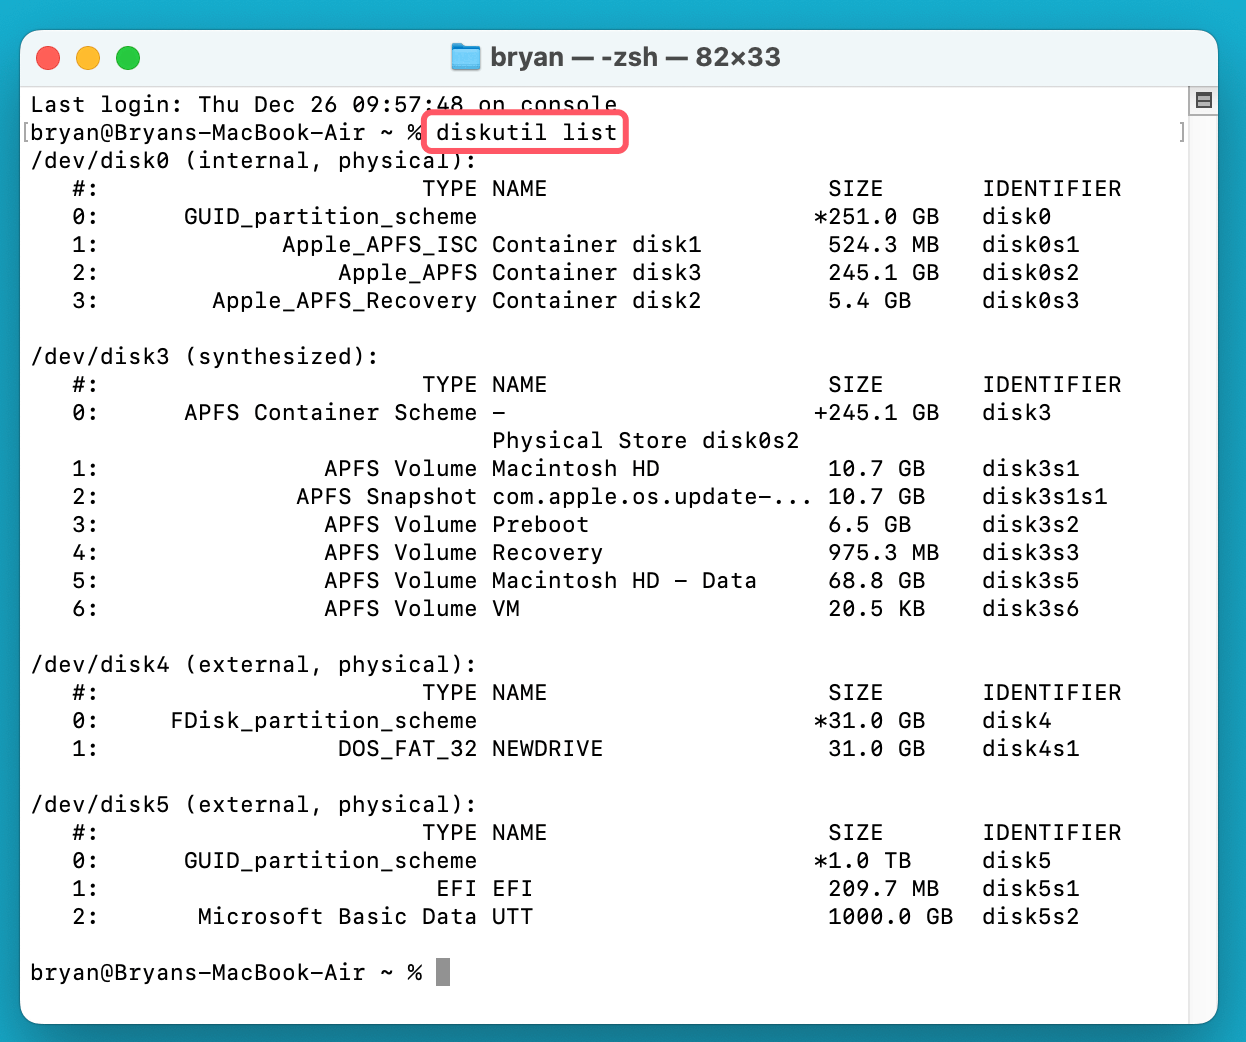
This command lists all connected drives. Note the identifier of the NTFS drive (e.g., disk5).
Step 2: Erase and Format the Drive
Use the following command to format the drive:
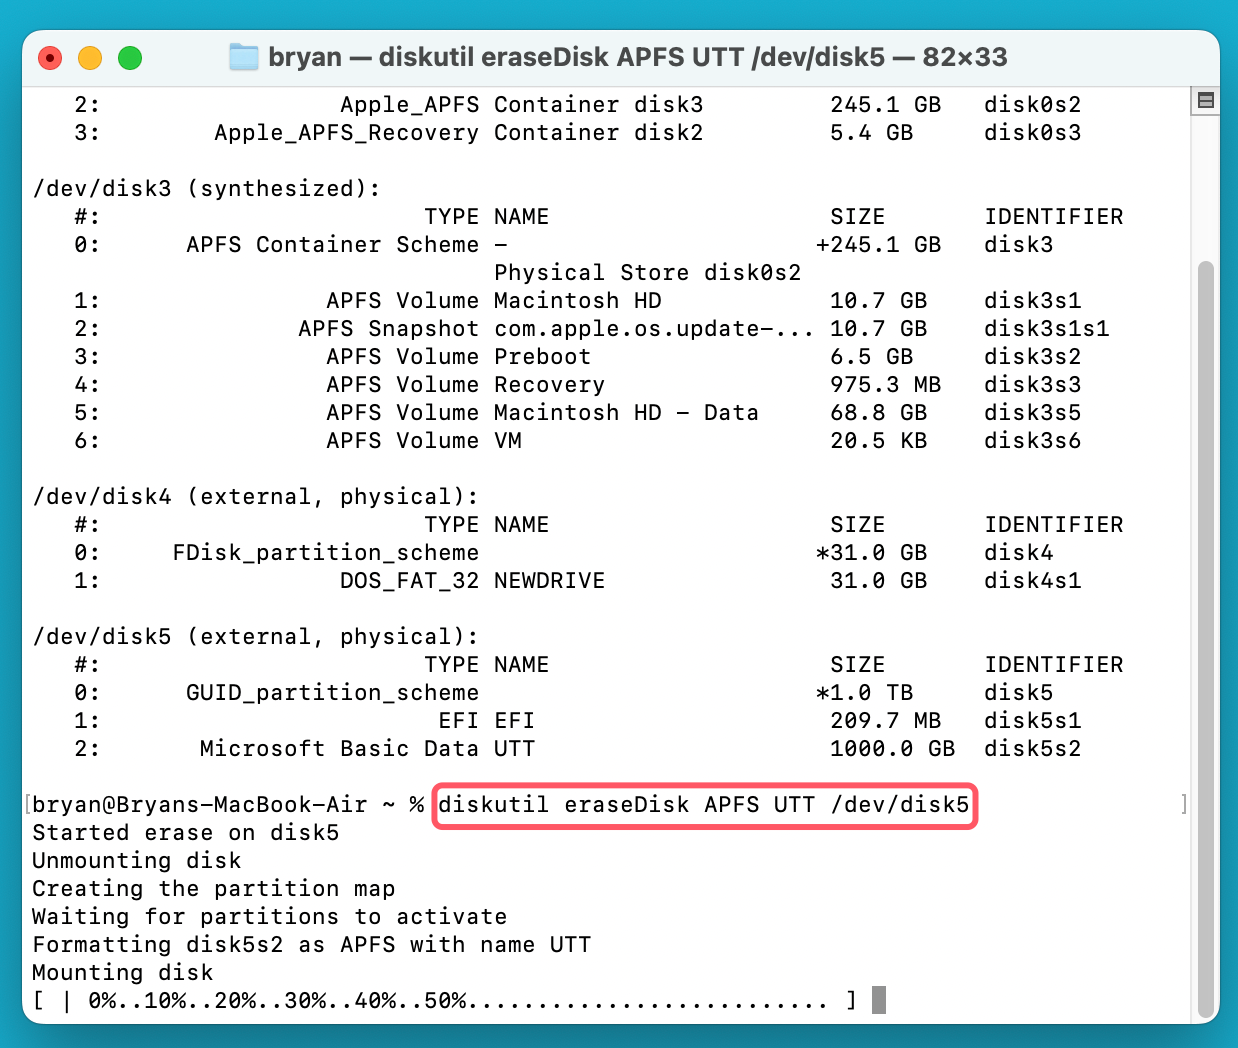
diskutil eraseDisk FILE_SYSTEM DRIVE_NAME /dev/diskX
- Replace FILE_SYSTEM with the desired format (e.g., APFS, ExFAT, or MS-DOS for FAT32).
- Replace DRIVE_NAME with your preferred drive name.
- Replace /dev/diskX with the identifier of your drive.
For example, format a NTFS drive to APFS, named UTT. Type diskutil eraseDisk APFS UTT /dev/disk5, then press Enter.
Step 3: Verify the Formatting
Once complete, use the diskutil list command again to confirm the file system has been updated.
Method 3. Using Third-Party Tools
If Disk Utility fails or you encounter issues, third-party tools like Donemax NTFS for Mac, Donemax Data Eraser for Mac or Donemax Data Recovery for Mac can help manage and format NTFS drives. These tools provide additional features such as enabling NTFS write support on macOS.
For example, you can use Donemax NTFS for Mac to format any NTFS drive to APFS, HFS+, ExFAT or FAT32:
Step 1. Download and install Donemax NTFS for Mac, then open it from Launchpad.
Step 2. Open Donemax NTFS for Mac, select the NTFS drive, click on Format button. Then select ExFAT, FAT32, APFS or Mac OS Extended as the file system, click on Continue button to format it.

Choose the Right File System for Your Drive
Selecting the right file system is critical when formatting your drive, as it determines compatibility, performance, and the overall user experience. Here's a deeper dive into each option, including their strengths, weaknesses, and ideal use cases:
APFS (Apple File System):
APFS is Apple's cutting-edge file system, designed to take full advantage of the capabilities of modern macOS devices. Its advanced features include:
- High Performance: APFS is optimized for SSDs, ensuring fast file transfers and low latency. It also works with mechanical drives but may not offer the same speed benefits.
- Snapshots: This feature allows you to create point-in-time copies of your data, which is useful for backups and version control.
- Space Sharing: Volumes formatted with APFS can share free space dynamically, eliminating the need for fixed partitions.
- Encryption: APFS includes built-in encryption, providing a robust layer of security for sensitive data.
Best Use Case: Choose APFS if your drive is intended exclusively for use with macOS systems running High Sierra or later. It's particularly suitable for SSDs or external drives used with Time Machine.
Limitations: APFS is not compatible with older versions of macOS or non-Apple operating systems, making it unsuitable for cross-platform scenarios.
HFS+ (Mac OS Extended):
Although largely replaced by APFS, HFS+ still has a role, especially for legacy systems.
- Compatibility with Older macOS Versions: If you're using a Mac running macOS Sierra or earlier, HFS+ remains the go-to file system.
- Reliable for Mechanical Drives: It handles traditional hard drives well, making it a good option for users with older hardware.
Best Use Case: Use HFS+ for older Macs or if you need a file system that works seamlessly with Time Machine on macOS versions before High Sierra.
Limitations: It lacks the advanced features of APFS, such as snapshots and dynamic space sharing.
ExFAT (Extended File Allocation Table):
ExFAT is often regarded as the "gold standard" for cross-platform compatibility. It bridges the gap between macOS, Windows, and Linux systems without the size limitations of FAT32.
- Support for Large Files: ExFAT can handle files larger than 4GB and partitions up to 128PB, making it ideal for video editing and large media files.
- Device Compatibility: It's recognized by most modern operating systems and devices, including cameras and gaming consoles.
Best Use Case: Use ExFAT if you frequently transfer large files between macOS and Windows systems or need to use your drive with multiple devices.
Limitations: ExFAT lacks journaling, which means it's more prone to data corruption in the event of an abrupt disconnection or power loss. It also doesn’t support advanced features like encryption or snapshots.
FAT32 (File Allocation Table 32):
FAT32 is one of the most universally supported file systems, making it a staple for older devices and simpler use cases.
- Wide Compatibility: FAT32 is compatible with virtually every operating system, including macOS, Windows, Linux, and even legacy systems.
- Ideal for Small Files: It works well for flash drives, memory cards, and small-capacity external drives.
Best Use Case: Choose FAT32 for drives used with older computers, cameras, or gaming consoles, especially when file sizes are relatively small.
Limitations: FAT32’s maximum file size of 4GB and partition size of 8TB can be a significant drawback for modern users. Its lack of journaling also makes it more prone to corruption.
How to Choose Based on Your Needs
- Mac-Only Use: APFS is the best choice for modern macOS systems, while HFS+ suits older Macs.
- Cross-Platform Compatibility: ExFAT is the clear winner for users who need to work seamlessly between macOS, Windows, and Linux.
- Legacy Devices: FAT32 is a safe bet for maximum compatibility but is not recommended for large files or modern workflows.
By carefully evaluating your needs and understanding the limitations and advantages of each file system, you can ensure the best performance and usability for your drive.
Common Issues and Troubleshooting
Drive Not Detected in Disk Utility:
- Check the physical connection and ensure the drive is powered if it's an external HDD.
- Restart your Mac and reconnect the drive.
- Use third-party tools to check the drive's health and mount it manually.
Formatting Errors:
- Ensure the drive isn't write-protected.
- Check if the drive has bad sectors or file system corruption.
- Run the First Aid tool in Disk Utility before attempting to format again.
File System Selection Mistakes:
- If you format the drive to an incompatible file system by mistake, you can reformat it using the steps above. Be cautious as this process will again erase all data.
Practical Scenarios and Recommendations
- Scenario: macOS-Exclusive Use:
Format the drive as APFS for the best performance and security. - Scenario: Cross-Platform File Sharing:
Use ExFAT to ensure seamless file transfers between macOS, Windows, and Linux systems. - Scenario: Legacy System Compatibility:
Opt for FAT32 for maximum device compatibility, especially with older gadgets. - Scenario: Large Media Storage:
Avoid FAT32 due to its file size limitations; choose ExFAT or APFS instead.
Recover Lost Data After Formatting Your NTFS Drive on Mac
If you have lost data due to formatting the NTFS drive to APFS, HFS+, FAT32 or ExFAT on Mac and don't have a backup, you can use Mac data recovery software to scan the drive and get the lost data back.
Step 1. Donemax Data Recovery for Mac is a powerful data recovery program. Just download and install it on your Mac.
Step 2. Open Donemax Data Recovery for Mac, select the formatted drive to start data recovery.

Step 3. Click on Scan button to deeply scan the formatted drive and find all deleted/erased files.

Step 4. Once the scan is completed, you can preview the recoverable files. Then select the wanted files, click on Recover button to save them.

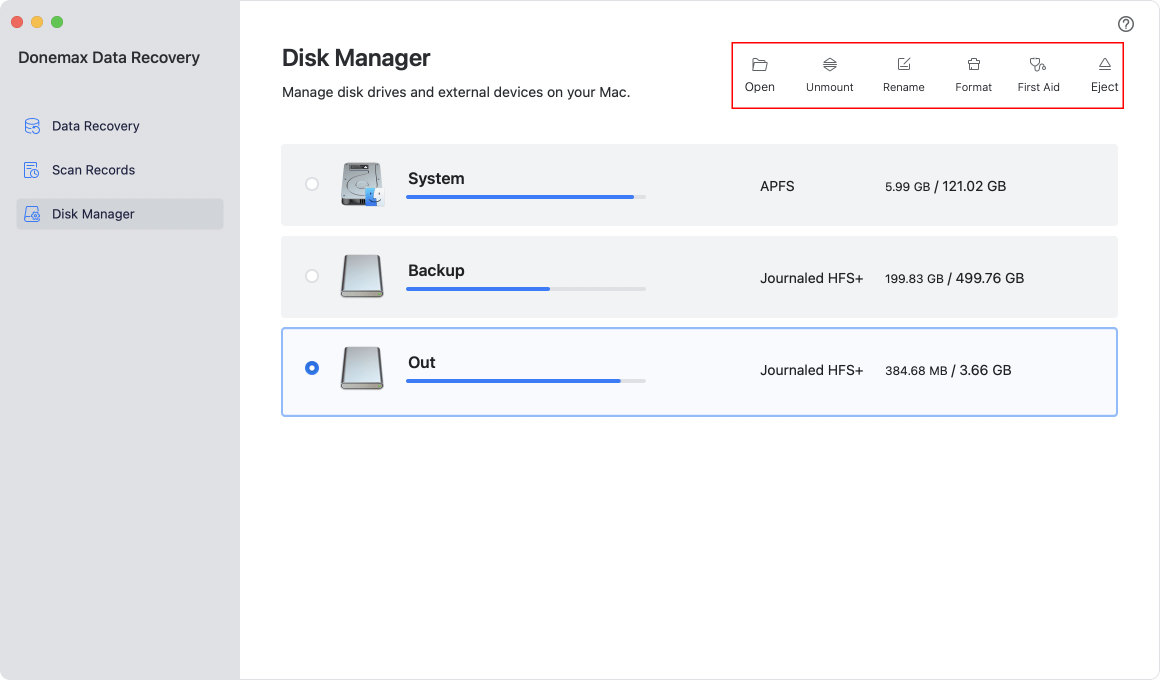
Donemax Data Recovery for Mac also can help you format an NTFS drive to FAT32, ExFAT, APFS, Mac OS Extended on Mac.
Conclusion
Reformatting an NTFS drive on macOS opens up a world of flexibility, allowing you to optimize the drive for specific purposes. Whether you're seeking macOS exclusivity with APFS, legacy support with HFS+, or cross-platform compatibility with ExFAT or FAT32, macOS tools like Disk Utility and Terminal make the process straightforward.
Always remember to back up your data and double-check your file system choice to avoid complications. With the right preparation and tools, you can ensure your drives are tailored to your exact needs, enhancing your productivity and data accessibility.

Donemax NTFS for Mac
An easy-to-use NTFS for Mac tool to help you enable writable for NTFS drives on Mac so that you can read-write NTFS drives on Mac without any limitation. It also can help you mount, format, repair, rename, open drive on your Mac.
Related Articles
- Feb 06, 2025[7 Fixes] Fix Volume Hash Mismatch Error on Mac Without Losing Data
- Sep 30, 2024How to Turn on A Mac?
- Jan 16, 202510 Solutions to Fix Fusion Drive Not Mounting or Not Showing Up on Mac
- Mar 26, 2025Turn On or Turn Off Mac Firewall: A Complete Guide
- Oct 18, 2024How to Upgrade to macOS Sequoia (for Intel-based/T2/Apple silicon Macs)?
- Dec 03, 2024How to Use NTFS Drive on Apple Silicon M-chip (M1/M2/M3/M4) Mac?

Christina
Christina is the senior editor of Donemax software who has worked in the company for 4+ years. She mainly writes the guides and solutions about data erasure, data transferring, data recovery and disk cloning to help users get the most out of their Windows and Mac. She likes to travel, enjoy country music and play games in her spare time.

Gerhard Chou
In order to effectively solve the problems for our customers, every article and troubleshooting solution published on our website has been strictly tested and practiced. Our editors love researching and using computers and testing software, and are willing to help computer users with their problems