PAGE CONTENT:
Mac computers come equipped with a built-in firewall designed to enhance security by blocking unauthorized network connections. A firewall acts as a barrier between your Mac and potential cyber threats, regulating incoming traffic to ensure that only safe and necessary connections are allowed. While the firewall is a crucial security feature, some users may need to disable it for certain applications or network configurations.
This guide provides a detailed step-by-step approach to turning the Mac firewall on or off, configuring advanced settings, troubleshooting issues, and understanding when it's best to enable or disable it.
Why You Should Enable or Disable the Mac Firewall?
When to Enable the Firewall?
Enabling the macOS firewall is recommended in the following scenarios:
- Public or Untrusted Networks: If you frequently connect to public Wi-Fi (cafés, airports, hotels), enabling the firewall helps protect your Mac from potential cyber threats by blocking unauthorized incoming connections.
- Preventing Unauthorized Access: A firewall can stop hackers from remotely accessing your Mac, particularly if they attempt to exploit open network ports.
- Enhanced Security for Sensitive Data: If you handle sensitive business or personal data, keeping the firewall on adds an extra layer of security against network-based threats.
When to Disable the Firewall?
Although the firewall is generally beneficial, there are instances where disabling it might be necessary:
- Local Network Sharing: If you frequently share files, printers, or media between devices on a trusted local network, the firewall might interfere with seamless connectivity.
- Performance Considerations: Some background services and applications require open network access. If the firewall blocks them, they may experience slowdowns or fail to function properly.
- Third-Party Security Solutions: If you use advanced security tools like third-party firewalls or VPNs, macOS's built-in firewall may not be necessary and could potentially cause conflicts.
How to Turn On or Turn Off the Firewall on Mac?
The process for enabling or disabling the firewall varies slightly depending on your macOS version. Below, we cover instructions for both macOS Ventura (and later) and macOS Monterey (and earlier versions).
For macOS Ventura and Later:
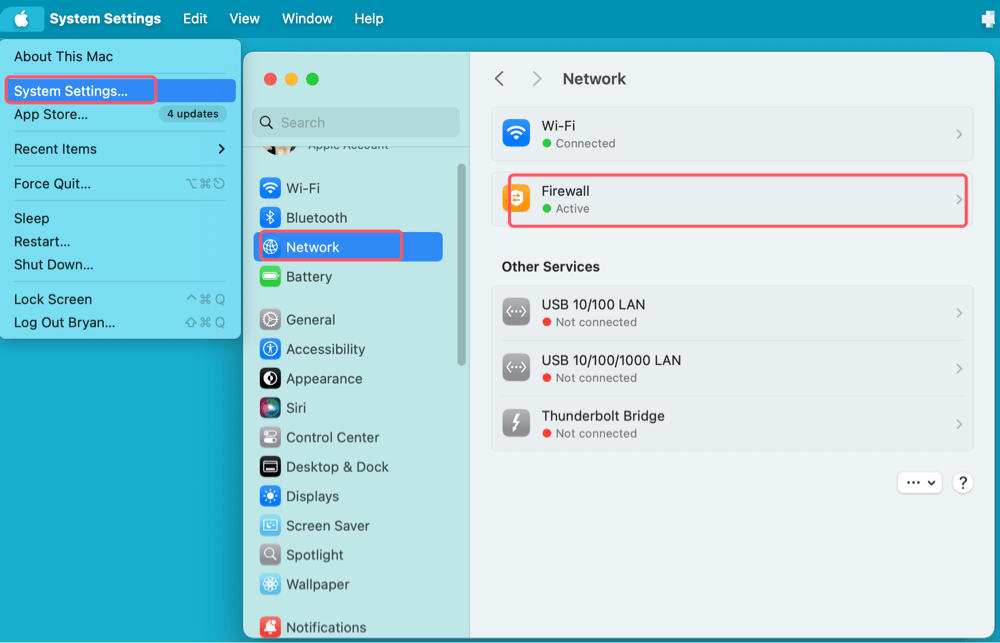
- Open System Settings:
- In the upper-left corner, click the Apple menu.
- Select System Settings.
- Navigate to the Firewall Section:
- Scroll down and click Network in the left sidebar.
- Select Firewall from the available options.
![Turn On or Turn Off Mac Firewall]()
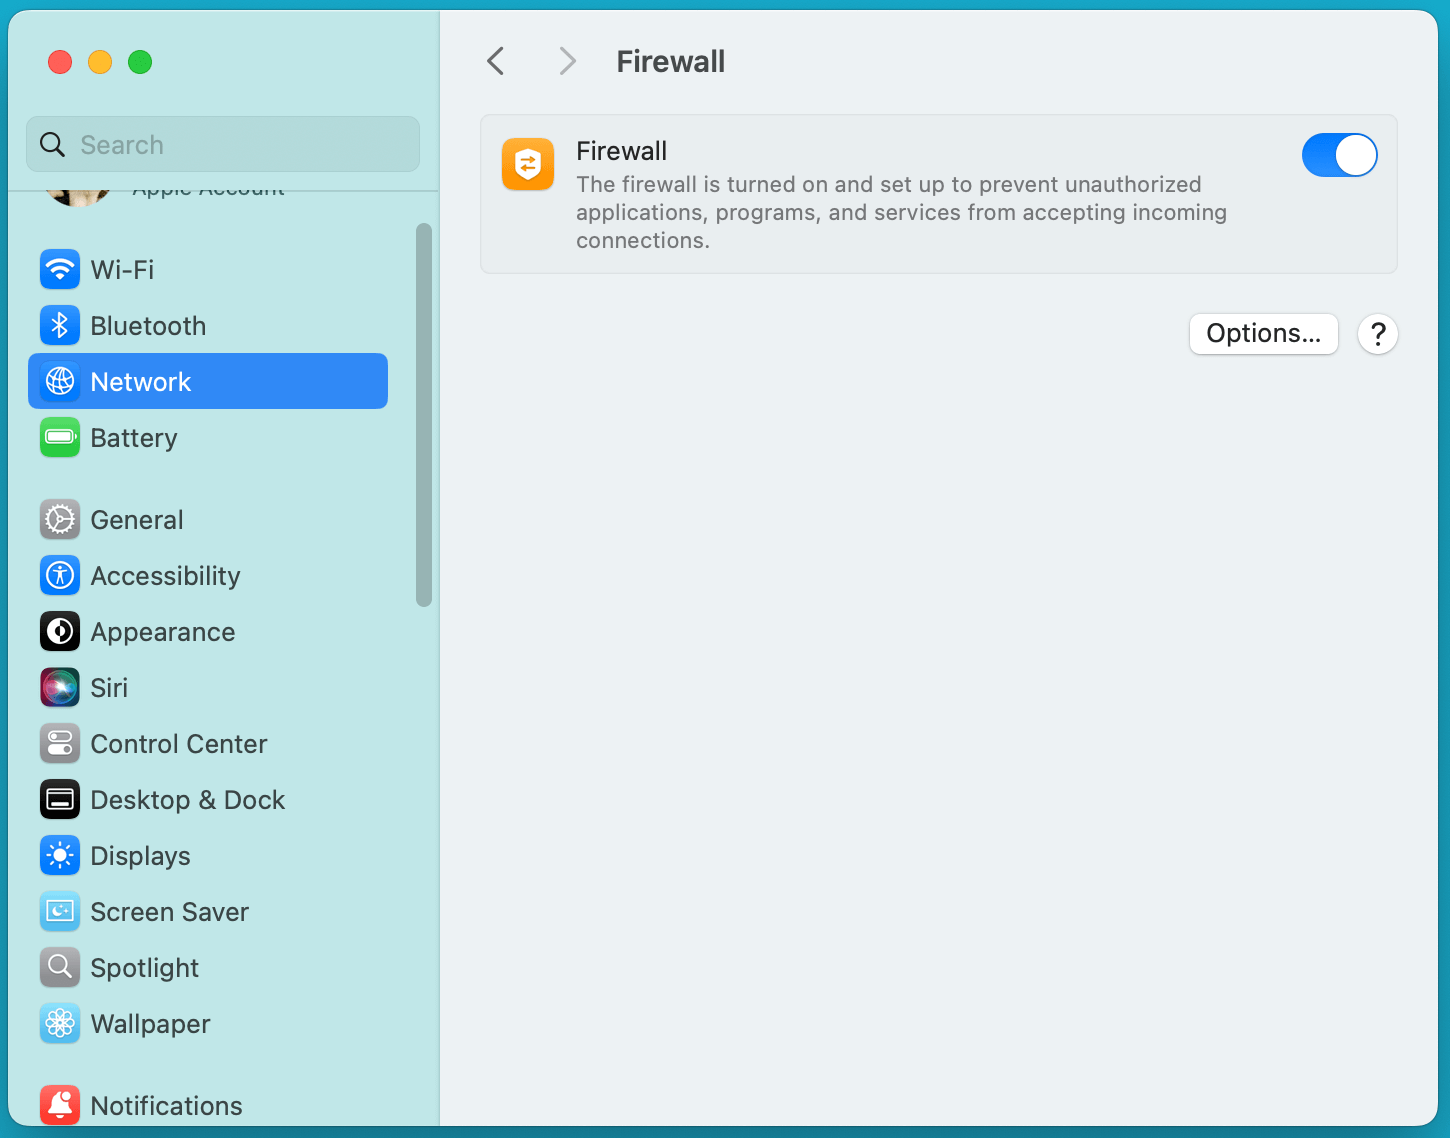
- Turn the Firewall On or Off:
- Use the switch to turn on or turn off Firewall on Mac.
![Turn On or Turn Off Mac Firewall]()
- Use the switch to turn on or turn off Firewall on Mac.
- Confirm the Action:
- To make changes, provide your administrator password when requested.
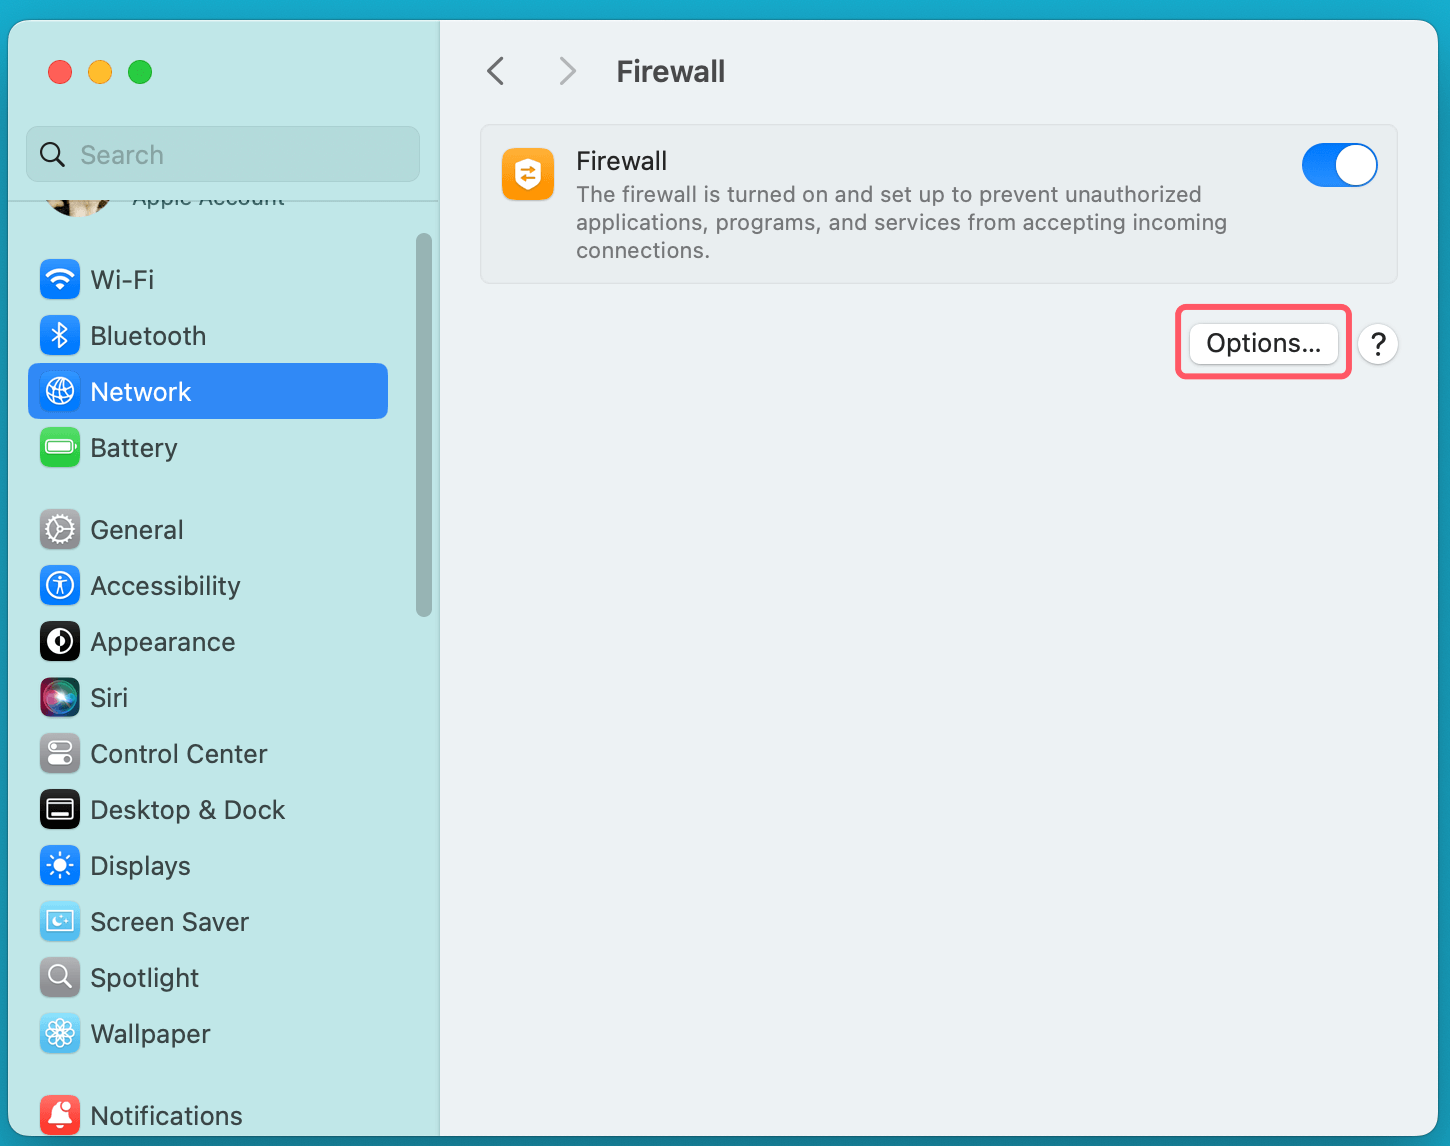
- Customize Firewall Settings (Optional):
- Click Options to access additional settings, such as blocking all incoming connections and allowing specific applications through the firewall.
![Turn On or Turn Off Mac Firewall]()
- Click Options to access additional settings, such as blocking all incoming connections and allowing specific applications through the firewall.
For macOS Monterey and Earlier:
- Open System Preferences:
- Select System Preferences by clicking the Apple menu.
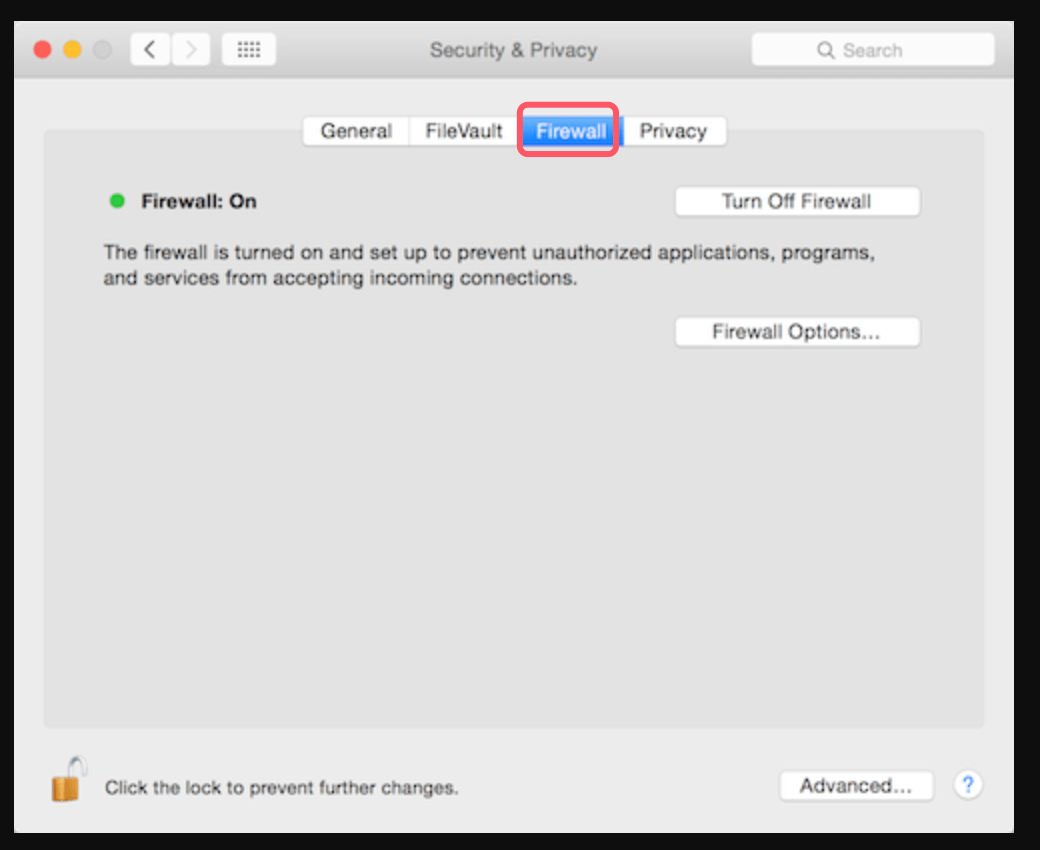
- Go to Security & Privacy:
- After selecting Security & Privacy, select the Firewall tab.
![Turn On or Turn Off Mac Firewall]()
- After selecting Security & Privacy, select the Firewall tab.
- Unlock Firewall Settings:
- Click the lock symbol in the bottom-left corner and input your administrator password to make changes.
- Turn the Firewall On or Off:
- Click Turn On Firewall to enable it.
- Click Turn Off Firewall to disable it.
- Modify Advanced Settings (Optional):
- Click Firewall Options to configure additional settings.
Advanced Firewall Settings:
Once the Mac firewall is enabled, you can fine-tune its behavior to match your security and networking needs. macOS provides several customization options to help you balance protection and functionality. Understanding these settings ensures that your firewall effectively secures your system without unnecessarily restricting essential applications.
1. Blocking All Incoming Connections
What Does This Setting Do?
When enabled, this option prevents all incoming connections to your Mac, except for essential Apple services, such as:
- System services required for internet connectivity (DHCP, DNS, iCloud, etc.).
- Built-in Apple apps like Messages and FaceTime, which rely on Apple's servers rather than direct peer-to-peer connections.
This means that no external device or app can establish a connection with your Mac unless it is explicitly allowed by Apple.
How to Enable It?
- Go to System Settings or System Preferences.
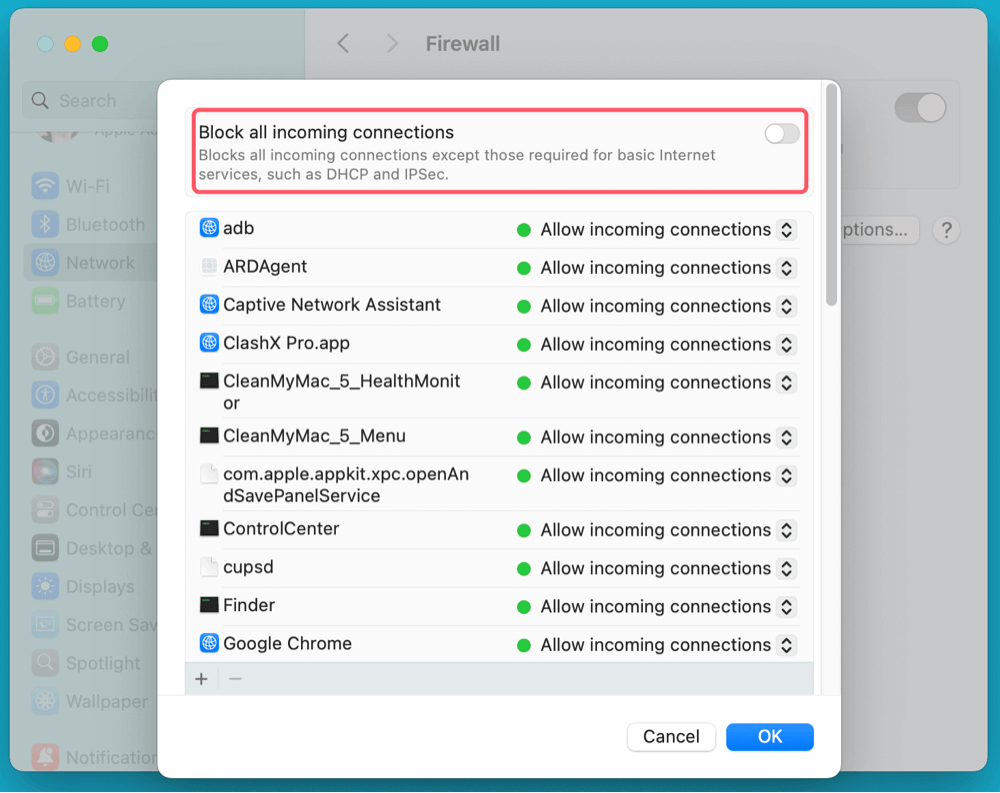
- Navigate to Network > Firewall or Security & Privacy > Firewall
- Click on Firewall Options.
- Check the box that says "Block all incoming connections".
![Turn On or Turn Off Mac Firewall]()
- Click OK to apply changes.
When Should You Use This?
- Best for high-security environments – If you are using your Mac in a sensitive setting (e.g., corporate offices, cybersecurity research, financial institutions), this feature helps ensure that no unauthorized inbound connections reach your machine.
- Using public Wi-Fi – Prevents network-based attacks on unsecured public hotspots.
When Should You Avoid This?
- If you rely on file sharing – Services like AirDrop, SMB file sharing, and network-based backups (e.g., Time Machine over a network) will be blocked.
- If you use remote access tools – Apps like Microsoft Remote Desktop, TeamViewer, or SSH connections will not function.
- Gaming and multiplayer apps – Some online multiplayer games require incoming connections for real-time communication.
2. Allowing Specific Apps Through the Firewall
Why Is This Important?
While the firewall protects your Mac by blocking unauthorized incoming traffic, some trusted applications need access to incoming connections to function correctly. For example:
- Video conferencing apps (Zoom, Skype) may require open ports to receive audio/video streams.
- Remote desktop applications (TeamViewer, Chrome Remote Desktop) need network access to allow remote control of your Mac.
- Online multiplayer games (Steam, Blizzard, or Epic Games platforms) often rely on peer-to-peer connections.
To ensure these apps work properly, macOS allows users to manually add them to the firewall's allow list.
How to Allow or Block an App?
- Open System Settings or System Preferences.
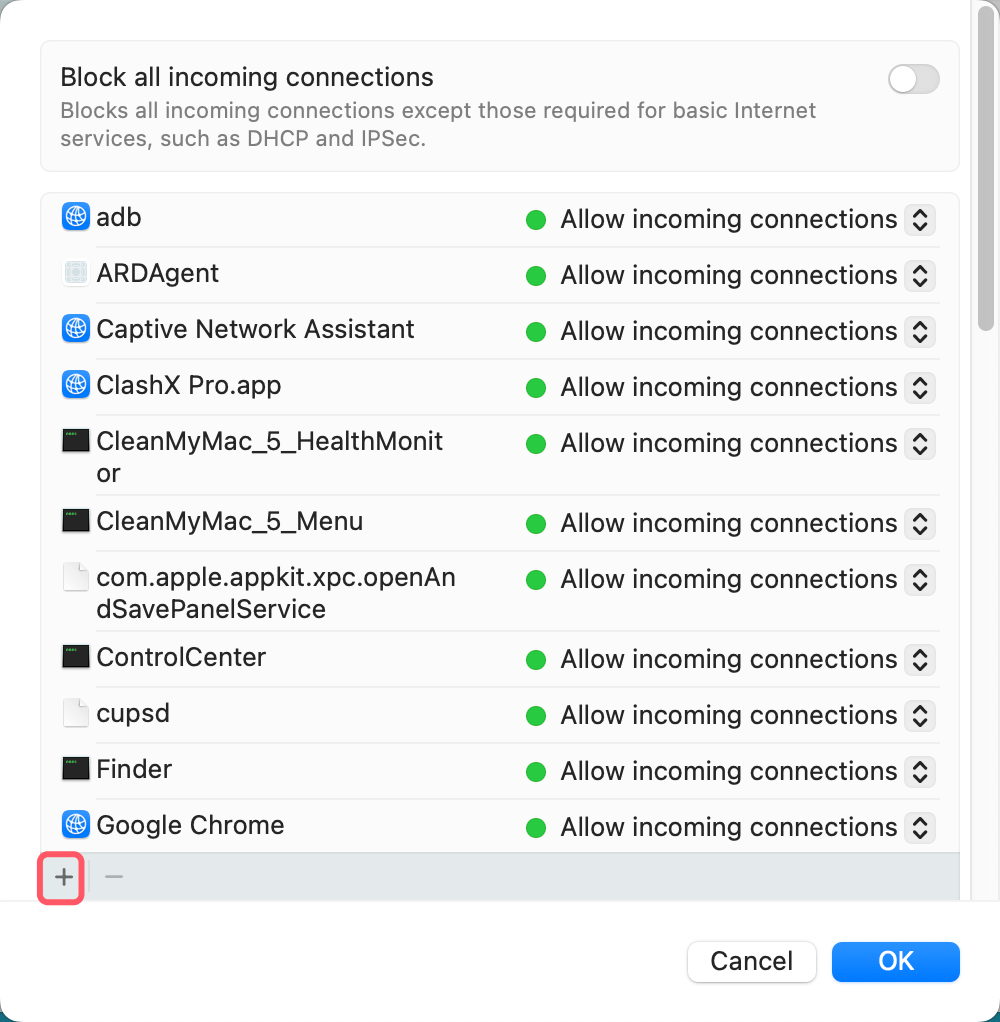
- Navigate to Firewall and click Firewall Options.
- Click the + button to add an application.
![Turn On or Turn Off Mac Firewall]()
- Select the application from your system and choose "Allow incoming connections" or "Block incoming connections".
- Click OK to apply changes.
Use Cases
- If an app is being blocked by the firewall – Some applications may be prevented from receiving network traffic, causing them to malfunction. Adding them to the allow list resolves this issue.
- Fine-tuning security – If you only want to allow a specific app instead of disabling the firewall entirely, this option provides a more controlled solution.
Security Risks and Considerations
- Allowing too many applications through the firewall reduces security, as each app represents a potential attack vector.
- Ensure that only trusted applications are added to the allow list.
- Keep applications updated, as outdated software with firewall exceptions may become a security risk.
3. Enabling Stealth Mode
What Does Stealth Mode Do?
Stealth Mode is a passive security feature that makes your Mac less visible on networks. When enabled:
- Your Mac will not respond to ping requests (ICMP packets), which are commonly used by attackers to detect active devices.
- Your system will ignore unwanted network probes, preventing potential attackers from discovering your machine.
- It increases resistance to certain network-based attacks by making your Mac appear "invisible" to unauthorized users.
How to Enable Stealth Mode?
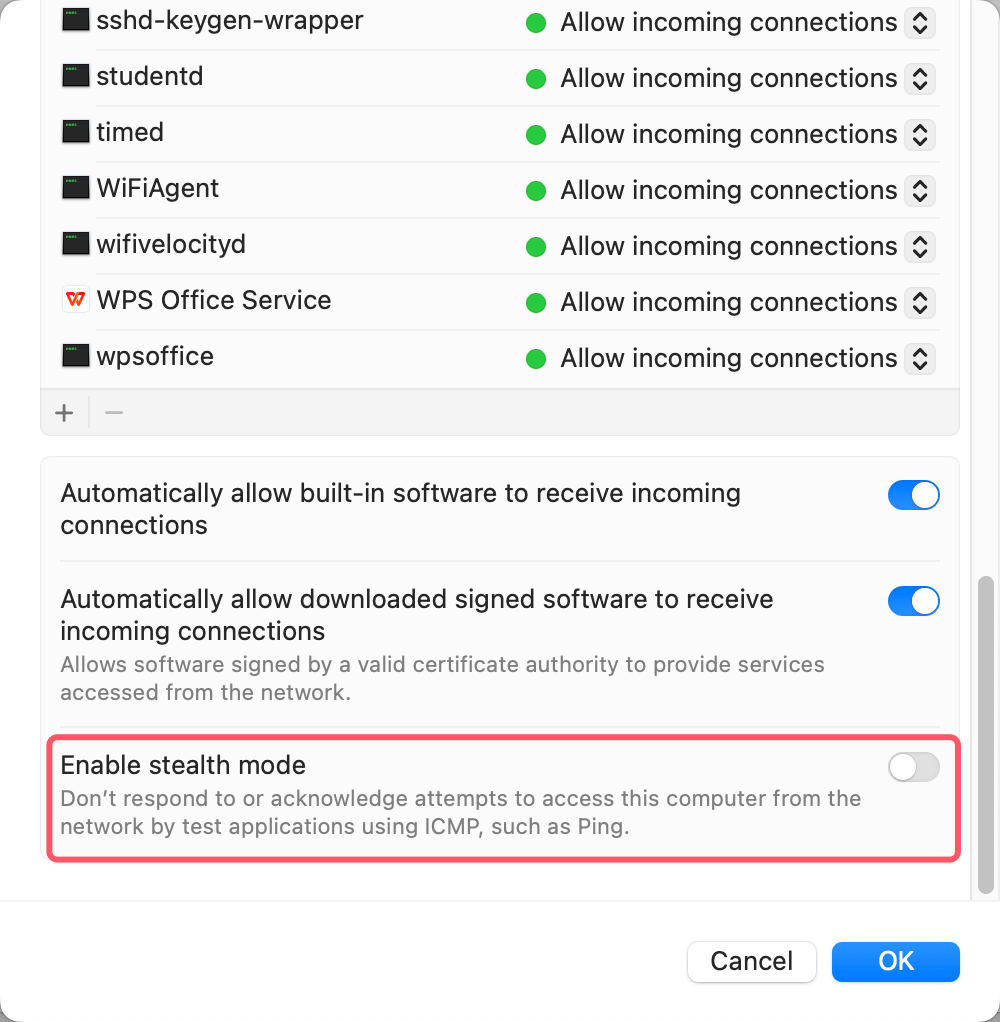
- Go to System Settings or System Preferences.
- Navigate to Firewall and click Firewall Options.
- Check the box that says "Enable stealth mode".
![Turn On or Turn Off Mac Firewall]()
- Click OK to save changes.
When Should You Use This?
- Public or untrusted networks – If you connect to Wi-Fi in hotels, coffee shops, or airports, stealth mode helps protect your Mac from potential attackers scanning the network.
- Cybersecurity professionals and IT experts – If you are performing penetration testing or security assessments, stealth mode helps reduce exposure to scanning tools.
- High-risk environments – If you suspect network surveillance or targeted attacks, stealth mode makes your Mac harder to detect.
Potential Drawbacks:
- Disrupts some local network features – If you rely on file sharing, remote desktop, or gaming services, stealth mode may cause connection issues.
- Not a substitute for other security measures – Stealth mode only prevents discovery; it does not block actual attacks if an attacker already knows your IP address.
Comparing Advanced Firewall Settings: Quick Summary
| Feature | What It Does | When to Use It | When to Avoid It |
|---|---|---|---|
| Block All Incoming Connections | Prevents all inbound traffic except essential Apple services | High-security environments, public Wi-Fi | File sharing, remote desktop, gaming |
| Allow Specific Apps | Grants firewall exceptions to trusted apps | When apps like Zoom, TeamViewer, or games need access | If unsure about an app's security |
| Stealth Mode | Hides your Mac from network scans | Public networks, cybersecurity professionals | If using local network features like file sharing |
Troubleshooting Firewall Issues on Mac
Sometimes, enabling or disabling the firewall may cause unexpected issues. Here are some common problems and their solutions:
1. Apps Not Working After Enabling the Firewall
- Issue: Certain apps, such as file-sharing tools, VoIP applications, or remote desktop software, may not function properly.
- Solution:
- Open Firewall Options and manually allow the affected app.
- If the app still doesn't work, temporarily disable the firewall and check if it resolves the issue.
2. Network Connectivity Problems
- Issue: You may experience slow or dropped network connections after enabling the firewall.
- Solution:
- Disable Block all incoming connections in Firewall Options.
- Restart your Wi-Fi router and reconnect to the network.
3. Cannot Turn Firewall On or Off
- Issue: The option to enable or disable the firewall is grayed out.
- Solution:
- Click the lock icon in System Settings or System Preferences and enter your administrator password to make changes.
- If the problem persists, try restarting your Mac.
Conclusion
The macOS firewall is an essential security feature that helps protect your device from unauthorized network access. While it's generally recommended to keep the firewall enabled, there are scenarios where disabling it may be necessary for seamless local networking or application functionality.
Related Articles
- Oct 11, 2024What is First Aid? How to Run First Aid to Repair Disk on Mac?
- Feb 17, 2025Fix XQD Card Not Showing Up or Not Mounting on Mac [10 Fixes]
- Dec 12, 2024How to Mount External Hard Drive or USB Drive Using Terminal on Mac?
- Jan 12, 2025Fix First Aid Found Corruption That Needs to Be Repaired Without Losing Data on Mac
- Nov 09, 2024Factory Reset macOS Catalina: A Comprehensive Guide
- Jan 16, 202510 Solutions to Fix Fusion Drive Not Mounting or Not Showing Up on Mac

Steven
Steven has been a senior writer & editor of Donemax software since 2020. He's a super nerd and can't imagine the life without a computer. Over 6 years of experience of writing technical solutions and software tesing, he is passionate about providing solutions and tips for Windows and Mac users.

Gerhard Chou
In order to effectively solve the problems for our customers, every article and troubleshooting solution published on our website has been strictly tested and practiced. Our editors love researching and using computers and testing software, and are willing to help computer users with their problems
