Written byStevenUpdated on Feb 17, 2025
Fix XQD Card Not Showing Up or Not Mounting on Mac [10 Fixes]
Approved byGerhard Chou
Tip: Before fixing XQD card not showing up or not mounting issues, you can use data recovery app - such as Donemax Data Recovery to recover inaccessible and lost files from the XQD card. Then you can follow this guide to fix common XQD card issues on your Mac.
PAGE CONTENT:
XQD cards are high-performance memory cards used primarily by professional photographers and videographers. They offer fast read/write speeds, making them ideal for handling large files like high-resolution images and 4K videos. However, Mac users may sometimes encounter an issue where the XQD card does not show up or mount properly. This can be frustrating, especially if you need to access important files.
There are several potential reasons for this problem, including compatibility issues, hardware faults, software glitches, or improper connections. In this guide, we'll explore various troubleshooting methods to help you fix an XQD card that is not showing up or mounting on your Mac.
Recover Data from the Unrecognized/Unmounted XQD Card on Mac
Before fixing the unrecognized or unmounted XQD card on Mac, you can use data recovery app - such as Donemax Data Recovery for Mac to help you export/recover data from it.
Step 1. Click Download button below to download Donemax Data Recovery for Mac, then install it on your Mac. Connect the XQD card to your Mac.
Step 2. Open Donemax Data Recovery from Launchpad, then select the XQD card to start scan.

Step 3. Click on Scan button to deeply scan the XQD card and find all existing files, inaccessible/hidden files, deleted/formatted/lost files, etc.

Step 4. Once the scan is completed, you can preview all recoverable files. Then select the wanted images/videos or documents, click on Recover button to save them to your computer.

10 Fixes for XQD Card Not Showing Up/Not Mounting on Mac
Fix 1. Check Basic Connections of the XQD Card & Mac
Before diving into more complex troubleshooting, it's essential to check the basic physical connections.
▪️ Ensure Proper Insertion
- Remove the XQD card and reinsert it into the card reader.
- Make sure it is firmly seated and not loose.
- If the card is not inserted correctly, your Mac may not detect it.
▪️ Try a Different XQD Card Reader or USB Port
- Some older XQD card readers may not be fully compatible with newer macOS versions.
- Try using a different XQD card reader.
- Switch USB ports and check if the issue persists.
- If you're using a USB hub, try connecting the reader directly to the Mac's USB port.
▪️ Try a Different Cable
If your XQD card reader connects via USB-C or USB-A, the issue could be a faulty cable. Test with another compatible cable to see if that resolves the issue.
Fix 2. Verify macOS Compatibility & Drivers
▪️ Check if the XQD Card Reader is Compatible with macOS
macOS updates sometimes introduce changes that can affect external device compatibility. Ensure your XQD card reader is supported by your current macOS version.
▪️ Reinstall or Update XQD Drivers
Some XQD card readers require drivers to function correctly. If your reader is from Sony or Lexar, check the manufacturer's website for the latest drivers and install them.
- For Sony XQD card readers, download drivers from Sony's official website.
- Restart your Mac after installation to ensure the drivers are properly loaded.
▪️ Check if the XQD Card Reader is Recognized in System Information
Step 1. Click the Apple menu > About This Mac > More Info > System Report.
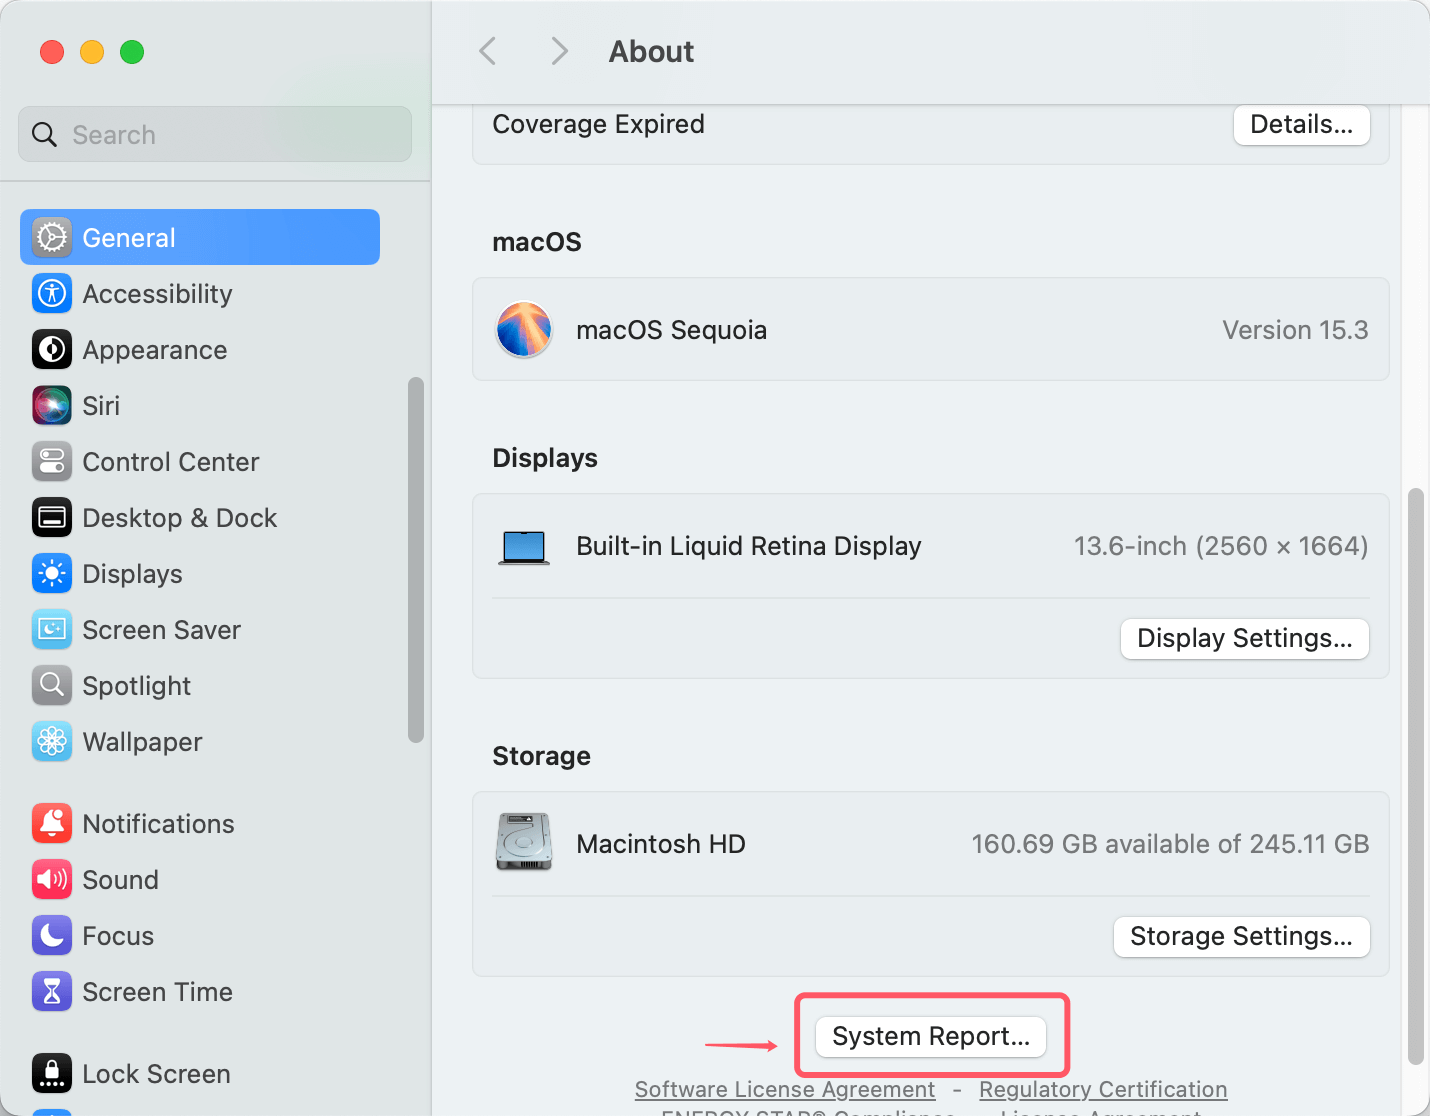
Step 2. Select USB (or Thunderbolt, depending on your reader).
Step 3. Look for your XQD card reader in the list of connected devices.
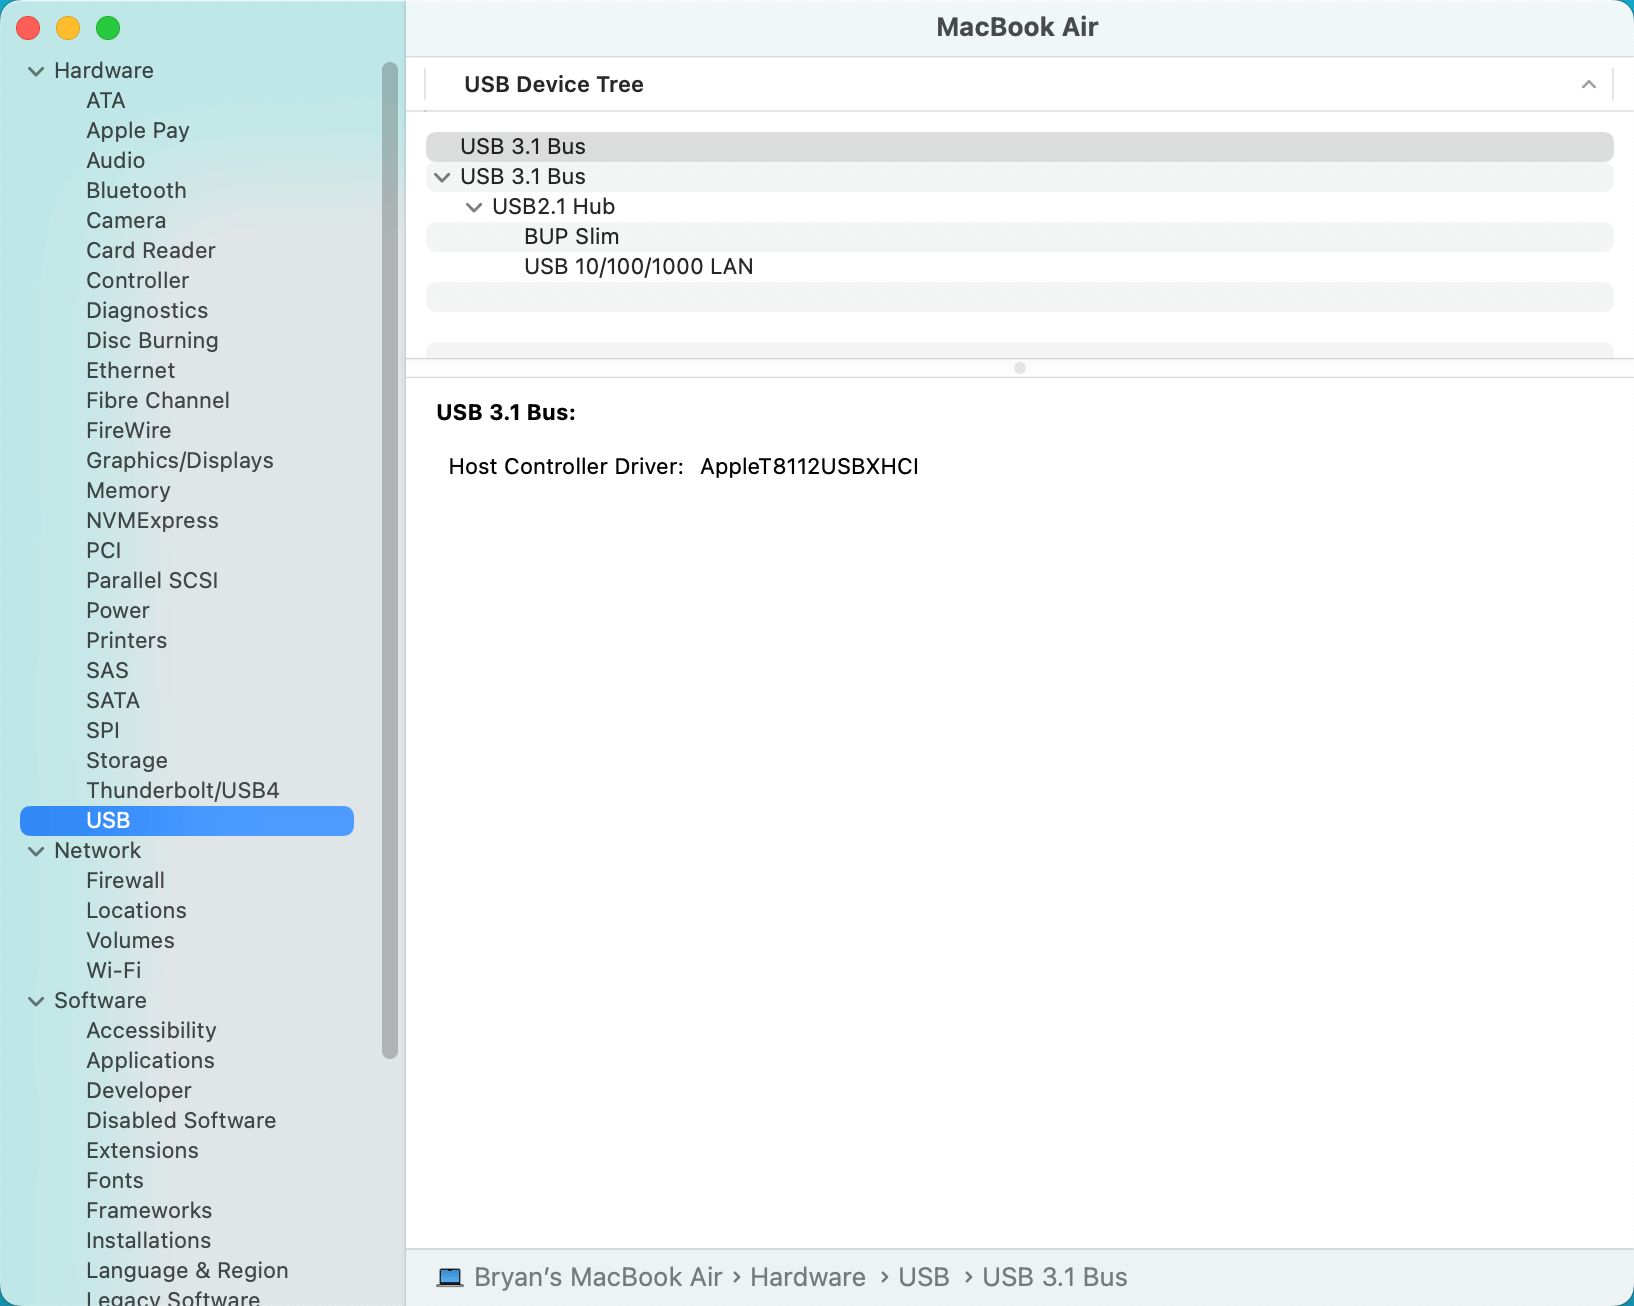
If the reader appears but the card does not, the issue may be with the card itself rather than the reader.
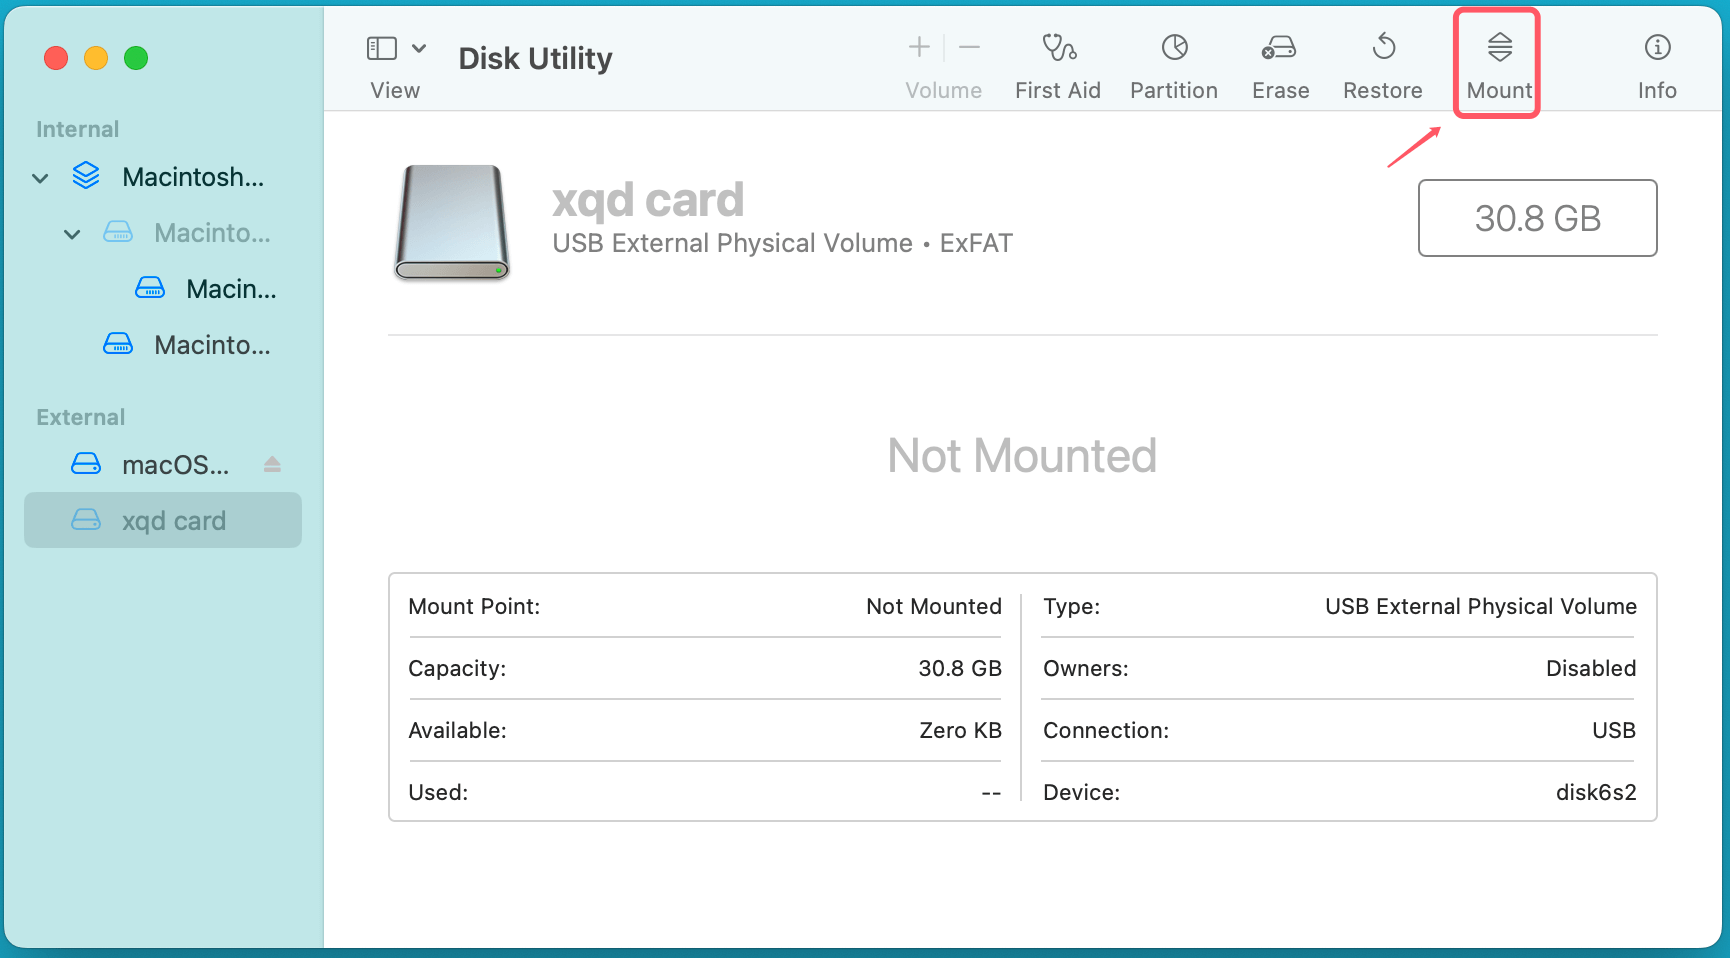
Fix 3. Check the XQD Card in Disk Utility
Disk Utility is a built-in macOS tool that allows users to manage storage devices.
Steps to Check Disk Utility:
Step 1. Open Disk Utility: Go to Disk Utility from Utilities via Applications
Step 2. Look for your XQD card under the External section on the left.
Step 3. If the card appears but is grayed out, select it and click Mount.
If the XQD Card Is Not Showing Up in Disk Utility
- Try refreshing Disk Utility by closing and reopening it.
- Restart your Mac and check again.
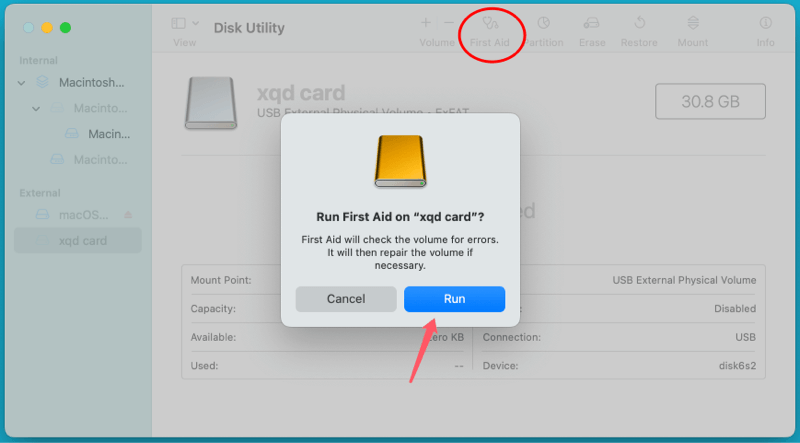
If the XQD Card Appears but Won't Mount
- Select the XQD card and click First Aid to repair potential disk errors.
![Fix XQD Card Not Showing Up or Not Mounting on Mac]()
- If First Aid fails, consider reformatting the card (explained later).
Fix 4. Reset NVRAM and SMC
Sometimes, resetting your Mac's NVRAM and SMC can help resolve hardware recognition issues.
Reset NVRAM (for Intel Macs)
- Turn off your Mac.
- Press and hold Option + Command + P + R while turning it on.
- Release the keys after about 20 seconds.
Reset SMC (for Intel Macs)
For Macs with a T2 chip:
- Shut down your Mac.
- Hold Control + Option + Shift for 7 seconds.
- While holding those keys, press and hold the power button for another 7 seconds.
- Release all keys, then turn on your Mac.
For Macs without a T2 chip, the process varies depending on the model.
💡 Note: If you have an Apple Silicon Mac (M1, M2, etc.), NVRAM and SMC resets happen automatically when you restart the system.
Fix 5. Test the XQD Card on Another Device
To determine whether the issue is with the XQD card itself or your Mac, try the following:
- Insert the XQD card into another Mac or a Windows PC.
- If the card works on another computer, the problem is likely related to your Mac.
- If the card is not detected on any device, it may be corrupted or damaged.
Fix 6. Format the XQD Card (if needed)
If the card appears in Disk Utility but refuses to mount, formatting it may resolve the issue. Warning: Formatting will erase all data on the card.
How to Format the XQD Card on Mac
Step 1. Open Disk Utility.
Step 2. Select your XQD card from the left panel.
Step 3. Click Erase at the top.
Step 4. Choose a file system format:
- ExFAT (best for compatibility with both Mac and Windows).
- APFS or Mac OS Extended (Journaled) (best for Mac-only usage).
Step 5.Click Erase and wait for the process to complete.
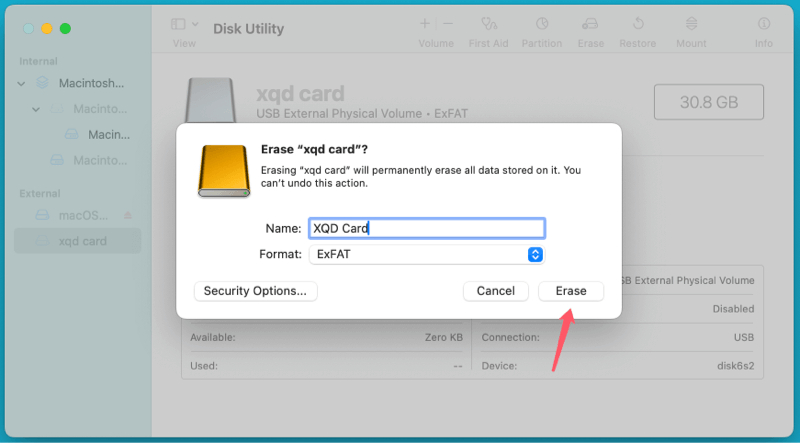
Once formatted, eject the card and reinsert it to see if it mounts correctly.
Fix 7. Check for macOS Software Updates
Sometimes, macOS updates fix bugs that cause external storage devices to malfunction.
How to Update macOS
Step 1. Go to Apple menu > System Settings > General > Software Update.
Step 2. If an update is available, install it and restart your Mac.
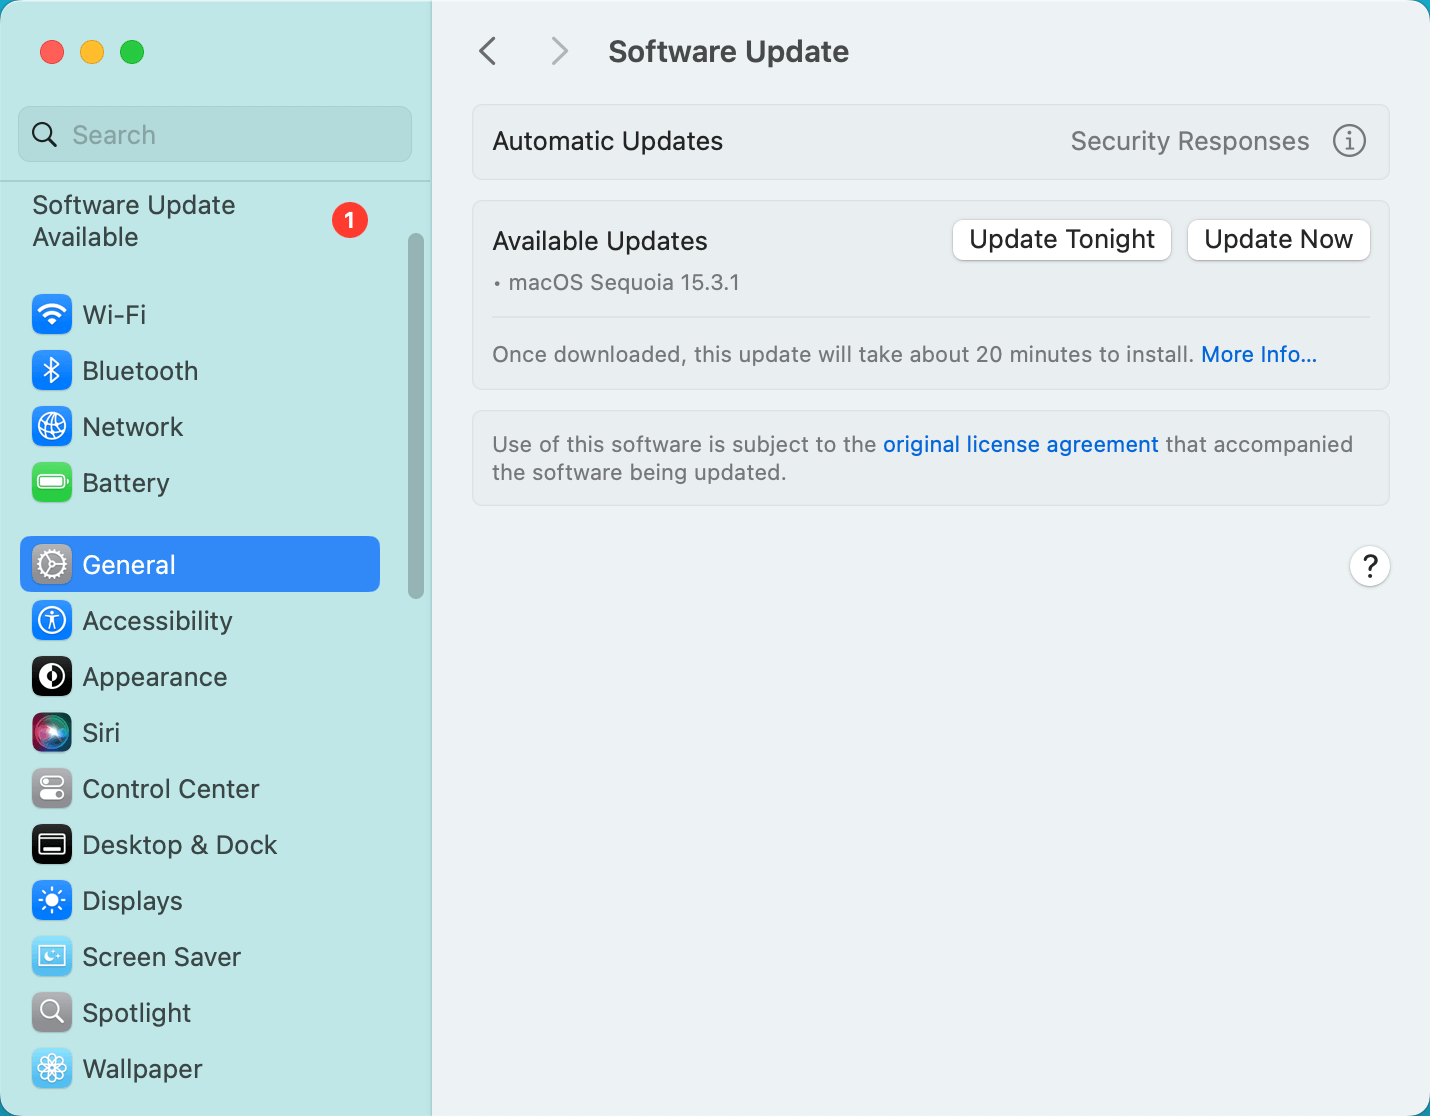
After updating, check if the XQD card is recognized.
Fix 8. Use Terminal to Mount the XQD Card
If your XQD card is not appearing in Finder or Disk Utility, you can use macOS's Terminal to check if the system detects it and manually attempt to mount it. Terminal provides powerful disk management commands that can help diagnose and fix issues with external storage devices.
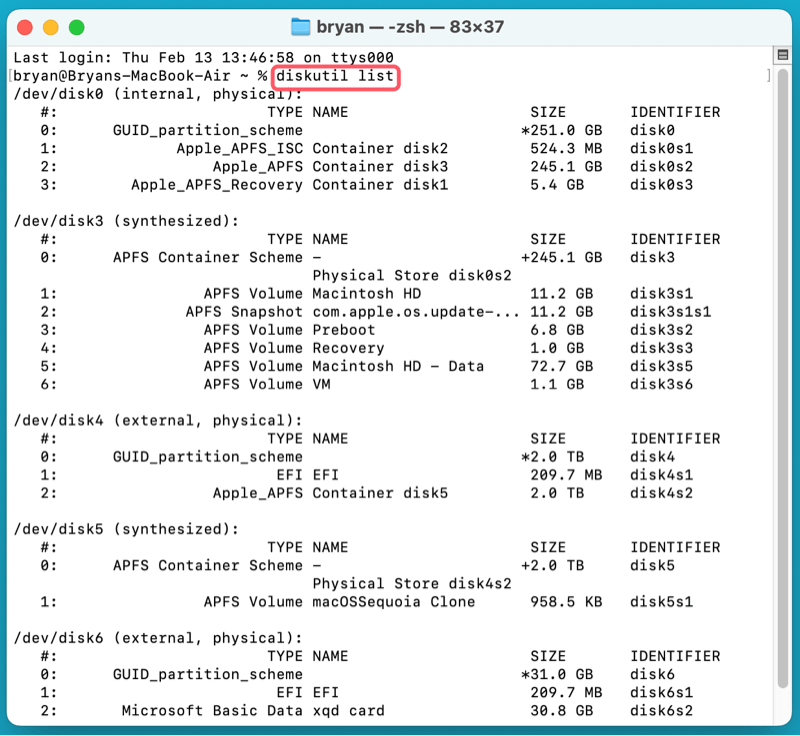
Step 1: Check if the Mac Recognizes the XQD Card
Even if your XQD card isn't mounting automatically, your Mac might still detect it at a lower system level. To verify this:
1. Open Terminal:
- Press Command + Space to open Spotlight Search and type "Terminal," then press Enter.
- Alternatively, go to Applications > Utilities > Terminal.
2. List all connected storage devices by running:
diskutil list
- This will display all available storage devices, including internal and external drives.
- Look for an entry labeled something like /dev/disk6 (the number may vary).
- If your XQD card appears in the list but is not mounted, you can try mounting it manually.
Step 2: Manually Mount the XQD Card
If your XQD card is detected but not mounting, use the following command:
diskutil mountDisk /dev/diskX
(Replace /dev/diskX with the actual disk identifier from Step 1, e.g., /dev/disk6).
- If the command succeeds, your XQD card should now be accessible in Finder.
- If you see an error message, proceed to the next step.

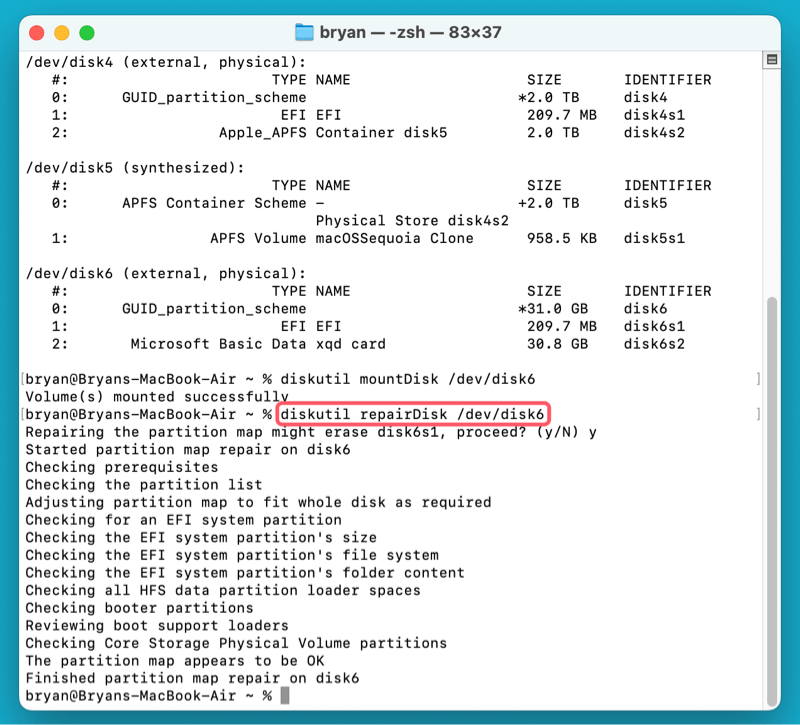
Step 3: Repair the XQD Card Using Terminal
If the disk refuses to mount, it might have filesystem errors. You can attempt to repair it using:
diskutil repairDisk /dev/diskX
- macOS will attempt to fix any corruption or filesystem issues on the card.
- If successful, try mounting it again with the diskutil mountDisk command.
Step 4: Force Mount the XQD Card Using a Specific Filesystem
If the regular mount command doesn't work, you can try specifying the filesystem format manually. If your XQD card uses ExFAT (which is common for high-capacity cards), run:
diskutil mount -mountPoint /Volumes/XQD -t ExFAT /dev/diskX

(Replace /Volumes/XQD with a custom name and /dev/diskX with your actual disk identifier.)
- If the filesystem is HFS+ (Mac OS Extended), use:
diskutil mount -mountPoint /Volumes/XQD -t hfs /dev/diskX
- If it's APFS, use:
diskutil mount -mountPoint /Volumes/XQD -t apfs /dev/diskX
Step 5: Check System Logs for Errors
If your Mac still doesn't recognize the XQD card, you can check system logs for more information:
1. Open Console (Command + Space, then search for "Console").

2. Select Log Reports and search for terms like USB, XQD, or disk.
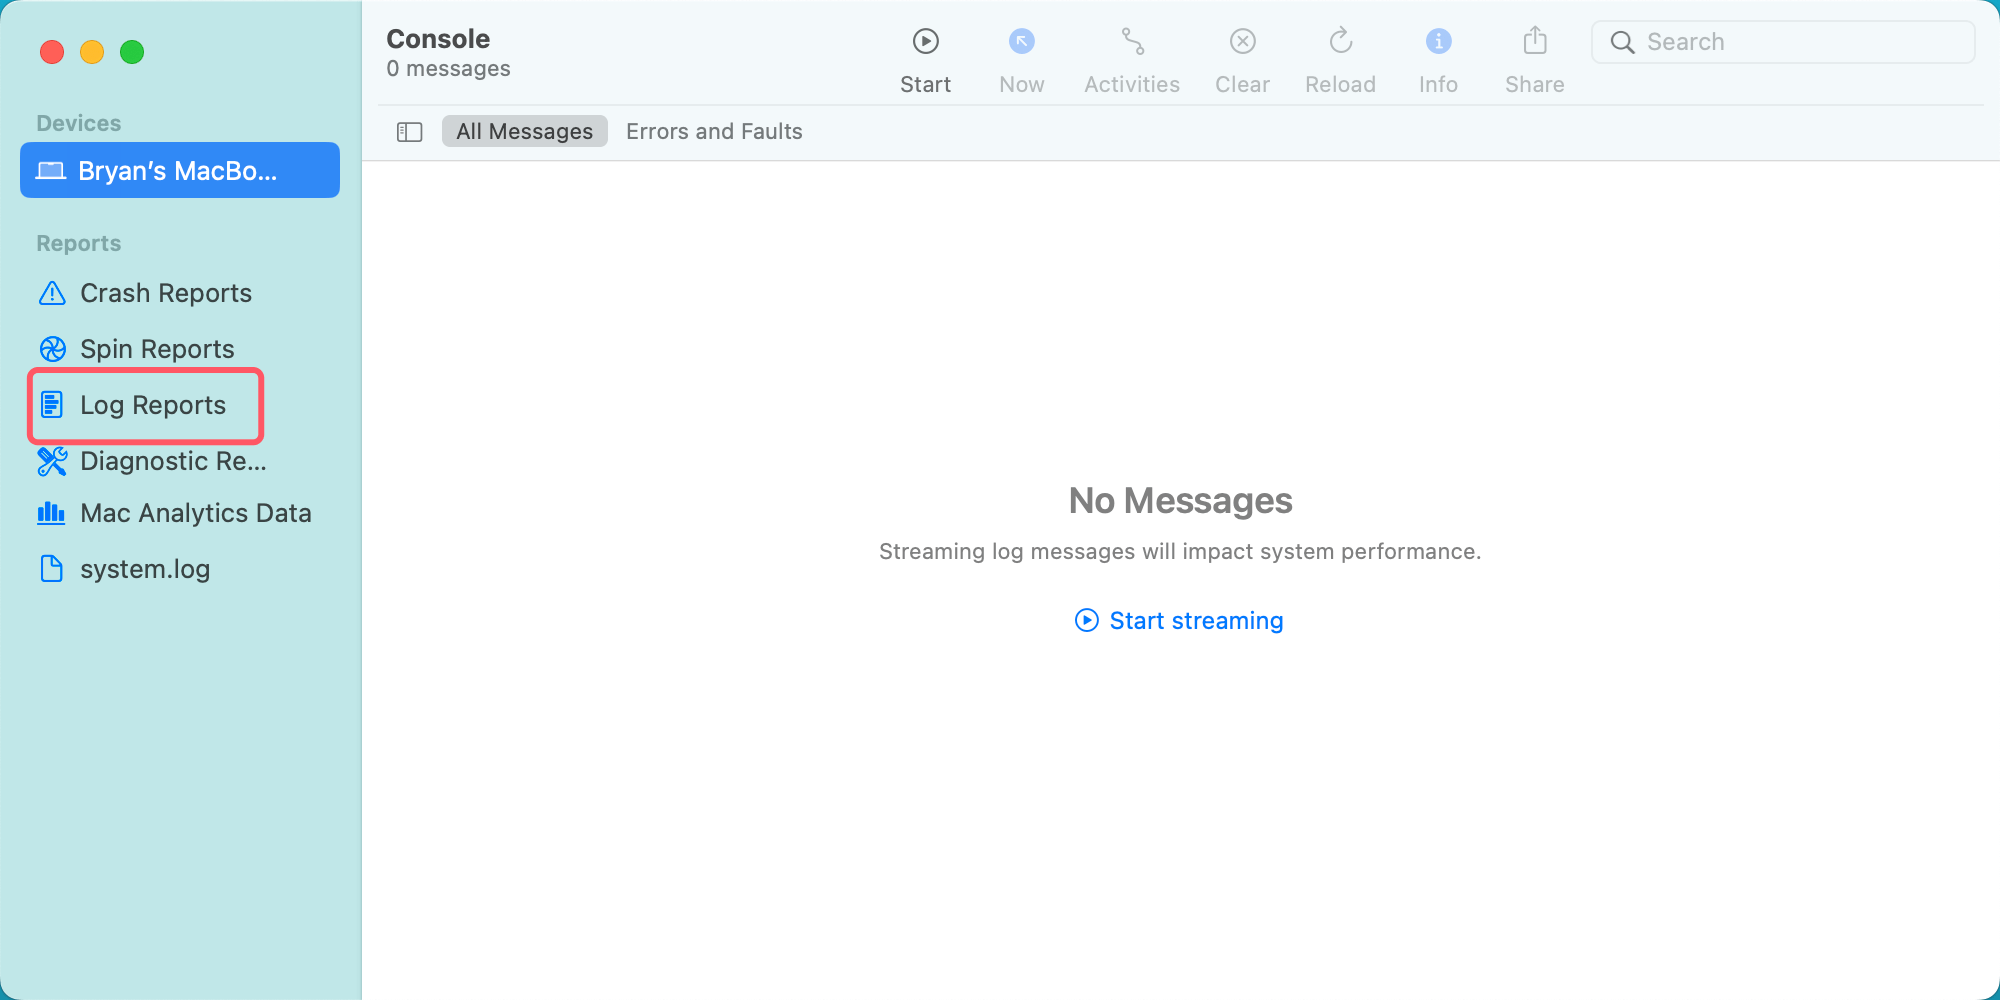
3. If you see repeated error messages, the card may be physically damaged or have a hardware failure.
Step 6: Format the XQD Card via Terminal (Last Resort)
If all else fails and you’re willing to erase the card, you can format it via Terminal:
diskutil eraseDisk ExFAT XQD /dev/diskX
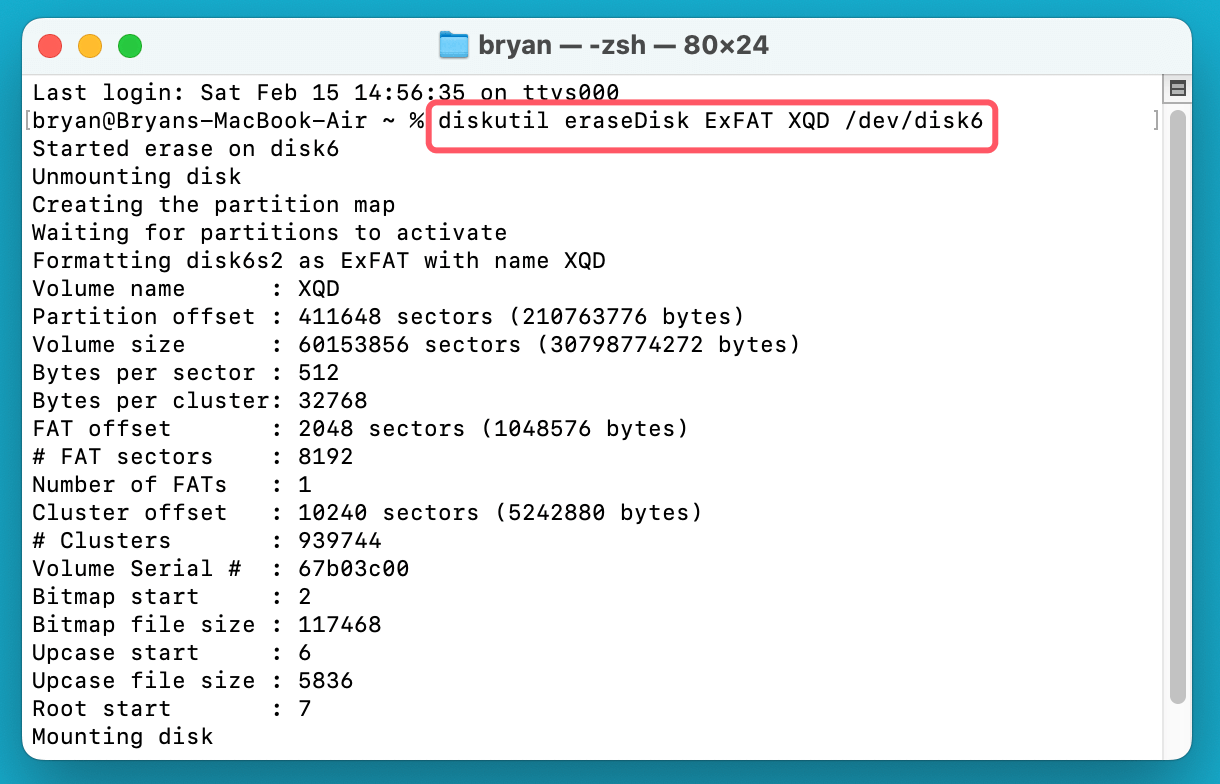
- This command reformats the card with the ExFAT file system and labels it "XQD".
- If you prefer Mac OS Extended (Journaled), use:
diskutil eraseDisk JHFS+ XQD /dev/diskX
- If successful, the XQD card should now mount automatically.
Using Terminal is an advanced way to troubleshoot XQD card issues when Finder and Disk Utility fail. However, if none of these methods work, the card may be physically damaged, and you might need to try it on another device or consider data recovery services.
Fix 9. Check Finder Settings
If the XQD card can be recognized by Disk Utility, but not showing up in Finder and Desktop, just check Finder Settings.
Step 1. Open a Finder, then click Finder on Apple menu.
Step 2. Choose Settings.
Step 3. When Finder Settings opens, click General and Sidebar, ensure External disks is selected.
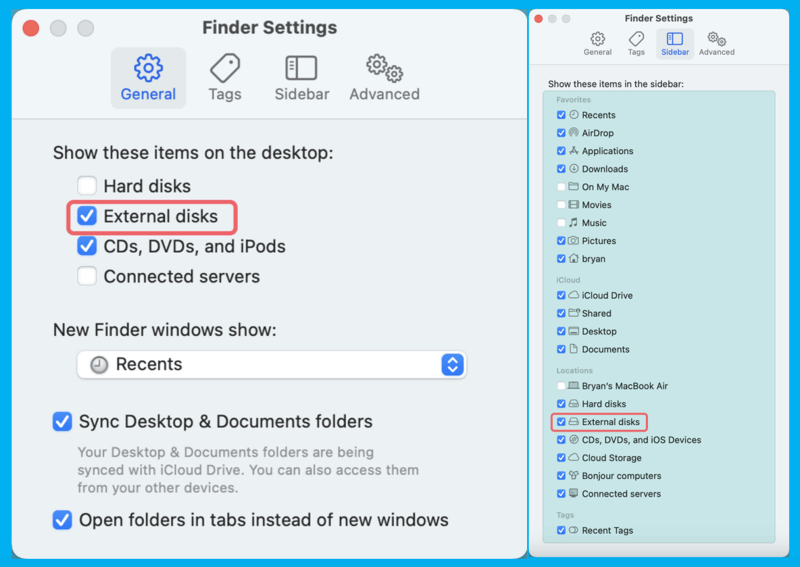
Then check if you can see the XQD card on Finder's sidebar and desktop.
Fix 10. Contact Manufacturer Support
If none of the above solutions work, the problem might be hardware-related.
- Check the manufacturer’s website for firmware updates for your XQD card reader.
- If your XQD card is under warranty, consider contacting the manufacturer (e.g., Sony, Lexar) for a replacement.
How to Use NTFS XQD Card on Mac?
If your XQD card has been formatted to NTFS file system, it may not work on your Mac. If you want to mount and read-write an XQD card on Mac, just try NTFS for Mac tool.
Step 1. Download and install Donemax NTFS for Mac on your Mac, ensure the XQD card has been connected to your Mac.
Step 2. Open Donemax NTFS for Mac, find and select the NTFS XQD card, click on Mount button to mount it.

Step 3. Click on Enable Writable button so that you can read-write the NTFS XQD card on your Mac.

Conclusion
Fixing an XQD card that won't show up or mount on a Mac requires a step-by-step approach, from checking physical connections and updating drivers to using Disk Utility and Terminal commands for manual troubleshooting. In most cases, simple solutions like switching USB ports, resetting NVRAM/SMC, or running First Aid in Disk Utility can resolve the issue. However, if the card remains undetected, formatting it may be necessary, though this will erase all data. Keeping macOS updated, using compatible card readers, and safely ejecting storage devices can help prevent future issues. If the problem persists, contacting the manufacturer for support may be the best course of action. By taking preventive measures such as safely ejecting the card and keeping software up to date, you can reduce the chances of future issues.
If you have lost data from your XQD card, you can use Donemax Data Recovery for Mac to help you recover lost data and fix the corrupted XQD card on your Mac.
Donemax Data Recovery for Mac
Donemax Data Recovery for Mac is one of the best Mac data recovery software. It is easy-to-use and can help in recovering deleted, formatted, inaccessible or lost data from Mac HDD/SSD, external disk, USB drive, SD card, camera or other storage devices.
Related Articles
- Dec 17, 2024How to Clean Install macOS High Sierra?
- Jan 05, 2025How to Disable iPhone Mirroring on Mac?
- Jul 13, 2024How to Repair An External Hard Drive on Mac?
- Mar 21, 2025Run Wireless Diagnostics on Mac: A Complete Guide
- Jan 16, 202510 Solutions to Fix Fusion Drive Not Mounting or Not Showing Up on Mac
- Nov 07, 2024Downgrade from macOS Sequoia to macOS Sonoma or Earlier Versions

Contributing Writer
Steven
Steven has been a senior writer & editor of Donemax software since 2020. He's a super nerd and can't imagine the life without a computer. Over 6 years of experience of writing technical solutions and software tesing, he is passionate about providing solutions and tips for Windows and Mac users.

Editor in chief
Gerhard Chou
In order to effectively solve the problems for our customers, every article and troubleshooting solution published on our website has been strictly tested and practiced. Our editors love researching and using computers and testing software, and are willing to help computer users with their problems