PAGE CONTENT:
External hard drives (HDDs, SSDs and Flash Drives) are convenient ways to store and back up important data and increase digital storage space. However, like any technology, they can have problems that make your data inaccessible or loseable.
If your drive isn't recognized, won't mount, or has corrupted files, these are all frustrating and worrying issues. Luckily, fixing an external hard drive on a Mac is usually possible with the right approach and tools.
This guide will diagnose and fix common external challenging drive problems on your Mac. Let's start by ensuring your essential data stays safe and accessible.
Recover Lost Data from Damaged External Hard Drive on Mac
Before repairing the damaged external hard drive, you can use a data recovery app to scan the drive and export all files from it to your Mac or another external hard drive. Donemax Data Recovery for Mac is a powerful Mac data recovery app. It can help you deeply scan any damaged drive and find all recoverable files including deleted files, existing files, inaccessible files, formatted data, etc.
Donemax Data Recovery for Mac
- Recover deleted files form external HDD/SSD.
- Export all inaccessible files from external hard drive to your Mac.
- Recover formatted or erased external hard drive on Mac.
Step 1. Connect the external hard drive to your Mac. Download and install Donemax Data Recovery for Mac, open it. Select the external hard drive to start data recovery.

Step 2. Click on Scan button to deeply scan the external hard drive and find all existing files, inaccessible files, formatted data, deleted or lost files, etc.

Step 3. Once the scan is completed, you can preview all recoverable files. Then select the wanted files files, click on Recover button.

How to Repair Damaged External HDD/SSD on Mac?
Method 1: Repair External Hard drive Mac with Terminal
Using the Terminal to repair an external HDD on a Mac is a powerful method for addressing disk issues. Terminal commands provide a way to directly interact with the system, allowing for more detailed troubleshooting and repair.

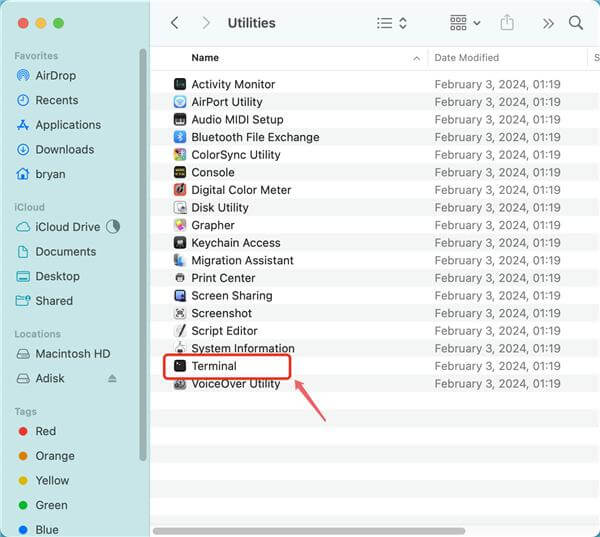
1. Start by opening Terminal from the Applications > Utilities folder. The first step is to list all connected drives using the command:
diskutil list
It will display a list of all disks connected to your Mac. Identify your external hard drive from the list, usually labeled as /dev/disk2.
2. To verify the disk for errors, use:
diskutil verifyDisk /dev/disk2
3. If the verification process identifies any issues, you can attempt to repair the disk. First, unmount the disk to ensure no data is being written during the repair process:
sudo diskutil unmountDisk /dev/disk2
4. Then, run the fsck (File System Consistency Check) command to repair the disk:
sudo fsck_hfs -fy /dev/disk2
5. After the repair is complete, remount the disk:
sudo diskutil mountDisk /dev/disk2
Terminal commands can be intimidating, but they are adequate for diagnosing and fixing various disk errors. Ensure you have a data backup before performing these steps, as improper use of Terminal commands can potentially lead to data loss.
Method 2: Reboot Your Mac in Safe Mode
Rebooting your Mac in Safe Mode is an excellent first step when troubleshooting issues with your external hard drive. Safe Mode restricts your Mac to essential system processes and turns off third-party software and startup items, allowing you to determine if software conflicts cause the issue.
- Shut down your Mac completely.
- When you're done, press and hold the Shift key and the start button again.
- When you see the login box, let go of the Shift key.
Your Mac performs several checks in Safe Mode, preventing specific software from loading. It can help resolve problems related to corrupted system files or incompatible software that might interfere with your external hard drive. Once in Safe Mode, connect your external hard drive and check if your Mac recognizes it. Try accessing the files and see if the issues persist.
Method 3: Check the USB Connections on the Mac
Checking the USB connections is a fundamental troubleshooting step for malfunctioning your external hard drive. Often, connectivity issues are the root cause of the problem, and resolving them can restore access to your drive.
- Inspect the USB Port and Cable: Start by ensuring the USB port and cable are in good condition. Look for any visible damage or wear on the cable, as a damaged cable can cause intermittent connections or complete failure. If the first USB cable doesn't work, use a different one.
- Different USB Ports: Use different USB ports on your Mac to connect your portable hard drive. Sometimes, specific ports may have issues or not provide enough power for the external drive. Using another port can help determine if the problem is with the port itself.
- Disconnect Other USB Devices: Remove all USB devices from your Mac except the external hard drive if you have multiple links. USB hubs and other devices can sometimes interfere with the connection. This step helps isolate the issue and determine whether there is a conflict with other peripherals.
- Power Cycle the External Drive: Some external hard drives have their power supply. If yours does, turn it off, wait a few seconds, and then turn it back on. It can reset the drive and resolve connection issues.
Method 4: Try Disk Utility First Aid
Disk Utility's First Aid feature is essential for diagnosing and repairing external hard drive issues on a Mac. This built-in utility can identify and fix various disk problems, making it a go-to solution for many users.
- Open Disk Utility: Launch Disk Utility from the Applications > Utilities folder.
- Select Your External Hard Drive: In the Disk Utility sidebar, find and select your external hard drive. Choose the correct disk to avoid running repairs on the wrong one.
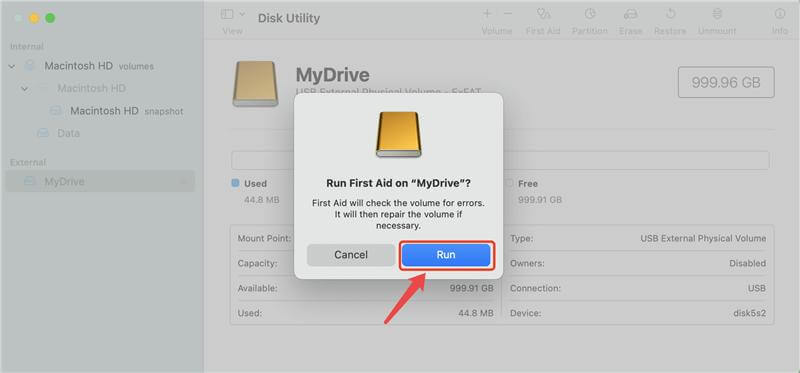
- Run First Aid: Click on the "First Aid" tab and then "Run." Disk Utility will look for mistakes on the disk and try to fix any problems.

Disk Utility's First Aid feature performs several checks, including verifying the file system's integrity and repairing any detected issues. If problems cannot be fixed, it will provide a detailed report. This report can help you understand the nature of the problems and determine the next steps.
Method 5: Format Mac's External Hard Drive
Formatting an external hard drive can resolve many issues, such as persistent corruption or file system errors that other methods cannot fix.
- Open Disk Utility: Launch Disk Utility from the Applications > Utilities folder.
- Select External Hard Drive: Select your external hard drive in the sidebar. Make sure to choose the correct disk to avoid formatting the wrong drive.
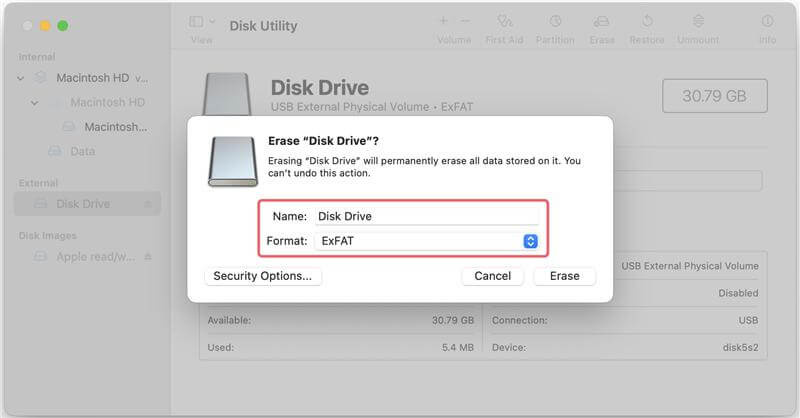
- To erase the Drive, Click the "Erase" tab. You must provide a name for the drive, select a format, and choose a scheme.
- Scheme: Choose GUID Partition Map for most modern uses.
- Confirm Erase: Click "Erase" to confirm. Disk Utility will format the drive according to your specifications. This process may take some time, depending on the drive size.

External Hard Drive Not Mounting and Not Writable on Mac?
NTFS file system is a Windows-based file system and not supported by macOS. When you connect an NTFS external hard drive to your Mac, you may find it is not mounting and is read-only. NTFS for Mac can help you solve this problem.
Step 1. Download and install the reliable NTFS for Mac tool - Donemax NFTS for Mac tool.
Step 2. Open Donemax NTFS for Mac, select the NTFS external hard drive, click on Mount button if the drive is not mounted.

Step 3. Click on Enable Writable button so that you can read-write it on your Mac.

Conclusion:
There are different ways to fix an external hard drive on a Mac, such as using Terminal instructions, checking the USB connections, and using the "First Aid" feature in Disk Utility. Safe Mode can help you find program conflicts, and formatting the drive can fix problems that won't go away.
By following these steps, you can find and fix common problems with portable hard drives, keeping your data safe and easy to access. Always back up your data, and be careful when using your portable drive to avoid problems in the future. You can keep your portable hard drive working well if you know what to do and have the right tools.
Related Articles
- Jul 19, 2025How to Find and Clear Large Files on Mac?
- Oct 18, 2024How to Empty or Force Empty Trash on Mac?
- Sep 20, 2024How to Install a Start Menu App for macOS Sequoia?
- Dec 26, 2024How to Format an NTFS Drive to APFS, HFS+, ExFAT, or FAT32 on Mac?
- Dec 23, 2024Fix LaCie External Hard Drive Read-Only on Mac: Comprehensive Guide
- Sep 23, 2025Fix Xcode Not Working on macOS Tahoe, Sequoia, Sonoma, etc.

Maria
Maria is one of the senior writers & editors of Donemax who lives and works in Sydney, Australia. She loves PC, Mac and Internet Technology. She has 6 years of writing articles about data recovery on PC/Mac, disk cloning solution, data eraser and computer OS optimization, etc. She is also interested in testing various software and digital products.

Gerhard Chou
In order to effectively solve the problems for our customers, every article and troubleshooting solution published on our website has been strictly tested and practiced. Our editors love researching and using computers and testing software, and are willing to help computer users with their problems
