Before we start: NTFS drives may not mount on your Mac. If you want to mount a NTFS drive on your Mac, just use NTFS for Mac tool. It can grant full read-access to NTFS drives and mount NTFS drives on Mac without any limitation.
PAGE CONTENT:
Mounting an external hard drive or USB drive on a Mac is usually straightforward with the Finder application. However, there are times when you may need to rely on the Terminal for advanced troubleshooting or automation purposes. Using the Terminal not only provides more control over the process but can also help resolve issues when the graphical user interface fails. This guide will walk you through the steps required to mount, troubleshoot, and unmount an external drive using Terminal on macOS.
External storage devices are essential for backing up data, transferring files, or extending a computer's storage capacity. While macOS is designed to make the process seamless through its graphical interface, technical issues like unrecognized drives or incorrect permissions can arise.
The Terminal is a powerful command-line tool that allows you to perform disk management operations with precision. This guide will help you understand the process of identifying, mounting, and troubleshooting external drives using the Terminal.
Step-by-step Guide: Mount External Device by Using Terminal Commands
#1 Prerequisites
Before diving into the process, ensure the following prerequisites are met:
- Terminal Access: Terminal is pre-installed on macOS. You can open it from the Applications > Utilities folder or search for it using Spotlight (Cmd + Space and type "Terminal").
![Use Terminal to Mount External Drive/USB Drive/SD Card on Mac]()
- Drive Connection: Confirm that the external hard drive or USB drive is securely connected to your Mac via a functional cable or port.
- Drive Compatibility: Ensure the drive's file system is supported by macOS. Common formats like HFS+, APFS, FAT32, and ExFAT are generally compatible. If the drive is formatted in an unsupported file system, you may need to reformat it.
#2 Identify the External Drive
Before mounting a drive using Terminal, you need to identify its system-assigned identifier. This identifier acts as a reference point for macOS to interact with the drive. Follow these steps to locate and understand your drive's details:
Step 1: List All Drives
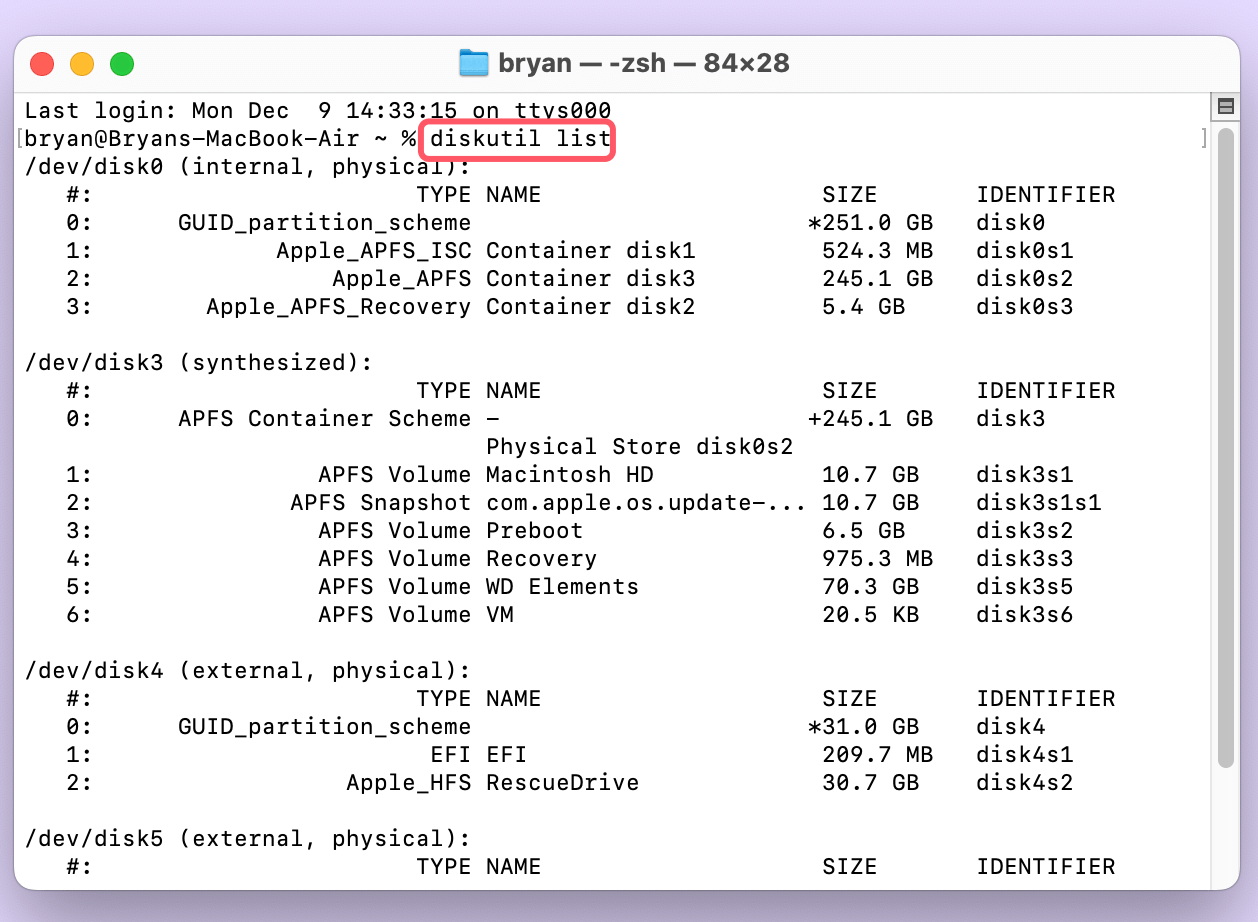
Start by listing all connected drives and their partitions with the following command in Terminal:
diskutil list
This command provides a detailed overview of all drives currently connected to your system, including internal storage, external drives, and their respective partitions. The list is organized hierarchically, making it easy to distinguish between main drives and their sub-partitions.
Step 2: Understand the Output
The output of the diskutil list command includes several key pieces of information about each drive and its partitions. Here's what to look for:
- Device Identifier: Each drive is assigned a unique identifier, such as /dev/disk4 for the entire drive or /dev/disk4s2 for a specific partition. This identifier is crucial for running further commands like mounting or repairing the drive.
- Volume Name: If the drive has been formatted and named, its volume name (e.g., "RescueDrive") will appear. This can help you quickly locate the correct drive in the list.
- File System Type: Displays the file system format of the drive or partition, such as:
- FAT32 or ExFAT: Commonly used for cross-platform drives (Windows, macOS, and Linux).
- APFS or HFS+: Used by macOS.
- NTFS: A Windows file system that macOS can read but not write without third-party tools.
- Mount Point: Indicates whether the drive is already mounted. If mounted, the output will show the location (e.g., /Volumes/DriveName). If not, it will say "Not mounted."
- Partition Map: Shows the partition scheme, such as GUID Partition Map or Master Boot Record (MBR), which can affect compatibility with different operating systems.
Sample Output:
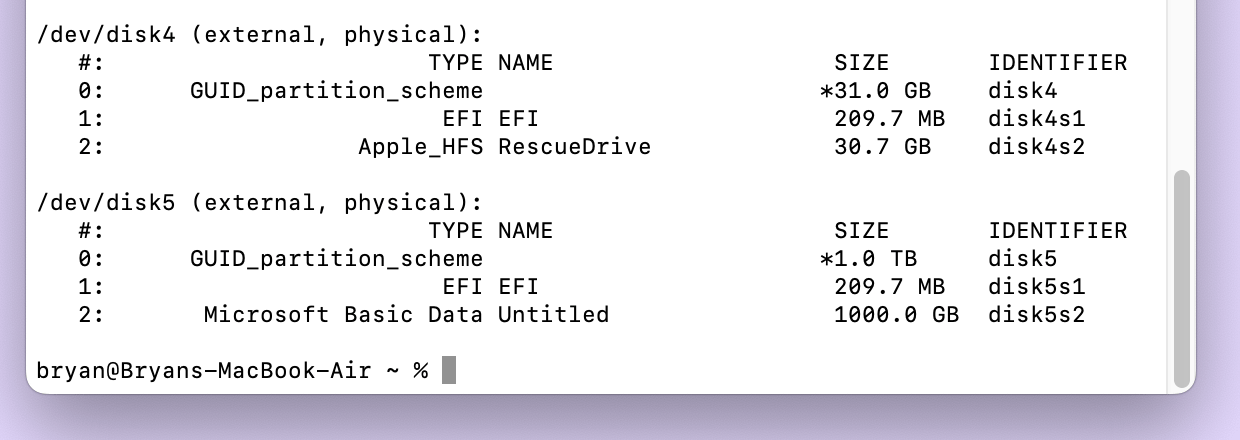
Here's an example of what the diskutil list output might look like:

- /dev/disk4: The external drive's main identifier.
- Disk4s1: A small EFI partition used for system purposes.
- Disk4s2: The primary partition named "RescueDrive."
Step 3: Note the Identifier
Once you've located your external drive in the list, note its device identifier. For example:
- If the drive is /dev/disk4, this identifier will be used for commands affecting the entire drive.
- If you're targeting a specific partition, such as /dev/disk4s2, use that identifier instead.
💡 Pro Tip:
If you have multiple drives connected, double-check the volume name and size to ensure you're selecting the correct one. Accidentally running commands on the wrong drive could lead to data loss.
#3 Mount the Drive
Once you have identified the drive, you can proceed to mount it manually.
Step 1: Mount the Drive
Use the following command to mount the drive:
diskutil mountDisk /dev/diskX
Replace diskX with the identifier noted earlier (e.g., /dev/disk4).

Step 2: Verify the Mount Point
After executing the command, confirm that the drive is mounted by checking the Finder or running the diskutil list command again. The drive should now show a mount point, such as /Volumes/DriveName.
Step 3: Handle Specific Partitions
If the drive contains multiple partitions, each partition will have its own identifier (e.g., /dev/disk4s1, /dev/disk4s2). Use the relevant identifier to mount a specific partition.
💡 Note: If you want to mount a NTFS drive on your Mac, Terminal may not work. You can use NTFS for Mac tool - such as Donemax NTFS for Mac to help you mount NTFS drive on Mac.
Step 1. Download and install Donemax NTFS for Mac.
Step 2. Select the NTFS drive, click on Enable Writable button so that you can write data to it.

Step 3. Click on Mount button to mount the NTFS drive on your Mac.

Troubleshooting Mounting Issues on Mac
Despite following the correct steps, external drives may fail to mount due to a variety of issues, ranging from hardware problems to file system errors. Below, we explore common problems and offer practical solutions.
Issue 1: Drive Not Recognized
When you connect your drive and it does not appear in the output of the diskutil list command, this usually indicates a connection or compatibility issue.
Causes:
- Loose or faulty cables.
- Malfunctioning USB ports.
- Incompatible or corrupted file system formats (e.g., ext4, often used by Linux).
- Drive hardware failure.
Solutions:
- Check Hardware:
- Try reconnecting the drive to another USB port.
- Use a different cable, especially if the current one shows signs of wear.
- Test the drive on another computer to rule out hardware failure.
- Inspect Drive Format:
- Use the diskutil info /dev/diskX command to check the file system format.
- If the drive is formatted in an unsupported format, consider reformatting it to a macOS-compatible format like APFS or ExFAT using Disk Utility.
- Reset SMC (System Management Controller): If the drive still isn't recognized, resetting the SMC on your Mac may resolve USB port or power delivery issues. Refer to Apple's support documentation for detailed steps based on your Mac model.
Issue 2: Permission Denied
Even when the drive is recognized, macOS may block access due to insufficient permissions.
Causes:
- The drive may be configured as read-only.
- User account does not have sufficient privileges to mount the drive.
Solutions:
- Repair Permissions: Use the following command to repair drive permissions:
sudo diskutil repairPermissions /dev/diskX
This command requires admin privileges, so you'll need to enter your password.
- Adjust Ownership Settings: If the drive is mounted but files cannot be accessed, try changing the ownership settings:
sudo chown -R $(whoami) /Volumes/DriveName
Replace DriveName with the actual name of the drive.
- Enable Write Access: If the drive is formatted as NTFS (a Windows format), macOS can only read it by default. Use a third-party tool like NTFS for Mac to enable write access.
Issue 3: File System Errors
Corrupted or damaged file systems can prevent a drive from being mounted properly.
Causes:
- Abrupt ejection of the drive during data transfer.
- Physical damage to the drive.
- Virus or malware infection (rare but possible).
Solutions:
- Repair the File System: Use diskutil repairDisk to fix minor errors:
diskutil repairDisk /dev/diskX
If the repair process indicates irreparable damage, consider using data recovery tools like Donemax Data Recovery for Mac to retrieve your files before reformatting the drive.
- Check File System Integrity: Run the following command to verify the file system:
fsck /dev/diskX
If errors are detected, repeat the command with the -fy flag to fix them:
fsck -fy /dev/diskX
- Reformat the Drive (Last Resort): If all else fails, back up any recoverable data and reformat the drive:
diskutil eraseDisk FILE_SYSTEM_TYPE DiskName /dev/diskX
Replace FILE_SYSTEM_TYPE with a format like APFS or exFAT.
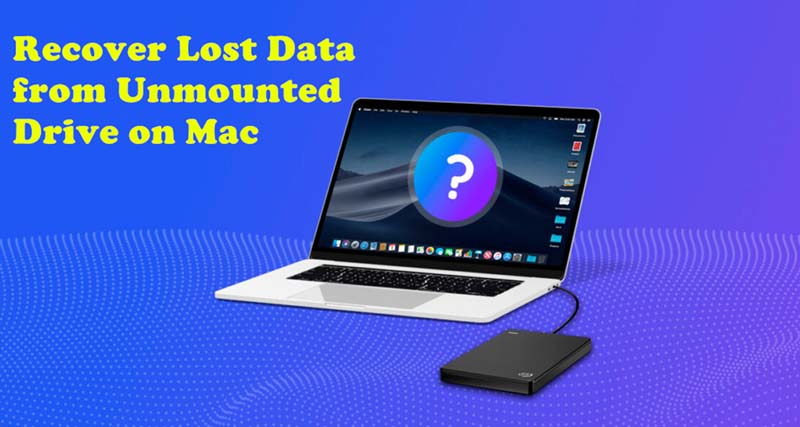
Recover Data from Unmounted or Erased Drive on Mac
Mac data recovery software can help you export data from unmounted drive or recover erased data on Mac.
Issue 4: Drive Stuck in Use
Sometimes, macOS cannot unmount a drive because it is in use, even if no visible application is accessing it.
Causes:
- Background processes or apps accessing the drive.
- Hidden system files being read or written.
Solutions:
- Identify Processes Using the Drive: Use the lsof (list open files) command to see which processes are accessing the drive:
lsof | grep DriveName
Once identified, terminate the processes with the kill command:
kill -9 PID
Replace PID with the process ID listed in the lsof output.
- Force Unmount the Drive: If terminating processes doesn't work, force unmount the drive:
diskutil unmountForce /dev/diskX
Be cautious, as this may interrupt ongoing data transfers.
- Restart Your Mac: If the issue persists, restart your computer to ensure all processes are terminated.
By systematically addressing these potential issues, you can resolve most problems with mounting external drives using Terminal. If a drive remains unresponsive after troubleshooting, it may indicate a deeper hardware fault requiring professional assistance.
Automating the Process (Optional)
For frequent tasks, you can automate the mounting and unmounting process using a shell script.
Step 1: Create the Script
Open a text editor (e.g., Nano) and create a new script file:
nano mount_drive.sh
Add the following script:
#!/bin/bash
# Replace diskX with your drive identifier
DRIVE_IDENTIFIER="/dev/diskX"
echo "Mounting drive..."
diskutil mount $DRIVE_IDENTIFIER
echo "Drive mounted successfully!"
Save the file and make it executable:
chmod +x mount_drive.sh
Step 2: Run the Script
Execute the script whenever you need to mount the drive:
./mount_drive.sh
You can create a similar script for unmounting.
Conclusion
Mounting an external hard drive or USB drive using Terminal on a Mac may seem daunting at first, but it provides a level of control and troubleshooting capabilities that the graphical interface cannot. By following the steps outlined in this guide, you can confidently identify, mount, and manage external drives using simple Terminal commands.
Whether you're a casual user trying to resolve a mounting issue or a power user looking to automate tasks, the Terminal is a versatile tool for macOS disk management. Experiment with additional commands to explore its full potential.

Donemax NTFS for Mac
An easy-to-use NTFS for Mac tool to help you enable writable for NTFS drives on Mac so that you can read-write NTFS drives on Mac without any limitation. It also can help you mount, format, repair, rename, open drive on your Mac.
Related Articles
- Dec 21, 2024How to Delete Old Time Machine Backups?
- Apr 06, 2025Fix support.apple.com/mac/startup 3001F Error on Mac – A Comprehensive Guide
- Jul 04, 2025Fix Corrupted APFS Container on Mac Without Losing Data
- Oct 16, 2024Clean Install macOS Sequoia: A Comprehensive Guide
- Aug 05, 2024How to Use 1TB or 2TB SD Card on Mac?
- Jul 01, 2025[7 Fixes] Fix 'Your Computer Was Restarted Because of a Problem' on Mac

Christina
Christina is the senior editor of Donemax software who has worked in the company for 4+ years. She mainly writes the guides and solutions about data erasure, data transferring, data recovery and disk cloning to help users get the most out of their Windows and Mac. She likes to travel, enjoy country music and play games in her spare time.

Gerhard Chou
In order to effectively solve the problems for our customers, every article and troubleshooting solution published on our website has been strictly tested and practiced. Our editors love researching and using computers and testing software, and are willing to help computer users with their problems

