Written byCharlesUpdated on Feb 12, 2025
(10 Solutions) Can't Update macOS? Fix It Now
Approved byGerhard Chou
PAGE CONTENT:
Keeping your Mac updated is crucial for maintaining security, improving performance, and accessing new features. However, encountering issues when trying to update macOS can be frustrating. Whether your Mac refuses to install the update, gets stuck during the process, or simply doesn't show an available update, there are solutions to get things back on track. This guide provides a detailed breakdown of common problems and how to fix them effectively.

10 Fixes for Can't Installing or Checking macOS Update
Fix 1. Check Compatibility and Storage
Prior moving into troubleshooting, the first step is to ensure the compatibility of your system.
Check Compatibility:
Apple drops support for older Mac models with every major macOS release. To check if your Mac is eligible for the update:
- Click the Apple menu and select About This Mac.
- Note the Mac model and year.
- Compare it with the compatibility list for the macOS version you're trying to install (found on Apple's official website).
If your Mac is too old for the update, your options are limited to staying on your current version, upgrading to a compatible OS, or considering alternative installation methods like OpenCore Legacy Patcher for unofficial support.
Check Available Storage:
macOS updates require a significant amount of free space. If your update isn't proceeding, lack of storage might be the culprit. To check and free up space:
- Go to Storage from About This Mac via Apple menu (for older macOS versions) or click System Settings > General > Storage (for Ventura or later).
- Ensure you have at least 20–30GB free (larger updates may require more).
- Delete unnecessary files, empty the Trash, and remove old backups from System Settings > General > Storage.
![Fix Can't Update macOS]()
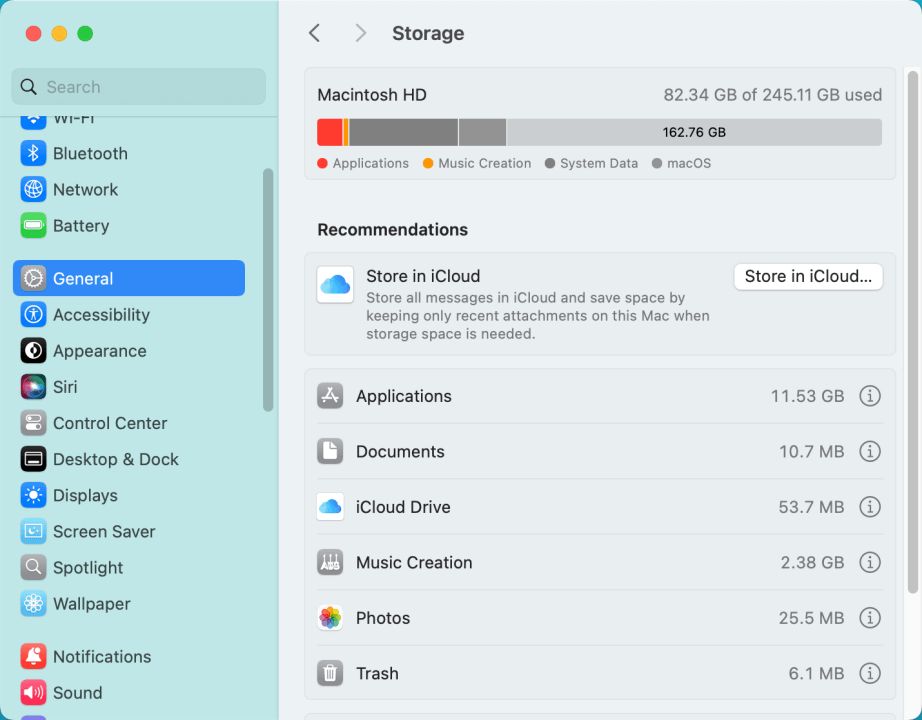
If storage is a persistent issue, consider using an external drive or cloud storage for large files.
Fix 2. Enable Fast Internet Connection
Slow internet connection can cause update failures. To verify and improve your connection:
- Run a speed test at Fast.com or Speedtest.net to ensure stable download speeds.
- If the update fails midway, restart your router and reconnect to the network.
- Try switching to a different Wi-Fi network or using an Ethernet cable for a stable connection.
If your network is slow, temporarily disabling VPNs and firewalls may help speed up the download.
Fix 3. Restart and Try Again
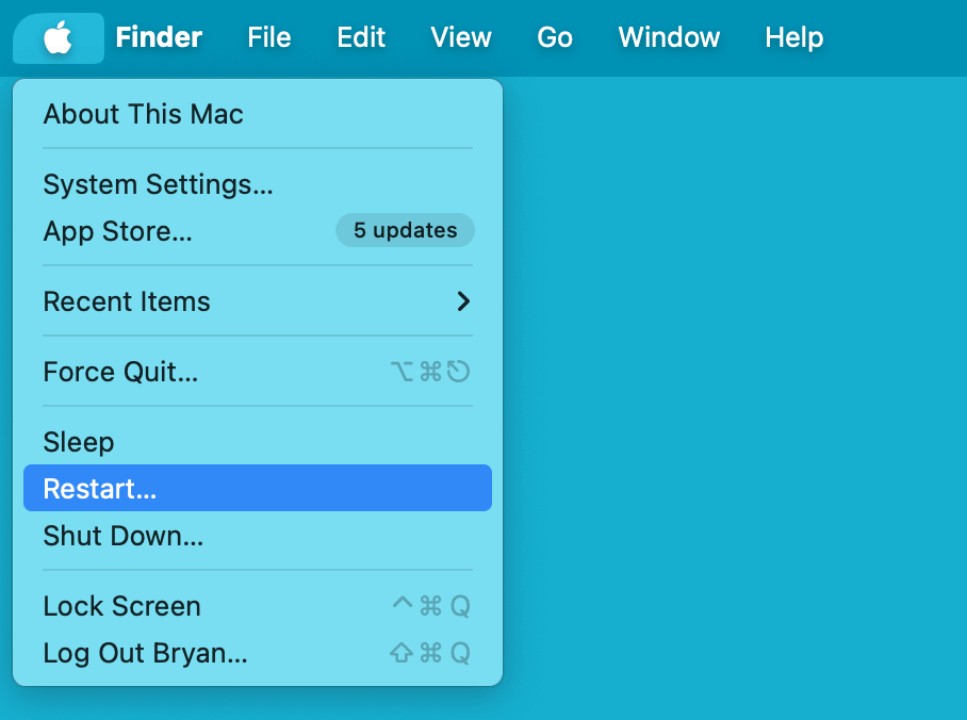
A simple restart can resolve minor glitches preventing the update.
- Click the Apple menu > Restart.
![Fix Can't Update macOS]()
- After rebooting, go to System Settings > General > Software Update and try updating again.
![Fix Can't Update macOS]()
Holding down the Shift key during boot will restart in Safe Mode if the problem continues. Safe Mode clears cache files that may be interfering with the update.
Fix 4. Check Apple's Servers
Sometimes, the problem isn’t on your end. If Apple’s update servers are experiencing issues, you won’t be able to download or install updates.
Check the official Apple System Status page:
- Visit Apple's System Status page.
- Look for "macOS Software Update" – if it's down or marked in yellow/red, wait for Apple to resolve the issue.
![Fix Can't Update macOS]()
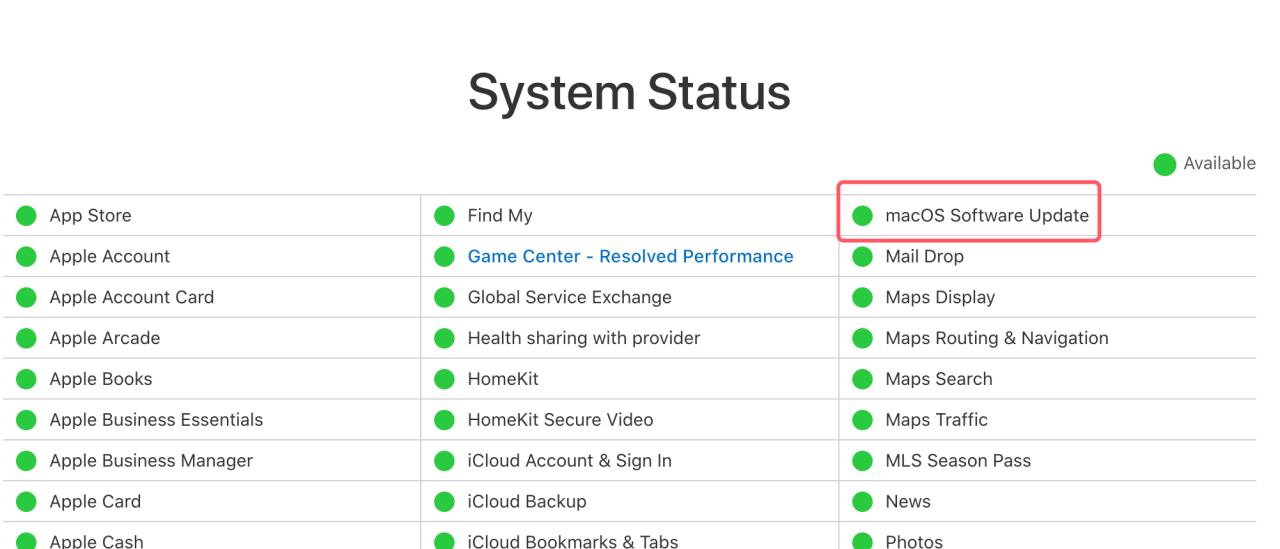
If Apple’s servers are fine, move on to other troubleshooting steps.
Fix 5. Update via System Preferences or Terminal
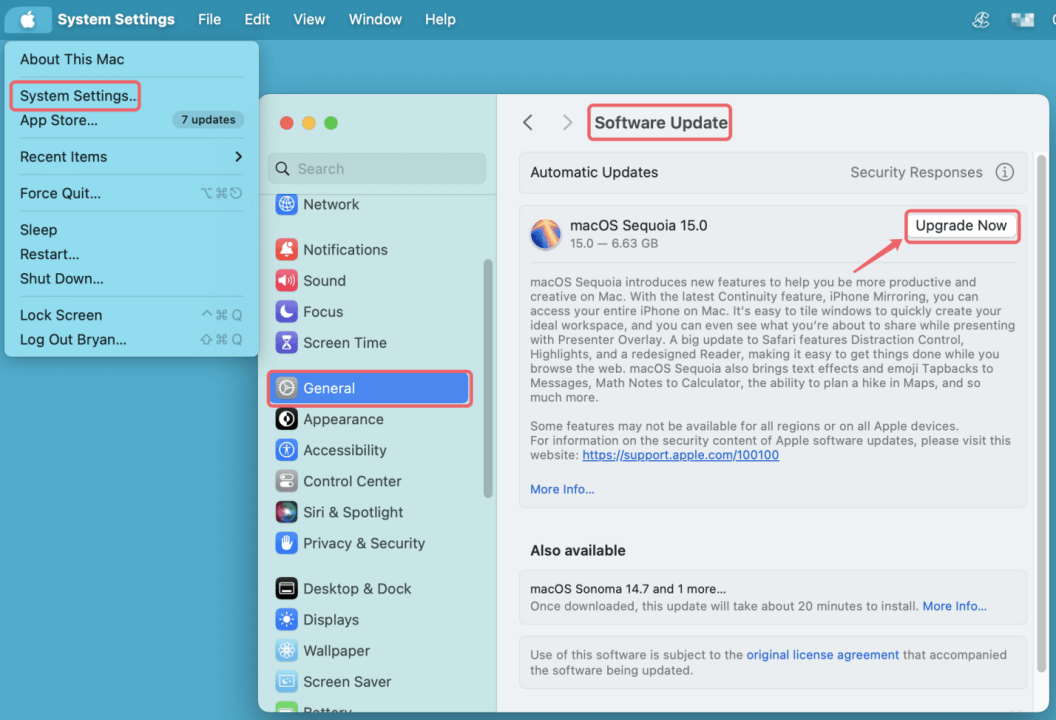
Normally, you should be able to update your Mac;
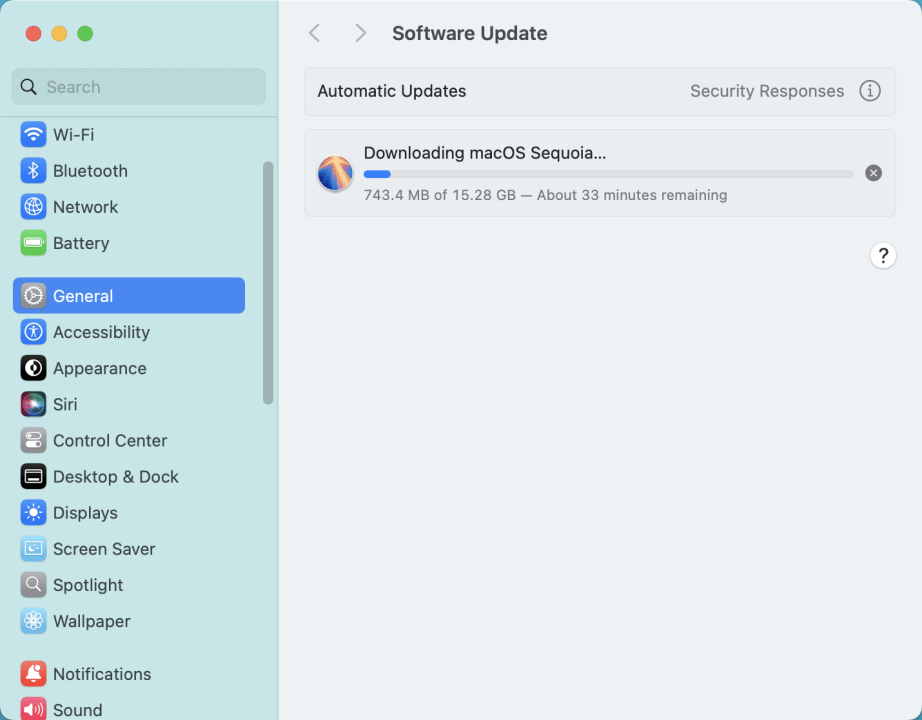
- Go to Software Update in System Preferences from General via System Settings in Apple menu
- Click Update Now or Upgrade Now, depending on the update type.
![Fix Can't Update macOS]()
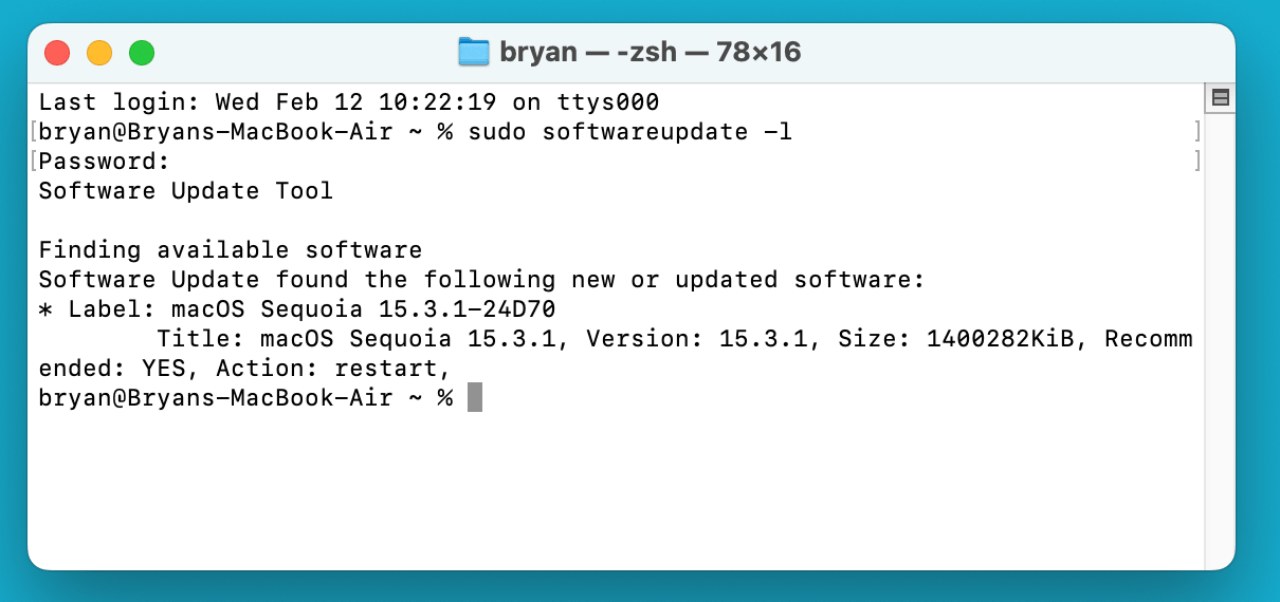
If the update is stuck, you can force it through Terminal:
- Open Terminal from Utilities via Applications.
- Type:
sudo softwareupdate -l
This lists available updates.
- To install updates, type:
sudo softwareupdate -ia
![Fix Can't Update macOS]()
- Enter your password and let the update install.
If the update still fails, proceed to advanced troubleshooting.
Fix 6. Reset NVRAM and SMC
Resetting NVRAM and SMC can fix many update-related issues.
Reset NVRAM (For Intel Macs only):
- Turn off your Mac.
- After turning it on, press and hold Option + Command + P + R for 20 seconds.
- When the Apple logo shows, let go of the keys.
Reset SMC (For Intel Macs only):
- Shut down your Mac.
- If your Mac has a removable battery, remove it for 15 seconds.
- For Macs with T2 chips, press and hold Control + Option + Shift for 7 seconds, then add the power button for another 7 seconds.
Apple Silicon Macs (M1, M2, and later) reset these automatically upon restart, so these steps are unnecessary.
Fix 7. Try Updating in macOS Recovery Mode
If the normal update method fails, installing macOS from Recovery Mode might help.
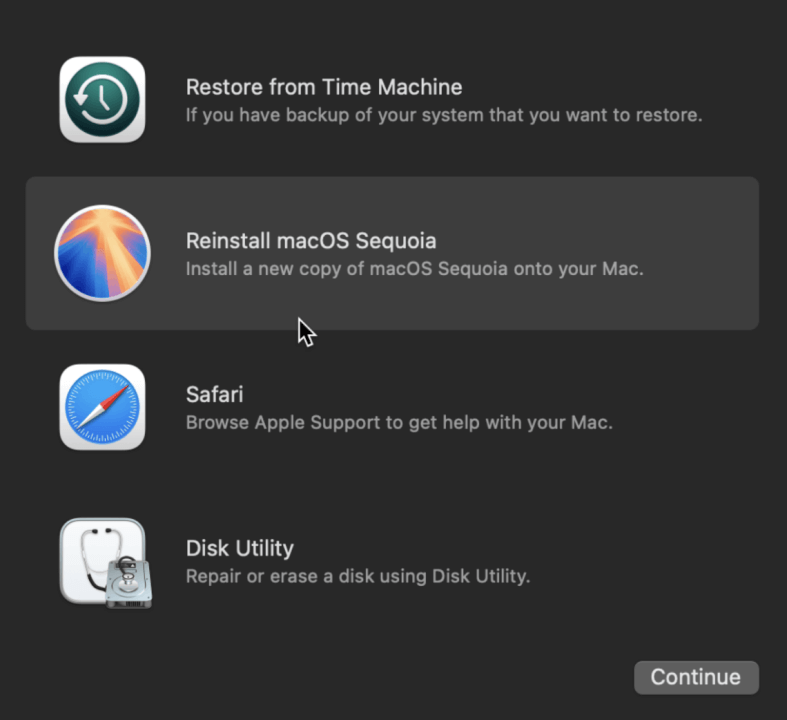
- Press and hold the Command + R keys until the Apple logo appears on your Mac after restarting it (for Intel-based Mac). Or press and hold Power button until it boots into macOS Recovery mode (for Apple silicon Mac). Select Options, click Continue.
![Fix Can't Update macOS]()
- Choose Reinstall macOS and adhere to the prompts displayed on the screen.
![Fix Can't Update macOS]()
- Let the installation complete without interruptions.

This method preserves your files while reinstalling a fresh copy of macOS.
Fix 8. Use a Bootable USB Installer to Install macOS
If you are unable to update macOS through normal methods, using a bootable USB installer can be a reliable workaround. This method is particularly useful if your Mac is stuck in a boot loop, experiencing repeated update failures, or if you prefer a clean installation of macOS.
Why Use a Bootable Installer?
A bootable macOS installer allows you to:
- You can install macOS on several Macs without having to download the installer every time.
- Bypass software update glitches and install macOS directly.
- Perform a clean installation by erasing the startup disk and starting fresh.
- Troubleshoot a non-booting Mac by booting into the installer and accessing Disk Utility or Terminal.
This method is especially useful for older Macs that might struggle with the built-in update process.
How to Create a Bootable macOS USB Installer
Step 1: Download the macOS Installer
The first step is to download the full macOS installer. The installer will appear in Applications as "Install macOS [Version].app".
If the App Store does not show the version you need, you can download older macOS versions from Apple's official website.
Step 2: Format the USB Drive
Next, you need to prepare your USB drive to make it bootable.
- Insert your USB flash drive into your Mac.
- Open Disk Utility found in Utilities via Applications.
- Select the USB drive in the left panel.
- Click Erase and format it as:
- Format: Mac OS Extended (Journaled)
- Scheme: GUID Partition Map
- Click Erase and wait for the process to finish.
This step ensures that your USB is correctly formatted for macOS installation.
Step 3: Create the Bootable Installer Using Terminal
Once the USB drive is ready, use Terminal to create the bootable installer.
- Open Terminal (found in Applications > Utilities).
- Type the following command, replacing [macOS version] with the correct name:
sudo /Applications/Install\ macOS\ [Version].app/Contents/Resources/createinstallmedia --volume /Volumes/MyUSB
For example, if you are creating a macOS Ventura installer, type:
sudo /Applications/Install\ macOS\ Ventura.app/Contents/Resources/createinstallmedia --volume /Volumes/MyUSB
- Press Enter, then enter your Mac’s administrator password when prompted.
- The process will take a few minutes. Once done, your USB drive will be renamed "Install macOS [Version]", confirming that the installer was successfully created.
How to Install macOS Using the Bootable USB Installer
Now that your bootable USB is ready, follow these steps to install macOS:
Step 1: Boot from the USB Installer
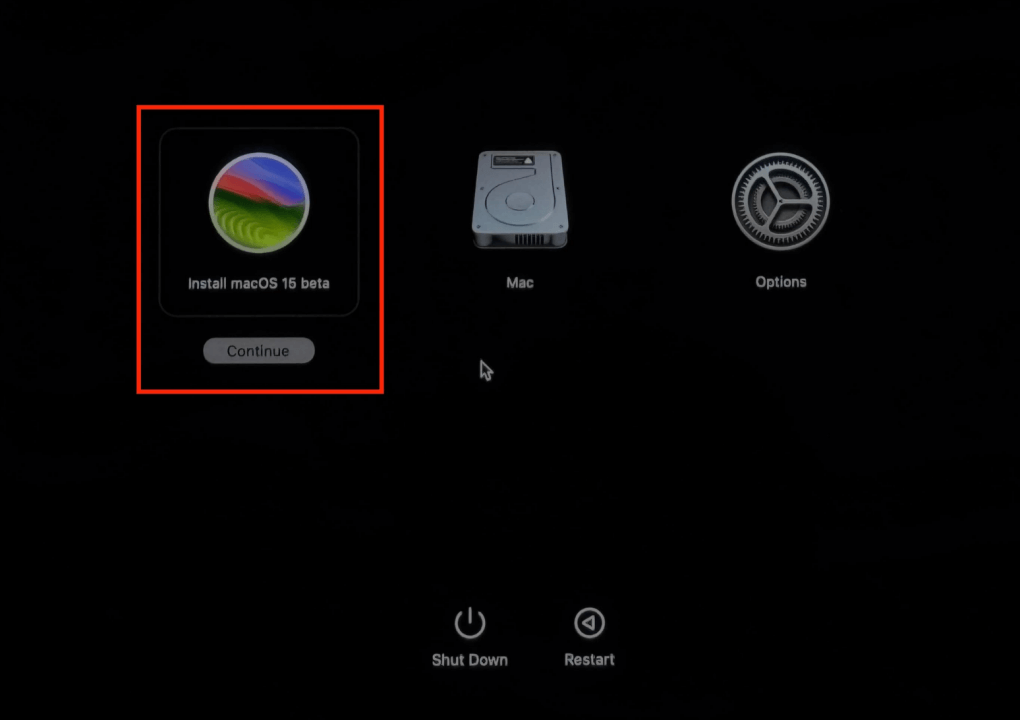
- Connect the USB disk that can be booted to the Mac.
- Press and hold the Option (⌥) key as soon as the Mac has restarted. If you are using a Mac with Apple silicon, boot into macOS Recovery mode.
- When the Startup Manager appears, select Install macOS [Version] from the bootable USB drive.
- Press Enter to boot into the macOS installer.
![Fix Can't Update macOS]()
Step 2: Install macOS
Once in the macOS installer, you have two options:
- Upgrade Installation: This installs macOS over your existing system without deleting any files.
- Clean Installation (Recommended): Erases the startup disk and installs a fresh copy of macOS.
What to Do If the Bootable Installer Doesn't Work?
If your Mac fails to recognize or boot from the USB installer:
- Try a Different USB Port – Some USB ports may not function correctly.
- Reformat the USB and Repeat the Process – A corrupted USB may prevent booting.
- Disable Secure Boot (For T2 Macs) – In Startup Security Utility, set Secure Boot to Medium Security.
- Use Internet Recovery Mode – If the USB fails, try holding Command + Option + R at startup to reinstall macOS via the internet.
Fix 9. Fix Corrupted System Files
If the update keeps failing, the issue might be with macOS system files. Running Disk Utility or fsck (File System Consistency Check) may help.
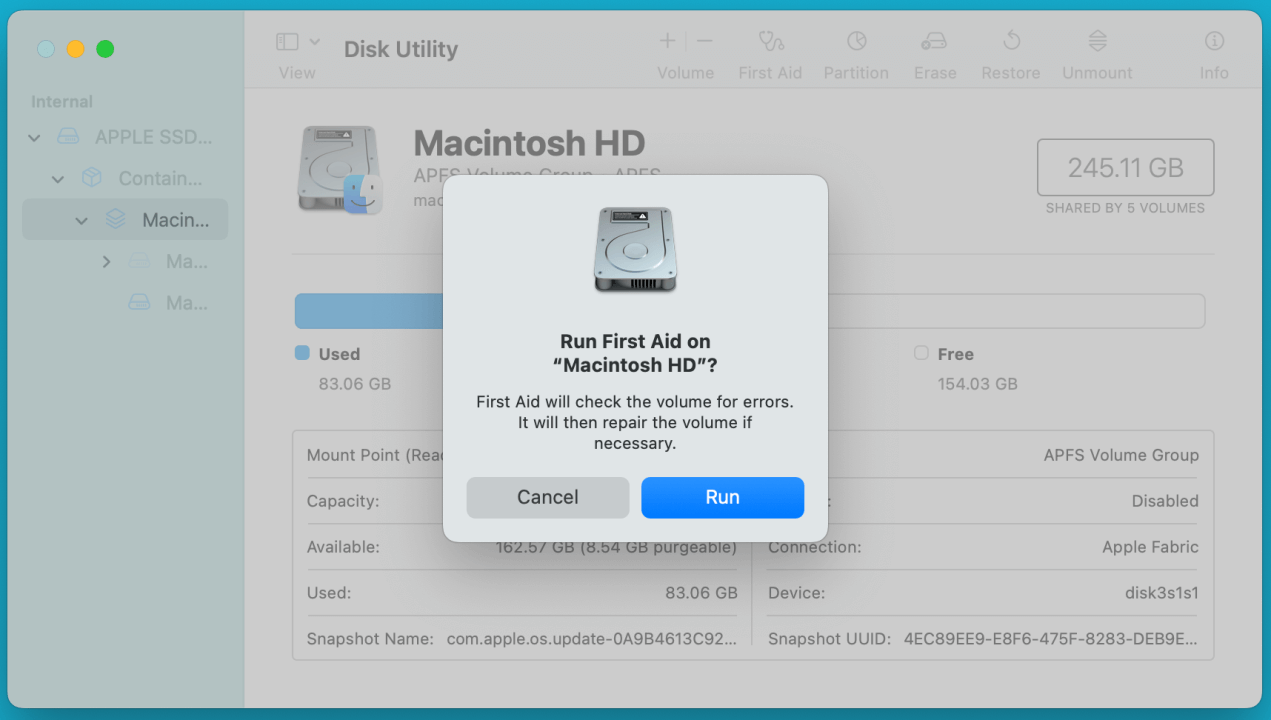
Run First Aid in Disk Utility
- Open Disk Utility from Applications > Utilities.
- Select Macintosh HD and click First Aid.
- Run First Aid on all volumes and restart your Mac.
![Fix Can't Update macOS]()
Use fsck in Single-User Mode (For Intel Macs Only)
- Restart your Mac and hold Command + S at startup.
- At the command prompt, type:
fsck -fy
- If errors are found, repeat until it reports "The volume appears to be OK."
For Apple Silicon Macs, Disk Utility should be used instead.
Fix 10. Contact Apple Support
If all else fails, reaching out to Apple Support is your best bet.
- Apple Support Website: support.apple.com
- Apple Store & Authorized Service Providers: If your Mac is under warranty, book an appointment at the Genius Bar.
- Apple Support Phone: Check your country’s Apple support number.
A hardware issue (such as a failing SSD) could be preventing updates, requiring professional diagnosis.
Tips for Fixing Can't Update macOS
1. Data Recovery after Fixing Can't Update macOS
If you have lost data after fixing can't update macOS, you can use Mac data recovery software, such as Donemax Data Recovery for Mac to help you get the lost data back.
Step 1. Download and install Donemax Data Recovery for Mac on your Mac.
Step 2. Open Donemax Data Recovery for Mac, select the Mac internal disk - Macintosh HD to start data recovery.

Step 3. Click on Scan button to deeply scan the Mac internal disk and find all deleted/erased files.

Step 4. After deep scan, you can preview all recoverable files. Then select the wanted files, click on Recover button to save them.

2. Make a Clone before or after Fixing Can't Update macOS
Before or after fixing errors of macOS, you can use disk cloning software - such as Donemax Disk Clone for Mac to create a full bootable clone backup for your Mac.
Step 1. Download and install Donemax Disk Clone for Mac on your Mac, then connect an external hard drive to the Mac.
Step 2. Open Donemax Disk Clone for Mac, choose OS Clone mode. Then select the external hard drive as the destination drive, click on Clone Now button.
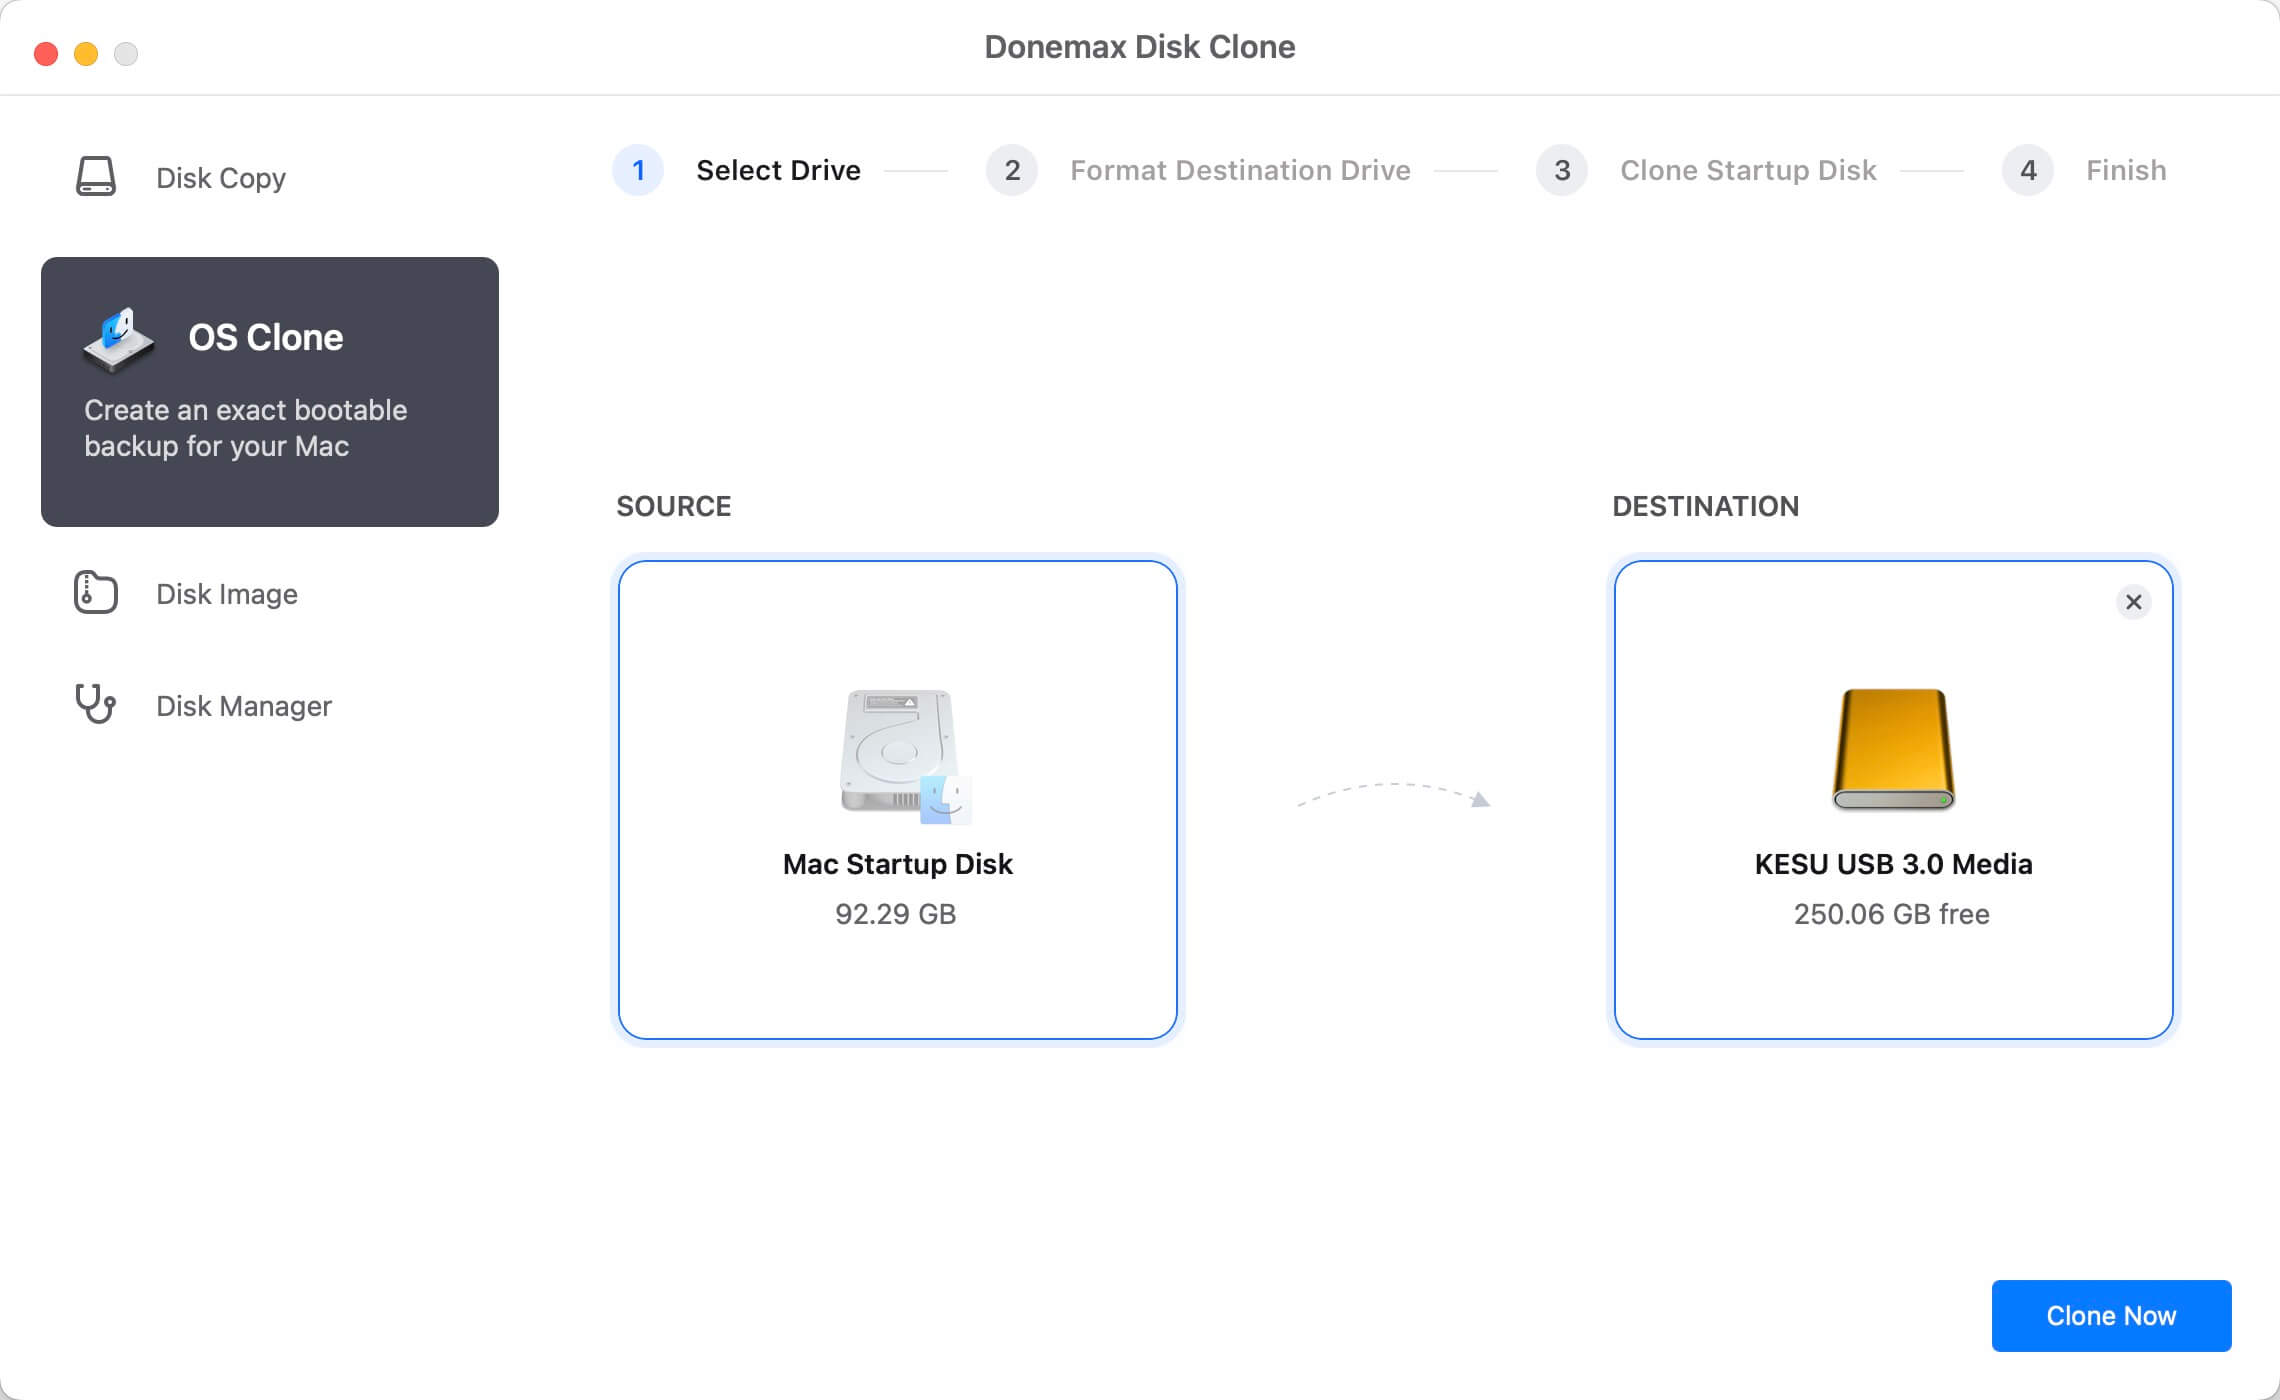
It will clone everything including macOS, apps, settings, user data from the Mac internal disk to the external hard drive, creating a full bootable clone.
Conclusion
Updating macOS is crucial for security and performance, but problems can arise. Start by checking compatibility and storage, ensuring a stable internet connection, and restarting your Mac. If the update still fails, use Terminal commands, reset NVRAM/SMC, or try Recovery Mode. Advanced options like a bootable USB installer or disk repair can help fix deeper issues.
By adhering to these steps, you should be able to successfully update macOS and keep your Mac running smoothly. If none of these methods work, Apple Support is always available to assist. Keep your system updated and enjoy the latest macOS features hassle-free!
Related Articles
- Mar 11, 2025How to Use Seagate One Touch SSD on Mac?
- Nov 18, 2024How to Hide or Remove Macintosh HD on Mac Desktop?
- Mar 12, 2025How to Use Seagate Ultra Compact SSD on Mac?
- Dec 25, 2024How to Resize and Partition SSD on Mac?
- Jul 25, 2024Fix Cannot Open Disk Utility on Mac
- Nov 25, 2024How to Create a Bootable USB Installer for macOS Monterey?

Contributing Writer
Charles
Charles, who lives in Sydney, Australia, is an editor & writer of Donemax Team. He is good at writing articles related with Apple Mac computers, Windows operating systems, data recovery, data erasure, disk clone and data backup, etc. He loves reading and playing tennis in his spare time and is interested in testing new digital devices such as mobile phones, Macs, HDDs, SSDs, digital cameras, etc.

Editor in chief
Gerhard Chou
In order to effectively solve the problems for our customers, every article and troubleshooting solution published on our website has been strictly tested and practiced. Our editors love researching and using computers and testing software, and are willing to help computer users with their problems