PAGE CONTENT:
- Understanding Partitions and Resizing SSDs
- Precautions Before Resizing or Partitioning SSD on Mac
- How to Resize and Partition an SSD Using Disk Utility?
- Troubleshooting Common Partitioning Issues
- Resizing or Deleting Partitions in the Future
- Recover Lost Data After Resizing or Partitioning SSD on Mac
- Conclusion
Resizing and partitioning an SSD on your Mac is a handy way to organize your storage, create space for multiple operating systems, or enhance performance. Whether you're a tech enthusiast looking to optimize storage or simply managing your digital clutter, macOS provides robust tools to help you manage your SSD partitions effectively.
This article will walk you through everything you need to know about resizing and partitioning SSDs on a Mac - from understanding the basics to troubleshooting common issues. Let's dive into the process and demystify SSD partitioning.
Understanding Partitions and Resizing SSDs
Before we get into the technical steps, it’s crucial to understand what partitioning means and how resizing plays a role in managing SSD space.
What Is Partitioning?
Partitioning is the process of dividing a single physical drive into multiple logical sections, called partitions. Each partition acts as an independent disk with its own file system and can be used for various purposes. You might partition a drive to install multiple operating systems, separate personal files from work files, or create dedicated backup storage.
While traditional hard drives often had multiple partitions, SSDs (Solid-State Drives) offer faster speeds and are more efficient in storage management, but they can also benefit from partitions when used wisely. By segmenting your SSD, you can maintain better control over your system, ensure clean installations, and protect important data.
Difference Between Resizing and Partitioning an SSD
Partitioning an SSD involves creating new sections or removing existing ones, while resizing refers to expanding or shrinking these sections. Resizing an SSD partition is useful if you need to allocate more or less space to a particular partition without affecting the rest of the drive.
For example, if one partition is running out of space, you can shrink another partition and reallocate that space to avoid issues like running low on disk space or slowing down your system. On the other hand, partitioning allows you to create entirely new segments on the drive.
Use Cases for Partitioning and Resizing SSDs
There are several common scenarios where you might want to partition or resize your SSD on a Mac:
- Dual Booting: Partitioning allows you to install multiple operating systems on a single drive. For instance, you can create separate partitions for macOS and Windows using Boot Camp.
- Storage Organization: You can organize files by creating dedicated partitions for personal files, work files, or multimedia.
- Backup and Recovery: Create a partition for backup purposes, or use it for Time Machine backups.
- Optimize Performance: Managing partitions can help optimize your SSD's performance, making it easier to maintain data integrity.
Precautions Before Resizing or Partitioning SSD on Mac
While resizing and partitioning an SSD is relatively straightforward on macOS, it's essential to take some precautions to ensure the process goes smoothly without causing data loss.
Backup Your Data
Before you proceed, back up all critical data from your SSD. Resizing or partitioning involves manipulating the drive's data, and while modern operating systems are generally good at preventing data loss during these processes, accidents can happen. Use Time Machine or an external storage solution to keep a copy of your essential files.
Free Space Requirements
Ensure that you have sufficient free space on your SSD before resizing or partitioning. You'll need enough available storage to create a new partition or expand an existing one. If you are running out of space, consider clearing out unnecessary files or moving them to an external drive to free up room.
Compatibility Check: File System Formats
macOS supports several file system formats, including APFS (Apple File System) and HFS+ (Mac OS Extended). APFS is the default for macOS High Sierra and later and is optimized for SSDs, offering faster performance and better space management. If you're planning to use partitions for different purposes (e.g., dual booting with Windows), be sure to select the appropriate file system for each partition. For example:
- APFS: Best for macOS partitions.
- HFS+: Older macOS format but still useful for compatibility.
- ExFAT: Useful for sharing partitions between macOS and Windows.
How to Resize and Partition an SSD Using Disk Utility?
macOS comes with a built-in disk management tool called Disk Utility, which provides a user-friendly interface for resizing and partitioning your SSD. Below are step-by-step instructions for performing these tasks.
● Accessing Disk Utility
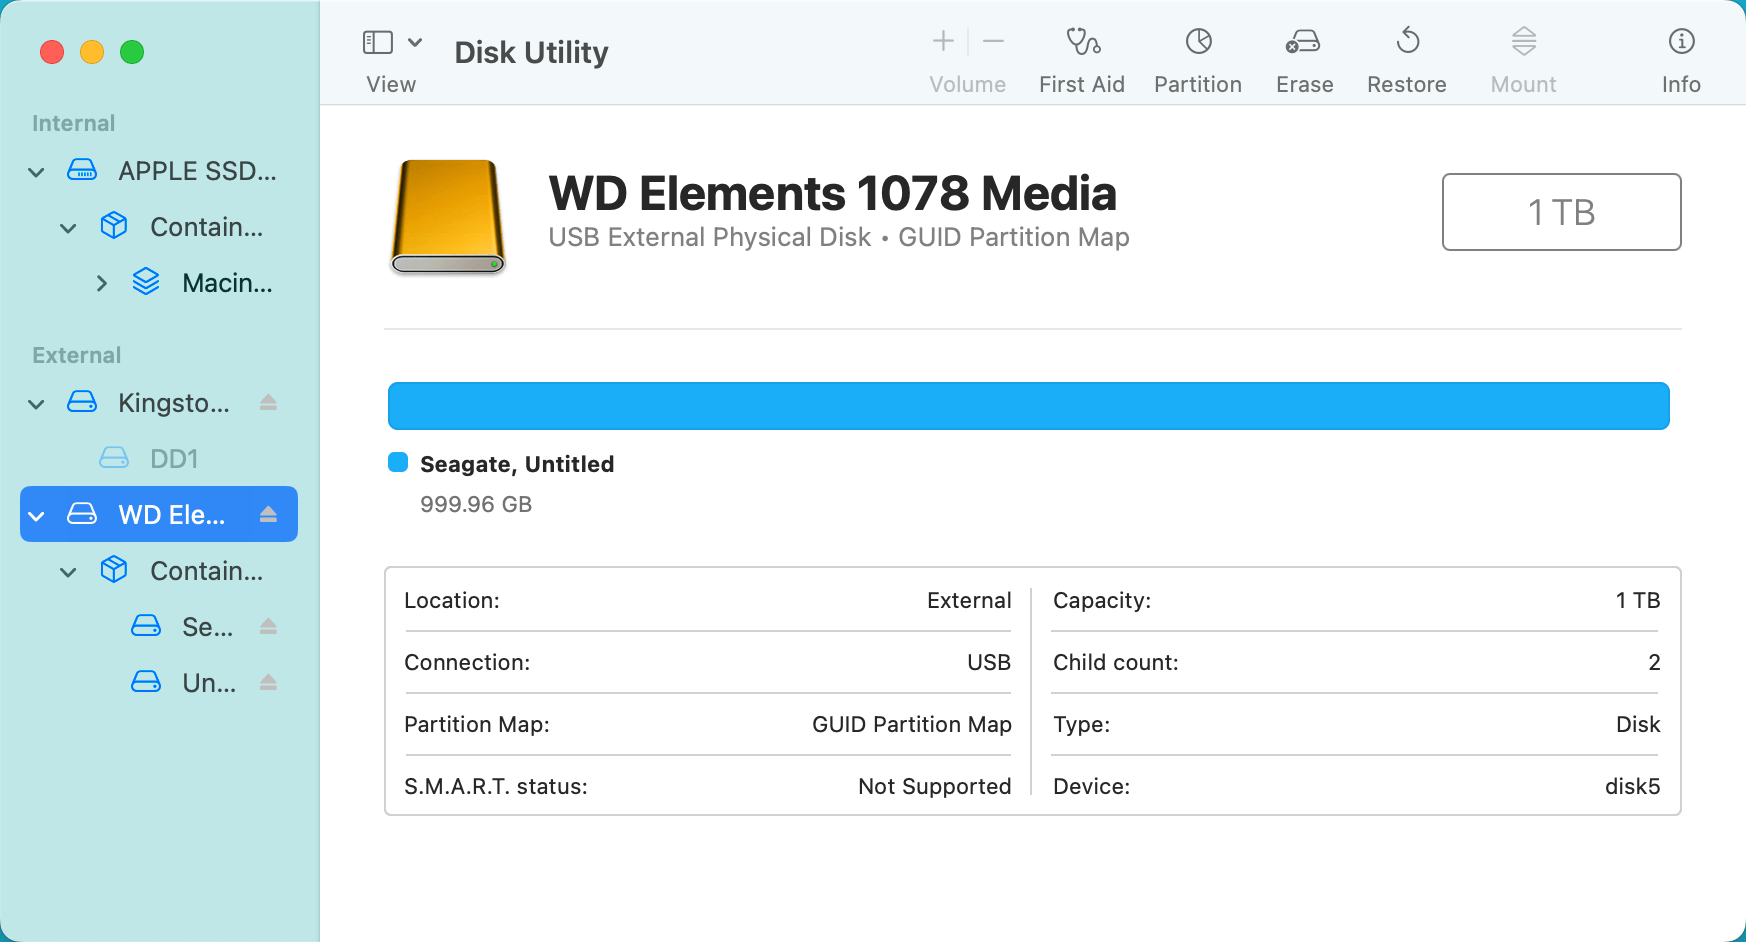
- Open Disk Utility: You can access Disk Utility from Applications > Utilities > Disk Utility or by using Spotlight Search (Command + Space) and typing "Disk Utility."
![Resizing and partitioning an SSD on your Mac]()
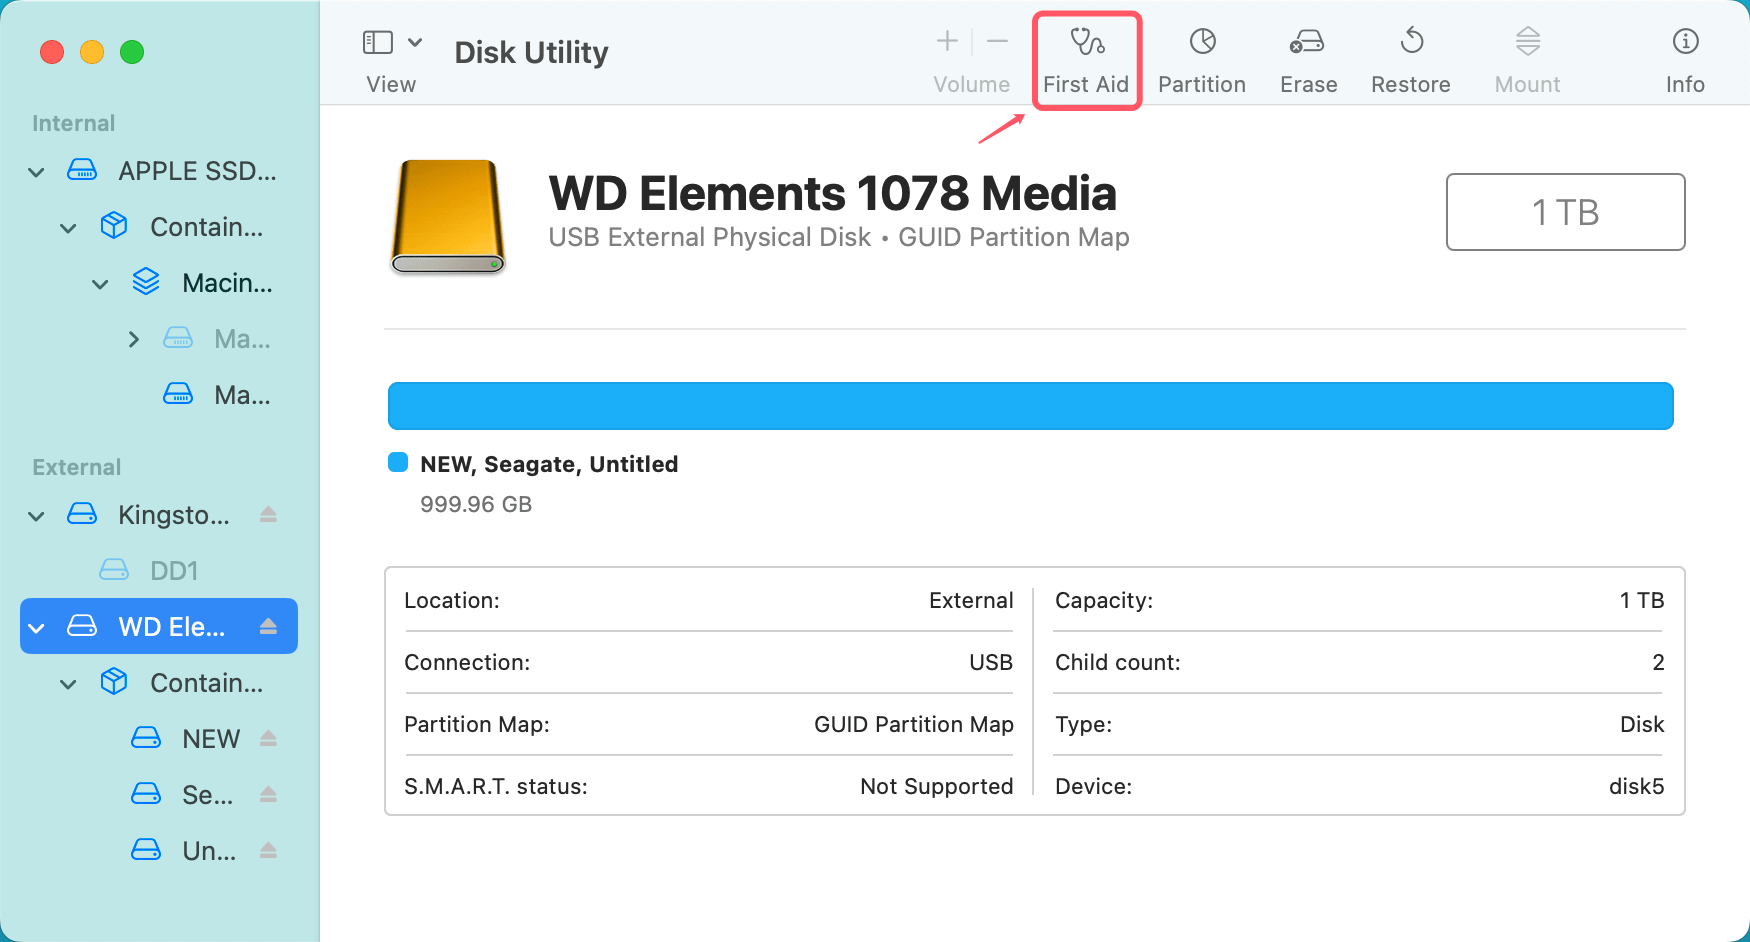
- Select Your SSD: In Disk Utility, locate your SSD in the sidebar under "Internal" or "External." Make sure you select the SSD itself, not just one of the existing partitions.
![Resizing and partitioning an SSD on your Mac]()
● Resizing a Partition
Resizing a partition allows you to change the space allocated to it without affecting other partitions.
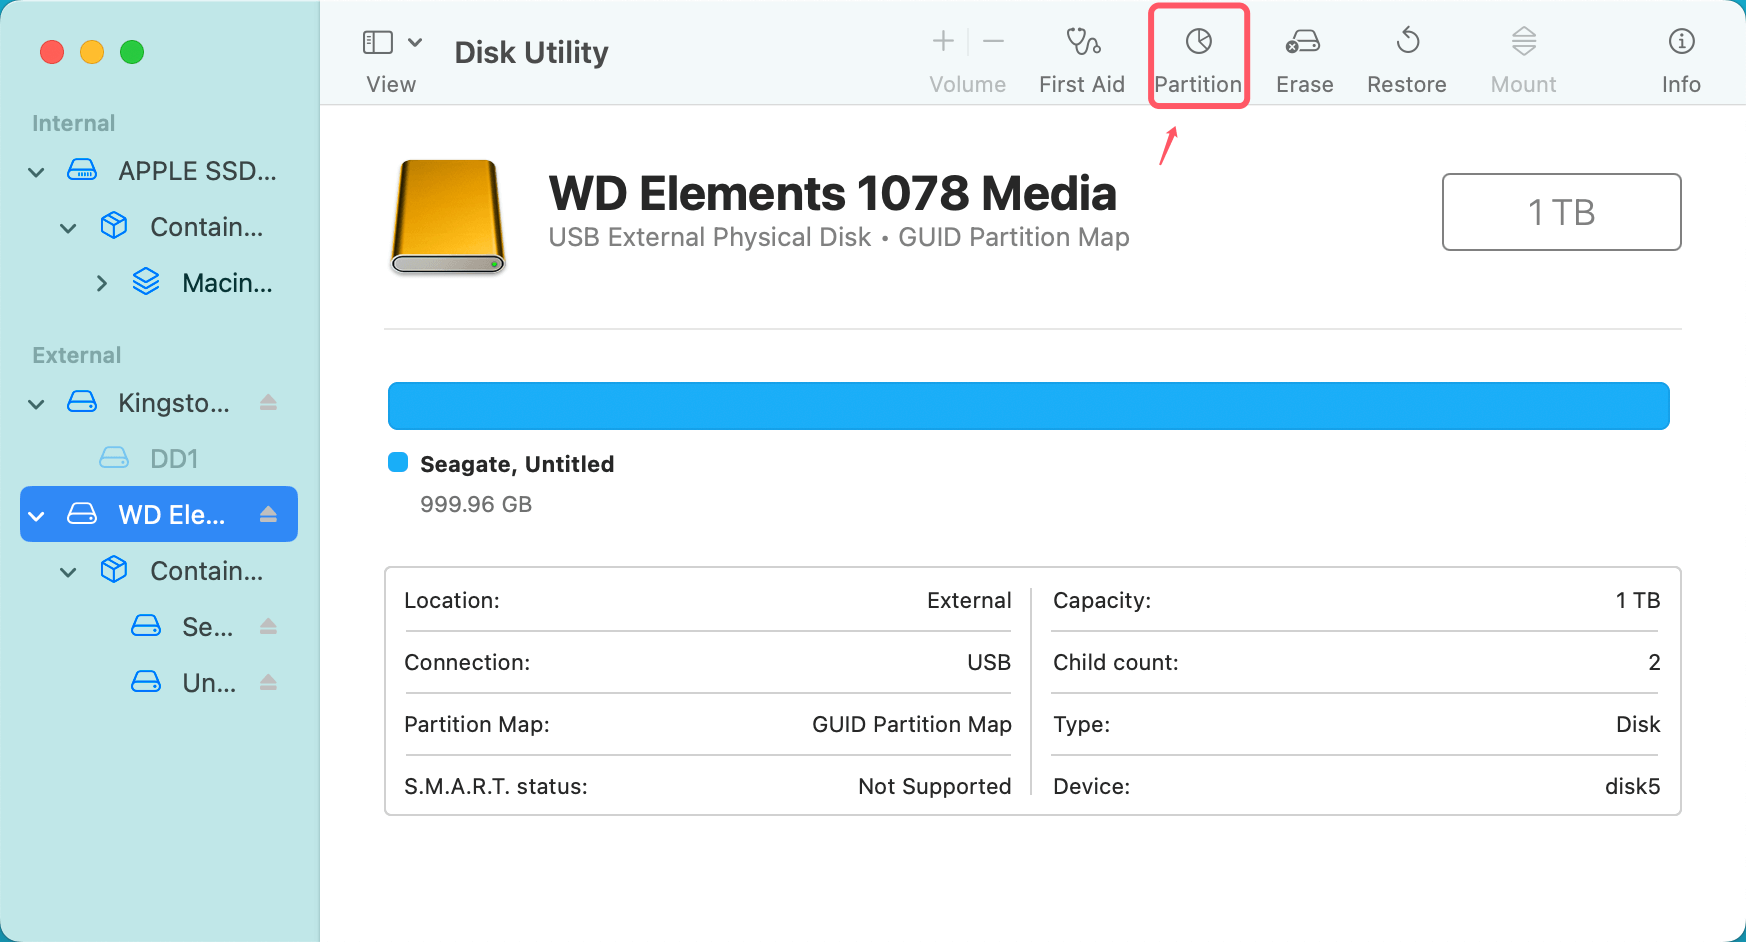
- Click Partition: With your SSD selected, click the Partition button in the toolbar.
![Resizing and partitioning an SSD on your Mac]()
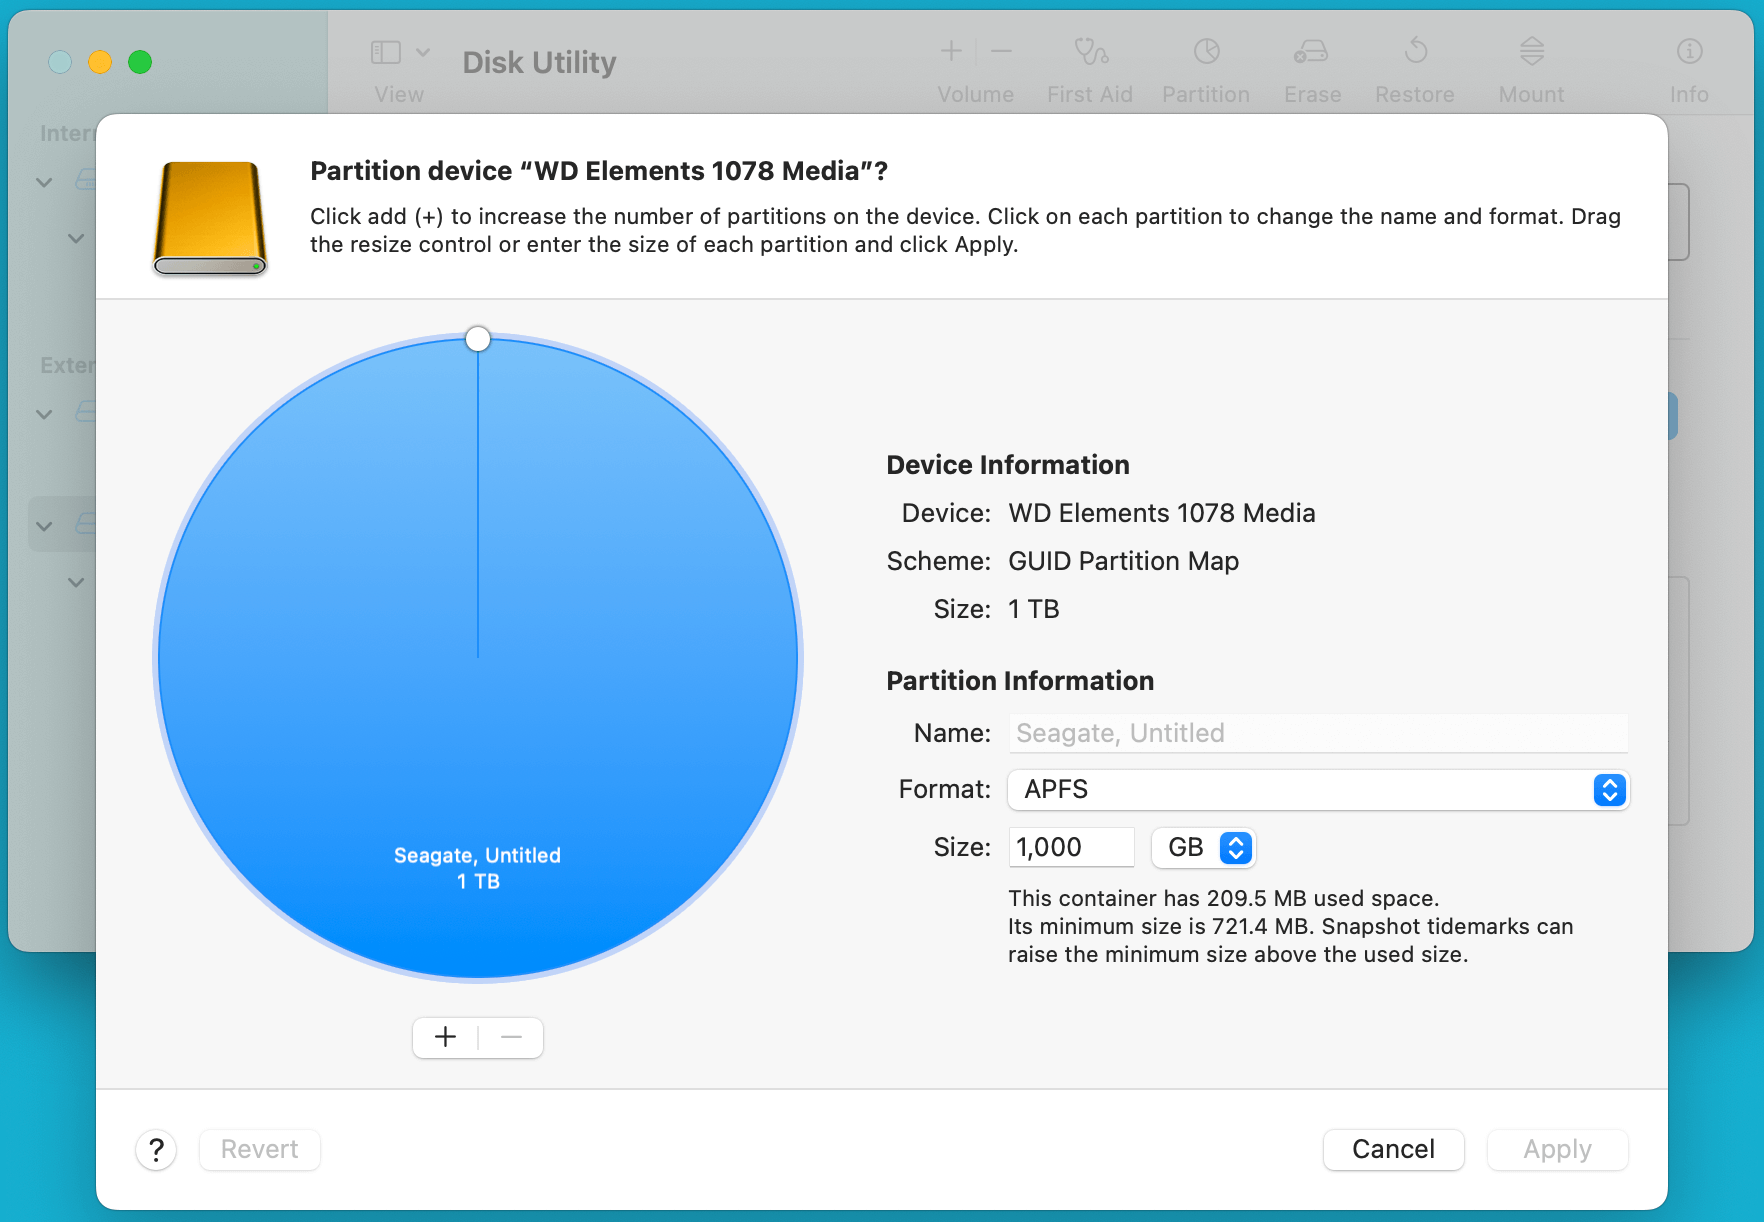
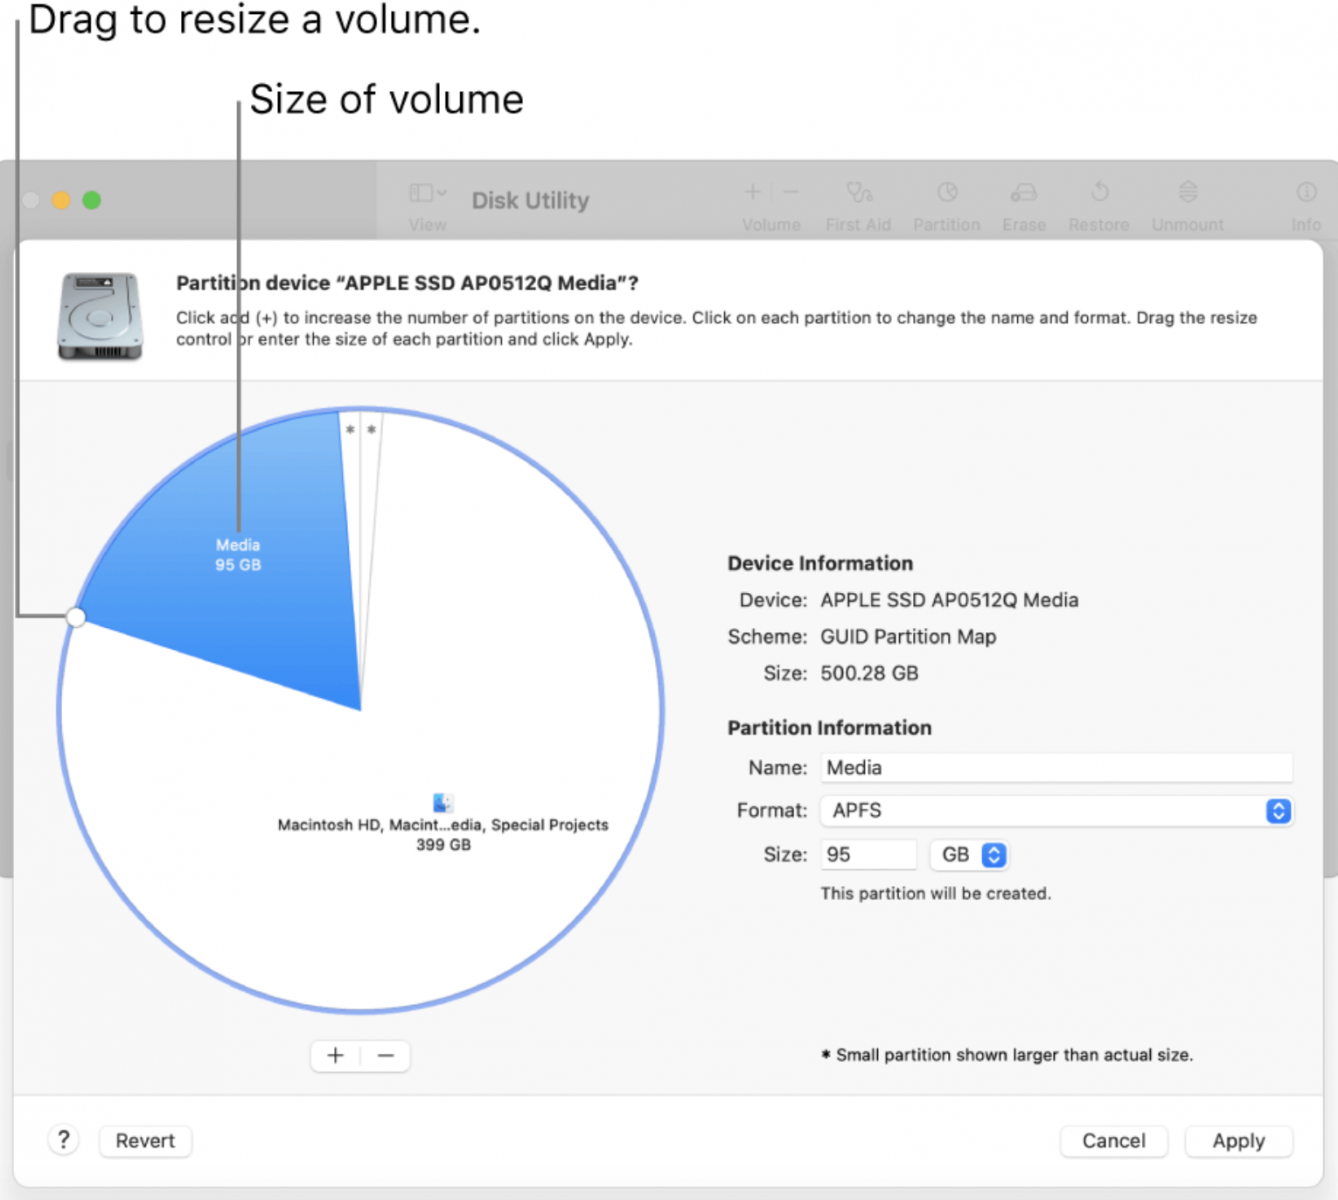
- Select the Partition to Resize: A pie chart will appear, showing the partitions on your drive. Click the partition you want to resize.
- Adjust the Size: Drag the partition's corner to shrink or expand its size, or enter a specific size in the "Size" field.
![Resizing and partitioning an SSD on your Mac]()
- Apply Changes: Click Apply to confirm the resize. macOS will resize the partition without deleting your data, but make sure you have a backup just in case.
● Creating a New Partition
If you want to create an entirely new partition from available space on your SSD, follow these steps:
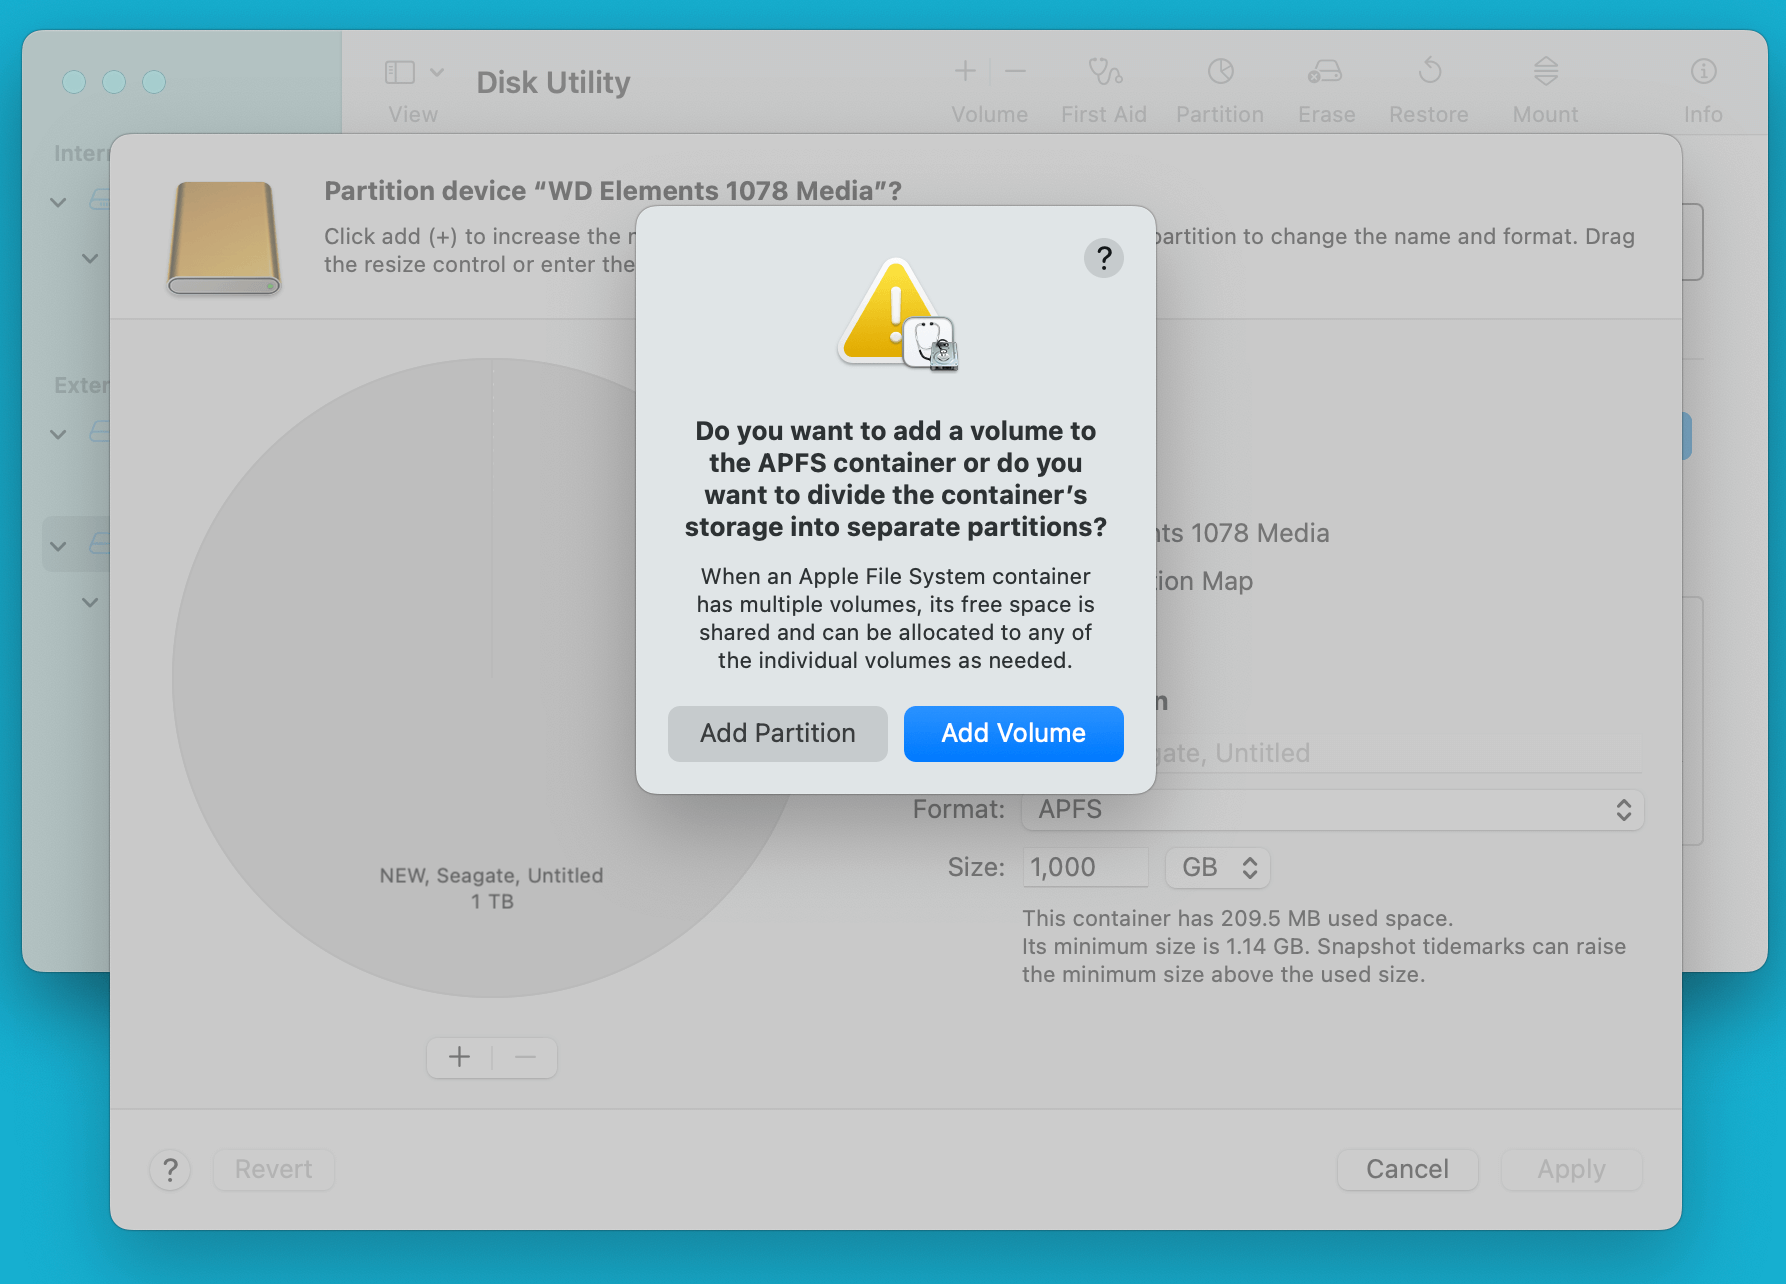
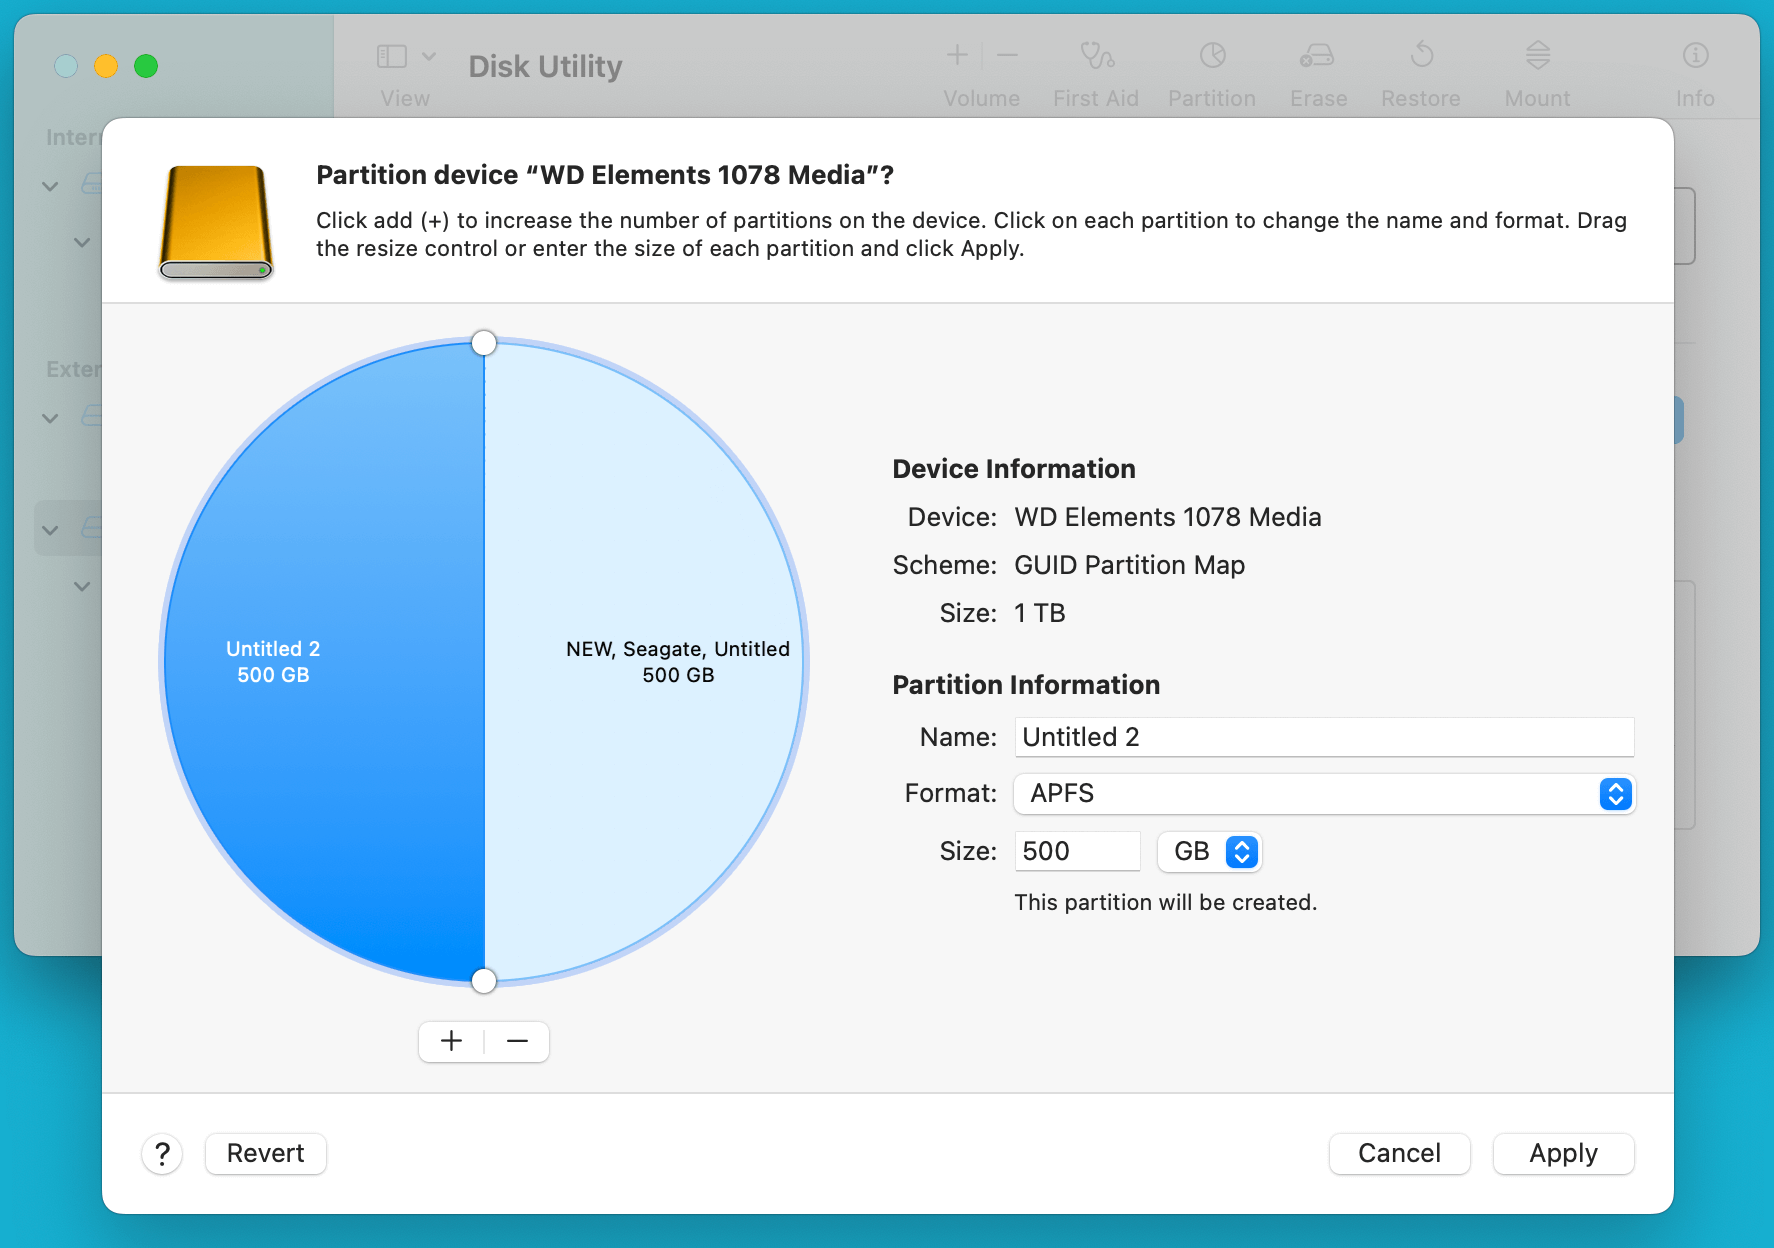
- Click the + Button: In the partition editor, click the + button beneath the pie chart to create a new partition.
- Name and Format the Partition: Give your new partition a name and choose a file system format (APFS, HFS+, ExFAT, etc.).
![Resizing and partitioning an SSD on your Mac]()
- Set the Size: Enter the size you want for the new partition. You can adjust this later if necessary.
![Resizing and partitioning an SSD on your Mac]()
- Apply Changes: Click Apply and Partition to confirm. macOS will create the new partition, and you can start using it immediately after the process completes.
Advanced Partition Management Options
For users who require more control over their SSD partitions or encounter limitations with Disk Utility, there are advanced options available.
Using Terminal for Advanced Partition Commands
The Terminal in macOS provides powerful disk management commands for users who prefer to work outside the graphical interface. One such command is diskutil, which allows you to perform tasks like resizing partitions, erasing volumes, or converting file systems. Here's an example:
Resize a Partition: Open Terminal and type the following command:
sudo diskutil resizeVolume /dev/disk5s2 50G
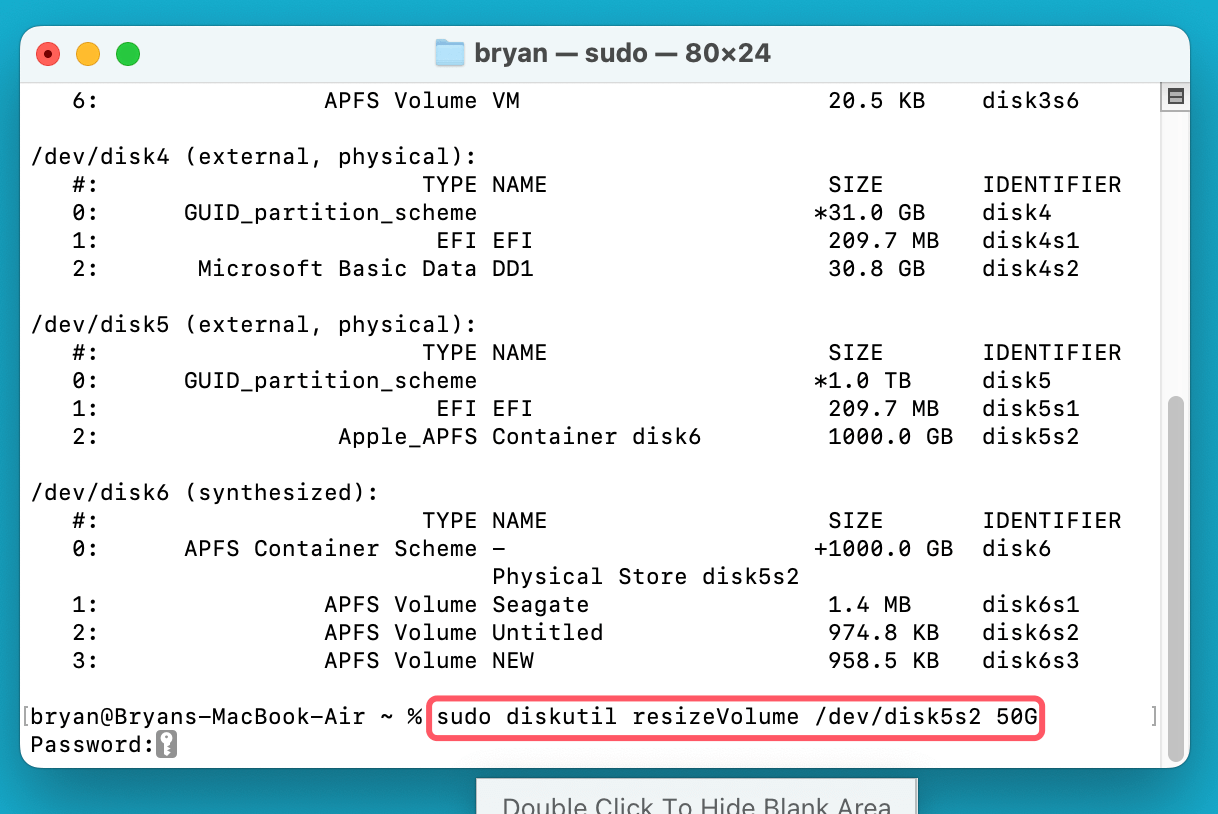
This command resizes the specified partition to 50GB. Make sure to replace /dev/disk5s2 with your actual partition identifier.
Third-Party Partitioning Tools
Several third-party tools provide additional partitioning features that may not be available in Disk Utility. Tools like Paragon Hard Disk Manager and Carbon Copy Cloner allow you to clone partitions, manage backups, and even recover lost partitions. However, it's essential to research the pros and cons of using third-party tools, as some may not offer the same level of reliability or safety as macOS's built-in utilities.
Troubleshooting Common Partitioning Issues
Partitioning an SSD is usually straightforward, but sometimes things can go wrong. Below are a few common issues and their solutions.
Unable to Resize Partitions:
If Disk Utility is unable to resize a partition, it could be due to insufficient free space, or the partition may be corrupted. To resolve this:
- Free up space: Delete unnecessary files to create more space.
- Run First Aid: Use the First Aid tool in Disk Utility to check for and repair any disk errors.
![Resizing and partitioning an SSD on your Mac]()
- Consider Reformatting: If resizing still doesn’t work, you may need to back up your data, erase the partition, and start fresh.
Unrecognized Partitions:
If macOS doesn't recognize a partition after resizing or creating it, the issue might be due to an incompatible file system format. Make sure you've formatted the partition in a format that macOS can read, such as APFS or HFS+. If the partition is intended for Windows, ensure you've used a format like ExFAT.
Resizing or Deleting Partitions in the Future
Over time, your storage needs may change, and you might want to resize or delete partitions to free up space or simplify your SSD's organization.
Resizing Partitions Again:
To resize a partition in the future, follow the same steps outlined earlier using Disk Utility. However, keep in mind that shrinking a partition will require free space in that partition, while expanding a partition requires adjacent unallocated space.
Deleting Partitions:
If you no longer need a partition, you can delete it to merge its space back into the main partition.
- Open Disk Utility: Select the partition you want to delete.
- Click the - Button: In the partition editor, click the – button.
- Apply Changes: Confirm the deletion, and the partition will be removed. The space will be available for other partitions or resizing.
Recover Lost Data After Resizing or Partitioning SSD on Mac
If you have lost data due to erasing/partitioning or resizing SSD on Mac, you can use SSD data recovery software to help you get the lost data back.
Step 1. Download and install the best SSD data recovery software - Donemax Data Recovery for Mac.
Step 2. Open Donemax Data Recovery for Mac, then select the SSD to start data recovery.

Step 3. Click on Scan button to deeply scan the SSD and find all recoverable files.

Step 4. Once the scan is completed, you can preview all recoverable files. Then select the wanted files, click on Recover button to save them.

Conclusion
Resizing and partitioning an SSD on your Mac can significantly improve your system's flexibility, storage management, and performance. With macOS's Disk Utility and advanced Terminal commands, the process is accessible even to users with minimal technical experience. Always remember to back up your data before making any changes to your SSD, and regularly monitor your storage to ensure optimal performance. By partitioning your drive smartly, you'll be able to tailor your Mac's storage to meet your specific needs while maintaining a clean and efficient system.
Related Articles
- Mar 21, 2025[8 Fixes] Fix Seagate Ultra Compact SSD Not Mounting on Mac
- Sep 25, 2024Fix Toshiba External Hard Drive Not Mounting on Mac (7 Solutions)
- Jul 27, 2025How to Back Up Mac Data to iCloud?
- Mar 21, 2025How to Use a Western Digital External Hard Drive on a Mac?
- Jul 19, 2025How to Find and Clear Large Files on Mac?
- Jul 15, 2025How to Enable and Disable Built-in Camera on Mac (Complete Guide)

Charles
Charles, who lives in Sydney, Australia, is an editor & writer of Donemax Team. He is good at writing articles related with Apple Mac computers, Windows operating systems, data recovery, data erasure, disk clone and data backup, etc. He loves reading and playing tennis in his spare time and is interested in testing new digital devices such as mobile phones, Macs, HDDs, SSDs, digital cameras, etc.

Gerhard Chou
In order to effectively solve the problems for our customers, every article and troubleshooting solution published on our website has been strictly tested and practiced. Our editors love researching and using computers and testing software, and are willing to help computer users with their problems


