PAGE CONTENT:
- Causes of Toshiba External Hard Drive Not Mounting on Mac
- Step-by-Step Solutions to Fix Toshiba Drive Not Mounting on Mac
- Solution 1. Check Physical Connections
- Solution 2. Use Disk Utility to Mount or Repair the Drive
- Solution 3. Update macOS or Reset NVRAM/PRAM
- Solution 4. Use Terminal to Manually Mount the Drive
- Solution 5. Repair Toshiba Drive with Third-Party Software
- Solution 6. Format the Drive (As a Last Resort)
- Solution 7. Use Data Recovery Tools (If the Drive is Corrupt)
- Preventive Measures to Avoid Future Issues
- Conclusion
Toshiba external hard drives are widely used for storing large amounts of data, backups, and transferring files between systems. However, like any other external drive, they can occasionally run into problems, such as not mounting when connected to a Mac. This can be frustrating, especially if you rely on the drive for important data. In this guide article, we will analyze several solutions to fix a Toshiba external hard drive that is not mounting on your Mac.
Analyzing the Problem
When a Toshiba external hard drive doesn't mount on a Mac, it means that the drive is not recognized by the macOS operating system, and you cannot access its contents through Finder. This problem could arise due to various reasons - ranging from minor connectivity issues to more serious software or hardware problems. If the drive isn't mounted, it may appear in Disk Utility or remain completely undetected.
Addressing this issue quickly is crucial to avoid data loss, especially if you have important files stored on the Toshiba drive. Let's first examine the potential causes before diving into solutions.
Causes of Toshiba External Hard Drive Not Mounting on Mac
Understanding the potential causes behind the issue is the first step in resolving it. Here are some of the most common reasons why a Toshiba external hard drive may fail to mount on a Mac:
1. Incompatible File System
Toshiba drives are often formatted with the NTFS file system, which is commonly used by Windows. While macOS can read NTFS drives, it cannot write to them without third-party software, and sometimes, this limitation can cause mounting issues.
2. Faulty USB Cable or Port
A damaged USB cable or malfunctioning port can cause communication errors between the Mac and the external drive, resulting in the drive not being detected or mounted.
3. Insufficient Power Supply
Some larger Toshiba external hard drives, especially those that require external power sources, may not function properly if they don't receive sufficient power. This is often the case with desktop-class drives.
4. Corrupted Disk Structure
The file system or the drive's partition map could be corrupted, preventing macOS from recognizing the drive. Disk corruption can occur due to improper ejection, physical damage, or software errors.
5. macOS Security and Privacy Settings
Starting with macOS Catalina and newer versions, certain external drives may not be automatically mounted due to security and privacy settings. Permissions need to be manually granted for macOS to interact with the drive.
6. Bad Sectors
Bad sectors on the drive can cause data retrieval issues, making the drive unreadable or unmountable.
Step-by-Step Solutions to Fix Toshiba Drive Not Mounting on Mac
Let's explore several methods you can use to troubleshoot and resolve the issue of your Toshiba external hard drive not mounting on a Mac.
💡Solution 1. Check Physical Connections
The first thing to verify is whether the issue lies with your physical setup.
Inspect the USB Cable and Port
- Use a different USB cable to check if the current one is faulty. Cables can wear out or suffer from internal damage, causing connectivity issues.
- If you're using a USB-C adapter, ensure that it's compatible with your drive. Try using another port on your Mac.
Test on Another Computer
- Connect the Toshiba external hard drive to another computer (Mac or Windows) to see if it mounts there. If it works on another device, the problem likely lies with your Mac or its settings.
Check for Sufficient Power
- If your Toshiba external hard drive is powered externally, ensure the power cable is securely connected and that the drive is receiving sufficient power. Lack of power can prevent the drive from mounting properly.
💡Solution 2. Use Disk Utility to Mount or Repair the Drive
It is a default macOS tool that can help diagnose and repair disk issues.
1. Open Disk Utility
- You can access Disk Utility by navigating to Utilities via Applications.
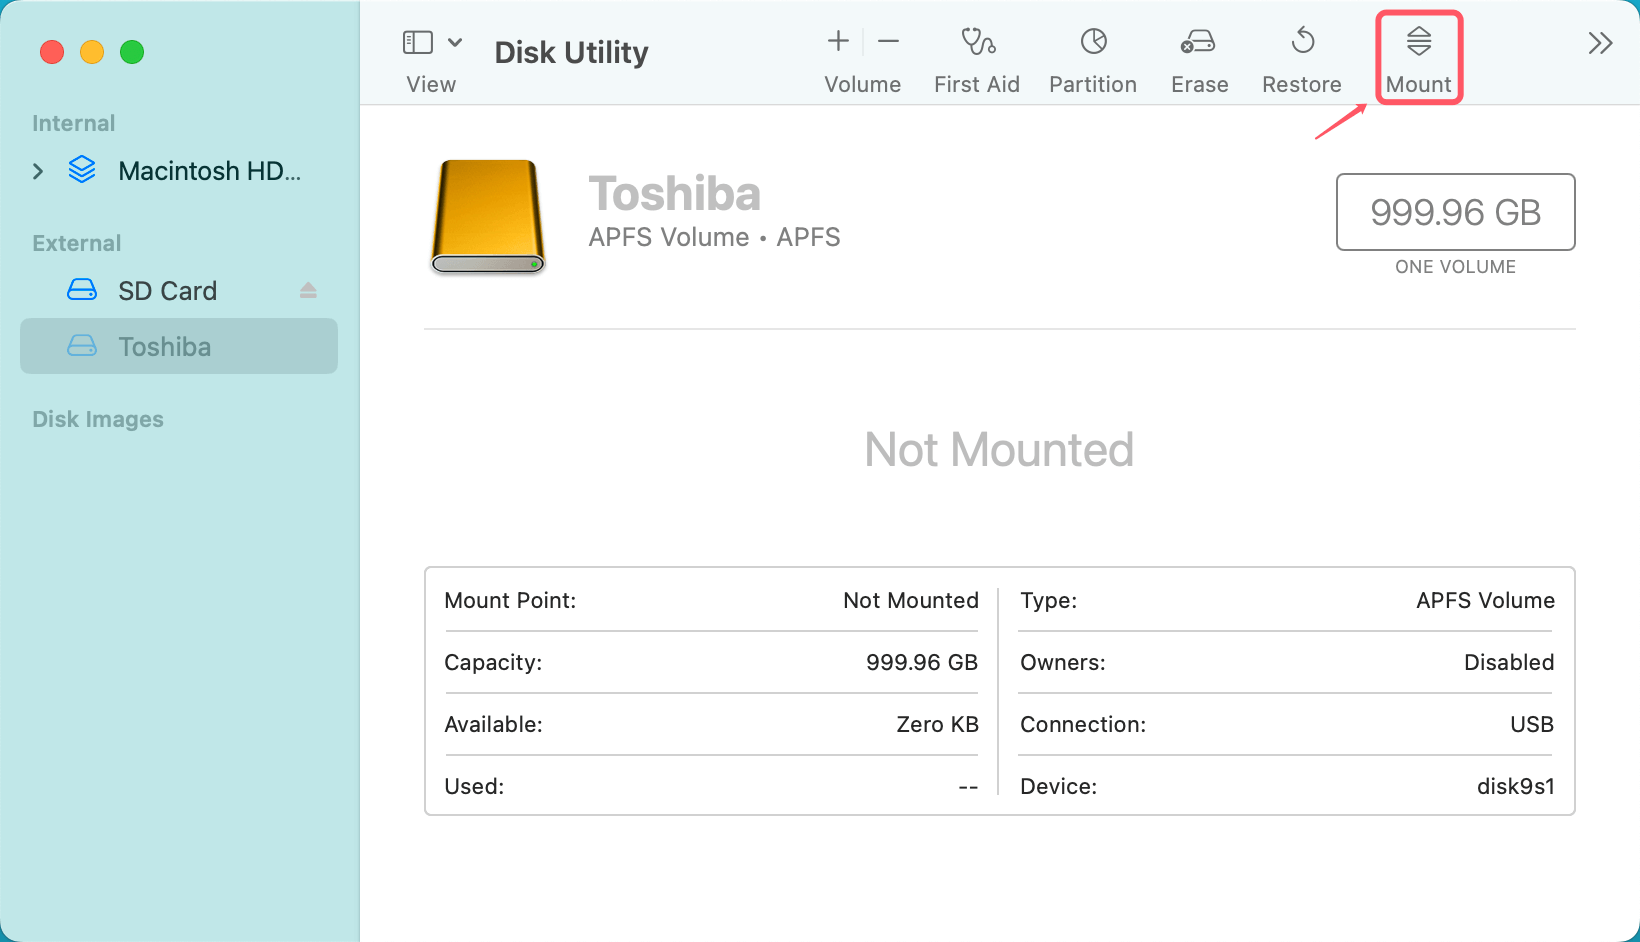
- In the sidebar, check whether your Toshiba external hard drive appears. If it shows up but is not mounted, click on the drive and select "Mount." Sometimes this simple action can resolve the issue.
![Open Disk Utility and Select Mount]()
2. Run First Aid
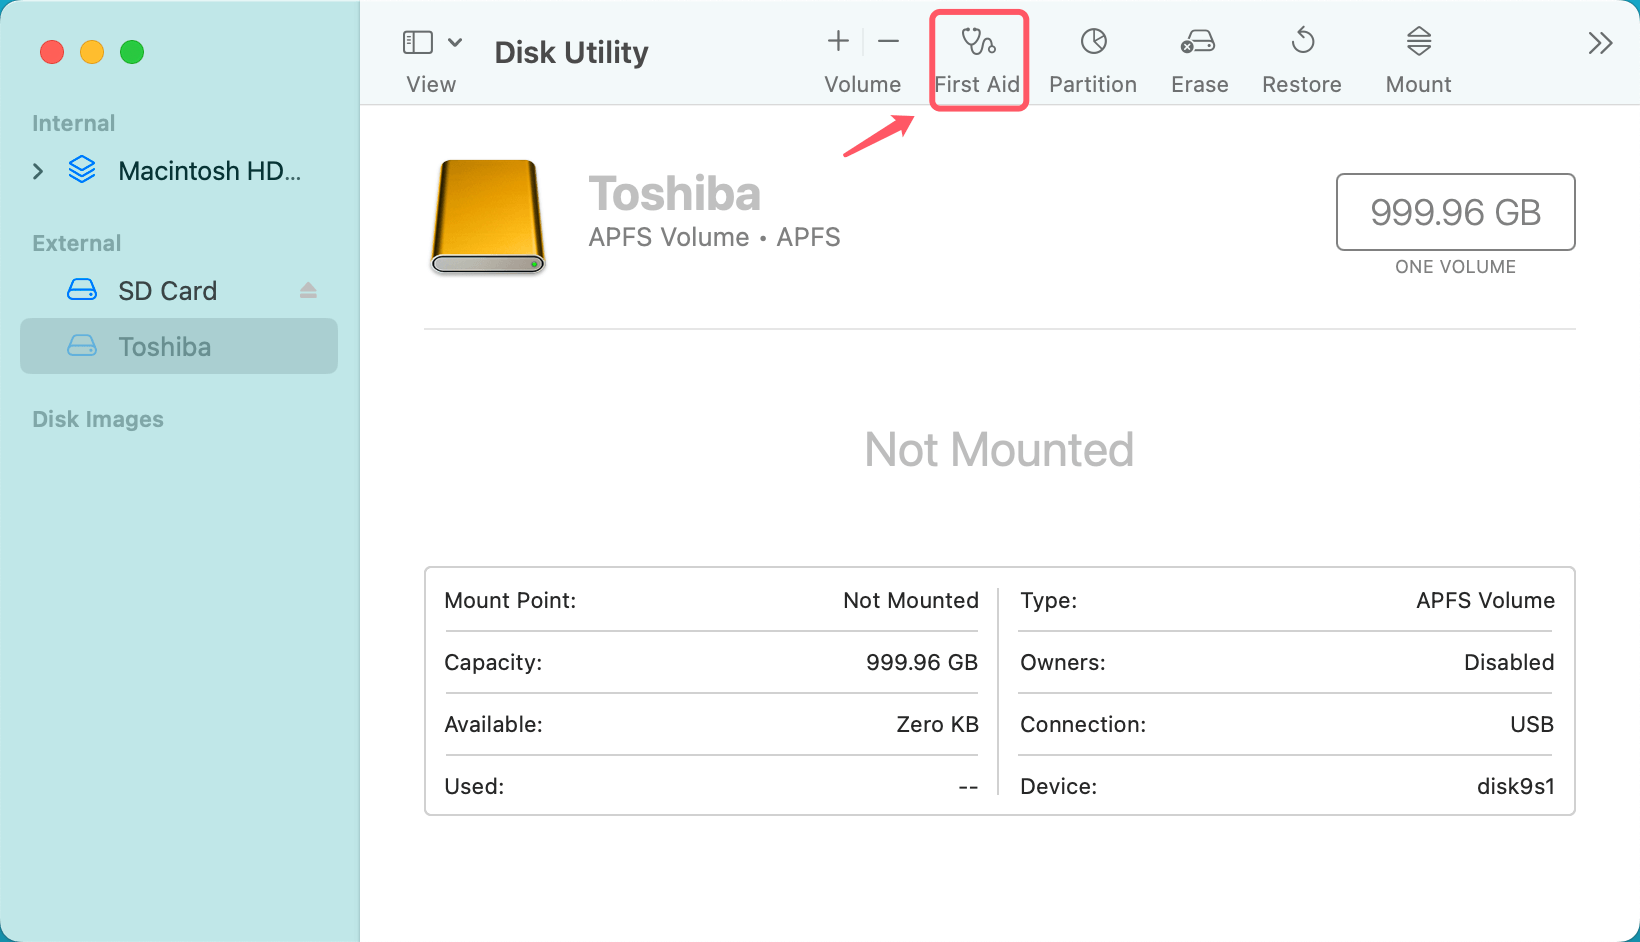
- If your drive appears but still won't mount, click on the drive in Disk Utility and select "First Aid." This tool scans the drive for file system errors and attempts to repair them.
![Run First Aid]()
- Wait for the process to complete, and if any errors are found and repaired, try mounting the drive again.
💡Solution 3. Update macOS or Reset NVRAM/PRAM
macOS updates can include important patches that fix bugs and hardware compatibility issues. Ensuring your Mac is updated might resolve the issue.
1. Update macOS
- Check if any updates are available by going to System Settings > General > Software Update.
- Install any pending updates, restart your Mac, and attempt to reconnect the external drive.
2. Reset NVRAM/PRAM
- Resetting NVRAM or PRAM can often fix hardware-related issues. To reset it:
- Turn Off your Mac.
- Switch it on and hit the Option, Command, P, and R keys at the same time.
- After around 20 seconds, let your Mac restart before releasing the keys.
After resetting, reconnect your Toshiba external hard drive and check if it mounts.
💡Solution 4. Use Terminal to Manually Mount the Drive
If Disk Utility doesn't show the drive or can't mount it, Terminal might help.
Check Drive Status
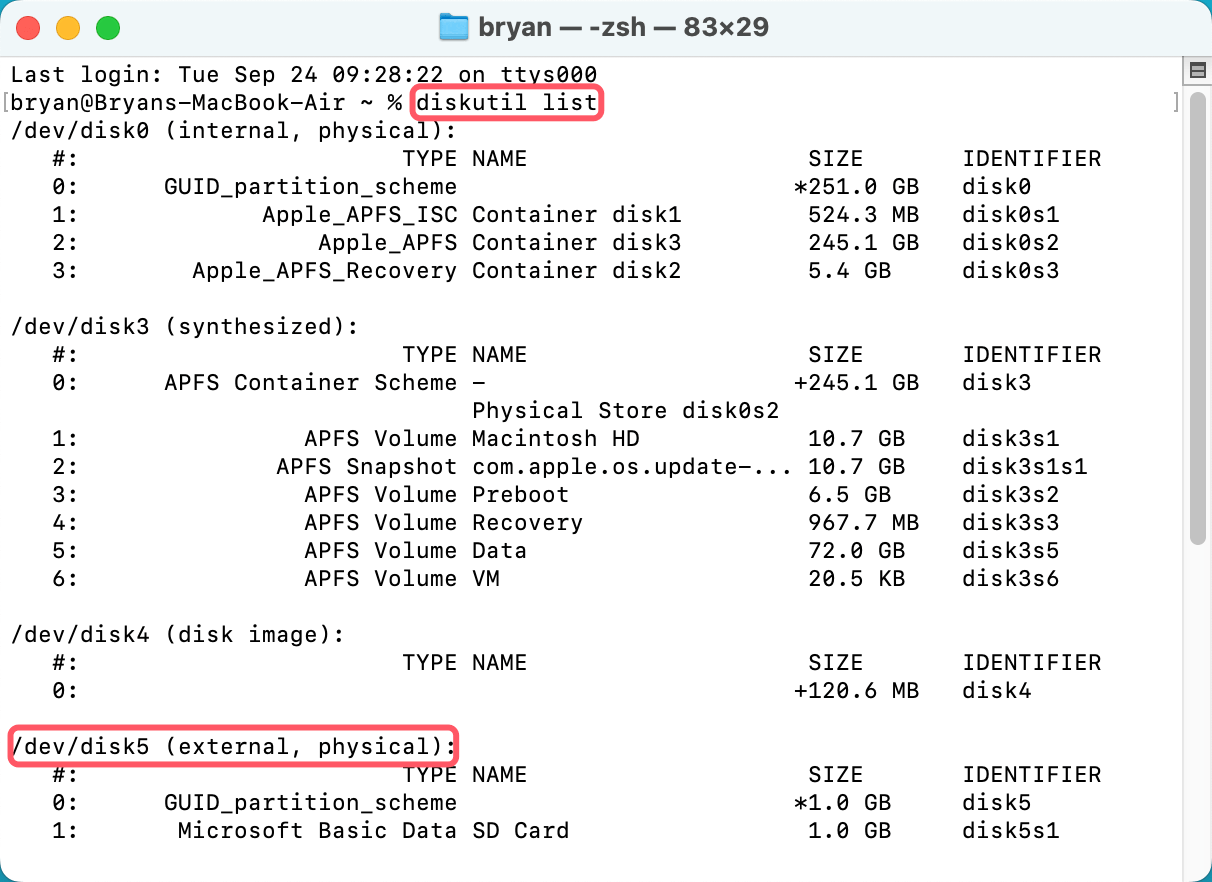
- Open Terminal from Utilities via Applications and type the below mentioned command to list all connected drives:
diskutil list
- Find your Toshiba external hard drive in the list. If it’s listed, note its identifier (e.g., disk5).
![Check Drive Status]()
Manually Mount the Drive
- Use the following command to attempt mounting the drive:
diskutil mountDisk /dev/disk5
(Replace /dev/disk5 with the identifier of your drive.)
![Manually Mount the Drive]()
If the drive mounts after running the command, you should be able to access it in Finder.
💡Solution 5. Repair Toshiba Drive with Third-Party Software
If neither Disk Utility nor Terminal works, your drive may have more serious issues, such as file system corruption or bad sectors. In this case, third-party software can be useful for repairing the drive and recovering data.
Popular Third-Party Tools
- Donemax Data Recovery: A well-known disk repair and data recovery tool that works with macOS. It can recover files and attempt to repair corrupted disks.
- Donemax Data Eraser: A comprehensive data erasure tool that checks drive health and repairs damaged file systems.
These tools often provide free trials that allow you to assess whether they can access your drive before committing to a purchase.
If the Toshiba external hard drive has been pre-formatted to NTFS, you can use a NTFS for Mac tool to mount it on your Mac.
Step 1. Download and install Donemax NTFS for Mac, run it from Launchpad.
Step 2. Open Donemax NTFS for Mac, select the NTFS Toshiba external hard drive, click on Mount button.

Step 3. If you want to read-write the NTFS Toshiba external hard drive, click on Enable Writable button.

💡Solution 6. Format the Drive (As a Last Resort)
If you've exhausted all options and still can't mount the drive, you may need to reformat it. However, this will erase all the data on the drive, so only proceed if you have a backup of your data or you're willing to lose the current contents.
Step 1. Go to Launchpad > Other > Disk Utility, open Disk Utility.
Step 2. Select the Toshiba external hard drive, click on Erase button.
Step 3. Select APFS (for macOS 10.13 or later) or Mac OS Extended (for older macOS) or ExFAT (for both Windows and macOS) as the Format, then click on Erase button again.
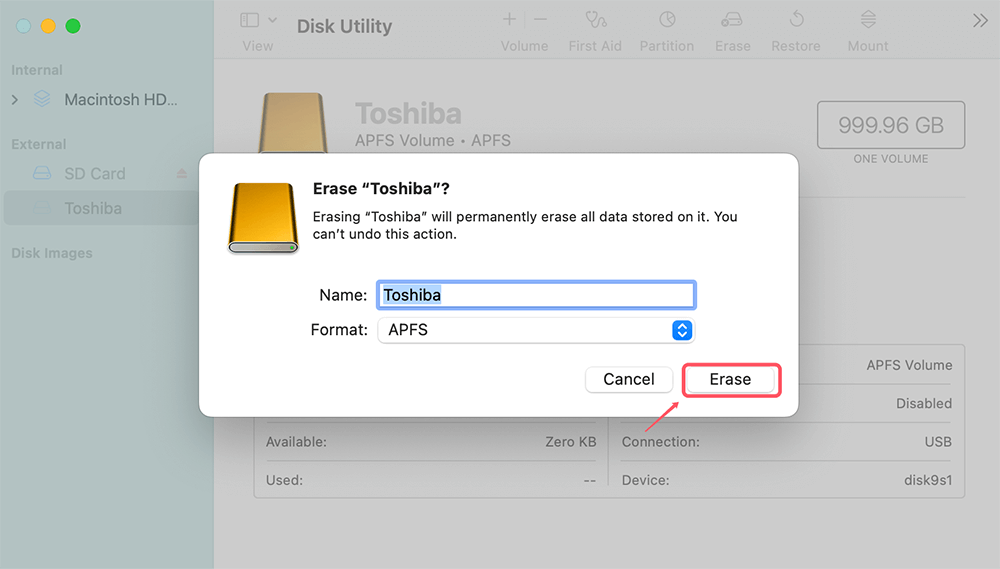
After formatting, your drive should mount properly, and you can begin using it again.
💡Solution 7. Use Data Recovery Tools (If the Drive is Corrupt)
If your Toshiba external hard drive still won't mount and you suspect it is corrupted, data recovery software might help.
Step 1. Download and install Donemax Data Recovery for Mac and connect the Toshiba external hard drive to your Mac.
Step 2. Open Donemax Data Recovery for Mac, select the Toshiba external hard drive to start data recovery.

Step 3. Click on Scan button to deeply scan the Toshiba external hard drive and find all recoverable files.

Step 4. Once the scan is completed, you can preview all recoverable files. Select the wanted files, click on Recover button.

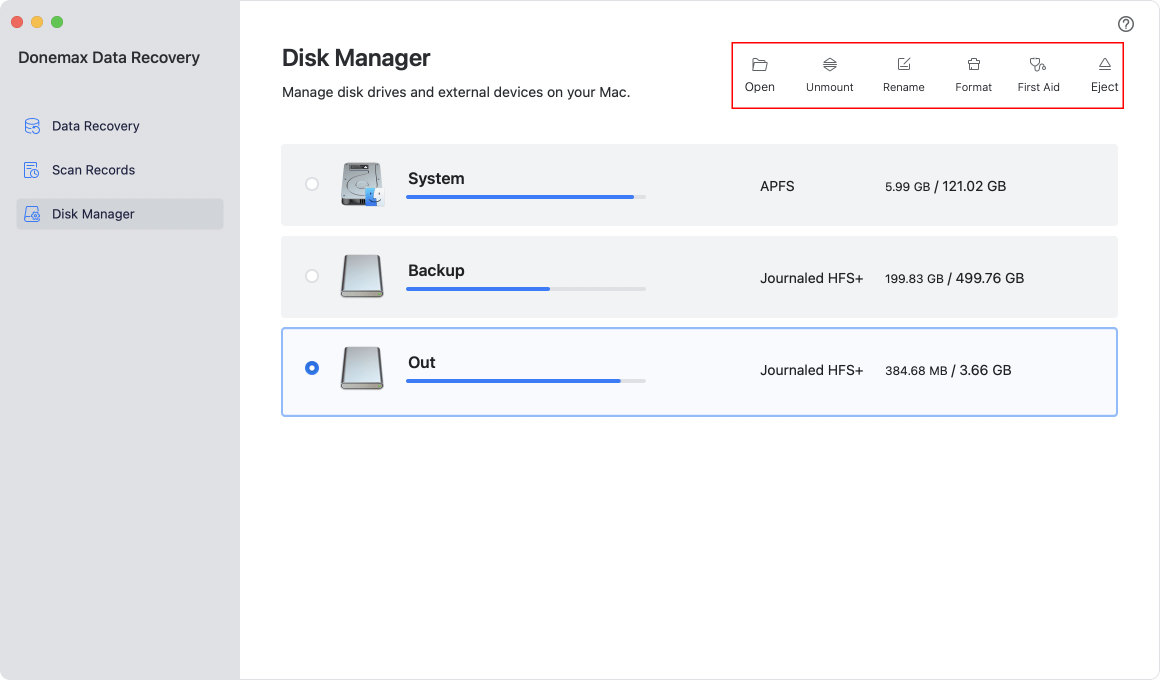
Donemax Data Recovery for Mac also can help you fix damaged Toshiba external hard drive on Mac. Just choose Disk Manager, select the Toshiba external hard drive, click on First Aid button to repair the Toshiba external hard drive.
Preventive Measures to Avoid Future Issues
To prevent future mounting problems with your Toshiba external hard drive, consider the following tips:
- Always Eject the Drive Properly: Before physically disconnecting the drive, ensure you eject it by right-clicking on the drive in Finder and selecting "Eject." This prevents file system corruption.
- Backup Important Data: Regularly back up important files to another drive or cloud storage service. This ensures you won't lose data in the event of a drive failure. For example, you can use disk cloning software to clone one hard drive to another hard drive.
- Update macOS and Drive Firmware: Keep your macOS updated with the latest patches. Additionally, check if Toshiba offers firmware updates for your external hard drive and apply them as needed.
- Use Reliable Cables and Ports: Avoid using damaged cables or faulty USB ports. If your drive supports USB 3.0 or USB-C, use these faster connections for improved stability and performance.
Conclusion
Facing a Toshiba external hard drive that isn't mounting on your Mac can be a frustrating experience, but as we've outlined, there are several solutions available to fix the issue. Start by checking physical connections and using macOS's built-in tools like Disk Utility and Terminal. If those don't work, third-party repair tools may help. In the worst-case scenario, formatting the drive is an option - though it's a last resort due to the data loss it entails.
By complying the solutions described in this article, you'll be better equipped to resolve the issue and avoid similar problems in the future. Always remember to back up your data and take preventive measures to ensure your drives stay healthy and accessible.
Related Articles
- Jul 12, 2024Can I Use CCleaner to Wipe Data Permanently on Mac?
- Nov 18, 2024How to Restart and Force Restart Mac?
- Oct 23, 2024How to Reinstall macOS Sequoia?
- Nov 29, 2024How to Convert or Reformat an USB Drive to NTFS on Mac?
- Mar 19, 2025How to Fix Mac Error Code -8062: A Comprehensive Guide
- Mar 21, 2025How to Use a Western Digital External Hard Drive on a Mac?

Christina
Christina is the senior editor of Donemax software who has worked in the company for 4+ years. She mainly writes the guides and solutions about data erasure, data transferring, data recovery and disk cloning to help users get the most out of their Windows and Mac. She likes to travel, enjoy country music and play games in her spare time.

Gerhard Chou
In order to effectively solve the problems for our customers, every article and troubleshooting solution published on our website has been strictly tested and practiced. Our editors love researching and using computers and testing software, and are willing to help computer users with their problems
