PAGE CONTENT:
If your Mac which is running macOS Sequoia is experiencing performance issues, frequent crashes, or software glitches, reinstalling macOS Sequoia can be a highly effective way to restore your computer to optimal functioning. Reinstalling macOS can either refresh the system without affecting your data or start afresh with a clean installation, depending on your needs. In this comprehensive guide, we will learn the process of reinstalling macOS Sequoia, from backing up your data to resolving common installation issues.
Before Reinstalling macOS Sequoia
Before starting the reinstallation process, it's important to ensure that your Mac is prepared for the procedure. Reinstalling macOS requires some pre-planning to avoid data loss and unnecessary complications.
1. Backup All Your Data
The most important step before reinstalling macOS Sequoia is backing up your data. Even if you choose to reinstall macOS without erasing your data, things can still go wrong. To be safe, create a backup of all your files and settings. Time Machine is Apple's built-in backup solution, and it's incredibly easy to use. Alternatively, you can back up your files manually to an external hard drive or use cloud services like iCloud, Google Drive, or Dropbox.
Create Bootable Clone for macOS Sequoia
Clone all data from your Mac to the external hard drive, creating a full bootable clone backup for your Mac.
2. Ensure Your Mac is Compatible
Make sure your Mac is compatible with macOS Sequoia before proceeding. Check Apple's official website for the system requirements and ensure that your Mac meets or exceeds them.

You can create a bootable installer to install macOS Sequoia on unsupported Macs.
3. Stable Internet Connection
Reinstalling macOS often requires downloading files from Apple's servers, so a stable and fast internet connection is essential. Make sure you're connected to a reliable network before starting the process.
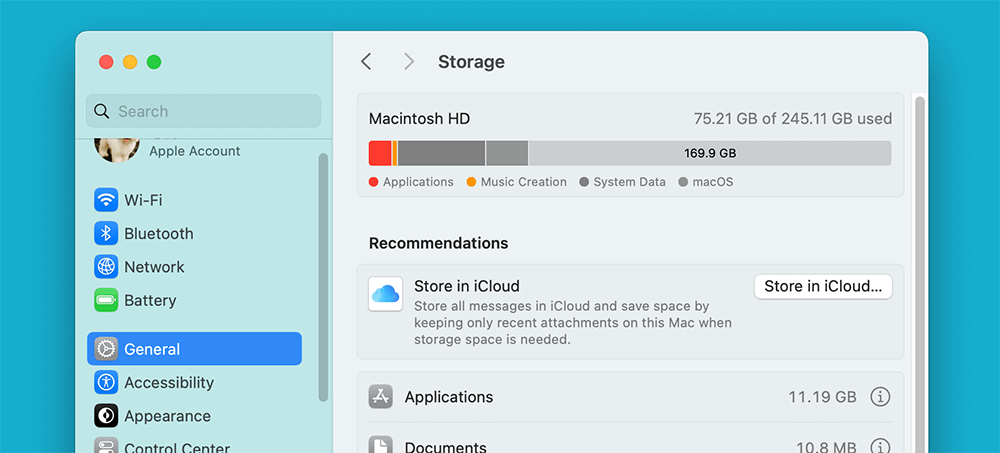
4. Sufficient Disk Space
Check your available disk space. If your Mac doesn't have enough free space, the installation may fail or encounter errors. Go to Apple Menu > System Settings > General > Storage to see how much free space is available. You'll typically need at least 15-20GB of free space for the installation to proceed smoothly.
Methods for Reinstalling macOS Sequoia
There are two primary methods for reinstalling macOS Sequoia: a standard reinstall that leaves your files and data intact, and a clean install that erases everything on your hard drive and starts fresh. The method you choose depends on your specific situation. If you're just looking to fix performance issues, the first option should suffice. If you want to eliminate all software issues and start from scratch, a clean install is a better choice.
🔖Method 1: Reinstall macOS Sequoia Without Erasing Data
This method is ideal if you want to reinstall macOS while keeping your files, apps, and settings intact. It's a straightforward process and is typically used when macOS is behaving erratically but your data is still safe.
Step 1. Restart Your Mac in macOS Recovery Mode.
You will need to boot your Mac into Recovery Mode in order to reinstall macOS Sequoia. Take these actions:
- In the upper-left corner of the screen, click the Apple Menu.
- Click on Restart.
- Hold down Power button until your Mac restarts until the Loading Startup Options shows up. This boots your Mac into Recovery Mode.
- Choose Options, click on Continue button.
![Restart Your Mac in macOS Recovery Mode]()
Step 2. Access macOS Utilities and Choose Reinstall macOS.
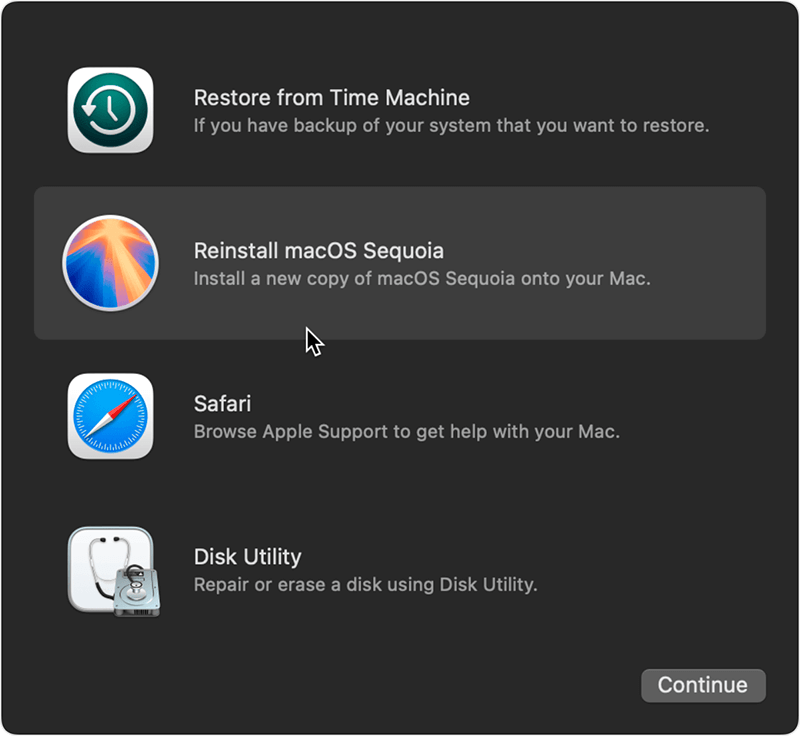
Once in Recovery Mode, the macOS Recovery window will appear. Here, you'll see several options, including Restore from Time Machine Backup, Reinstall macOS, and Disk Utility.
From the list of choices, choose Reinstall macOS Sequoia and click on Continue button.
Step 3. Select the Disk for Installation.
Next, you'll be prompted to select the disk on which macOS Sequoia should be reinstalled. In most cases, you'll choose the main internal drive, typically called Macintosh HD. If you have multiple partitions or drives, make sure to choose the correct one.
Step 4. Let the Process Complete and Restart the Mac.
Once you select the installation disk, macOS will begin downloading and reinstalling the system. The process may take some time depending on the speed of your internet connection and your Mac's hardware. Your Mac will restart several times during the installation process, so be patient.
Post-installation Tasks: Checking System Updates and Restoring Settings
After the reinstallation is complete, your Mac will reboot to the Welcome screen. You won't need to set everything up again, but it is recommended to check for system updates and restore your settings from Time Machine or another backup if necessary. You can also restore individual files from your backup once the reinstallation is done.
🔖Method 2: Clean Install of macOS Sequoia
A clean install erases everything on your Mac, giving you a fresh start. This method is typically used if your Mac is plagued by persistent software issues that can't be resolved by a simple reinstall, or if you're planning to sell or give away your Mac.
Step 1. Backup Your Data.
Before performing a clean install, it's crucial to back up all of your data. A clean install will wipe your Mac's hard drive completely, so make sure you have a recent backup. You can use Time Machine or manually back up your important files to an external drive.
Step 2. Create a Bootable Installer Using a USB Drive.
To perform a clean install of macOS Sequoia, you'll need a bootable installer. This allows you to reinstall macOS from a USB drive rather than downloading it from Apple's servers.
- Go to the App Store and download the macOS Sequoia installation.
- Place a USB drive into your Mac that has at least 16GB of capacity.
- Launch Terminal and enter the subsequent command:
sudo /Applications/Install\ macOS\ Sequoia.app/Contents/Resources/createinstallmedia --volume /Volumes/MyVolume
- Replace MyVolume with the name of your USB drive.
- Press Enter and follow the on-screen prompts to create the bootable installer.
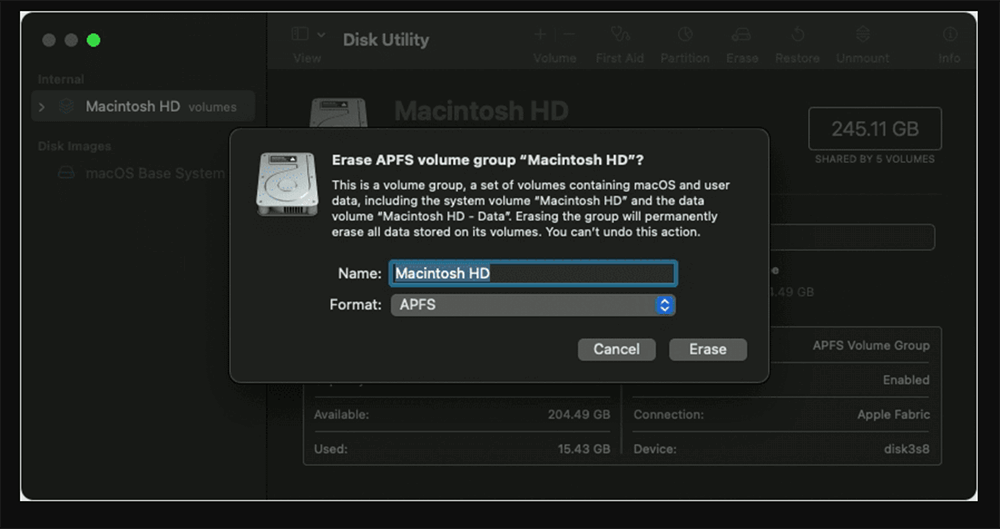
Step 3. Erase Your Mac's Drive via Disk Utility.
To perform a clean install, you'll need to erase your Mac's internal drive. This will remove all data, so be sure you've backed up your important files.
- Boot into macOS Recovery Mode by holding down Power button during startup. Choose Options and click on Continue button.
- In the macOS Recovery window, select Disk Utility.
- Choose your main internal drive (typically called Macintosh HD).
- Click Erase and choose the correct format. If your Mac uses an SSD, select APFS. For older Macs with traditional hard drives, use Mac OS Extended (Journaled).
![Erase Your Mac's Drive via Disk Utility]()
- Confirm the action to erase the disk.
Step 4. Install macOS Sequoia from the Bootable Installer.
Now that the drive is erased, you're ready to install macOS Sequoia:
- Attach your Mac to the bootable USB installer.
- Shut down your Mac. Then press and hold Power button until it boots into macOS Recovery mode.
- Select the USB drive as the startup disk.
![Install macOS Sequoia from the Bootable Installer]()
- Follow the on-screen instructions to install macOS Sequoia.
Step 5. Set Up macOS as New or Restore from a Backup.
The macOS setup aid will appear after the installation is finished. During the setup process, you have the option to either restore data from a Time Machine backup or set up your Mac as fresh.
Reinstalling macOS Sequoia FAQs and Tips
🔖Common Issues During Reinstallation and How to Fix Them
Sometimes, the reinstallation process doesn't go as smoothly as planned. Here are some common issues and how to resolve them:
1. Stuck at Installation Progress Bar
If the installation seems stuck at the progress bar, try restarting your Mac by holding down the Power button. Boot back into Recovery Mode and attempt the installation again. If the problem persists, you may need to erase your drive using Disk Utility and perform a clean install.
2. Insufficient Disk Space Errors
If macOS Sequoia won't install due to insufficient disk space, you can free up Mac's space by deleting unnecessary files or moving data to an external drive. Alternatively, you can use Disk Utility to erase the disk and perform a clean install.
3. macOS Recovery Not Working
If your Mac fails to boot into Recovery Mode, you can use another Mac to create a bootable installer or use Apple's internet recovery option. To access internet recovery, hold down Command+Option+R during startup until the spinning globe appears.
🔖Post-Reinstallation Steps
After reinstalling macOS Sequoia, there are a few important steps to take to ensure your system runs smoothly:
1. Restoring Files and Apps
If you performed a clean install, you'll need to restore your files from a backup. You can do this using Time Machine or by manually copying files from an external drive. Be sure to reinstall any important apps that you use regularly.
2. Configuring System Settings
Reinstalling macOS will reset your system preferences to their default settings. Spend some time adjusting settings such as display preferences, trackpad behavior, and security options to your liking.
3. Running System Updates
After reinstallation, check for software updates by going to Apple Menu > System Preferences or System Settings > General > Software Update. Keeping your macOS and apps updated is essential for maintaining system security and performance.
🔖Tips for Maintaining a Healthy macOS System After Reinstallation
Once you've successfully reinstalled macOS Sequoia, it's important to maintain your system to avoid future issues. Here are a few tips:
- Regular Backups: Make regular backups using Time Machine, Mac disk cloning software or another backup solution. This ensures that you won't lose important data if something goes wrong.
- System Updates: Keep macOS and all your apps updated to the latest versions. Updates often include security patches and performance improvements.
- System Cleanups: Regularly clean up unnecessary files and free up disk space. You can use built-in tools like Storage Management or third-party apps like CleanMyMac, AweCleaner for Mac, DMmenu for Mac to remove junk files.
- Security Checks: Keep your Mac secure by enabling FileVault for disk encryption, using a strong password, and enabling two-factor authentication for Apple ID.
Recover Lost Data after Reinstalling macOS Sequoia
If you have lost data due to erasing the startup disk or reinstalling macOS Sequoia, you can use Mac data recovery software to get the lost data back.
Step 1. Download and install Donemax Data Recovery for Mac on your Mac, then open it from Launchpad.
Step 2. After launching Donemax Data Recovery for Mac, select the internal SSD (normally called Macintosh HD) to scan.

Step 3. Click on Scan button to deeply scan the internal SSD and find all deleted, erased or lost files.

Step 4. Once the scan is completed, you can preview the files and folders. Just select the wanted files/folders, click on Recover button to save them.

Conclusion
Reinstalling macOS Sequoia can breathe new life into your Mac, whether you're doing a simple reinstall to resolve software issues or performing a clean install for a fresh start. By complying the process described in this guide article, you can safely reinstall macOS, avoid common pitfalls, and restore your Mac to optimal performance. Don't forget to regularly back up your data and keep your system updated to ensure smooth operation in the future.
Related Articles
- Aug 12, 2025How to Turn Off Mac Notifications on Mac: Complete Guide for All macOS Versions
- Jun 05, 2025Fix Sabrent Rocket External SSD Read-Only on Mac
- Dec 09, 2024How to Add an External Hard Drive to Dock on Mac?
- May 28, 2025How to Take a Screenshot on Mac?
- Jul 04, 2025Fix Mac Won't Restart or Restart Not Working: Complete Guide
- Sep 24, 2024How to Restore macOS by Using Time Machine Backup?

Maria
Maria is one of the senior writers & editors of Donemax who lives and works in Sydney, Australia. She loves PC, Mac and Internet Technology. She has 6 years of writing articles about data recovery on PC/Mac, disk cloning solution, data eraser and computer OS optimization, etc. She is also interested in testing various software and digital products.

Gerhard Chou
In order to effectively solve the problems for our customers, every article and troubleshooting solution published on our website has been strictly tested and practiced. Our editors love researching and using computers and testing software, and are willing to help computer users with their problems

