PAGE CONTENT:
Performing a clean install of macOS is a great way to refresh your system, fix lingering issues, and ensure that you get the best possible performance from your machine. Whether you're encountering persistent errors, or simply want a fresh start with macOS Sequoia, a clean install will help you achieve that. In this article, we will show you how to clean install macOS Sequoia, take you through each step of the process, from backing up your data to restoring your files after installation.

Why Perform a macOS Sequoia Clean Install?
There are several reasons why you might want to perform a clean install of macOS Sequoia:
- Performance Optimization: Over time, Macs can accumulate unnecessary files, background processes, and leftover data from uninstalled apps. This can slow down your system. A clean install wipes everything off your Mac's drive, offering you a fresh start with a clean, unburdened system.
- Fixing Persistent Issues: Sometimes, regular macOS updates or upgrades can introduce bugs or errors that are hard to fix without starting over. If your system is suffering from frequent crashes, freezes, or unexplainable errors, a clean install could resolve those issues.
- Clearing Out Bloat: After years of use, your system can accumulate outdated files, junk from apps, and other clutter. A clean install allows you to clear out all the bloat and unnecessary files.
- Ensuring System Stability: When upgrading to a major macOS version, a clean install ensures that no remnants from previous versions interfere with system stability.
Prerequisites Before a Clean Install of macOS Sequoia
Before you embark on a clean install of macOS Sequoia, it's essential to take some preparatory steps to ensure you don't lose any data or encounter any issues along the way.
1. Back Up Your Data
A clean install will wipe everything from your Mac's hard drive. This implies that before you begin, you should back up any vital files. There are several ways to do this:
- Time Machine Backup: This is the easiest and most recommended way to back up your entire Mac. Time Machine will create a complete backup of your system, which you can use to restore specific files or your entire system after the clean install.
- iCloud Drive: You can store important documents, photos, and other files in iCloud Drive to ensure they are safe and accessible after the installation.
- External Hard Drive: Copy important files manually to an external hard drive if you prefer not to use Time Machine or iCloud.
- Disk Clone: Clone everything from the Mac to an external hard drive, creating a full bootable clone backup.
2. Check System Requirements
Make sure your Mac meets the system requirements for macOS Sequoia. You can usually find the system requirements on Apple's website or in the App Store description for macOS Sequoia. Ensure you have enough storage space (at least 20GB of free space is typically required), as well as an Intel or Apple Silicon processor compatible with Sequoia.

3. Download macOS Sequoia
The installer for macOS Sequoia must be downloaded before you can begin the installation procedure. Here's how to do it:
- Click on the App Store icon and look up macOS Sequoia.
- Click on Get or Download to initiate the process.
![Download macOS Sequoia]()
- After the download is finished, the installer will launch on its own. Don't start the installation yet; you'll need to create a bootable USB drive first.
Step-by-Step Guide to Perform a Clean Install of macOS Sequoia
1. Create a Bootable macOS Sequoia Installer
To perform a clean install, you'll need to create a bootable USB installer. This can be accomplished using a USB device that has at least 16GB of capacity.
Here's how to create one:
- Insert your USB drive into your Mac.
- Launch Disk Utility, select GUID Partition Map as the scheme, and format the USB disk as Mac OS Extended (Journaled) or APFS.
- After formatting, open Terminal (found in Applications > Utilities).
- Use the following Terminal command to create the bootable installer:
sudo /Applications/Install\ macOS\ Sequoia.app/Contents/Resources/createinstallmedia --volume /Volumes/MyVolume
Replace "MyVolume" with the name of your USB drive.
- Terminal will prompt you for your admin password. Enter it and press Return.
![Enter password and press Return]()
- Once the process completes, your bootable macOS Sequoia installer will be ready.
2. Erase Your Mac's Hard Drive
To perform a clean install, you'll need to erase your Mac's internal drive.
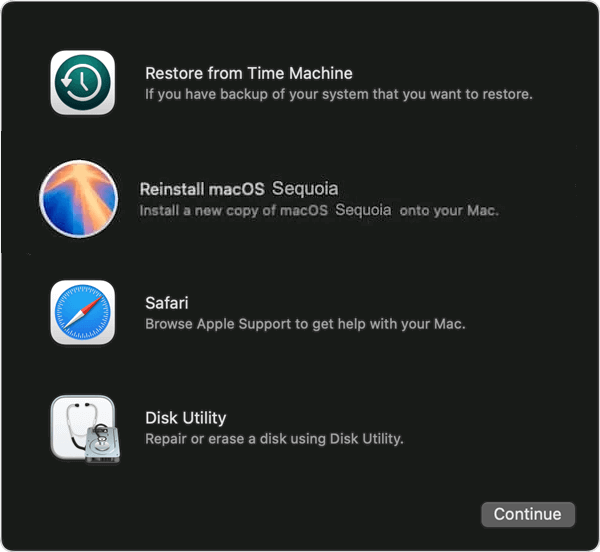
- Shut down the Mac. Then press and hold Power button until the Mac boots into macOS Recovery mode. (If the Mac is an Intel-based Mac, press and hold Command+R keys.) Then select Options and click Continue.
![boots into macOS Recovery mode]()
- Select Disk Utility and click Continue.
![Select Disk Utility and click Continue]()
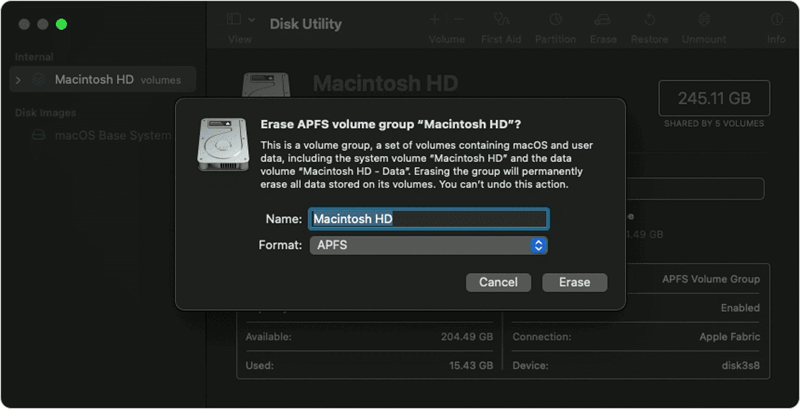
- In Disk Utility, select your primary drive from the list on the left.
- Press the Erase button located at the window's top.
- Choose APFS as the file system format (or Mac OS Extended (Journaled) for older Macs) and click Erase.
![Choose APFS as the file system format]()
- Wait for the process to complete, then close Disk Utility.
3. Install macOS Sequoia
After erasing your Mac's hard drive, you can proceed with the installation of macOS Sequoia.
- Connect the USB installer to your Mac.
- Restart the Mac, press and hold Power button to enter into macOS Recovery mode. (If you want to install macOS Sequoia on old Intel-based Mac, press Option key when restarting.)
- Choose the USB installer.
![Choose the USB installer]()
- Follow the onscreen instructions to install macOS Sequoia.
- The length of the installation procedure varies based on the hardware of your Mac. Ensure your Mac is plugged into a power source during the installation.
Initial Setup After Installation
Once the installation completes, your Mac will restart, and you'll be greeted by the macOS Sequoia setup assistant. Here's what to do next:
1. Setting Up macOS Sequoia
During the setup, you'll need to configure some basic options:
- Select Your Country and Language: Choose your country or region, then select the language and keyboard layout you want to use.
- Wi-Fi Network: Connect to your Wi-Fi network to enable system setup and updates.
- Sign In with Your Apple ID: Sign in with your Apple ID to enable iCloud, the App Store, and other services.
- Set Up Touch ID and Apple Pay (Optional): If you have a Mac with Touch ID, you can set it up at this stage.
2. Restore Data (Optional)
If you used Time Machine or another backup method to save your data before the clean install, now is the time to restore it. Here's how:
- Using Time Machine: If you created a Time Machine backup, you'll be prompted during setup to restore from a backup. Choose this option if you want to restore all your files and settings.
- Using iCloud: If you backed up files to iCloud, sign in with your Apple ID and restore your documents, photos, and other files from iCloud Drive.
- Manual Restore: For users who backed up data manually to an external drive, copy the files back to your Mac after the setup is complete.
Troubleshooting Potential Issues
Though macOS clean installs are generally smooth, some users may encounter issues. Here's how to deal with common problems:
1. Common Installation Errors
- "macOS cannot be installed on this computer": This error typically occurs when your Mac's hardware doesn't meet the system requirements. Double-check that your Mac is compatible with macOS Sequoia.
- Installation Freezes or Crashes: If the installation process freezes or crashes, try restarting your Mac and booting from the USB installer again. You may also need to re-download the macOS Sequoia installer if it was corrupted.
2. What to Do If Installation Fails
If the clean install fails repeatedly:
- Recreate the Bootable Installer: Try creating the bootable USB drive again to rule out a problem with the installer.
- Reset NVRAM and SMC: Resetting the NVRAM and SMC can help resolve hardware-related issues that might be causing the installation to fail. Instructions for doing so are available on Apple's support website.
- Seek Professional Help: If you're unable to resolve the issue yourself, consider reaching out to Apple Support or visiting an Apple Store.
3. Recover Lost Data after Clean Installation
If you have lost data due to clean installing macOS Sequoia and don't have a backup, you can use data recovery software - such as Donemax Data Recovery for Mac to help you scan the erased drive and cleaned system, finding all recoverable files.
Step 1. Download and install Donemax Data Recovery for Mac on macOS Sequoia.
Step 2. Open Donemax Data Recovery for Mac, select the internal SSD to start data recovery.

Step 3. Click on Scan button to deeply scan the internal SSD and find all recoverable files.

Step 4. Once the scan is completed, you can preview all recoverable files. Then select the wanted files, click on Recover button.

Benefits of a Clean Install of macOS Sequoia
After performing a clean install of macOS Sequoia, you should notice several benefits:
1. Performance Improvements
Since a clean install removes all of the unnecessary files and processes that accumulate over time, your Mac will likely run faster and more smoothly. You'll also have more available disk space since all junk files, cache, and unnecessary data will be gone.
2. Fresh Start
A clean install provides a fresh start, free from any issues or problems that may have existed in the previous system. Apps, settings, and files that were causing issues will no longer affect your Mac.
3. Stability and Reliability
With a clean install, you'll experience greater system stability and reliability. You won't have to worry about leftover files from older versions of macOS causing conflicts with the new installation.
Conclusion
Performing a clean install of macOS Sequoia can dramatically improve your Mac's performance and provide a fresh start free from lingering issues or clutter. By following the steps outlined in this guide - backing up your data, creating a bootable installer, erasing your drive, and restoring your files - you can ensure a smooth and successful installation.
A clean install might take some time and effort, but the results are well worth it. Enjoy your newly refreshed and optimized macOS Sequoia system!
Related Articles
- Nov 25, 2024How to Create a Bootable USB Installer for macOS Monterey?
- Apr 07, 2025Troubleshoot The Volume is Not Compatible with This Update on Mac [7 Fixes]
- Jul 27, 2025Fix Wrong Date and Time on Mac: Complete Troubleshooting Guide
- Jul 13, 2024How to Repair An External Hard Drive on Mac?
- Jul 22, 2025Troubleshoot and Fix common macOS Tahoe 26 Beta Issues
- Dec 23, 2024Fix LaCie External Hard Drive Read-Only on Mac: Comprehensive Guide

Coco Lin
Coco has been a writer and a chief programmer at Donemax software since 2018. Over 10 years of experience of writing troubleshooting articles in the software industry, she is passionate about programming and loves to providing solutions to Windows and Mac users. Also she enjoys music and palying tennis in her free time.

Gerhard Chou
In order to effectively solve the problems for our customers, every article and troubleshooting solution published on our website has been strictly tested and practiced. Our editors love researching and using computers and testing software, and are willing to help computer users with their problems


