PAGE CONTENT:
Creating a bootable USB installer for macOS Monterey is a handy skill for any Mac user. Whether you need to reinstall the operating system, upgrade multiple devices, or troubleshoot system issues, having a USB installer ensures you're prepared for various scenarios. This guide will walk you through the process, detailing every step with clarity so that even those new to this process can follow along.
Why Create a Bootable USB Installer for macOS Monterey?
A bootable USB installer is incredibly versatile. It allows you to:
- Install macOS on a freshly formatted drive.
- Recover your system in cases where macOS won't boot.
- Upgrade or reinstall macOS Monterey on multiple devices without downloading the installation file multiple times.
- Perform system repairs and troubleshooting.
With detailed instructions, this post will guide through the process of making one, from assembling the necessary supplies to using the installer to start your Mac.
How to Create a Bootable USB/Disk Installer for macOS Monterey?
Prerequisites
Before diving into the process, you'll need a few things:
- A USB Drive: Choose a flash drive. Ensure no important files are stored on it since the process will erase its contents.
- A Compatible Mac: You'll need a Mac running macOS to create the bootable installer.
- macOS Monterey Installer: This is the installation file for macOS Monterey, which can be downloaded directly.
- Time and Patience: Depending on your Mac's speed and internet connection, the process may take some time.
Step 1: Download macOS Monterey
Downloading the macOS Monterey installer is the first and most crucial step in the process. Without this file, you won't be able to create the bootable USB installer. While the process is simple, a few details and precautions can make the experience smoother.
Why Download Directly from the Mac Store?
It is the safest and most reliable source for downloading macOS. It ensures you're getting an authentic and unaltered installer file. Downloading from third-party sources can expose your system to malware or incomplete files, so always use Apple's official store.
Detailed Steps to Download macOS Monterey:
- Open the Mac App Store: Click the icon on the Dock to open the Mac App Store, or use Spotlight to find it by pressing Command + Space and typing "Mac App Store."
- Find macOS Monterey: In the search bar at the top-left corner, type "macOS Monterey." The macOS Monterey page should appear in the search results.

Or you can click the Download link: macappstores://apps.apple.com/app/macos-monterey/id1576738294?mt=12
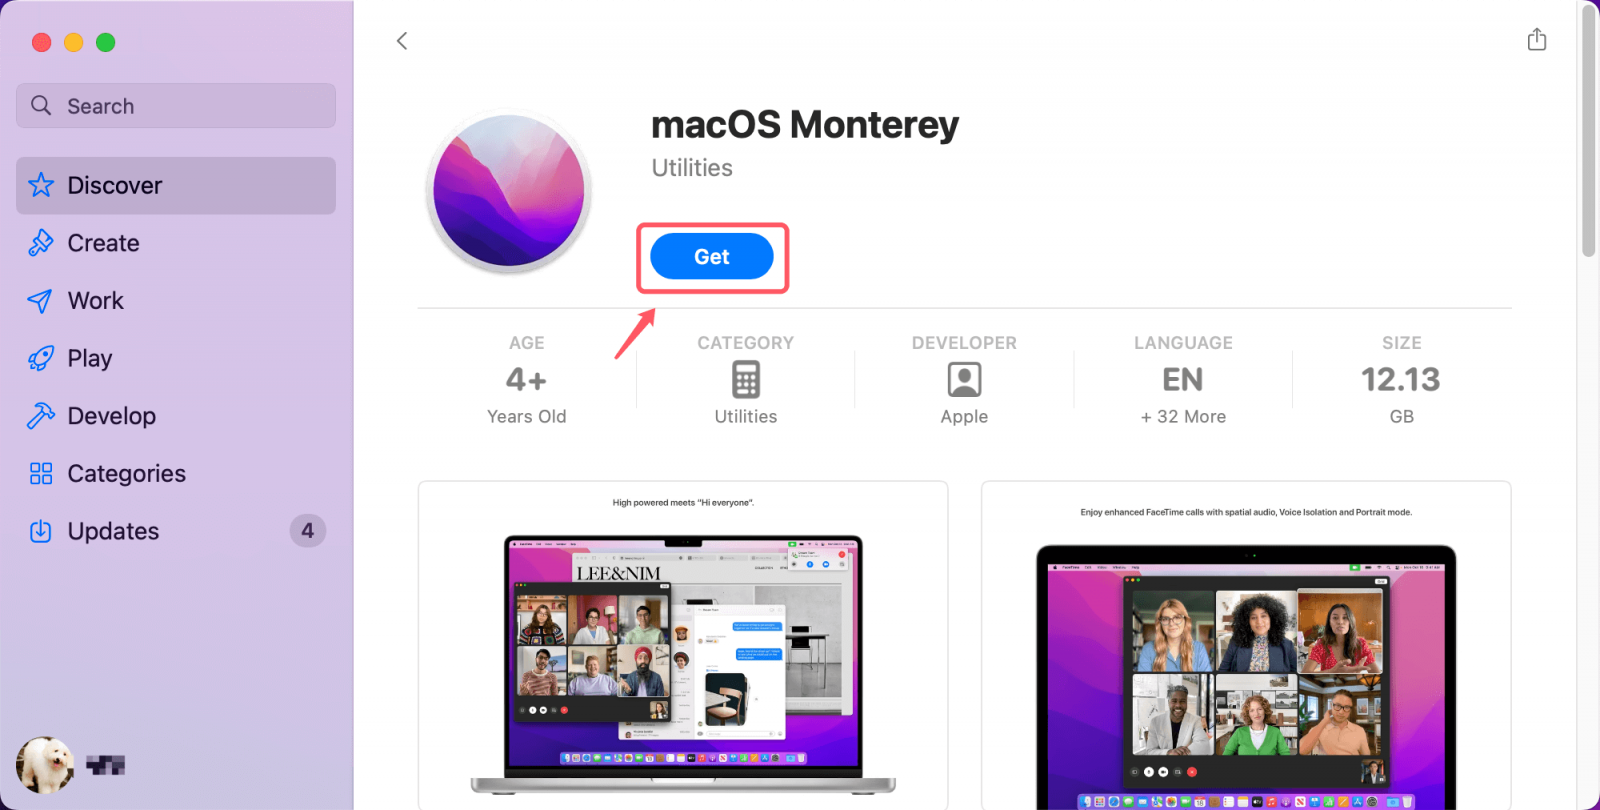
- Download the Installer: On the macOS Monterey page, click the Get button. This will redirect you to System Preferences, where the download process begins. Be patient, as the installer file is several gigabytes in size. Depending on your internet speed, this may take some time.
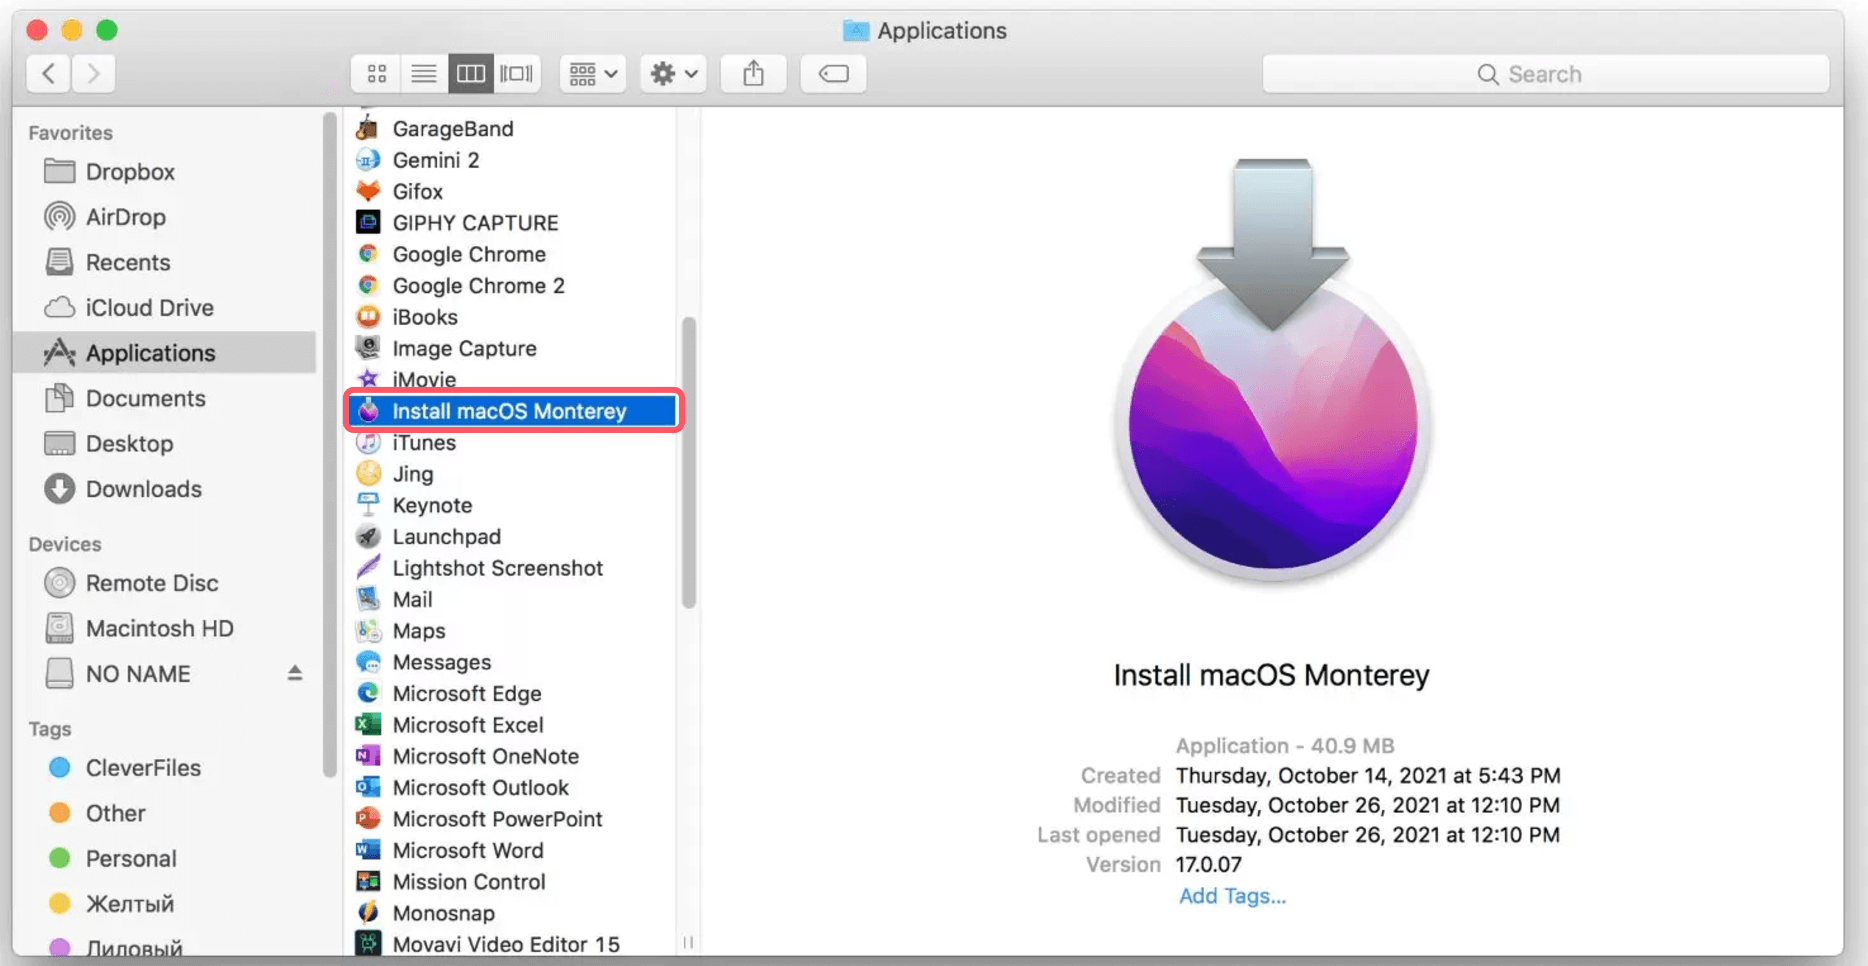
- Locate the Installer File: Once the download is complete, the installer will automatically open to prompt you to begin the macOS installation. Do not proceed with the installation at this stage. Instead, close the installer by clicking Quit Install macOS in the menu bar.
The downloaded file will be saved in your Applications folder as Install macOS Monterey.app. You can confirm its presence by opening Finder, navigating to Applications, and looking for the file.

Important Considerations:
- Ensure Adequate Storage Space: The macOS Monterey installer file is approximately 12GB, so make sure your Mac has sufficient free space before starting the download.
- Check for Compatibility: Verify that your Mac is compatible with macOS Monterey before downloading the installer. You can find the compatibility list on Apple's support website or the macOS Monterey page in the App Store.
What If You Can't Find macOS Monterey in the App Store?
Occasionally, older versions of macOS may not appear in the main App Store search results. If this happens:
- Use this direct link to the macOS Monterey page provided by Apple.
- Alternatively, search for "Apple macOS downloads" in your browser to locate Apple's official macOS download resources.
Redownloading the Installer:
If you've previously downloaded macOS Monterey but deleted the file, you can redownload it from the App Store. However, ensure you clear any incomplete downloads or old versions to avoid conflicts.
Step 2: Format the USB Drive
Next, you need to prepare your USB drive by formatting it. This process ensures the drive is ready for macOS installation files. Here's how to do it:
- Plug your USB drive into the USB port on your Mac.
- Go to Disk Utility from Utilities via Applications or search for it in Spotlight to launch Disk Utility.
- In Disk Utility, select your USB drive from the left-hand sidebar. Be cautious to select the correct drive, as this process will erase all data on it.
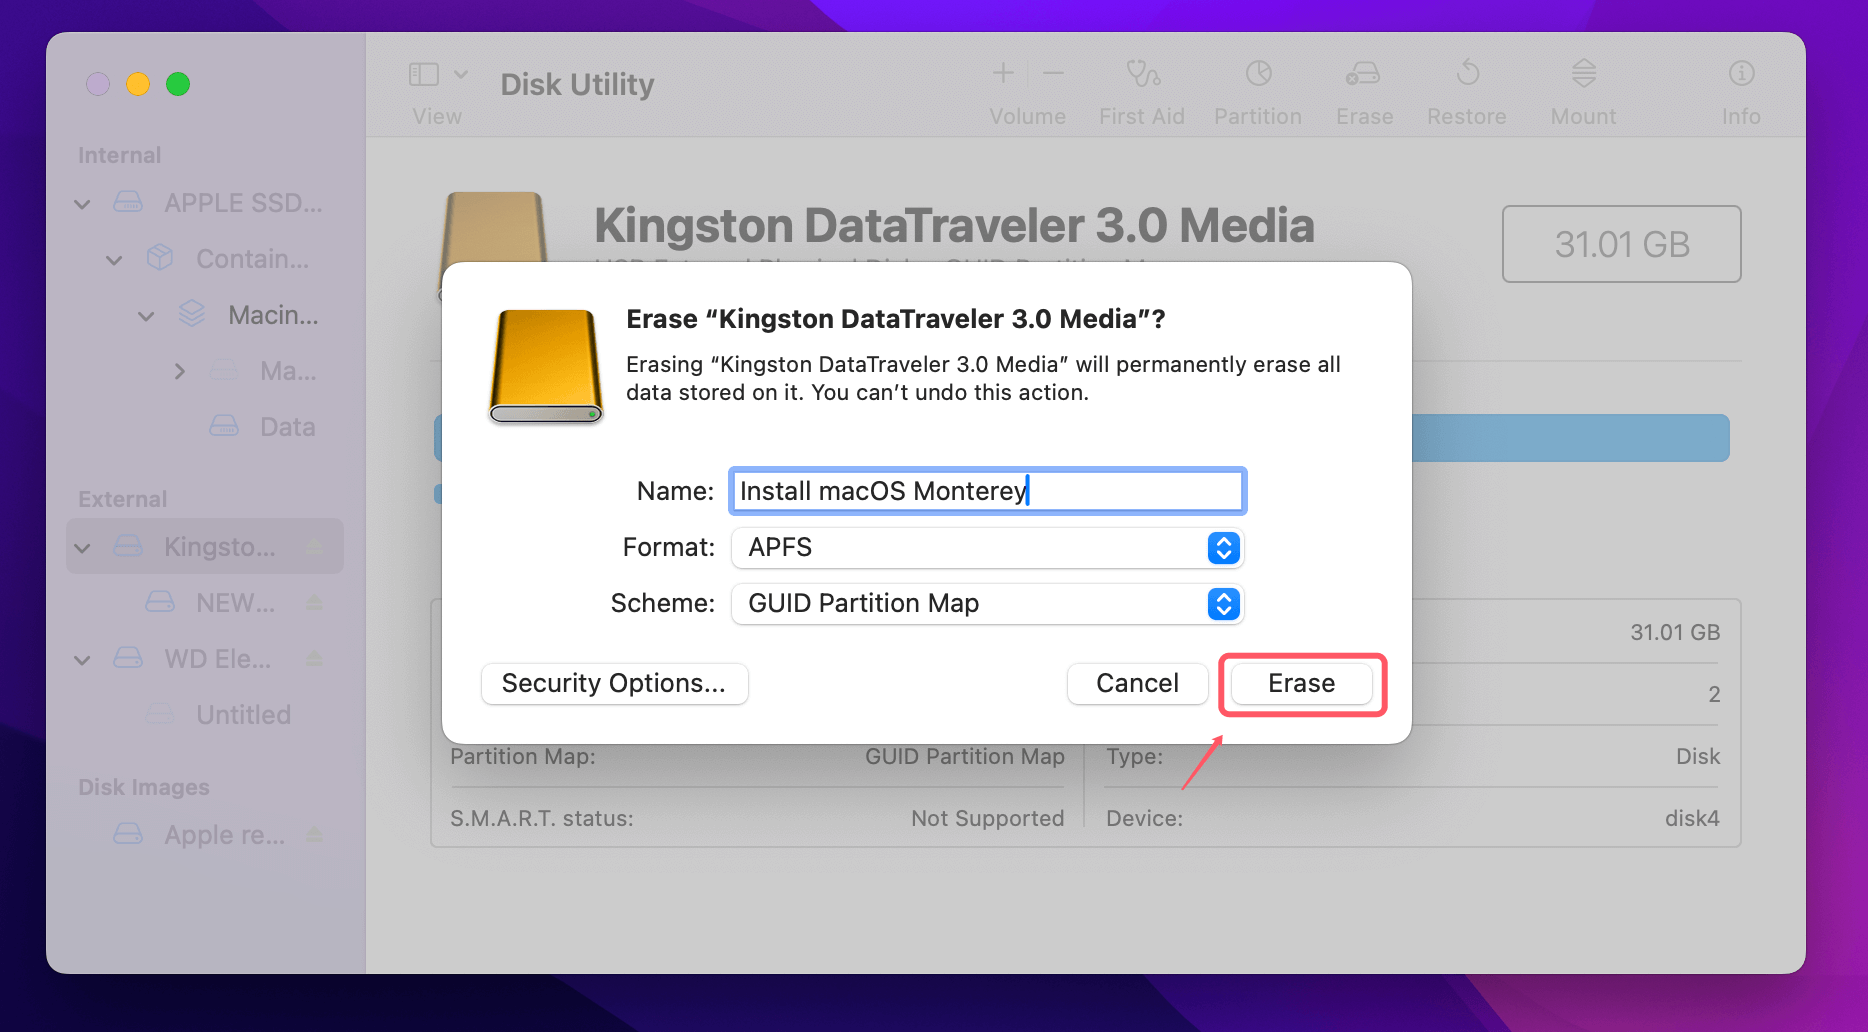
- Press the Erase button located at the window's top.
- In the dialog box, set the following:
- Name: Enter a name like "Install macOS Monterey" (you can choose any name).
- Format: Select Mac OS Extended (Journaled) or APFS.
- Scheme: Choose GUID Partition Map.
- Click Erase and wait for the formatting to complete.
![Create a Bootable USB/Disk Installer for macOS Monterey]()
Once the drive is formatted, it's ready to be used for creating the installer.
Step 3: Create the Bootable USB Installer Using Terminal
The Terminal app is a powerful tool that allows you to perform tasks directly with command-line instructions. Creating a bootable USB installer using Terminal is efficient, and while it might seem intimidating for those unfamiliar with it, the process is straightforward when broken down.
Understanding the Command:
The following is the command that was used to generate the bootable USB installer:
sudo /Applications/Install\ macOS\ Monterey.app/Contents/Resources/createinstallmedia --volume /Volumes/MyVolume
(Replace MyVolume with the name of your USB drive)
Executing the Command
- Locate Your USB Drive Name: Open Finder and verify the name of your USB drive under "Locations." Use this name in the command if it differs from “Untitled.”
- Run the Command in Terminal: Once you input the command, Terminal will display messages about erasing the USB drive, copying installation files, and setting up the bootable installer. This process might take several minutes, especially if your USB drive has slower write speeds.
- Monitor Progress: Terminal provides a progress report as it transfers files to the USB drive. You'll see messages like "Copying to disk" and percentage updates. Patience is key here, as larger files can take time to transfer.
- Completion: Once the process is done, Terminal will display a message confirming that the bootable USB installer has been successfully created.
Common Issues During This Step:
- If you see an error stating "command not found," ensure the macOS installer file is in the Applications folder. If it isn't, redownload it from the Mac App Store.
- If the process gets interrupted or the USB drive doesn't appear as an option during booting, try reformatting the drive and repeating the command.
By following these detailed instructions and understanding the command's components, you'll feel more confident using Terminal and troubleshooting any issues that arise. The end result is a reliable USB installer ready to bring macOS Monterey to life.
Step 4: Eject the USB Drive Safely
Before removing the USB drive, ensure you eject it properly to prevent data corruption:
- Open Finder and locate the USB drive in the left-hand sidebar.
- Click the Eject button next to the USB drive's name.
- Wait until the drive disappears from the Finder sidebar, then remove it from the USB port.
Step 5: Boot from the USB Installer
Your USB installer is now ready to be used. To install or reinstall macOS Monterey, you'll need to boot your Mac from the USB drive:
- Connect your Mac to the USB installer.
- Shut down the Mac.
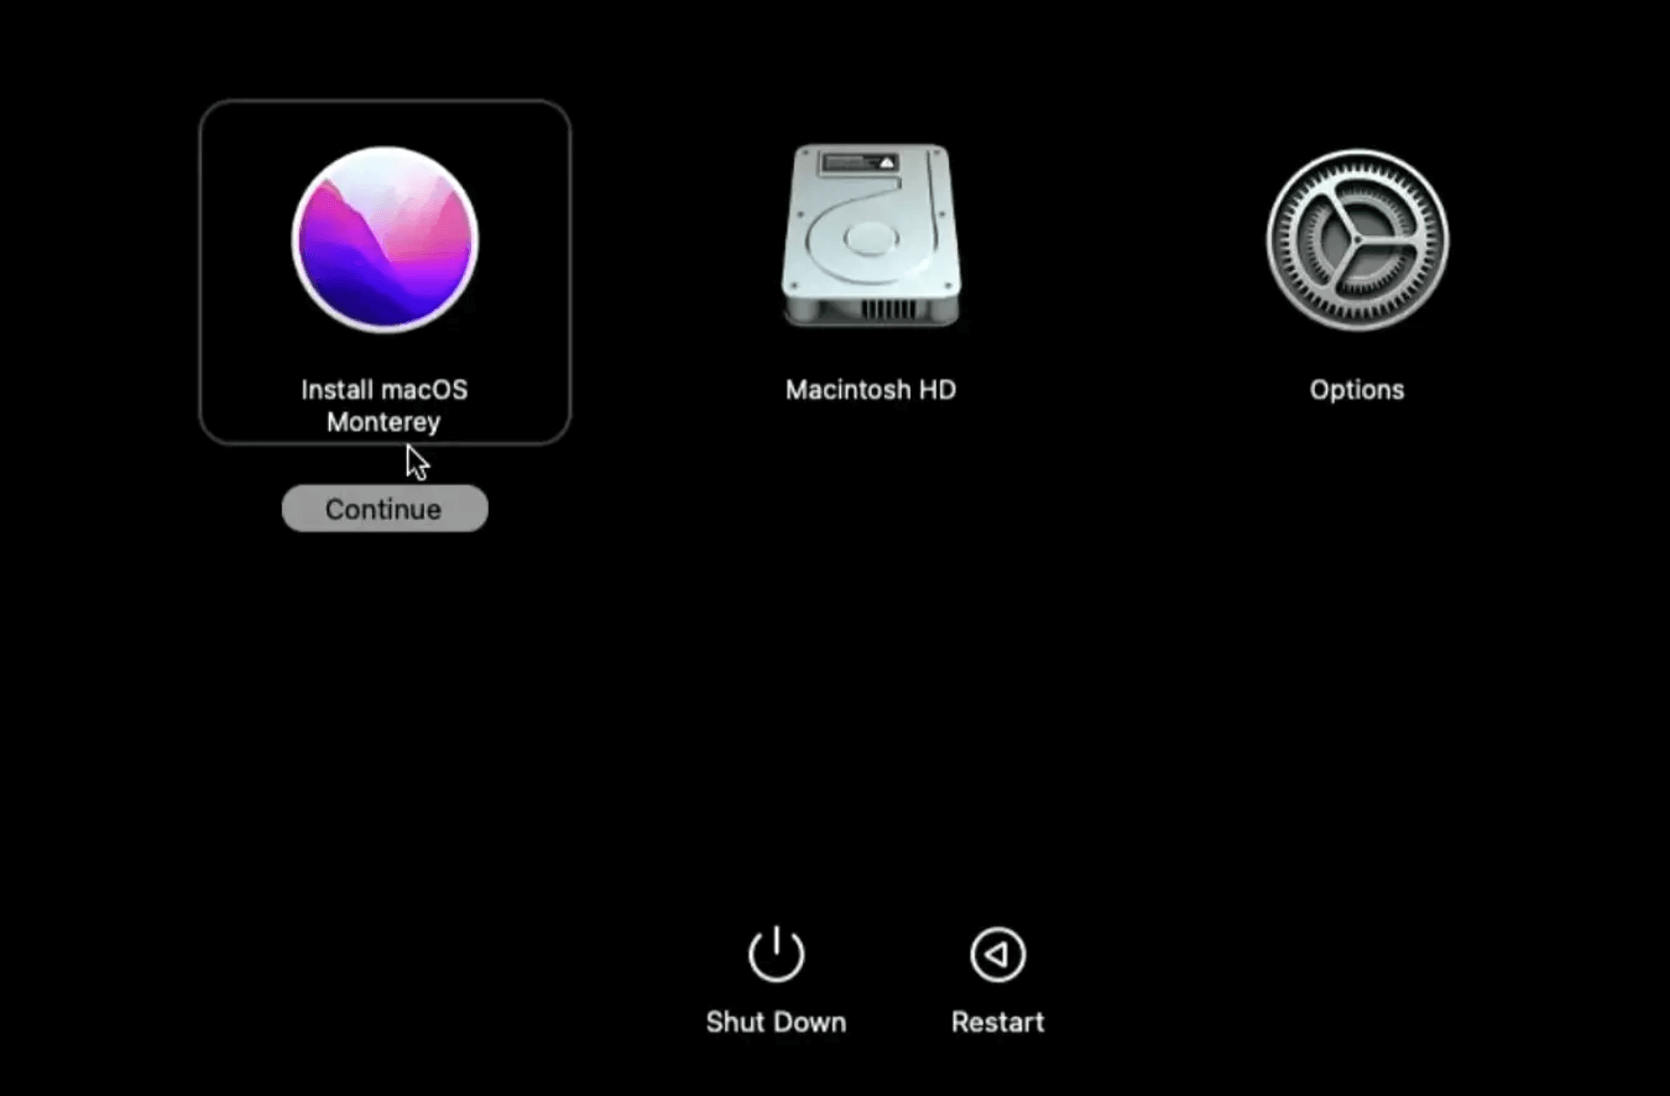
- Press and hold Power button until you see Loading Startup Options.
- Select Install macOS Monterey, click Continue.
![Create a Bootable USB/Disk Installer for macOS Monterey]()
Troubleshooting Tips
Despite following the steps carefully, you might encounter issues. Here are some common problems and their solutions:
1. USB Not Showing Up in Startup Manager
- Ensure the USB drive is formatted correctly as Mac OS Extended (Journaled) or APFS.
- Try connecting the USB to a different port or using another USB drive.
2. Terminal Command Not Working
- Verify the name of your USB drive matches the name used in the Terminal command.
- Double-check that the macOS installer is in the Applications folder.
3. macOS Installer Fails to Load
- Ensure the macOS Monterey installer file isn't corrupted. Redownload it from the Mac App Store if necessary.
- Test the USB drive on another Mac to confirm it's working.
Conclusion
Creating a bootable USB installer for macOS Monterey equips you with a powerful tool for system installations, troubleshooting, and recovery. The process might seem technical, but with the detailed steps provided, it's achievable for anyone with basic computer skills.
By following this guide, you'll save time and frustration, especially in emergencies when your Mac refuses to boot. Keep your bootable installer handy for future use, as it can be a lifesaver in critical situations.

Donemax Disk Clone for Mac
An award-winning disk cloning program to help Mac users clone HDD/SSD/external device. It also can create full bootable clone backup for Macs.
Related Articles
- Dec 13, 20248 Solutions to Fix WD Elements Not Showing Up on Mac
- Mar 31, 2025Force Shut Down Mac: A Complete Guide
- Nov 19, 2024How to Perform Clean Install of macOS Sonoma?
- Aug 07, 2024How to Format SD Card on Mac?
- Nov 11, 2024Fix macOS Sequoia Crashes Frequently or Keeps Restarting
- Jan 16, 202510 Solutions to Fix Fusion Drive Not Mounting or Not Showing Up on Mac

Christina
Christina is the senior editor of Donemax software who has worked in the company for 4+ years. She mainly writes the guides and solutions about data erasure, data transferring, data recovery and disk cloning to help users get the most out of their Windows and Mac. She likes to travel, enjoy country music and play games in her spare time.

Gerhard Chou
In order to effectively solve the problems for our customers, every article and troubleshooting solution published on our website has been strictly tested and practiced. Our editors love researching and using computers and testing software, and are willing to help computer users with their problems

