Before we start: Before or after clean installing macOS Sonoma on your Mac, you can use disk cloning software - such as Donemax Disk Clone for Mac to make a full bootable clone backup for your Mac.
PAGE CONTENT:
To free up disk space or improve your Mac's performance, you may need to clean install macOS Sonoma on your Mac. In this article, we will show you how to securely and quickly clean install macOS Sonoma on your Mac.
What to Do Before Clean Installing macOS Sonoma?
1. Back Up Your Mac
It is strongly recommended to make a backup of your important data before performing clean installation of macOS Sonoma. You can back up your Mac with Time Machine or third-party disk cloning programs.
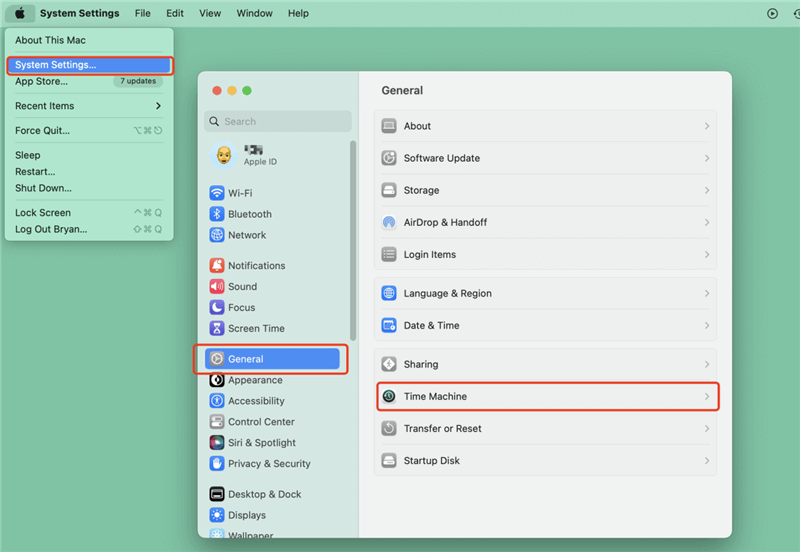
- Time Machine: Connect an external hard drive to your Mac, format it to APFS by using Disk Utility. Then go to System Settings > General > Time Machine, set the external hard drive as the backup disk, then Time Machine will back up all data from the Mac to the external hard drive automatically.
![clean install macOS Sonoma on your Mac]()
- Disk Clone: Donemax Disk Clone for Mac is an easy-to-use disk cloning program. It can securely clone everything from the Mac's internal disk to the external hard drive, making a full bootable clone backup.
![Donemax Disk Clone for Mac]()
2. Create macOS Sonoma Bootable USB Installer
You need to make a macOS Sonoma bootable USB installer for clean installation or installing macOS Sonoma on unsupported Mac machines. A bootable USB installer is very useful whether you want to reinstall everything on your Mac, set up multiple devices, or need a trusted tool for fixing problems.
Follow this guide's detailed, step-by-step instructions to prepare your USB drive, download the necessary macOS installer, and make the bootable media using Terminal or other tools. If you follow these steps, you'll be ready for installation, ensuring the process goes smoothly and quickly.
Get ready to change how you install things and take care of your Mac with the security of having a bootable USB installer ready.
For many reasons, a bootable USB driver for macOS Sonoma can be very helpful:
- Clean Installation: It lets you install macOS Sonoma from scratch, ensuring your system works easily and efficiently without any files or settings left over from previous installations.
- Multiple Installations: You can save time and effort by installing macOS Sonoma on more than one device with the same USB driver.
- Troubleshooting: If your Mac has problems that prevent it from starting up regularly, a bootable USB installer can help. Through the installer, you can access recovery tools and restart the operating system.
macOS Sonoma bootable installer requirements:
To make a USB bootable driver for macOS Sonoma, you will need the following things before you start:
- A USB drive with 16 GB of space since the macOS setup file is about 13 GB. It's best to set up the drive as Mac OS Extended.
- A Mac that is in good health and works with macOS Sonoma. The macOS Sonoma installer used to make the USB bootable installer needs to be installed on the Mac. That is necessary so that macOS Sonoma can work with that type of Mac.
- An internet link that works well and stays stable on your Mac. During the process, you must connect to the internet and download the macOS software from the website or the App Store.
Steps to make a macOS Sonoma bootable USB installer:
Step 1. Open App Store, type macOS Sonoma in search box and press Return.
Step 2. Click Get to download macOS Sonoma on the Mac.
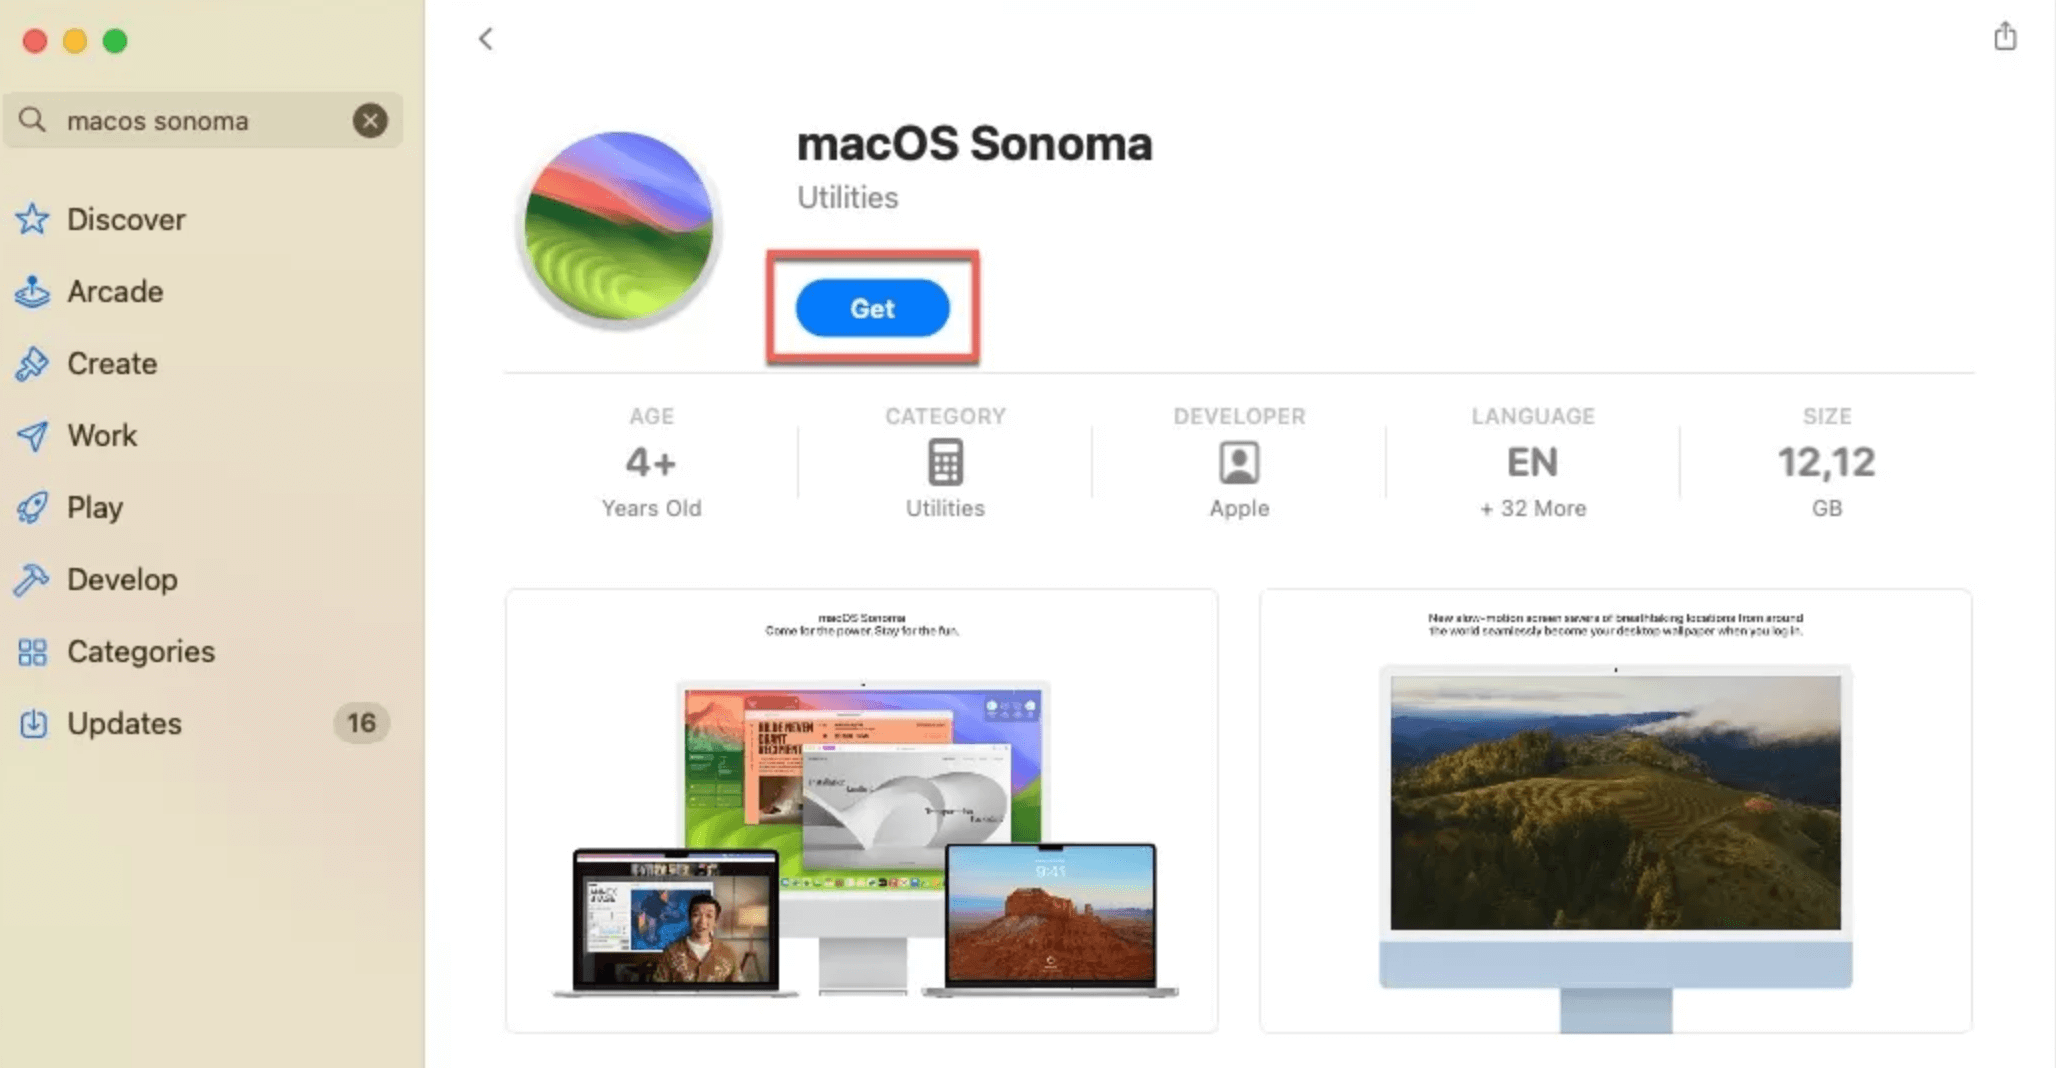
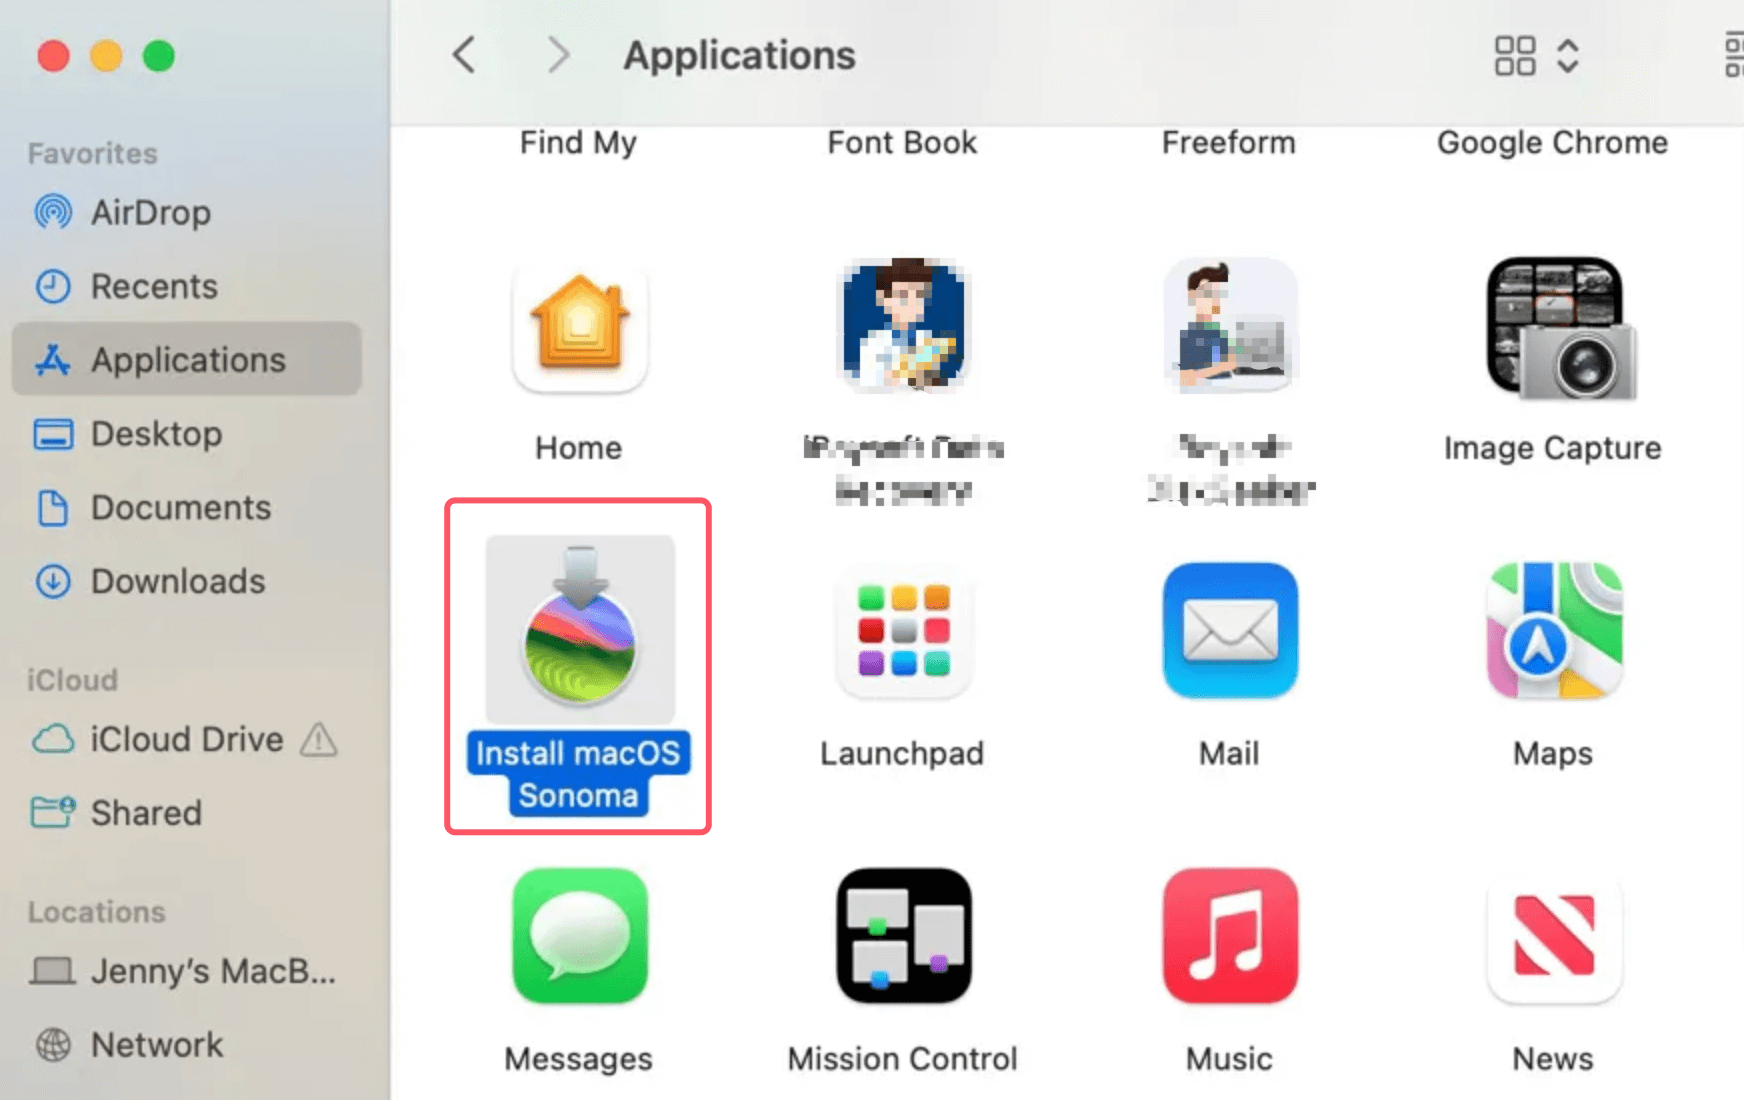
Once the downloading process gets finished, check the macOS Sonoma Installation app (named Install macOS Sonoma) in Applications. Don't open the app.
Step 3. Connect an USB drive (16GB+) to your Mac and format it to APFS by using Disk Utility.
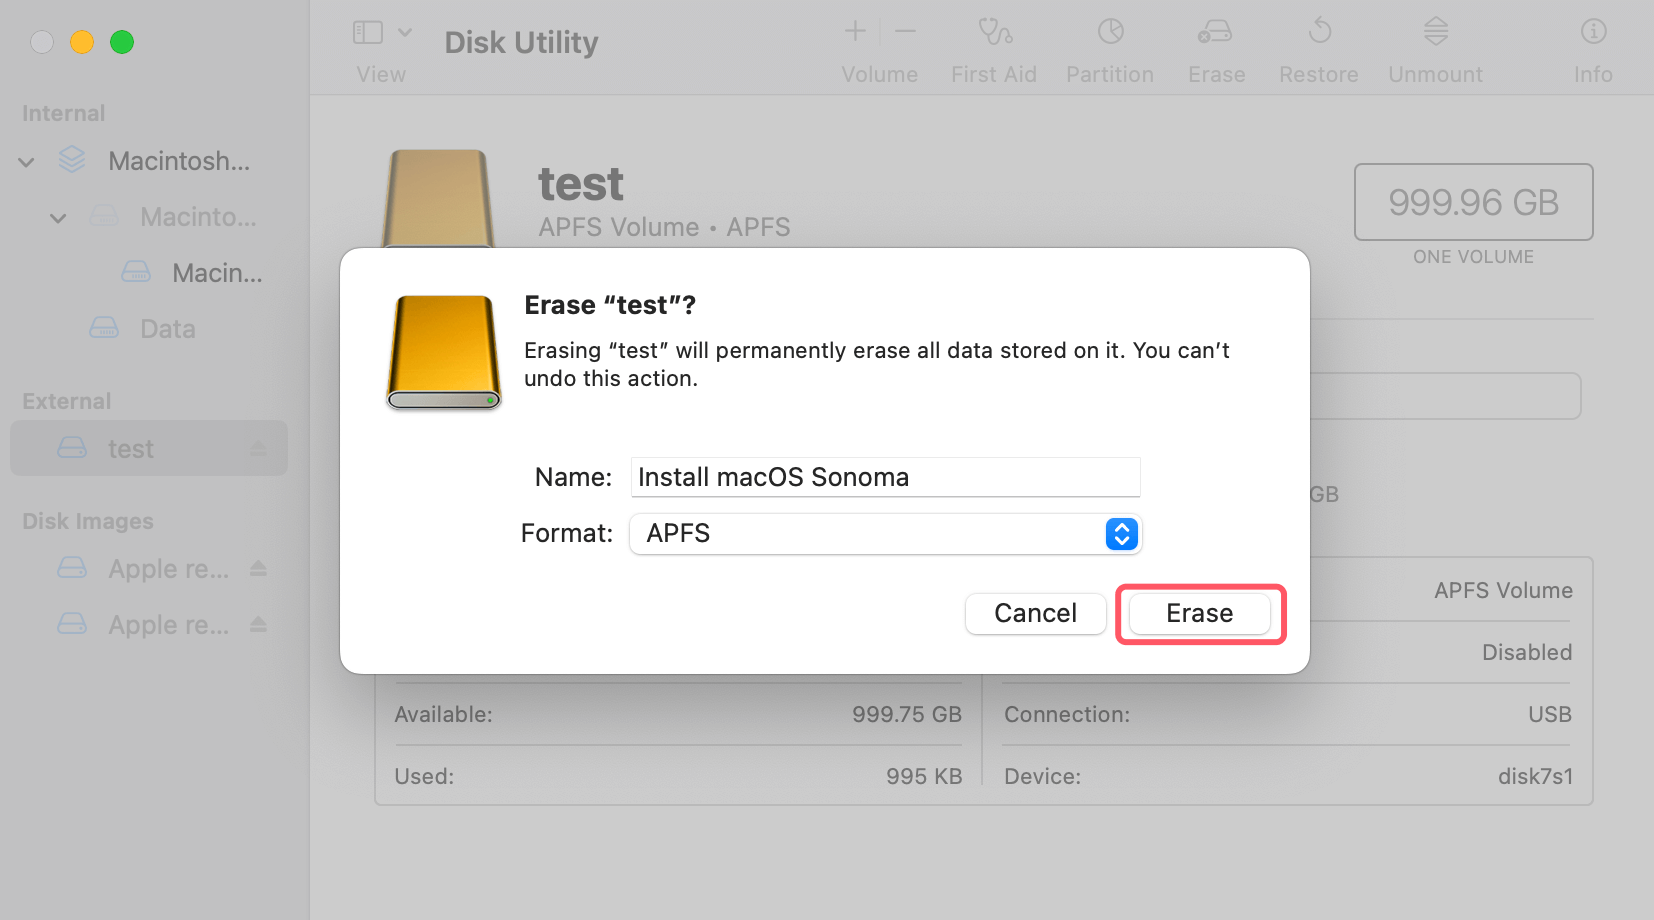
Step 4. Go to Applications > Utilities, open Terminal, enter:
sudo /Applications/Install\ macOS\ Sonoma.app/Contents/Resources/createinstallmedia --volume /Volumes/MyVolume
Replace MyVolume with name of the USB drive.

Enter the login password and press Return, it will create the bootable installer on the USB drive.
Steps to Clean Install macOS Sonoma via Bootable USB Installer
Connect the UBS installer to the Mac on which you want to clean install macOS Sonoma:
1. Wipe the startup disk
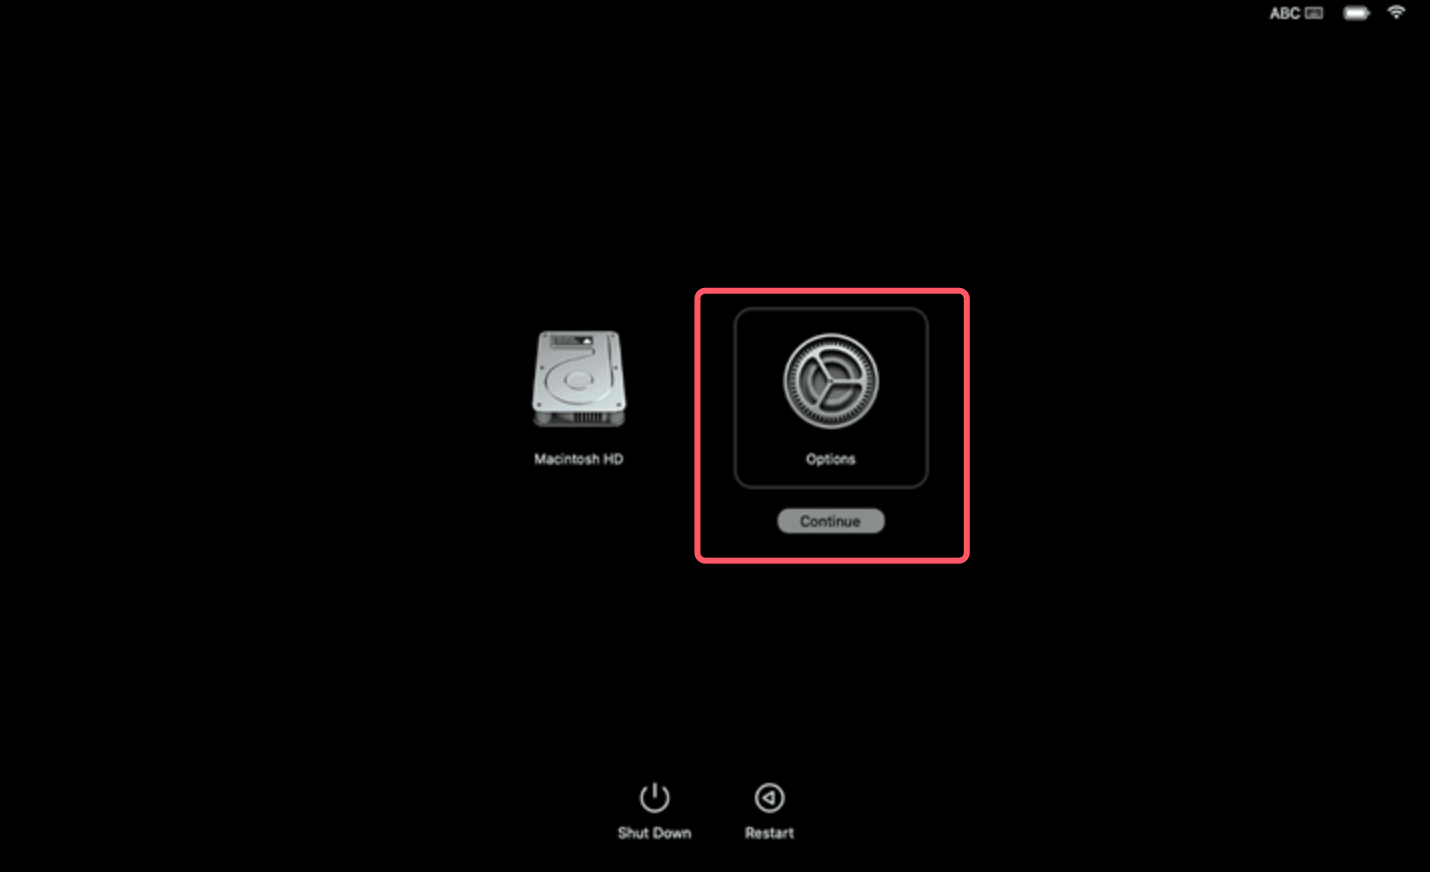
- Shut down the Mac.
- Press and hold Power button until you see Loading Startup Options.
- Choose Options and click on Continue button.
![clean install macOS Sonoma on your Mac]()
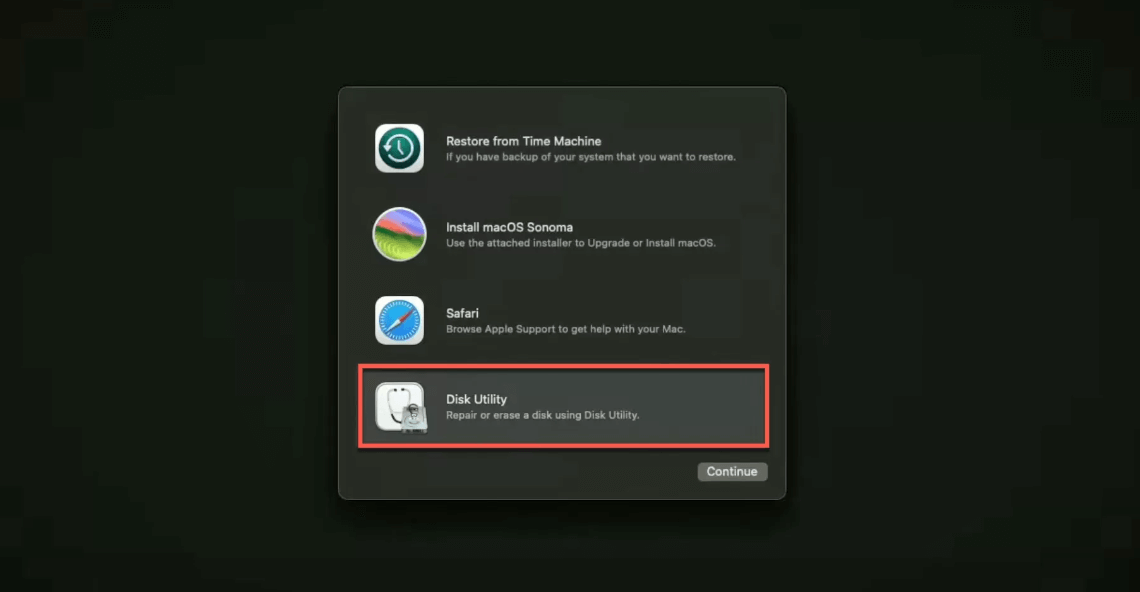
- Choose Disk Utility and click on Continue button.
![clean install macOS Sonoma on your Mac]()
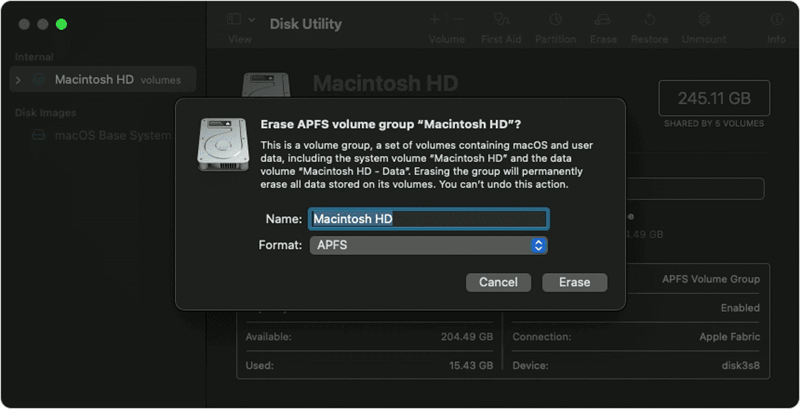
- Select the Startup disk (usually labelled as Macintosh HD), click Erase.
- Select APFS as the file system, click Erase again.
![clean install macOS Sonoma on your Mac]()
2. Clean install macOS Sonoma via USB installer
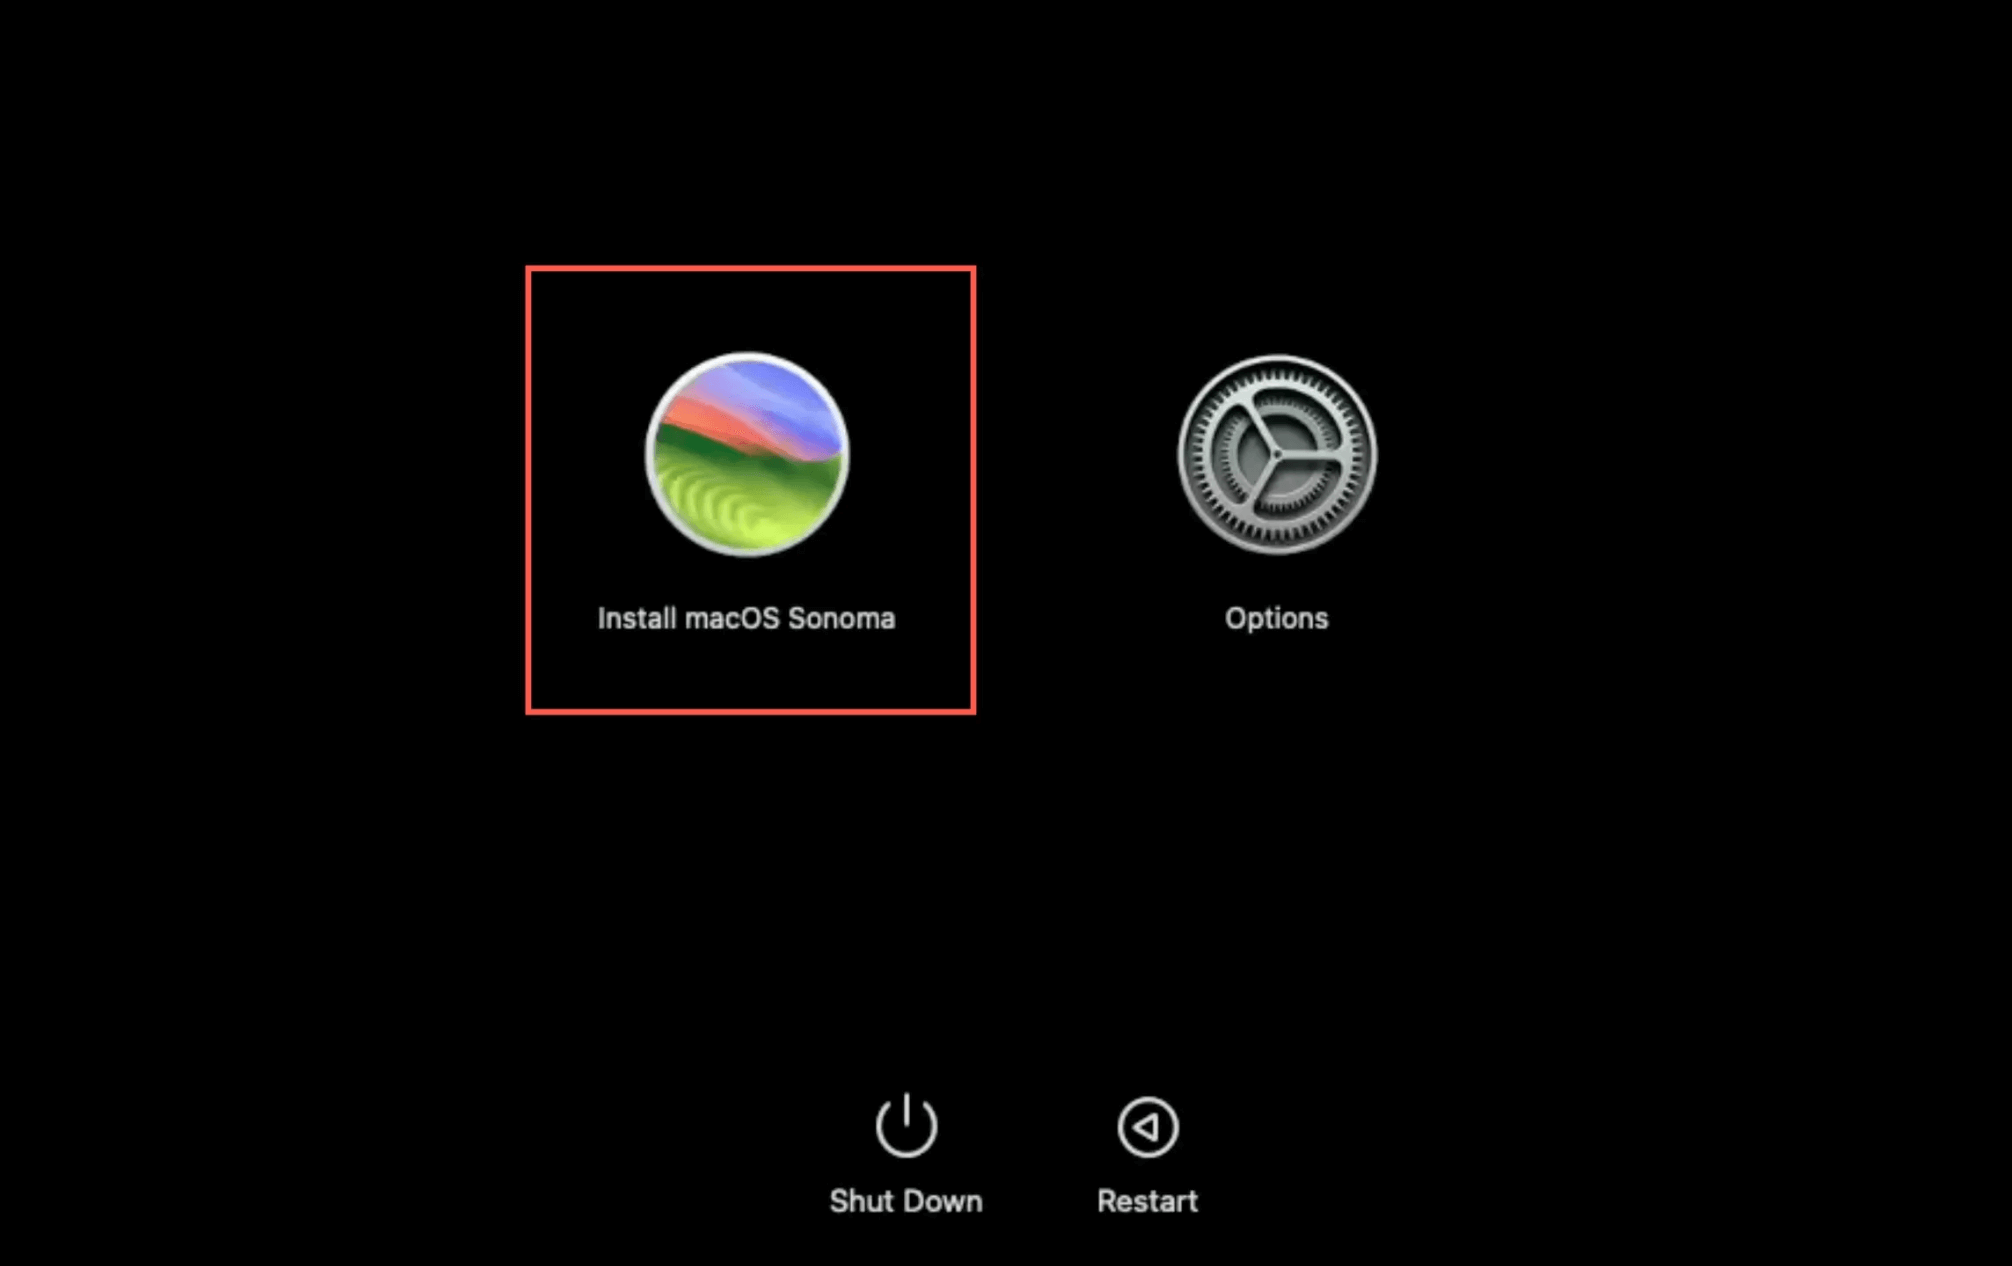
Restart the Mac, press and hold the Power button to enter into macOS Recovery mode. Then select the bootable USB installer and press Enter. Follow the onscreen instructions to install macOS Sonoma.
How to Fix Common Problems and Issues:
- USB Drive Not Recognized: If your USB drive doesn't show up, reset it and try the steps again. Ensure it's not going through a hub and is connected straight to your Mac.
- Installer Fails to Create: Ensure your Mac and the USB drive have enough room. Make sure the application for macOS Sonoma is in the Applications folder.
- Installation Fails: If the program fails, try getting the macOS Sonoma installer again. Make sure that your Mac has all of the things that macOS Sonoma needs.
Additional Tips and Considerations:
- Keep the Installer Updated: As soon as a new version of macOS Sonoma comes out, make a bootable USB drive and download the updated driver. This will ensure you have the newest features and security patches.
- Backup Regularly: Make sure you back up your data with Time Machine or another backup tool before making big changes to your system, like installing macOS from scratch.
- Use Quality USB Drives: Buy USB drives from well-known names that are of good quality. That can keep data from getting damaged and ensure the update goes smoothly.
Recover Lost Data After Clean Install of macOS Sonoma
If you lose everything after clean install macOS Sonoma, you can use Mac data recovery software to deeply scan the internal disk and find the lost files.
Step 1. Download and install the reliable Mac data recovery software - such as Donemax Data Recovery on your Mac, then open it on your Mac.
Step 2. Open Donemax Data Recovery, then select Macintosh HD to start data recovery.

Step 3. Click on Scan button to deeply scan the internal disk (Macintosh HD) and find all deleted/erased or lost files.

Step 4. Once the scan is completed, you can preview all recoverable files. Then select the wanted files, click on Recover button to save them.

Conclusion:
Making a macOS Sonoma bootable USB installer is easy and very useful because it lets you do clean installs, upgrades on multiple devices, and effective troubleshooting. If you follow this guide, getting your USB drive ready, downloading the macOS software, and using Terminal to make the bootable media will be easy.
That ensures the download goes smoothly and gives you a reliable tool for keeping your Mac in good shape. Take advantage of the speed and ease of use of a bootable USB installer to make handling your macOS installations easier and more flexible.
Then you can use the USB installer to clean install macOS Sonoma on your Mac. Make a backup before you start clean installation process.

Donemax Disk Clone for Mac
An award-winning disk cloning program to help Mac users clone HDD/SSD/external device. It also can create full bootable clone backup for Macs.
Related Articles
- Feb 20, 2025Fix Xcode Not Working on macOS Sequoia, Sonoma, Ventura, etc.
- Dec 25, 20242025 Best FAT32 Disk Formatter for Mac
- Jan 04, 2025How to fix fsck_msdos on Mac without Data Loss?
- Nov 07, 2024Downgrade from macOS Sequoia to macOS Sonoma or Earlier Versions
- Oct 21, 2024macOS Sequoia Not Recognizing USB Flash Drives, 9 Methods to Fix It
- Sep 25, 2024Fix Toshiba External Hard Drive Not Mounting on Mac (7 Solutions)

Christina
Christina is the senior editor of Donemax software who has worked in the company for 4+ years. She mainly writes the guides and solutions about data erasure, data transferring, data recovery and disk cloning to help users get the most out of their Windows and Mac. She likes to travel, enjoy country music and play games in her spare time.

Gerhard Chou
In order to effectively solve the problems for our customers, every article and troubleshooting solution published on our website has been strictly tested and practiced. Our editors love researching and using computers and testing software, and are willing to help computer users with their problems
