Before we start: Before clean installing macOS Monterey on your Mac, you can use Time Machine to back up your Mac or use disk cloning software - Donemax Disk Clone for Mac to make a full bootable clone backup for your Mac.
PAGE CONTENT:
macOS Monterey, Apple's powerful operating system, brings a suite of exciting features designed to enhance your Mac experience. From Universal Control to improved FaceTime capabilities, Monterey stands out as a valuable upgrade. However, as enticing as these features are, some users may find their systems bogged down with clutter from years of use, or they may encounter performance issues after an upgrade. For these cases, performing a clean install of macOS Monterey is the optimal solution. In this comprehensive guide, we will explore each and every step of the procedure, from preparation to troubleshooting, ensuring your transition to Monterey is smooth and stress-free.
What is a Clean Install, and Why Choose It?
A clean install involves erasing your Mac's internal drive and installing the operating system from scratch. Unlike a simple upgrade, which retains your files and settings, a clean install removes all existing data. This allows your Mac to start fresh, free from old files, outdated settings, or potential bugs that can cause instability.
You might consider a clean install if:
- Your system has been sluggish or plagued by persistent errors.
- You've accumulated unnecessary files over years of use and want to declutter.
- You're upgrading from an older macOS version and want to ensure maximum compatibility.
- You want to repurpose your Mac or sell it, ensuring no personal data remains.
![Securely Clean Install macOS Monterey]()
Preparation Steps Before Starting
A clean install requires careful preparation. Follow these steps to ensure your data is secure and the process runs smoothly.
Backup Your Data:
Since a clean install erases everything on your Mac, backing up your files is crucial. Use Time Machine, Apple's built-in backup solution, or manually copy important files to an external drive or cloud storage. This ensures you can retrieve your documents, photos, and other essential data after the installation.
If you want to create a bootable clone backup for Mac, just use disk cloning software - such as Donemax Disk Clone for Mac to clone everything of the Mac to the external hard drive.
Related article: Make a full bootable clone backup for a Mac.
Check System Compatibility:
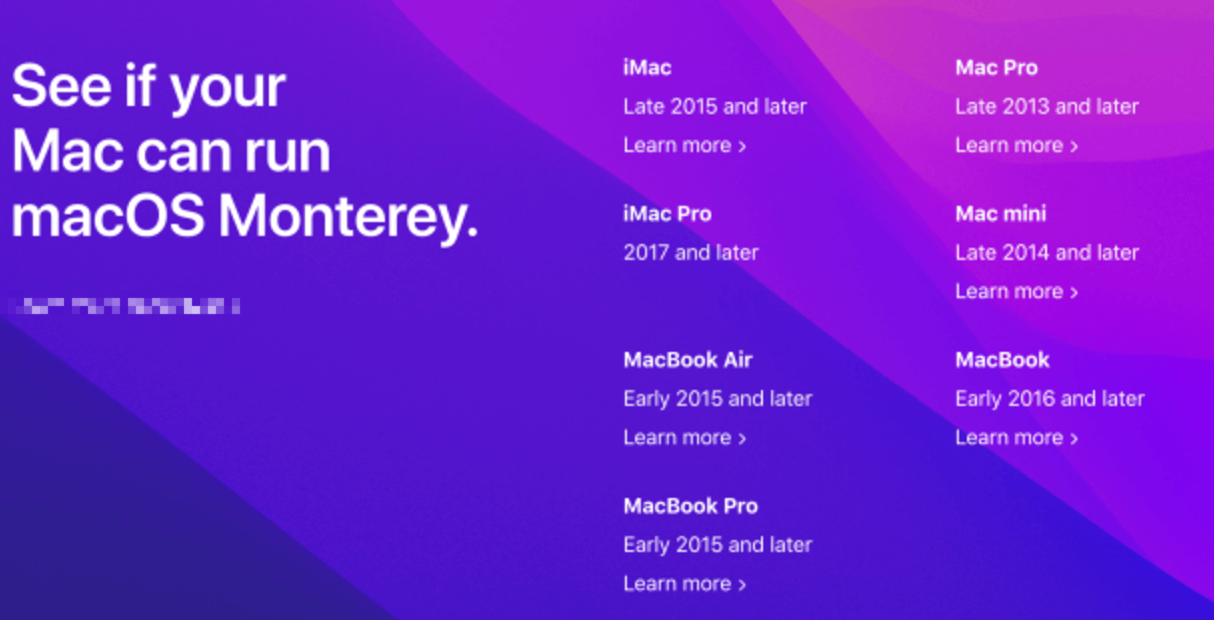
Before diving in, confirm that your Mac supports macOS Monterey. If your Mac isn't on the list, Monterey may not work, and you'll need to stick with an earlier version.
Gather Necessary Tools:
You'll need:
- A USB drive or external disk with at least 16 GB of storage.
- A stable internet connection to download the macOS Monterey installer.
- Patience - while the process is straightforward, it can take some time.
Steps to Clean Install macOS Monterey
#1 Create a Bootable macOS Monterey USB Installer
A bootable USB installer is an essential tool for performing a clean install. It allows you to install macOS Monterey from scratch without relying on your Mac's existing operating system. This section provides an in-depth look at how to create this installer step by step, ensuring you have everything you need for a smooth process.
Why Create a Bootable Installer?
Creating a bootable installer is particularly useful in several scenarios:
- If your Mac is experiencing severe issues and cannot boot into its existing operating system.
- When upgrading from an older macOS version that lacks direct access to Monterey.
- To reuse the installer across multiple Macs without downloading the large file each time.
Here's how to create your bootable macOS Monterey installer.
Step 1: Download the macOS Monterey Installer
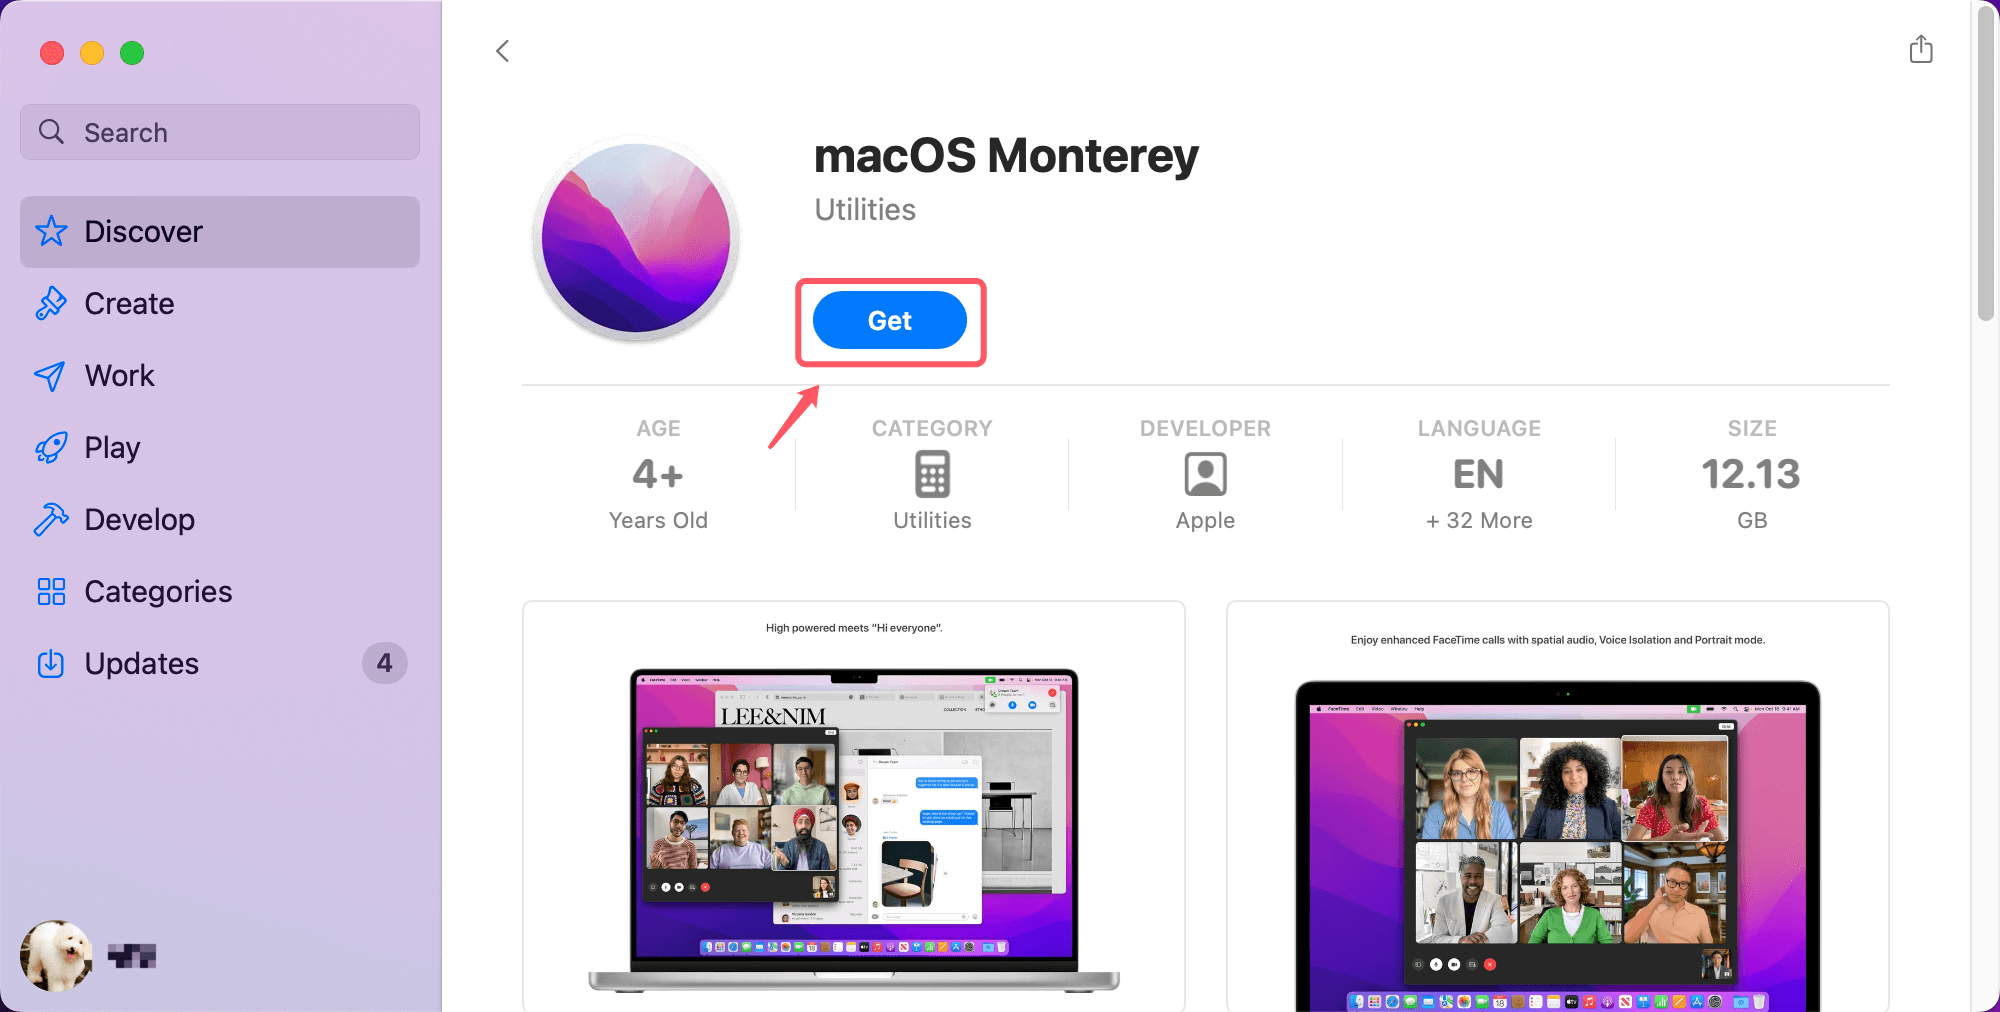
- Access the App Store: Open the App Store on your Mac and search for "macOS Monterey." Apple provides the installer as a free download.
![Securely Clean Install macOS Monterey]()
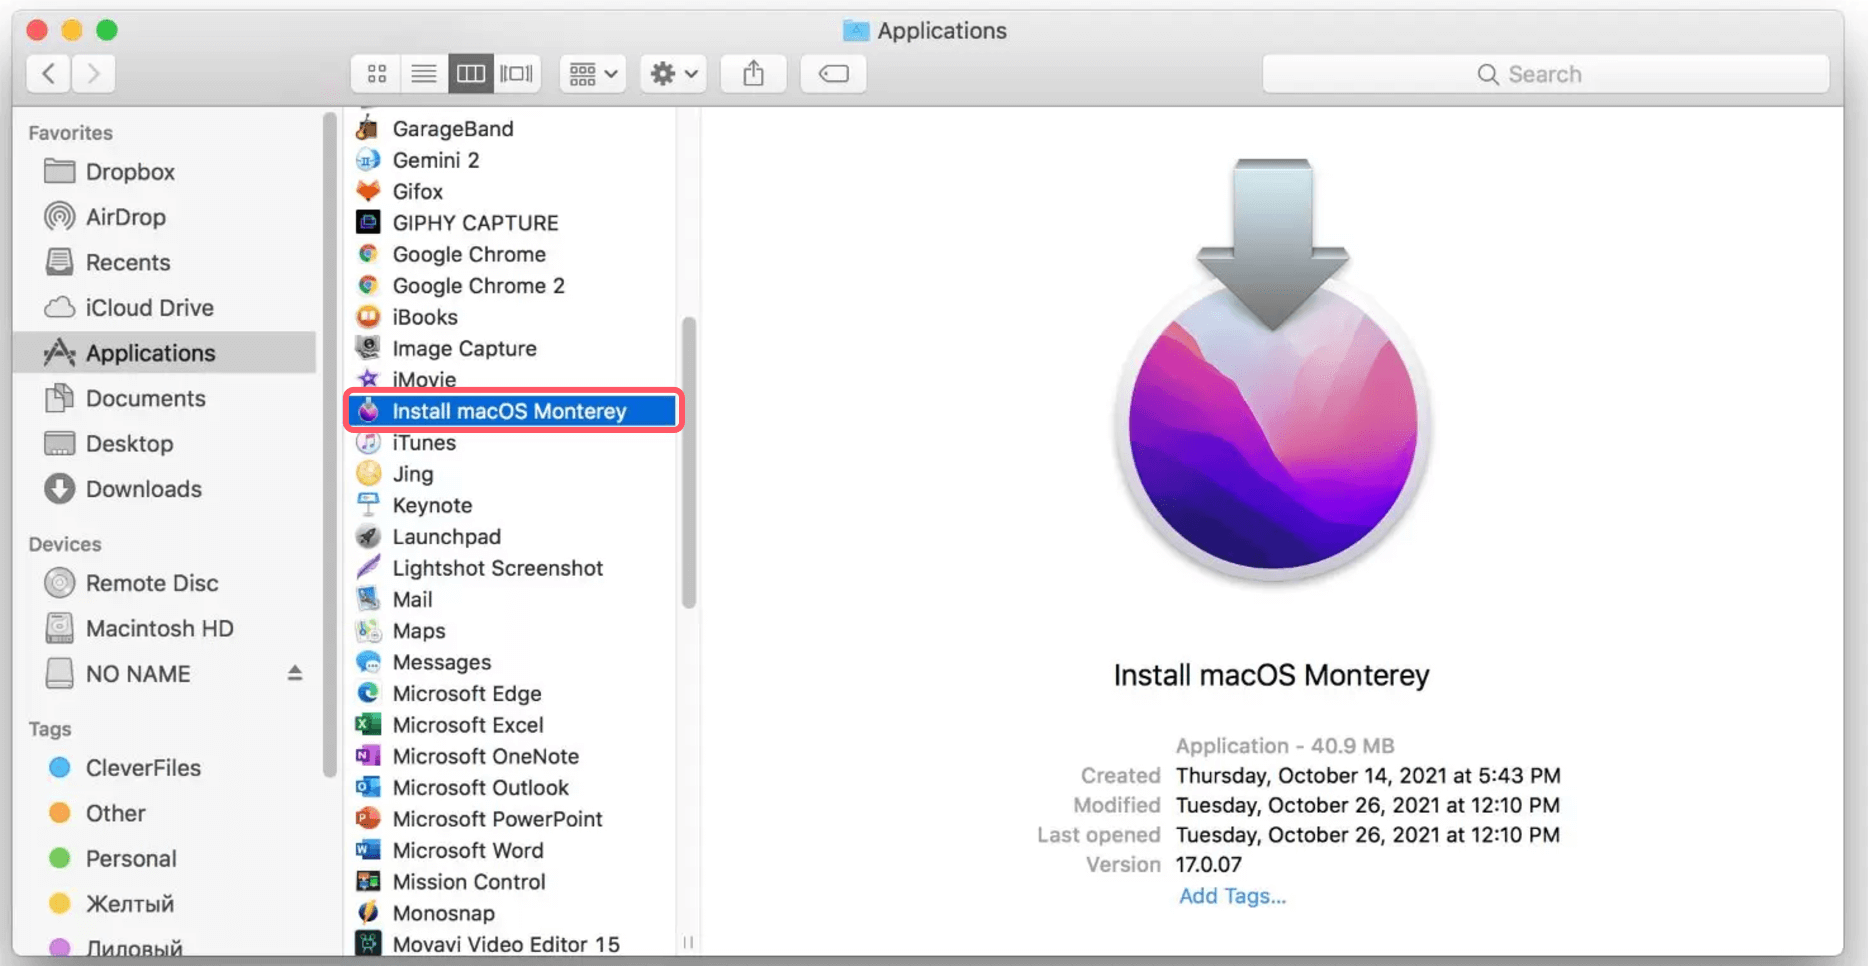
- Download the Installer: Click Get, and the installer will begin downloading. Once the download is complete, it will appear in your Applications folder as Install macOS Monterey.app. Do not proceed with the installation yet - your goal is to use this file to create a bootable drive.
![Securely Clean Install macOS Monterey]()
💡 Tip: If you've already upgraded to Monterey but need the installer for another system, you can re-download it from the App Store or Apple's official website.
Step 2: Format the USB Drive
- Insert the USB Drive: Plug your USB drive (at least 16 GB) into your Mac.
- Open Disk Utility: Search for Disk Utility using Spotlight (Command + Space) or find it in Applications > Utilities.
- Select the USB Drive: In the left-hand panel, locate your USB drive. Be sure to select the entire drive, not just a volume within it.
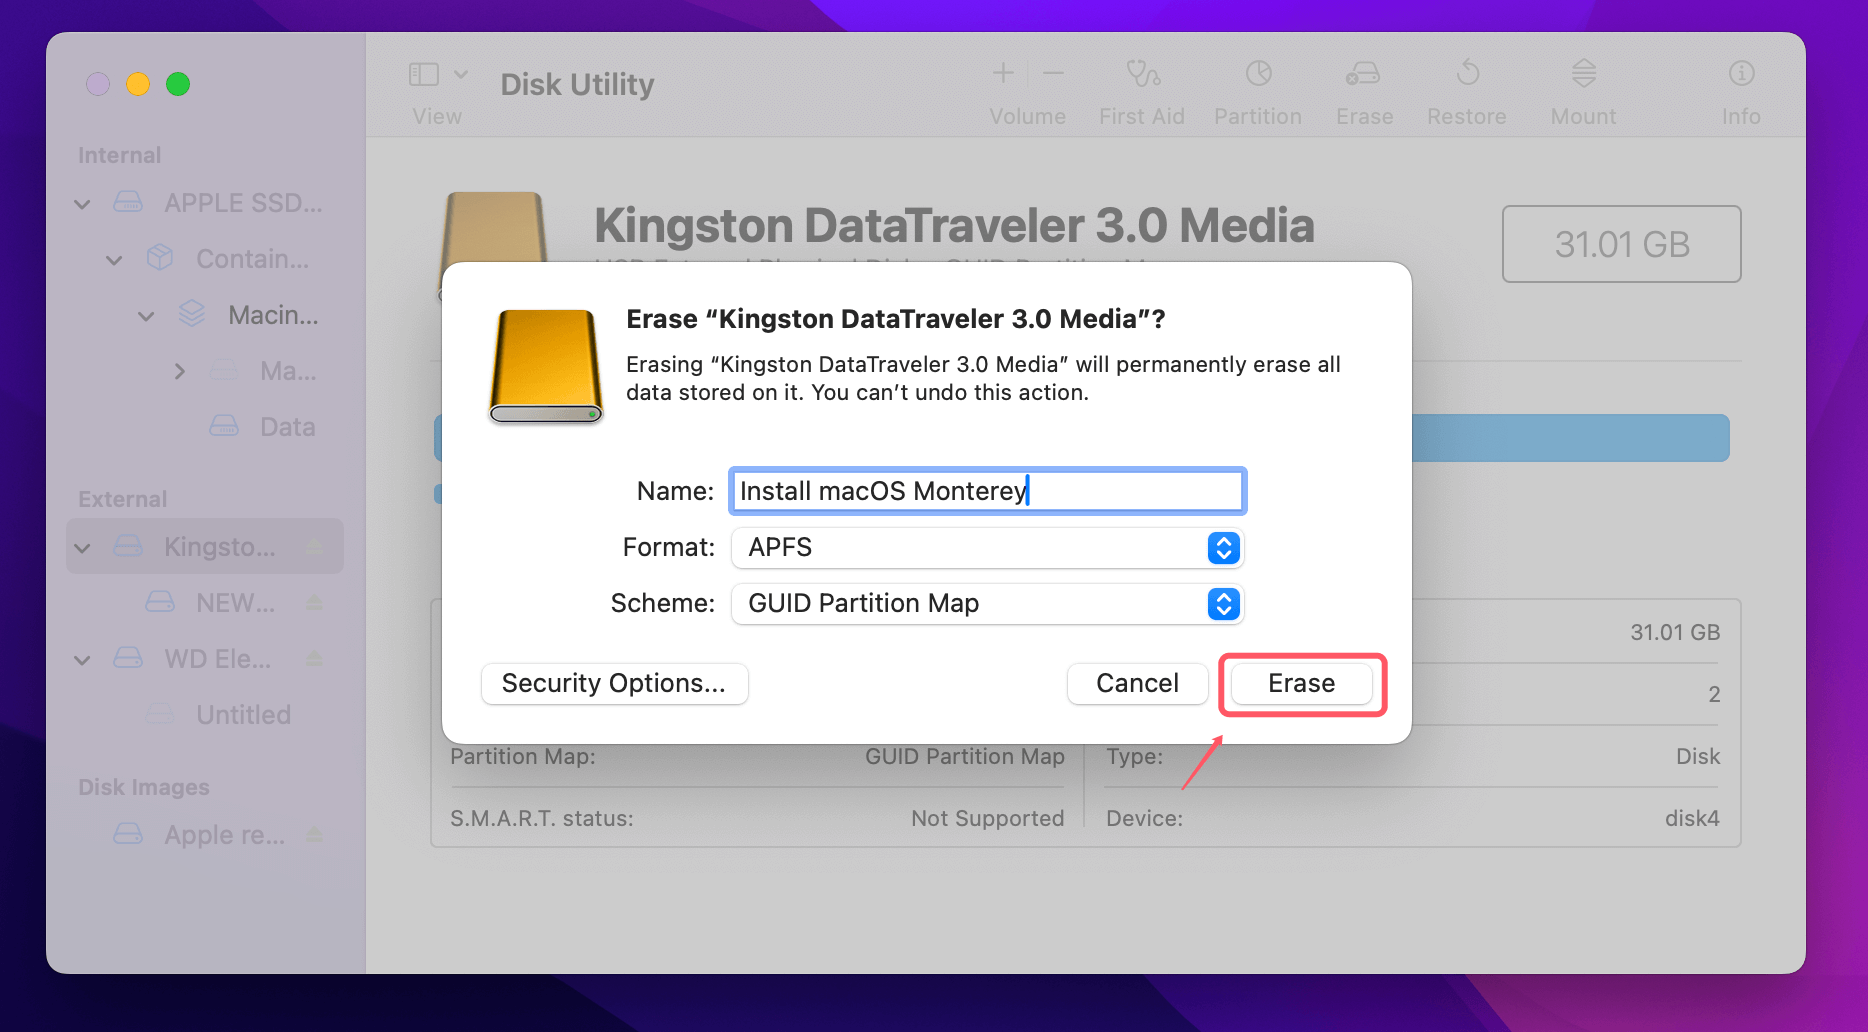
- Erase the Drive: At the top of the window, click the Erase button.
- Name the drive (e.g., "Install macOS Monterey").
- Choose the format Mac OS Extended (Journaled).
- The GUID Partition Map is the scheme of choice.
- Confirm Erase: Click Erase, and Disk Utility will reformat the drive. This process deletes all data on the USB drive, so ensure no important files are stored on it beforehand.
![Securely Clean Install macOS Monterey]()
Step 3: Use Terminal to Create the Installer
Terminal, macOS's powerful command-line tool, is used to copy the installer to the USB drive and make it bootable.
- Open Terminal: Search for Terminal using Spotlight or navigate to Applications > Utilities > Terminal.
- Run the Createinstallmedia Command: Enter the following command, replacing MyVolume with the name of your USB drive:
sudo /Applications/Install\ macOS\ Monterey.app/Contents/Resources/createinstallmedia --volume /Volumes/MyVolume
Here's what each part of the command does:
- sudo: Grants administrator privileges, necessary for this task.
- /Applications/Install\ macOS\ Monterey.app: Specifies the location of the installer.
- createinstallmedia: A built-in macOS tool for creating bootable media.
- --volume /Volumes/MyVolume: Tells the command where to copy the installer (your USB drive).
- Authenticate: Press Return and enter your administrator password when prompted. Note that the password won't display as you type it, but this is normal.
- Wait for Completion: Terminal will display progress as it erases the USB drive and copies the installer. The process may take several minutes, so be patient. When it’s done, Terminal will show a message confirming the USB drive is ready to use.
💡 Troubleshooting Tip: If the USB installer doesn't appear on startup manager, repeat the process to ensure no steps were missed, especially formatting the drive and entering the correct command in Terminal.
With your bootable macOS Monterey installer ready, you now have a reliable tool to perform a clean install on your Mac or assist others in upgrading. This method is especially handy for IT professionals or users managing multiple Macs.
#2 Perform the Clean Install of macOS Monterey
Now that your bootable USB installer is ready, it's time to perform the clean install.
Step 1: Boot into Start Manager or macOS Recovery
For Intel-based Mac:
- Insert the USB installer into your Mac.
- Press and hold the Option (Alt) key as soon as your Mac has restarted.
- When the startup manager appears, select the USB drive and press Return.
For Apple silicon Mac:
- Connect the USB installer to your Mac and shut down the Mac.
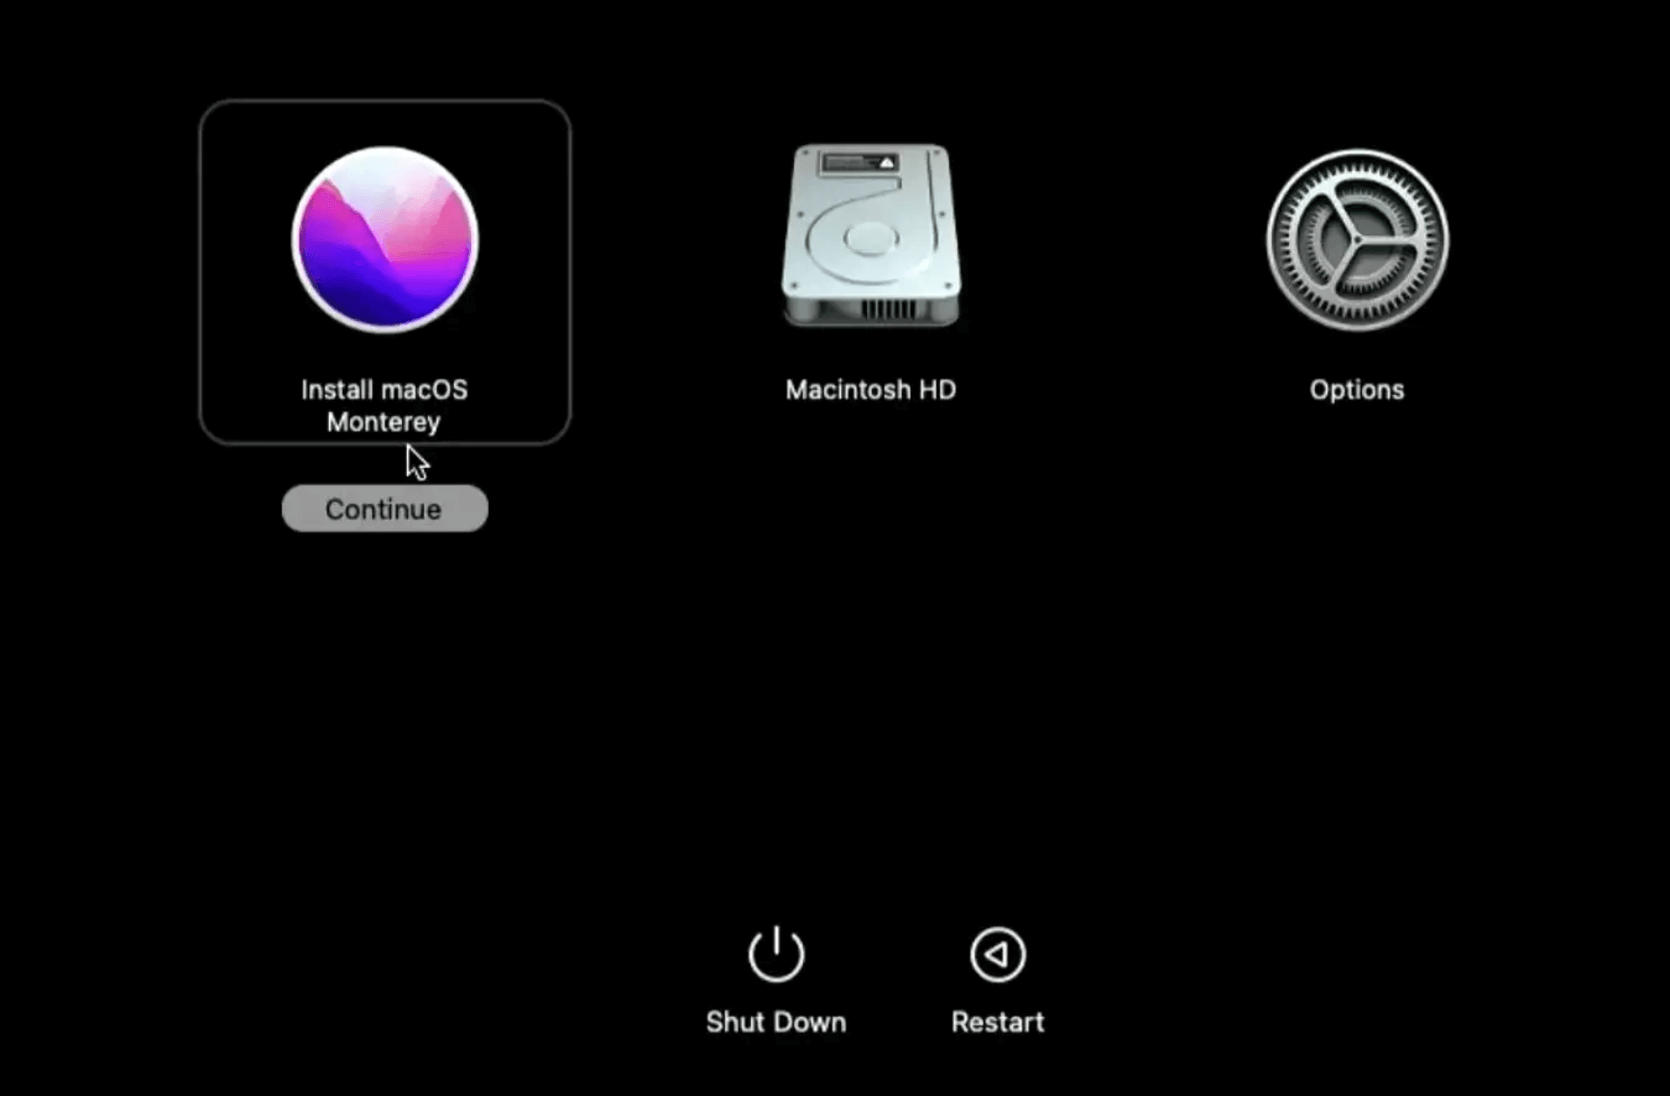
- Turn on the Mac, press and hold Power button until you see Loading Startup Options.
- Select Install macOS Monterey, click on Continue button.
![Securely Clean Install macOS Monterey]()
Step 2: Format Your Mac's Internal Drive
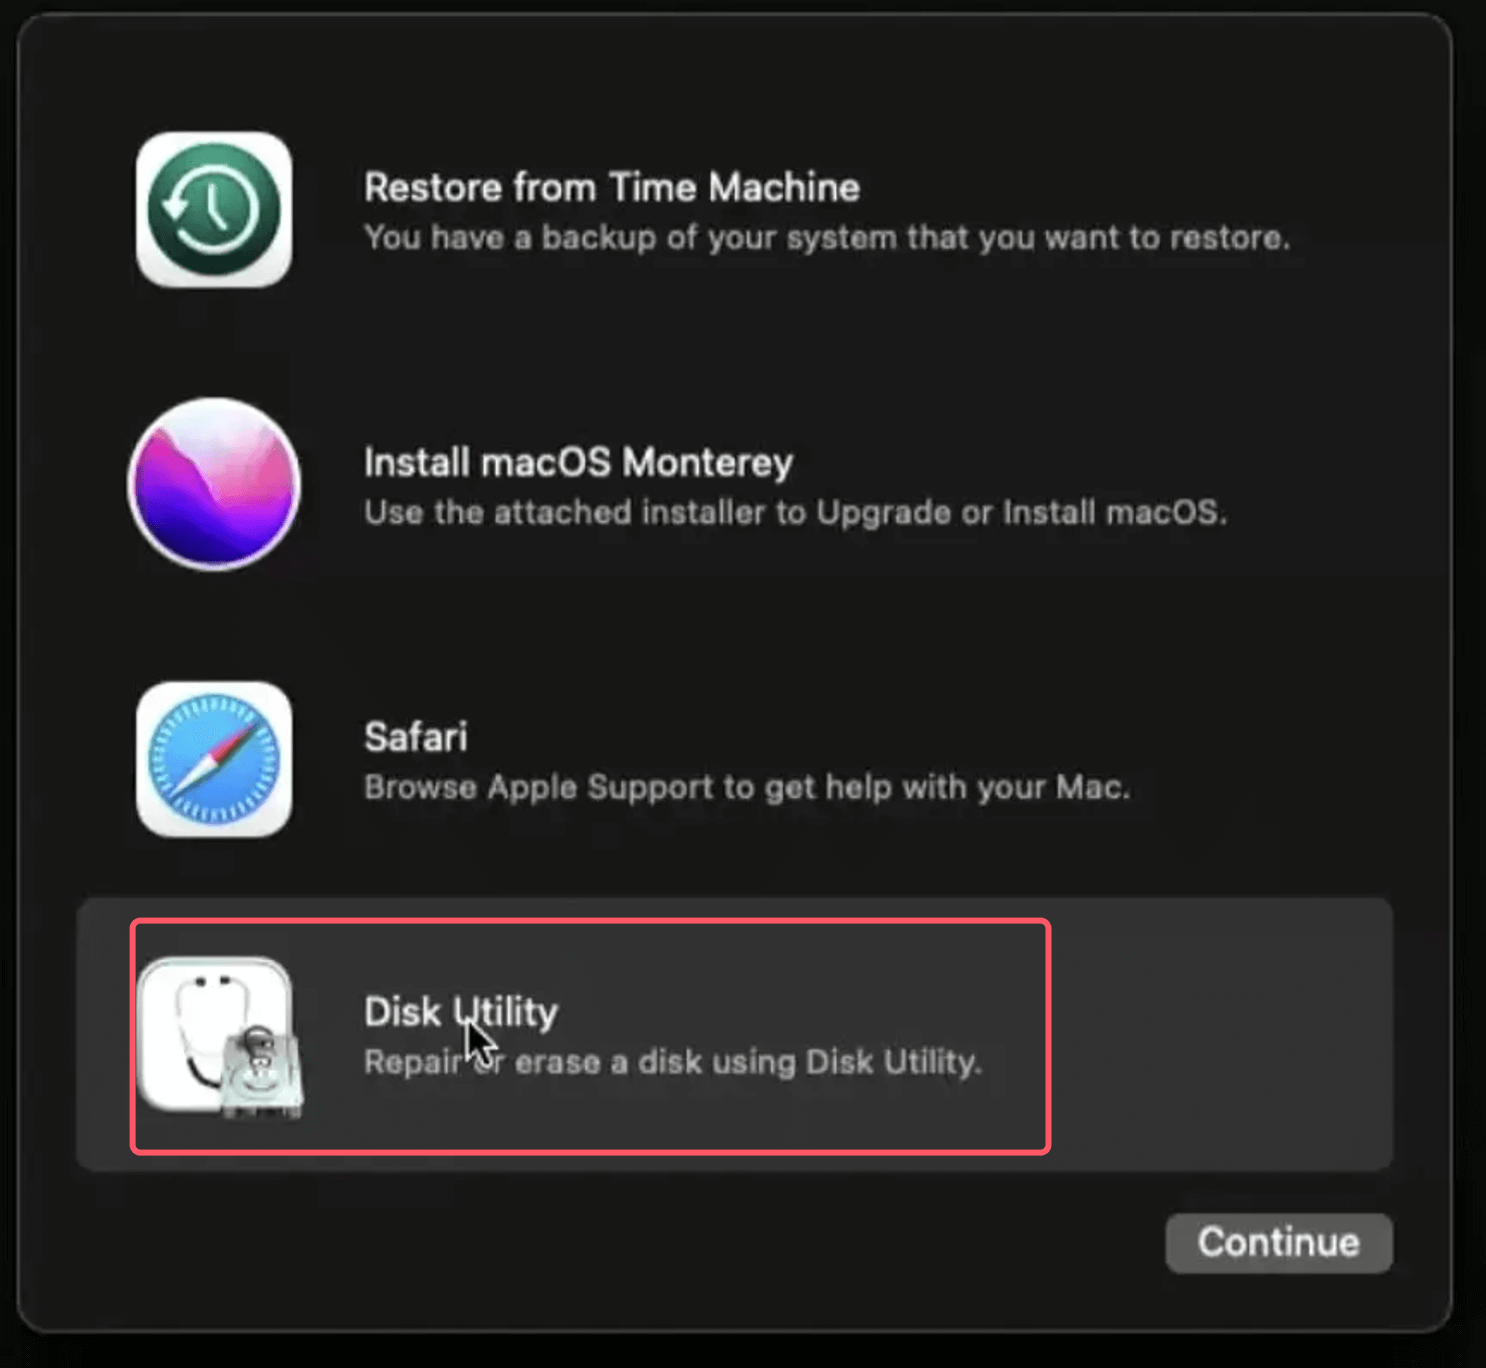
- Once the installer loads, click Disk Utility from the Utilities window.
![Securely Clean Install macOS Monterey]()
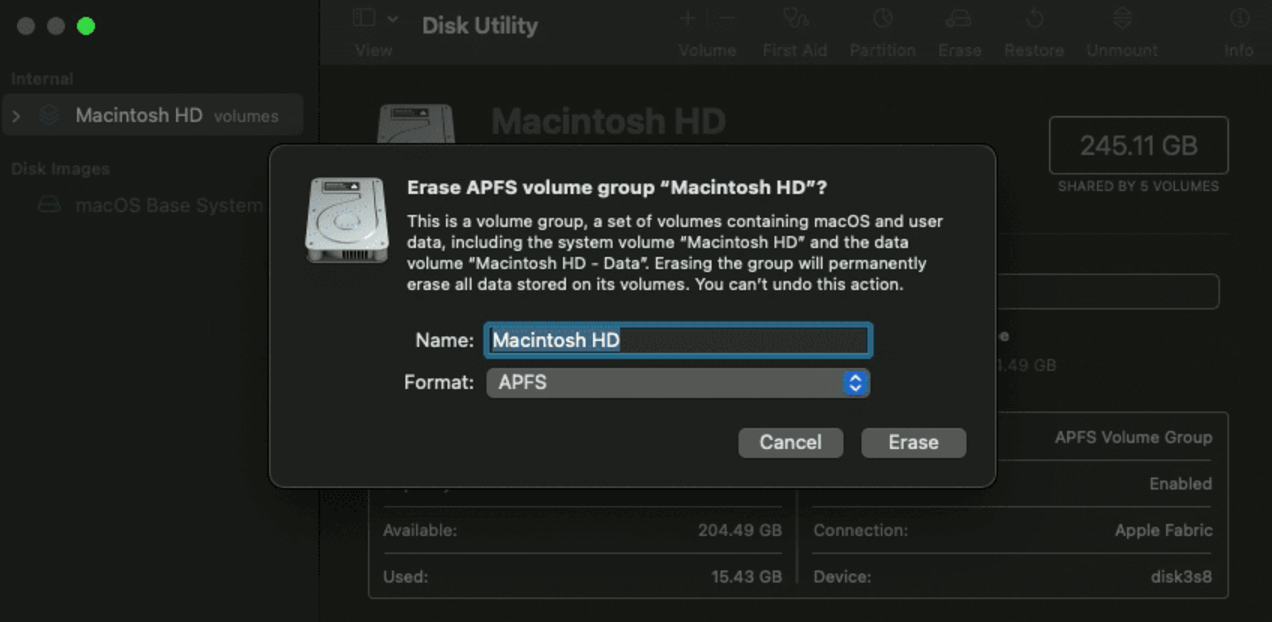
- Select your Mac's internal drive (usually named Macintosh HD) and click Erase.
- Choose APFS as the format and GUID Partition Map as the scheme.
- Click Erase and wait for the process to complete.
![Securely Clean Install macOS Monterey]()
Step 3: Install macOS Monterey
- Exit Disk Utility and return to the Utilities window.
- Select Install macOS Monterey and follow the on-screen instructions.
- Choose the newly formatted internal drive as the destination.
- Wait for the installation to complete. Your Mac will restart several times during this process.
Set Up macOS Monterey After Installation
Once the installation is complete, your Mac will greet you with the setup assistant.
Step 1: Configure Basic Settings
- Choose your country, language, and keyboard preferences.
- Connect to a Wi-Fi network.
- Sign in with your Apple ID to sync iCloud data (optional).
Step 2: Restore Files and Apps
If you backed up your data, now is the time to restore it.
- Open Migration Assistant from the Utilities folder.
- Select your backup source (Time Machine, external drive, or another Mac) and follow the prompts to transfer files and apps.
Step 3: Update and Customize
- Open System Preferences to adjust settings such as display, notifications, and privacy.
- Install any available software updates by visiting the Software Update section.
- Reinstall essential apps and adjust your workspace to your liking.
Troubleshooting Common Issues
Despite your best efforts, issues can arise during or after a clean install. Here are some common problems and their solutions:
Installation Fails or Freezes:
- Ensure your USB installer is properly formatted and created.
- Check that your Mac's firmware is up-to-date.
- Restart the process using macOS Recovery or a fresh USB installer.
Missing Files or Data:
- Double-check your backups for missing files.
- If you used Time Machine, ensure you've selected the correct backup version.
App Compatibility Issues:
- Some older apps may not work with macOS Monterey. Visit the developer's website for updates or consider alternatives.
Poor Performance Post-Installation:
- Install pending updates, as they often include bug fixes.
- Reset the NVRAM/PRAM and SMC to resolve hardware-related issues.
Conclusion
A clean install of macOS Monterey is an effective way to rejuvenate your Mac and ensure optimal performance. While the process may seem daunting, following this guide step by step will make it manageable and rewarding. Always back up your data, take your time with each phase, and enjoy the benefits of a fresh, clutter-free system.
If you encounter any issues beyond the scope of this guide, Apple's official support resources and forums are excellent places to seek assistance. Happy computing with macOS Monterey!
Before or after clean installing macOS Monterey on your Mac, you can use Donemax Disk Clone for Mac to create a full bootable clone for your Mac.

Donemax Disk Clone for Mac
An award-winning disk cloning program to help Mac users clone HDD/SSD/external device. It also can create full bootable clone backup for Macs.
Related Articles
- May 10, 2025How to Find BitLocker Recovery Key (Unlock Password)?
- Mar 22, 2024What Is SMC? How to Reset SMC on Mac?
- May 12, 2025How to Upgrade from Windows 10 to Windows 11?
- Sep 17, 2025Solution to Bypass BitLocker Recovery Blue Screen?
- Sep 01, 2025How to Fix Dead WD External HDD or SSD?
- Nov 11, 2024How to Change Startup Disk on Apple Silicon Mac?

Christina
Christina is the senior editor of Donemax software who has worked in the company for 4+ years. She mainly writes the guides and solutions about data erasure, data transferring, data recovery and disk cloning to help users get the most out of their Windows and Mac. She likes to travel, enjoy country music and play games in her spare time.

Gerhard Chou
In order to effectively solve the problems for our customers, every article and troubleshooting solution published on our website has been strictly tested and practiced. Our editors love researching and using computers and testing software, and are willing to help computer users with their problems

