Written byMariaUpdated on Mar 19, 2025
How to Fix Mac Error Code -8062: A Comprehensive Guide
Approved byGerhard Chou
PAGE CONTENT:
Mac computers are known for their reliability, but occasionally, users may encounter unexpected errors. One such frustrating issue is Mac Error Code -8062, which often appears when you try to copy, move, or delete files. This error can prevent users from managing their files efficiently, leading to workflow disruptions.
Understanding the causes and solutions for this error is crucial for maintaining a smooth Mac experience. Whether you're trying to clear out your Trash, transfer files to an external drive, or simply move data between folders, this guide will walk you through the best ways to resolve Error Code -8062.
What is Mac Error Code -8062?
Error Code -8062 is a file operation-related error that usually appears in macOS when there's an issue with file management. Users typically encounter this error message when:
- Trying to delete files or empty the Trash.
- Moving files from one location to another.
- Copying data to an external storage device (USB, external HDD, SSD, etc.).
- Performing Time Machine backups.
This error prevents the operation from completing successfully, often leaving users puzzled about what went wrong.
Common Causes of Mac Error Code -8062
To effectively fix this issue, it's important to understand what might be causing it. Here are some of the common reasons:
1. Permission Issues
Certain files and folders require specific permissions for modification. If your user account lacks the necessary permissions, macOS will block the operation, leading to this error.
2. Corrupt or Locked Files
If the file you're trying to move or delete is corrupt or locked, macOS may not be able to process the request, triggering the error.
3. Third-Party Software Conflicts
Some third-party apps can interfere with file operations, especially security and backup applications that manage disk access.
4. Issues with External Drives
If you encounter the error while transferring files to an external drive, the drive could be faulty or improperly formatted.
5. System Bugs or Glitches
Minor macOS bugs can cause file management issues, leading to error codes like -8062.
How to Fix Mac Error Code -8062?
1. Restart Your Mac
Prior moving into complex solutions, try restarting your Mac. This simple step can fix temporary system glitches that might be causing the error.
Steps to Restart Your Mac:
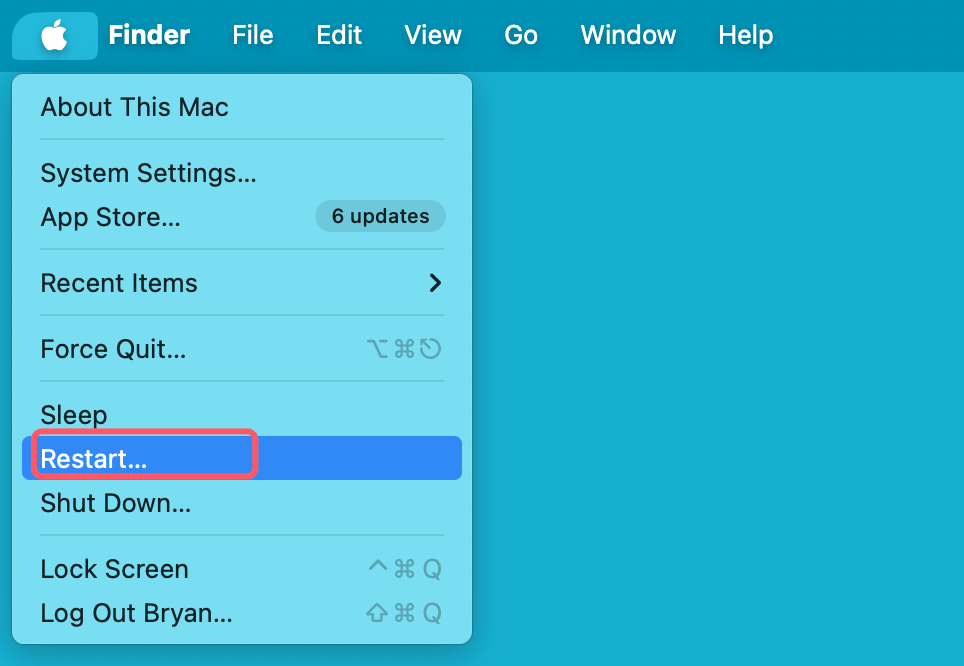
- In the upper-left corner, click the Apple menu.
- Select Restart and wait for the system to reboot.
![Mac Error Code -8062]()
- Try performing the file operation again.
If the error persists, move on to the next solution.
2. Check File and Folder Permissions
If you don't have the right permissions to modify a file, macOS will block the operation. You can manually change the permissions to resolve this issue.
Steps to Change File Permissions:
- Perform a right-click on the troublesome folder or file.
- From the drop-down option, choose Get Info.
![Mac Error Code -8062]()
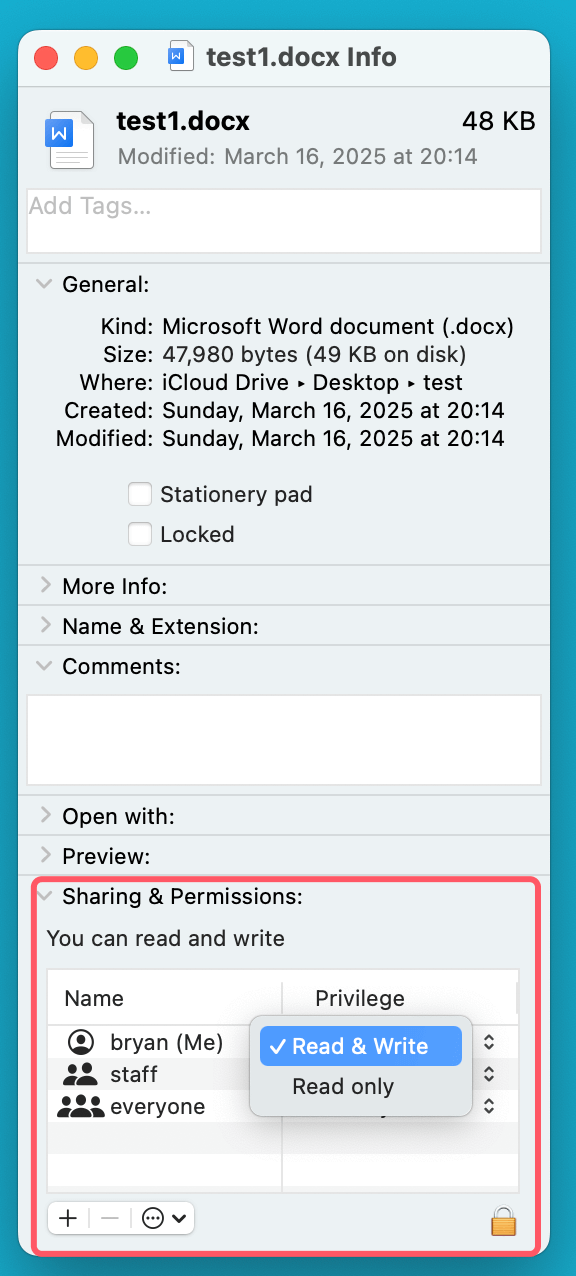
- Navigate to the Sharing & Permissions area.
- Enter your administrator password after clicking the lock icon in the bottom-right corner.
- Change the permissions under the Privilege column to Read & Write for your user account.
![Mac Error Code -8062]()
- Click the gear icon and select Apply to enclosed items (for folders).
- Close the window and try the file operation again.

3. Delete Files Using Terminal
If you're unable to delete a file via Finder, using Terminal can bypass Finder-related restrictions.
Steps to Delete a File Using Terminal:
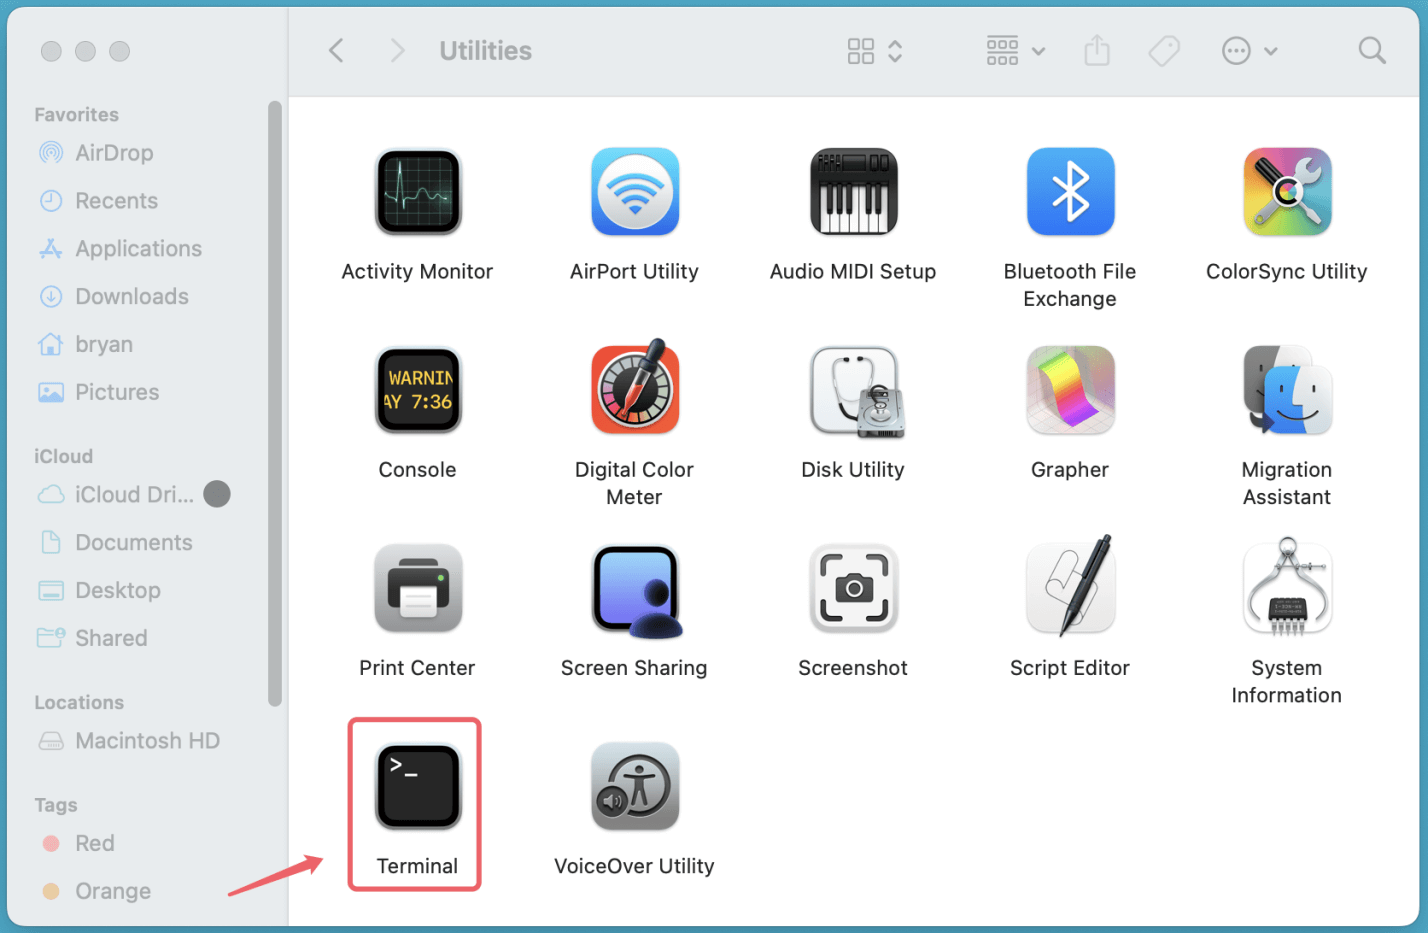
- Open Terminal from Utilities via Applications.
![Mac Error Code -8062]()
- Type the following command:
rm -rf ~/.Trash/*
![Mac Error Code -8062]()
- Press Enter and close Terminal.
- Restart your Mac and check if the error is resolved.
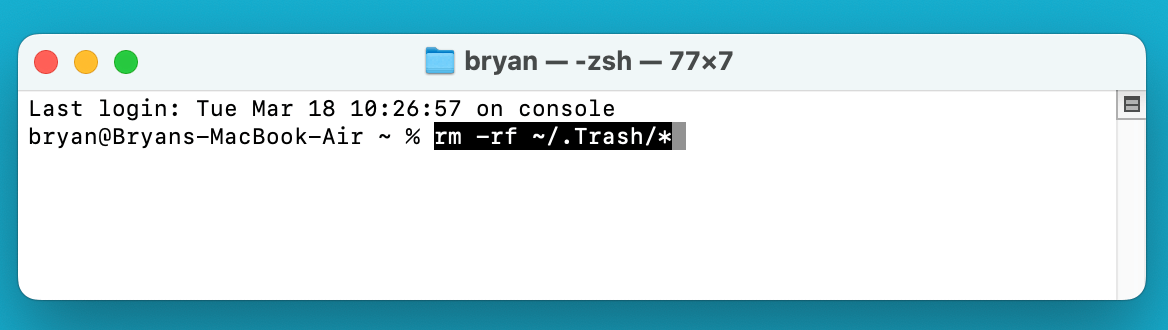
⚠️ Warning: Be careful when using the rm -rf command, as it permanently deletes files without recovery.
4. Empty Trash Securely
If you encounter Error Code -8062 while trying to empty the Trash, use a force-empty method.
Steps to Force Empty Trash:
- Hold the Option key and right-click the Trash icon in the Dock.
- Select Empty Trash while still holding the Option key.
- Confirm the action if prompted.
Alternatively, you can use Terminal:
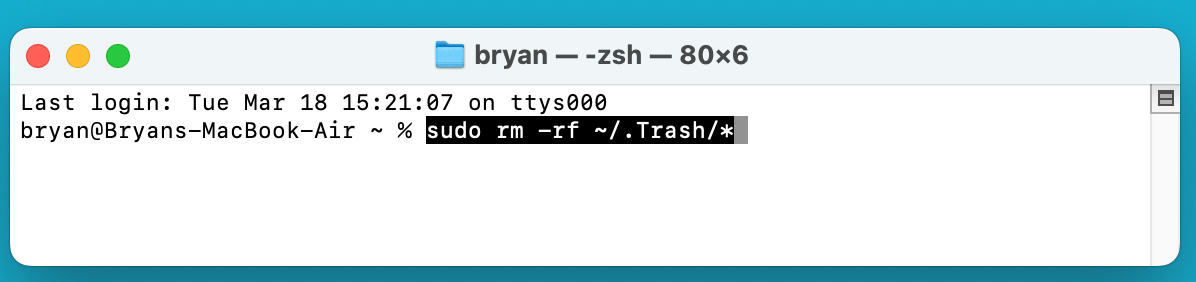
- Open Terminal and type:
sudo rm -rf ~/.Trash/*
![Mac Error Code -8062]()
- Press Enter, enter your admin password, and hit Return.
- Restart your Mac.
5. Use Disk Utility to Repair Disk Permissions
A built-in tool called Mac's Disk Utility aids in keeping your hard drive in good condition. It is especially useful when you're experiencing file operation errors like Mac Error Code -8062, which could stem from disk corruption or permission issues.
When you delete, move, or copy files, macOS relies on a structured file system that assigns permissions and organizes data on the disk. If these permissions become corrupted, your Mac may prevent certain file operations, leading to errors. Running First Aid in Disk Utility can repair such issues and restore normal functionality.
What Causes Disk Permission Issues?
Disk permissions can become faulty due to several reasons, including:
- Software Installation & Uninstallation – Some apps modify system files during installation but fail to reset permissions when uninstalled.
- System Updates or Crashes – A system crash or incomplete macOS update may leave behind inconsistent permissions.
- Third-Party Security or Cleanup Tools – Some security or cleaning apps modify file permissions, sometimes leading to unexpected restrictions.
- Long-Term System Use Without Maintenance – Over time, system files and disk permissions may become disorganized, requiring repair.
How to Use Disk Utility to Repair Your Mac's Disk
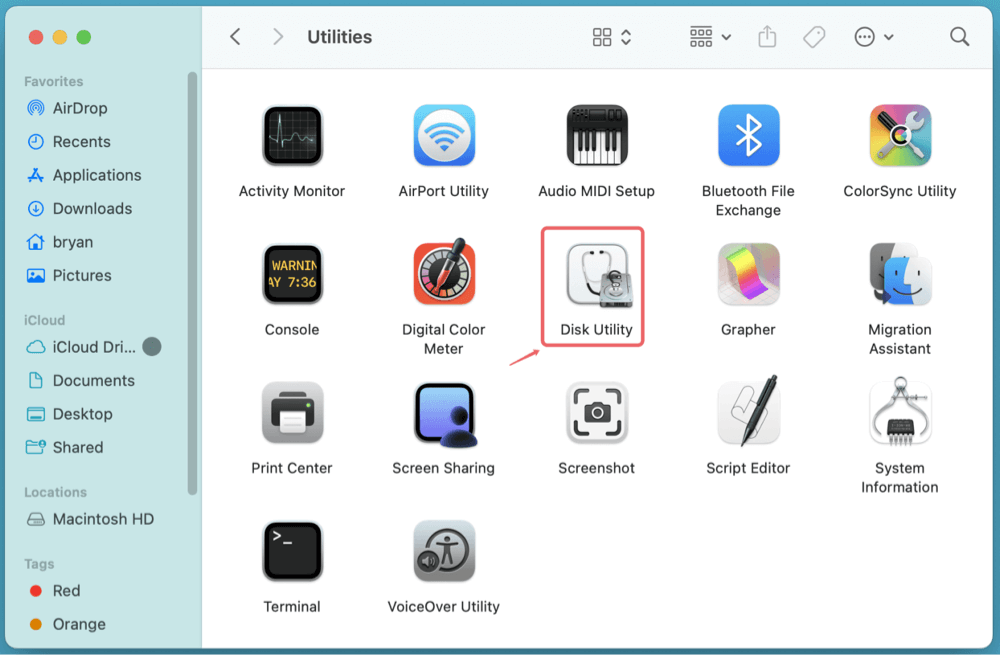
Step 1: Open Disk Utility
- Click the Apple menu at the top left of the screen.
- Select Utilities via Applications.
![Mac Error Code -8062]()
Step 2: Select Your Drive
- In the left panel, you'll see a list of storage devices.
- Click on Macintosh HD (or the affected disk if you're facing issues with an external drive).
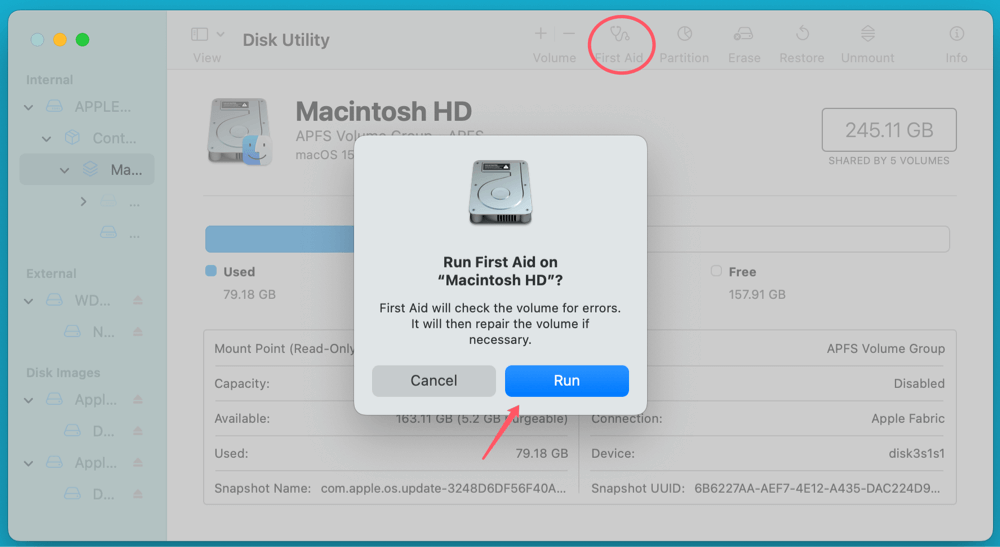
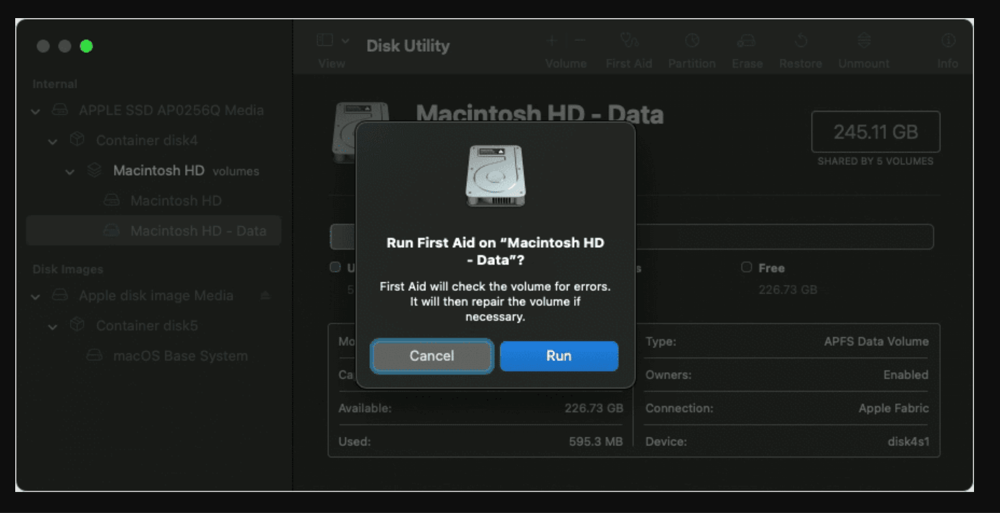
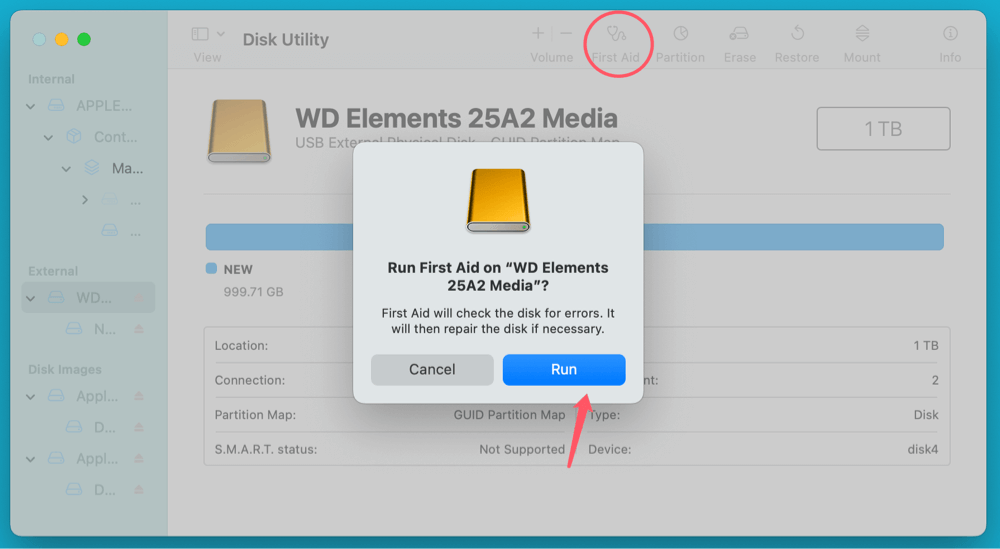
Step 3: Run First Aid
- Click the First Aid button in the top toolbar.
- A confirmation box will appear - click Run.
![Mac Error Code -8062]()
- Disk Utility will now scan the disk for issues and attempt to repair them.
- If Disk Utility finds errors, it will attempt to fix them automatically.
Step 4: Restart Your Mac
Once the repair is complete, restart your Mac and check if the file operation issue persists.
Advanced: Running Disk Utility in macOS Recovery Mode
If you’re unable to repair the disk using normal First Aid, you might need to use macOS Recovery Mode to perform the operation.
How to Run Disk Utility in Recovery Mode:
- For Intel-based Macs:
- Restart your Mac and immediately press Command (⌘) + R until the Apple logo appears.
- This boots into macOS Recovery Mode.
- For Apple Silicon (M-chip) Macs:
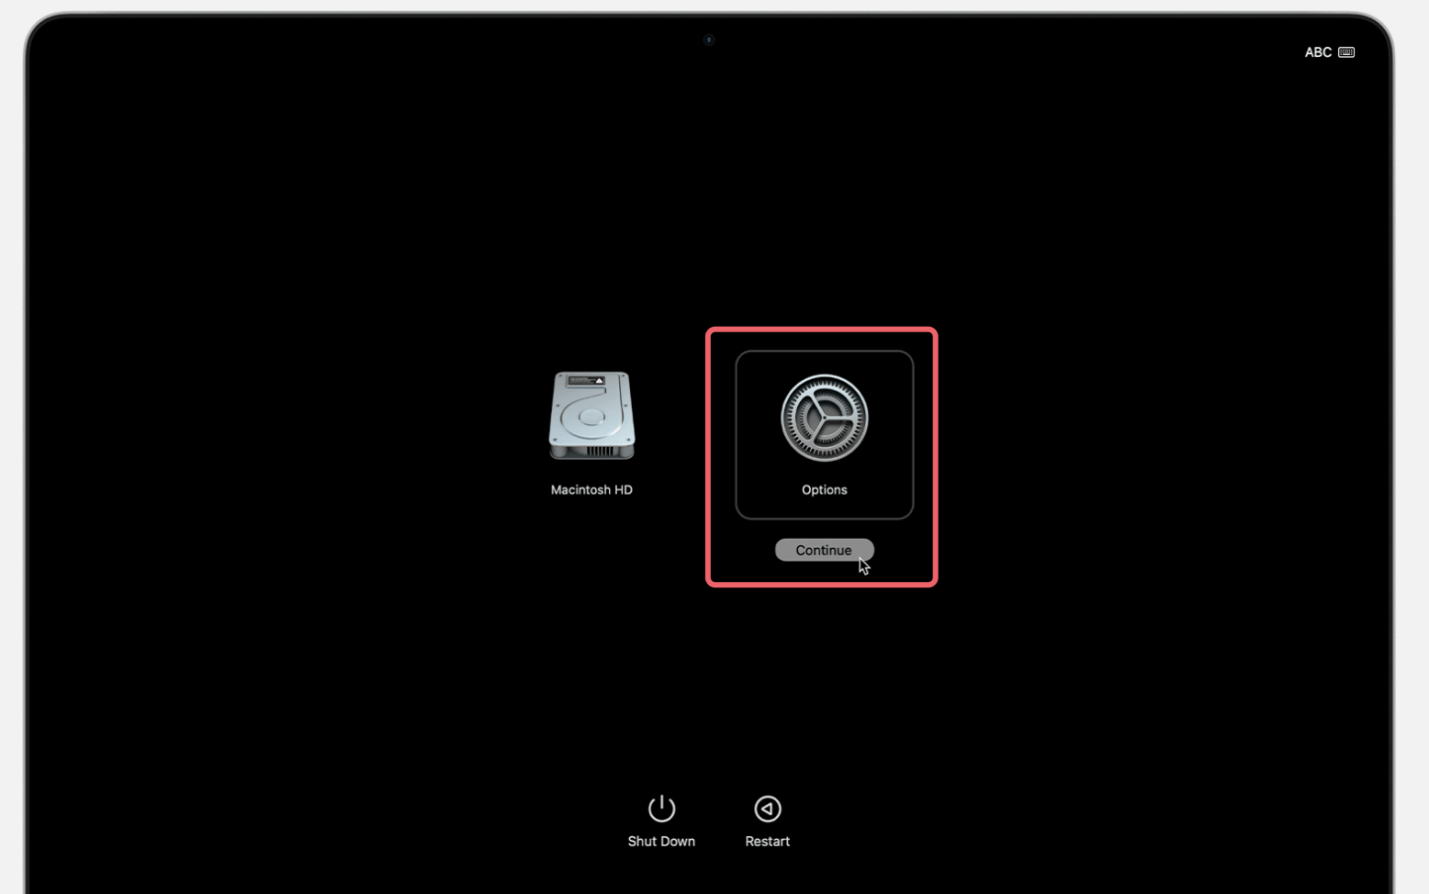
- Shut down your Mac completely.
- Press and hold the Power button until Loading startup options appears.
- Click Options > Continue to enter macOS Recovery.
![Mac Error Code -8062]()
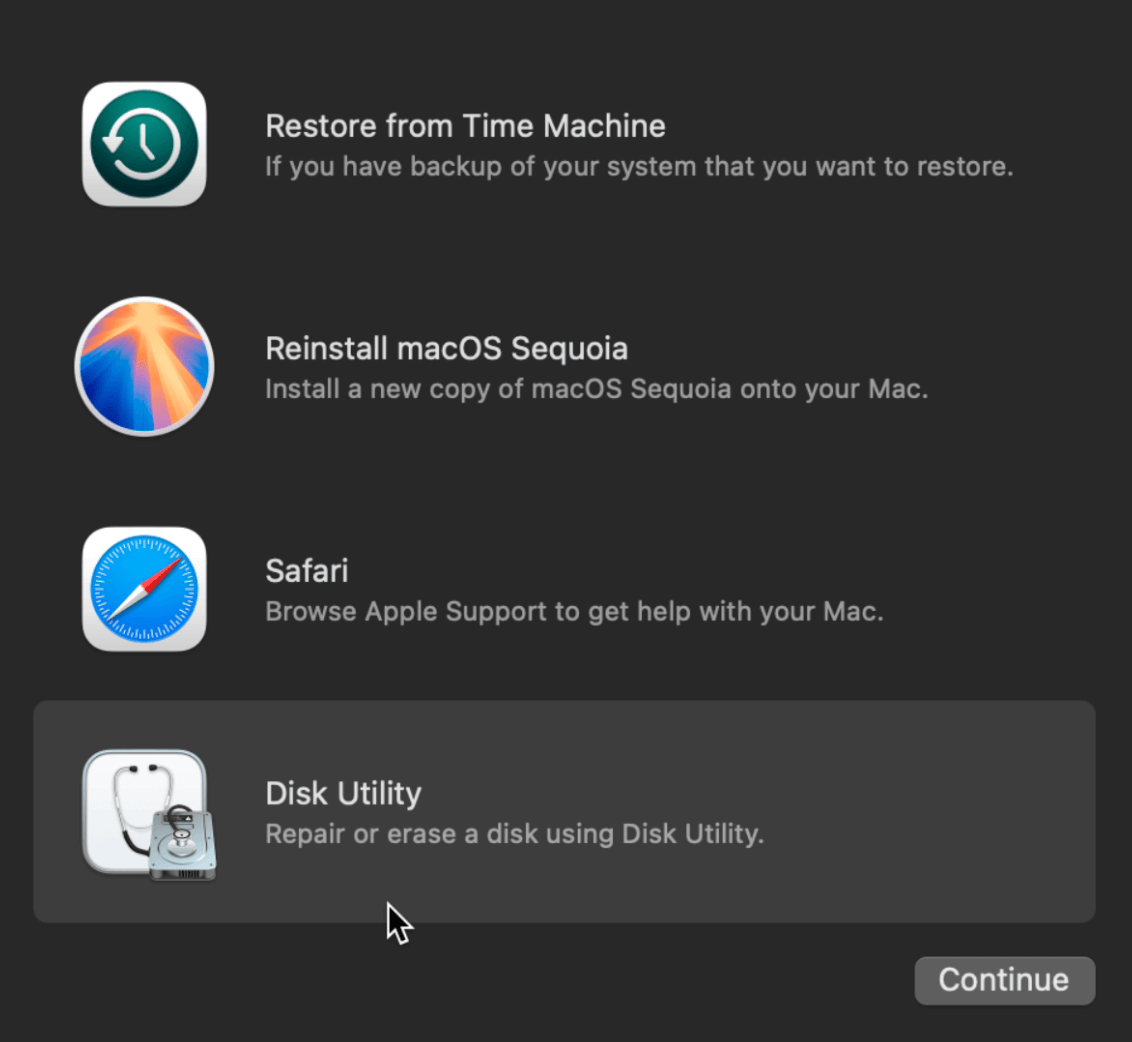
- Select Disk Utility:
- Once in macOS Utilities, select Disk Utility and click Continue.
![Mac Error Code -8062]()
- Choose Macintosh HD and run First Aid as explained earlier.
![Mac Error Code -8062]()
- Once in macOS Utilities, select Disk Utility and click Continue.
- Restart and Test
- After First Aid completes, exit Disk Utility and restart your Mac.
- Try the file operation again to see if the error is resolved.
When Should You Consider Formatting Your Drive?
If Disk Utility reports errors that it cannot repair, the only option may be to erase and reformat the drive. However, this will delete all data, so ensure you back up important files first.
Steps to Format a Drive Using Disk Utility:
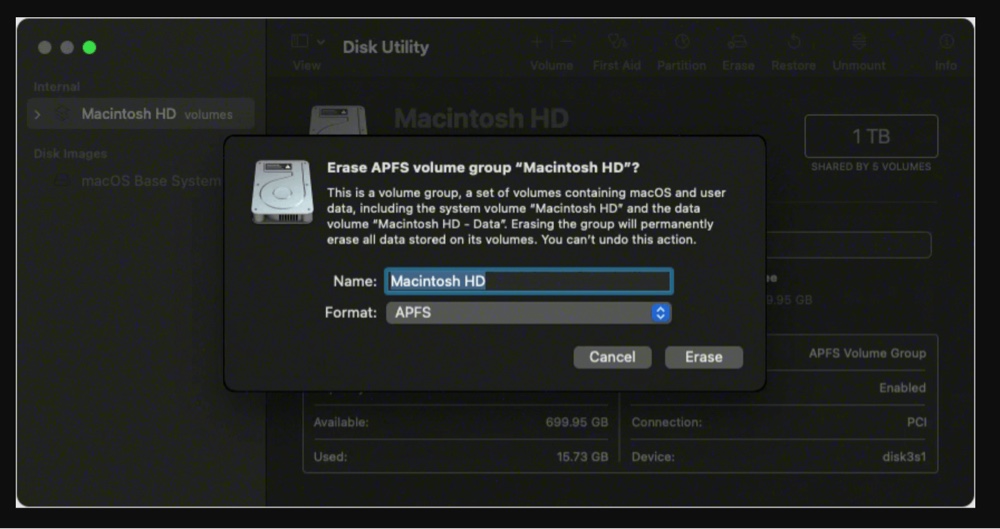
- Open Disk Utility and select the problematic drive.
- Click Erase at the top.
- Choose APFS (for macOS High Sierra or later) or Mac OS Extended (Journaled) for older macOS versions.
- Name the drive and click Erase.
![Mac Error Code -8062]()
- Once formatting is complete, try moving or deleting files again.
6. Check External Drives for Errors
If the error occurs while copying or moving files to an external drive, the drive might be corrupted.
Steps to Check and Fix External Drives:
- Connect the external drive to your Mac.
- Open Disk Utility.
- Select the external drive and click First Aid.
![Mac Error Code -8062]()
- If errors are found, follow on-screen instructions to fix them.
- If the problem persists, format the drive.
7. Reset NVRAM and SMC
Resetting NVRAM and SMC can resolve system glitches affecting file operations.
Steps to Reset NVRAM (Intel Macs only):
- Turn Off your Mac.
- Press and hold Option + Command + P + R as soon as you turn it on.
- Hold for 20 seconds, then release the keys.
- Let your Mac boot up and check if the issue is fixed.
Steps to Reset SMC (Intel Macs):
- Turn Off your Mac.
- For ten seconds, hold down the Shift + Control + Option + Power buttons.
- Release the keys and turn on your Mac.
For Apple Silicon Macs (M-chip), restarting the Mac performs an automatic SMC reset.
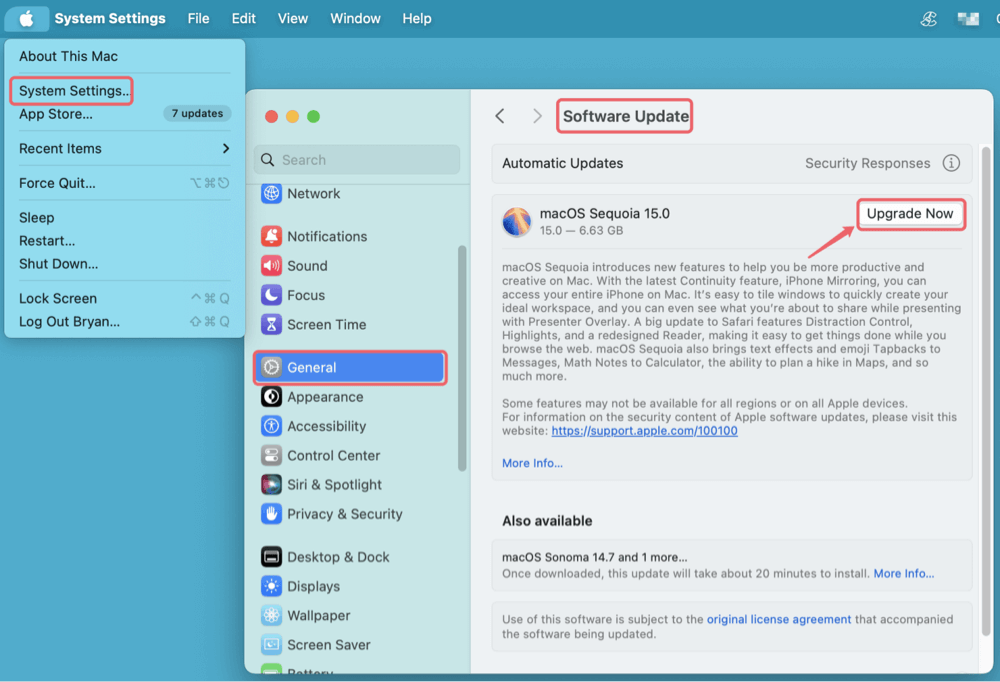
8. Update macOS
Outdated macOS versions may have unresolved bugs causing the error. Updating to the latest version can fix such issues.
Steps to Update macOS:
- Select System Settings > General > Software Update by clicking on the Apple menu.
- Click Update Now if there is an update available.
![Mac Error Code -8062]()
- Wait for the update to install and restart your Mac.
Conclusion
Mac Error Code -8062 can be frustrating, but by following these solutions, you should be able to resolve the issue efficiently. Whether it's fixing file permissions, using Terminal, repairing disks, or updating macOS, these methods will help you regain control over your file operations.
To prevent future occurrences, always keep your macOS updated, check external drives for issues, and be cautious when handling file permissions. If the problem persists, don't hesitate to seek professional assistance.
If you have lost data due to fixing error code 8062 on Mac, you can use data recovery software - such as Donemax Data Recovery for Mac to recover deleted, erased and inaccessible files.
Donemax Data Recovery for Mac
Donemax Data Recovery for Mac is one of the best Mac data recovery software. It is easy-to-use and can help in recovering deleted, formatted, inaccessible or lost data from Mac HDD/SSD, external disk, USB drive, SD card, camera or other storage devices.
Related Articles
- Aug 01, 2024Erase Button Greyed Out in Mac Disk Utility | How to Fix
- Nov 18, 2025Best 5 Methods to Format USB Flash Drive on Mac
- Aug 10, 2025How to Enable or Disable macOS Auto-Update?
- May 12, 2025Purple/Blue/Pink/Black/Green Lines on Mac Screen: Why & Fixes
- Jan 12, 2025How to Bypass Trash When Deleting Files on Mac?
- Dec 25, 2024How to Safely Eject or Force Eject External Hard Drive on Mac?

Contributing Writer
Maria
Maria is one of the senior writers & editors of Donemax who lives and works in Sydney, Australia. She loves PC, Mac and Internet Technology. She has 6 years of writing articles about data recovery on PC/Mac, disk cloning solution, data eraser and computer OS optimization, etc. She is also interested in testing various software and digital products.

Editor in chief
Gerhard Chou
In order to effectively solve the problems for our customers, every article and troubleshooting solution published on our website has been strictly tested and practiced. Our editors love researching and using computers and testing software, and are willing to help computer users with their problems