Before we start: Normally, you cannot format an USB drive to NTFS on Mac. You can use third-party NTFS for Mac tool - such as Donemax NTFS for Mac to force format an USB drive to NTFS on your Mac.
PAGE CONTENT:
When using a USB drive, it's crucial to select the correct file system for your needs, especially if you frequently switch between operating systems like Windows and macOS. The NTFS (New Technology File System) format is often used in Windows environments, as it supports large file sizes and offers better performance and reliability. However, macOS doesn't natively support NTFS write operations, which means it can only read data on an NTFS-formatted drive but not modify it. This can be problematic if you need to work with large files or store data on a USB drive that will also be used with a Windows machine.
In this article, we'll explore how to format a USB drive to NTFS on macOS. We'll walk you through the different methods available, including third-party software solutions and the use of Terminal for enabling NTFS write support on macOS. Additionally, we'll discuss alternative file systems like ExFAT and FAT32 that offer cross-platform compatibility between macOS and Windows.
What is NTFS and Why Format to NTFS?
NTFS (New Technology File System) is the default file system for modern Windows operating systems. It’s designed to handle large file sizes, improve security, and support advanced features like file compression and encryption. Here are some reasons why you might want to format your USB drive to NTFS:
- Efficient storage management: NTFS is more efficient than older file systems, particularly when it comes to managing large amounts of data.
- Large file support: NTFS can handle files larger than 4GB, which is essential for storing high-definition videos, software applications, and large datasets.
- Windows compatibility: NTFS is the native file system for Windows PCs, which makes it an ideal choice if you need to use your USB drive with Windows machines.
However, macOS only supports NTFS in a read-only capacity, meaning that while you can view files on an NTFS-formatted drive, you can't edit, delete, or add new files without additional software or steps.
Prerequisites Before Formatting USB Drive to NTFS
Before proceeding with the formatting process, it's important to take the necessary precautions and ensure that the USB drive is ready for the conversion.
1. Backup Your Data
Formatting a USB drive will erase all of its data, so it's crucial to back up anything you want to keep. You can use several methods to back up your data:
- Time Machine: macOS's built-in backup solution.
- Manual Copy: Simply drag and drop the files you want to save to a different location, such as your Mac's internal drive or an external storage device.
- Cloud Storage: Use services like Google Drive, Dropbox, or iCloud to upload important files.
💡 Note: If the USB drive is a RAW drive, you can use data recovery software to recover lost data from it.
🔗 Also read: fix RAW USB flash drive and recover lost data on Mac.
2. USB Drive Preparation
Make sure your USB drive is in good condition and ready for reformatting. Check its current file system using macOS's Disk Utility. This will help you ensure that it's not already formatted with a system that's incompatible with NTFS. If the drive is empty or contains data you don't need, you can proceed with the formatting process. If it has important data, make sure to back it up first.
Can I Format an USB Drive to NTFS on Mac?
How macOS Handles NTFS Drives:
macOS supports NTFS drives in a read-only mode by default, meaning you can view and copy files from an NTFS-formatted drive but can't modify or add files. If you attempt to write to the drive, macOS will show an error message stating that the drive is read-only. This is because macOS doesn't include native NTFS write support for security and stability reasons.
Challenges of Writing to NTFS on macOS:
To fully utilize NTFS drives on a Mac, particularly for writing, you'll need additional steps. If you're simply looking to read NTFS drives, macOS does this by default. But if you want to write data to an NTFS-formatted USB drive, you will need to use one of the following methods:
- Third-party NTFS software: This is the simplest and most reliable way to add full NTFS write support.
- Terminal commands: This is a more complex method that involves manually enabling NTFS write access but comes with some risks.
Now, let's explore the methods to format a USB drive to NTFS on macOS.
Methods to Format USB Drive to NTFS on Mac
Method 1: Using Third-Party Software
One of the easiest and most reliable ways to enable NTFS write support on macOS is to use third-party software. Several applications are available to add NTFS functionality to macOS.
Donemax NTFS for Mac is one of the best NTFS for mac software. It can securely and quickly format any drive including USB drive to NTFS on Mac.
Step 1. Download and install Donemax NTFS for Mac on your Mac, then connect the USB drive to your Mac.
Step 2. Open Donemax NTFS for Mac, then select the USB drive, click Format button.
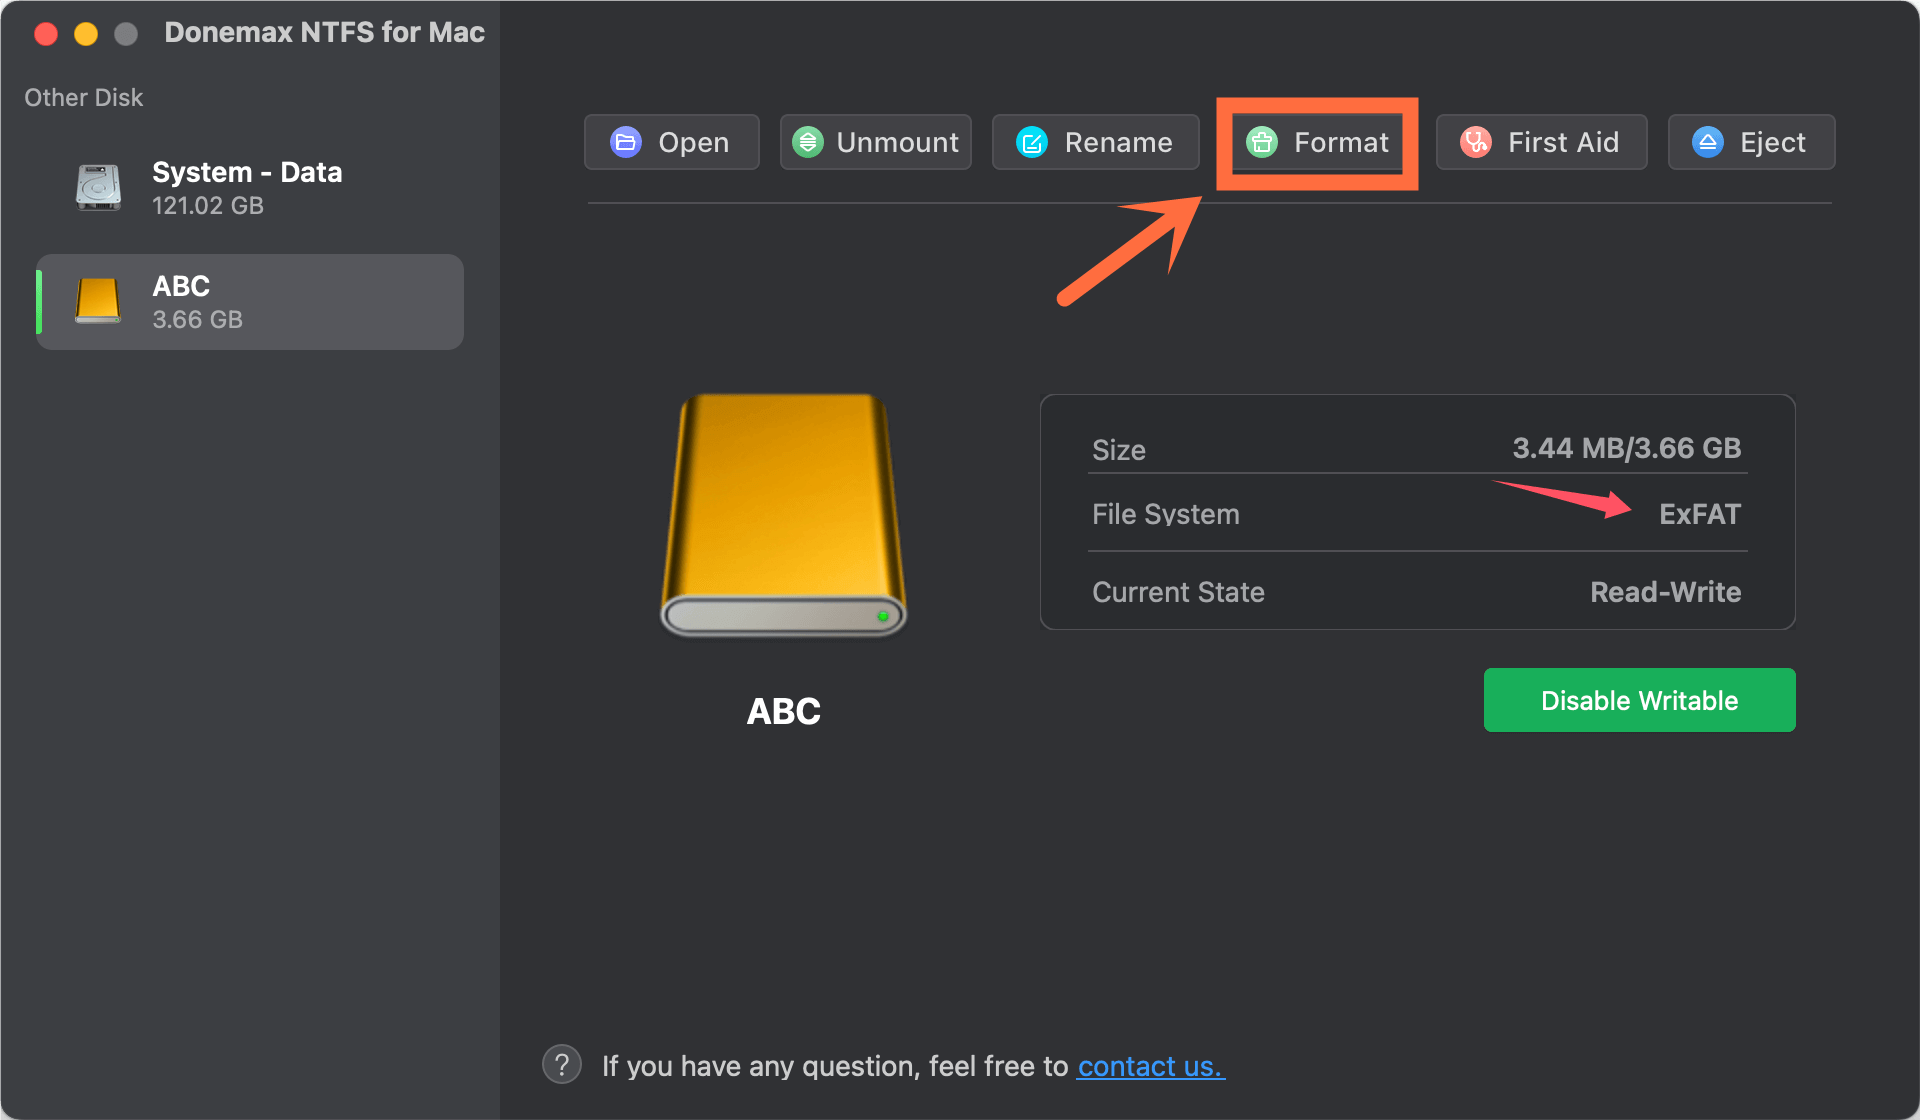
Step 3. Give the USB drive a name, then select NTFS as the file system.
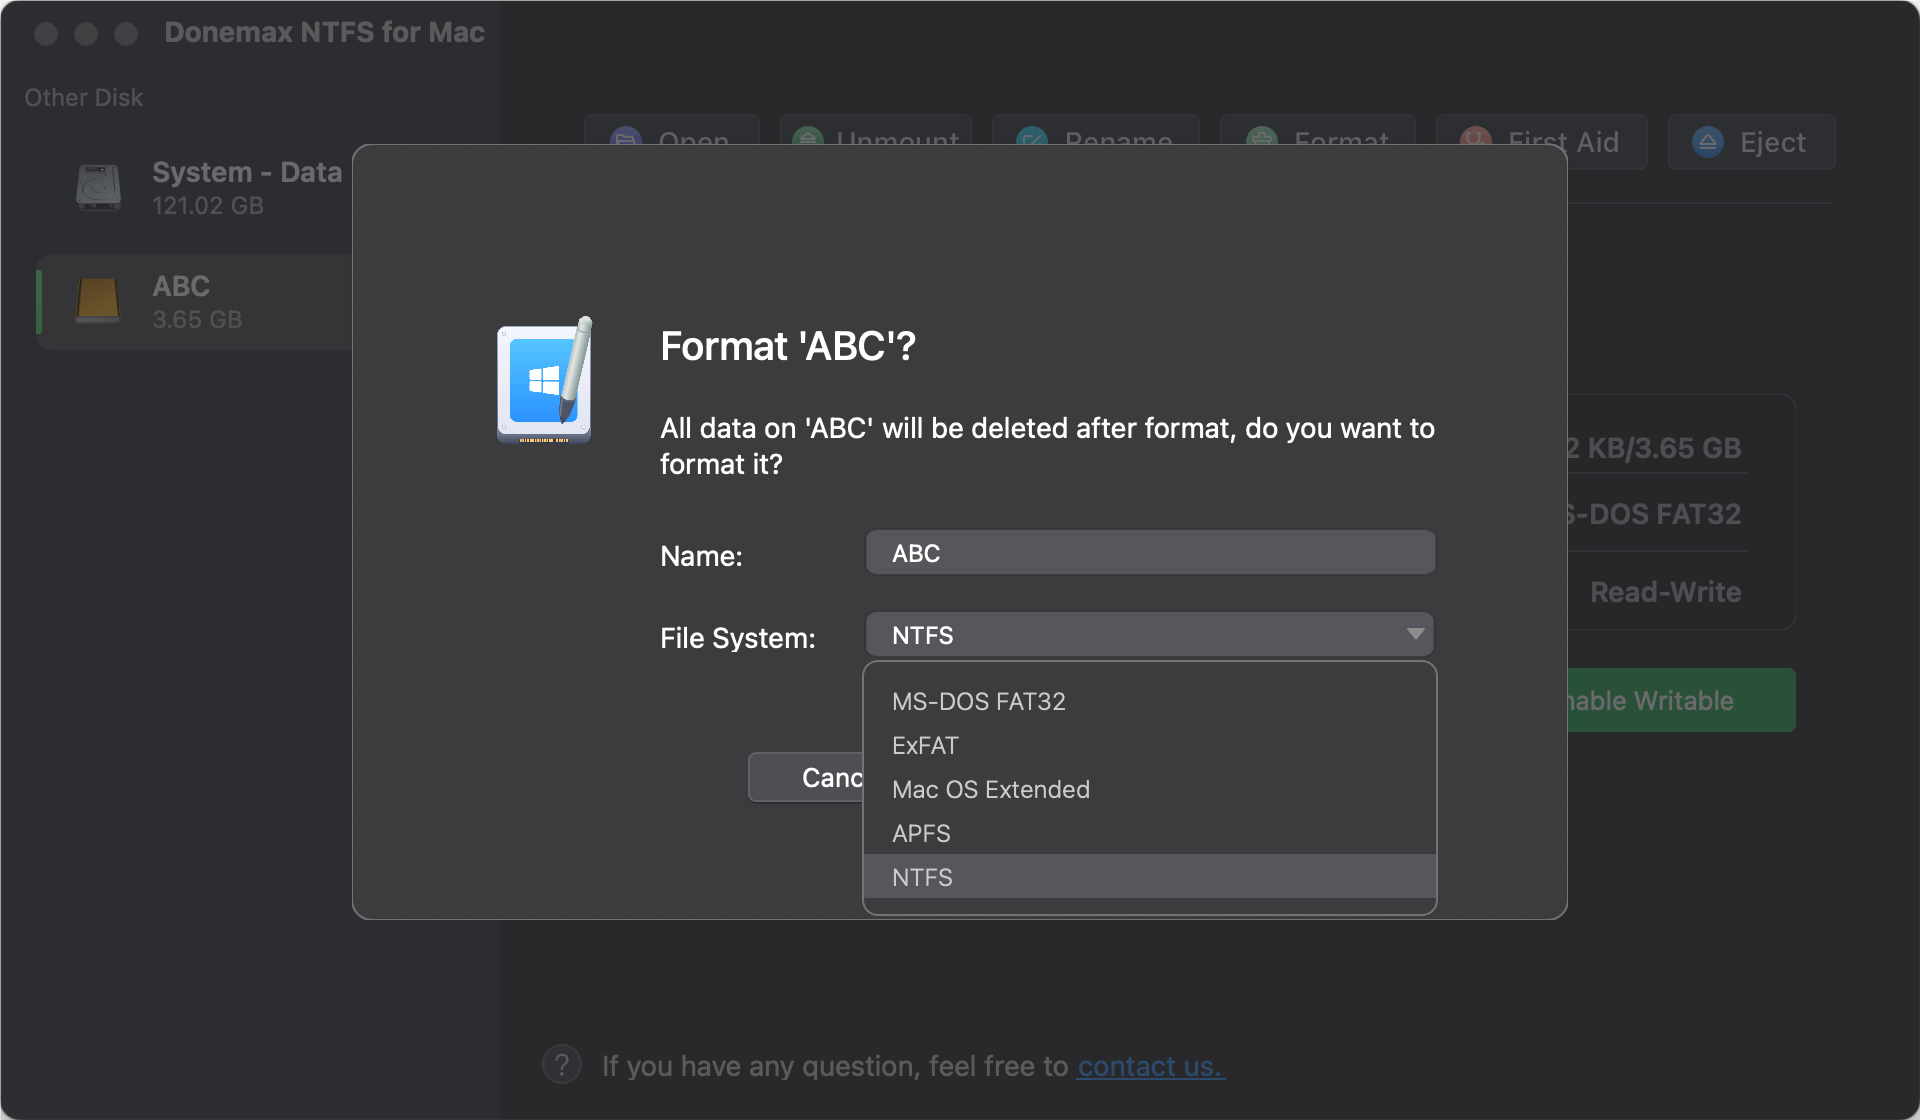
Step 4. Click Continue button to format the USB drive to NTFS.
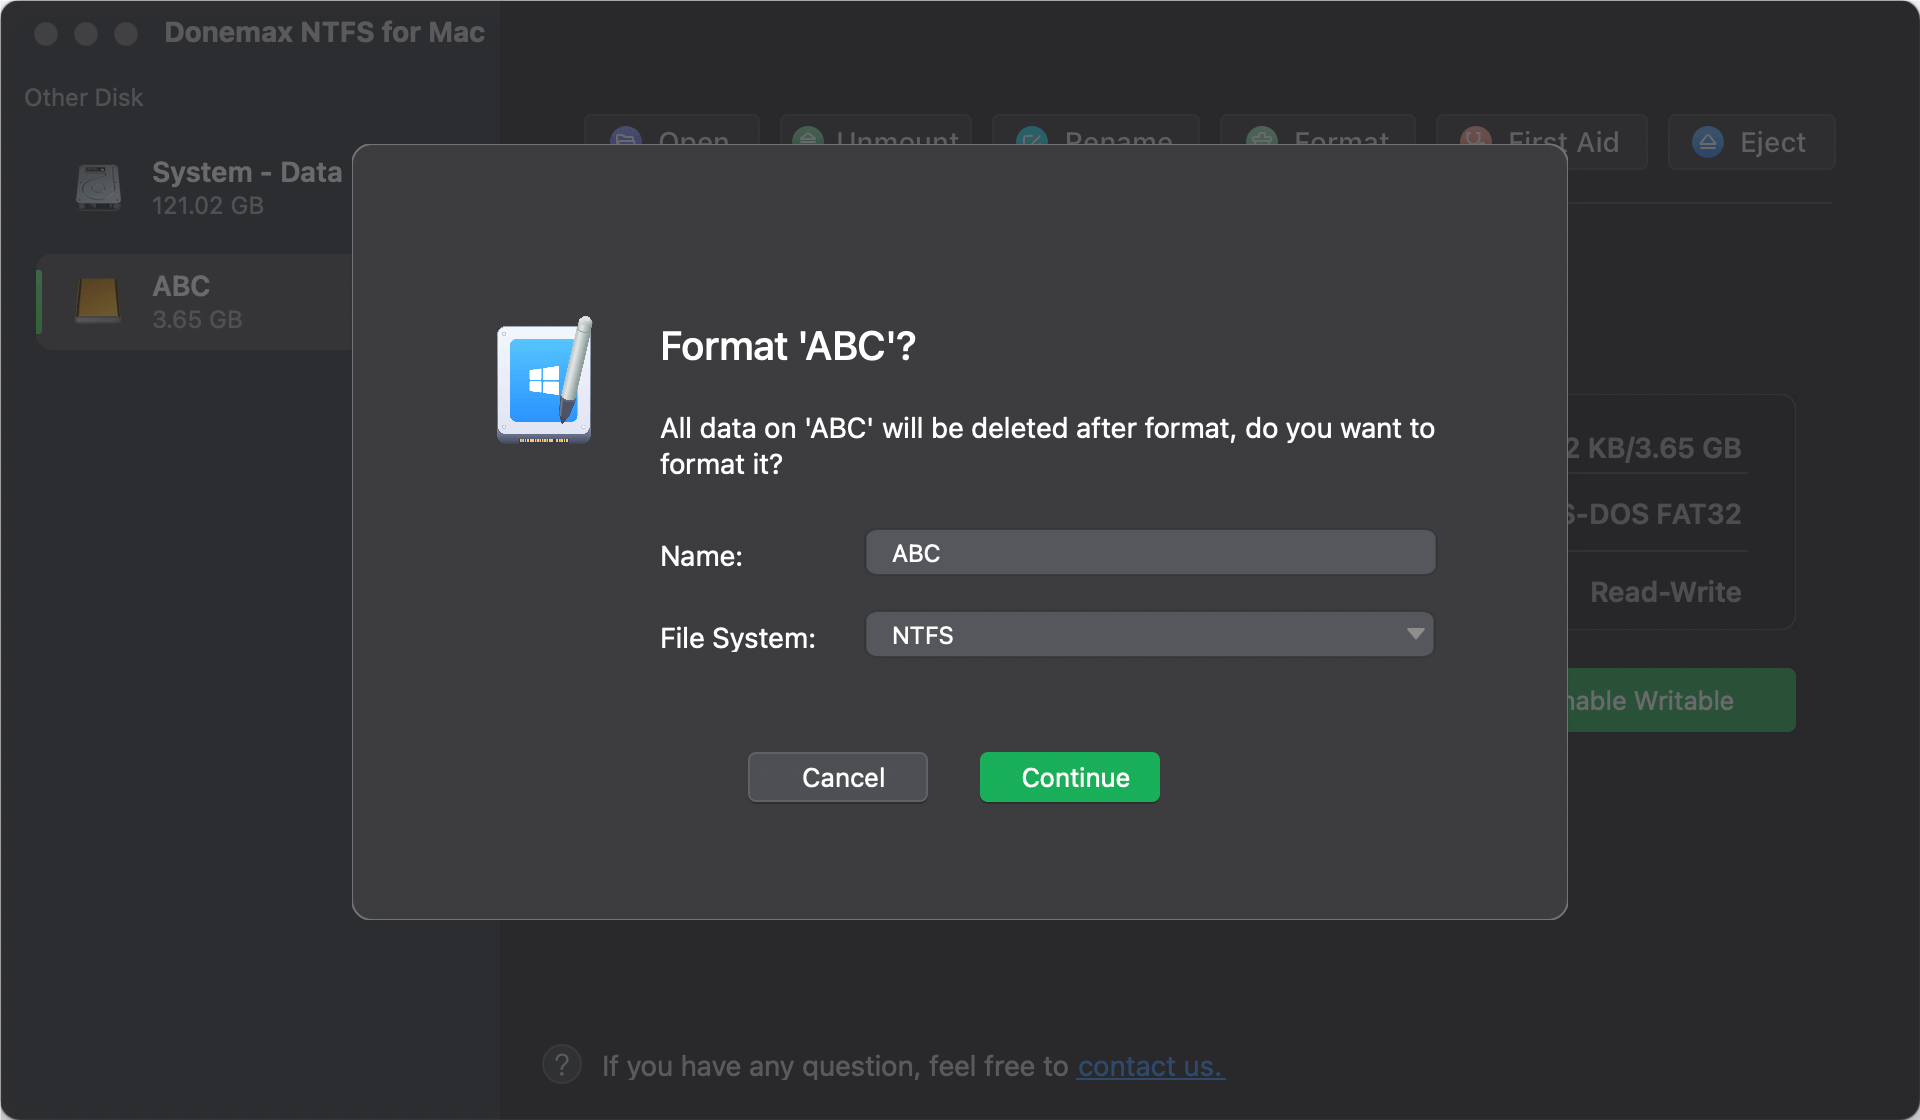
Step 5. If you want to read-write the NTFS USB drive on your Mac, just select the NTFS USB drive, then click on Enable Writable button.

More NTFS for Mac tools:
● Paragon NTFS for Mac
Paragon NTFS is one of the most well-known tools for enabling NTFS write support on macOS. It's fast, efficient, and easy to install. Once installed, you'll be able to format your USB drive to NTFS and read/write to it without any restrictions.
Step-by-Step Guide to Formatting USB Drive Using Paragon NTFS:
- Download and install Paragon NTFS for Mac from the official website.
- Plug in the USB drive you want to format.
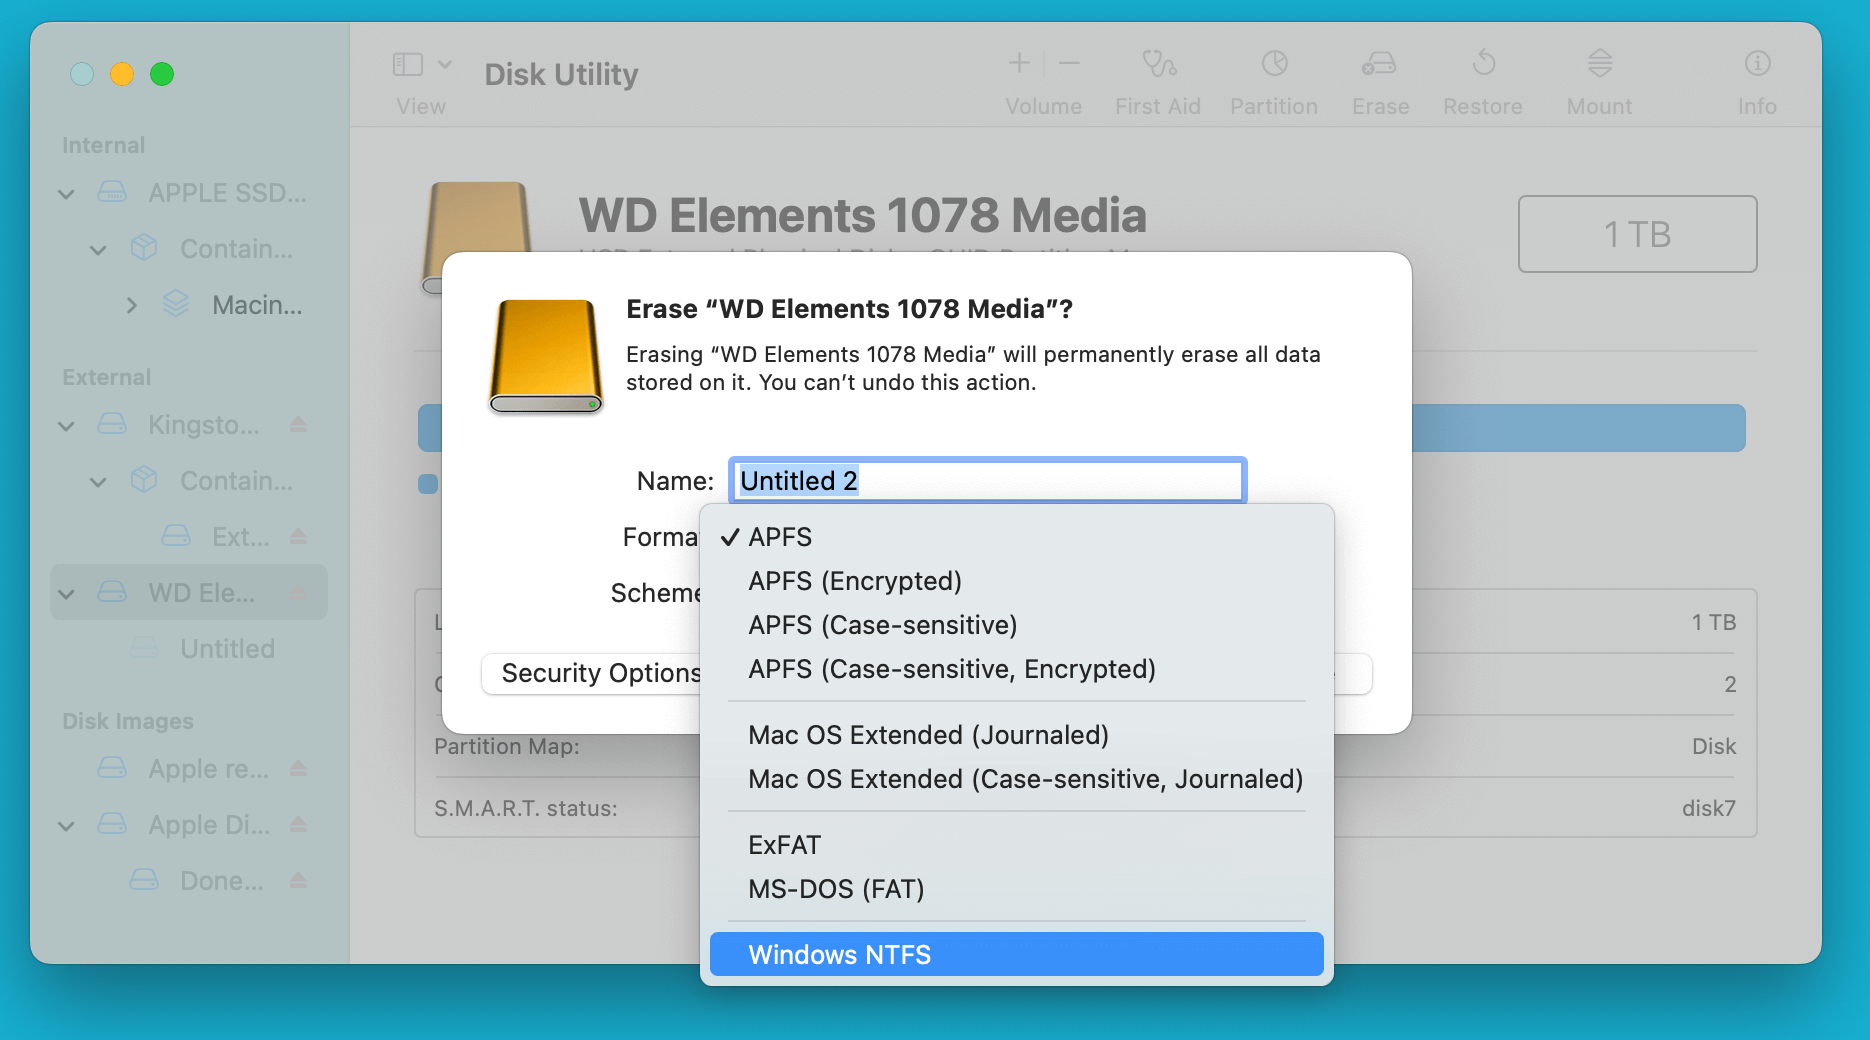
- Open Disk Utility on your Mac.
- Select the USB drive from the left-hand sidebar.
- Click the "Erase" button at the top.
- In the drop-down menu, choose NTFS (or Windows NTFS) as the file system format.
![Convert or Reformat an USB Drive to NTFS on Mac]()
- Click "Erase" to format the drive to NTFS.
- Once the process is complete, you can use the USB drive with full read/write functionality.
● Tuxera NTFS for Mac
Tuxera NTFS is another reliable software option for enabling NTFS support on macOS. It works similarly to Paragon NTFS, providing seamless integration with macOS and allowing full access to NTFS-formatted drives.
Step-by-Step Guide to Formatting USB Drive Using Tuxera NTFS:
- Download and install Tuxera NTFS for Mac from the official website.
- Connect the USB drive to your Mac.
- Open Disk Utility and select the USB drive.
- Choose the "Erase" option and select NTFS (or Windows NTFS )as the file format.
![Convert or Reformat an USB Drive to NTFS on Mac]()
- Click "Erase" to format the drive.
Both Paragon and Tuxera offer a free trial version, but you'll need to purchase a license for continued use.
Method 2: Using Terminal (Command Line) for Read-Only NTFS Access
If you prefer a more hands-on approach, you can enable NTFS write support through Terminal. This method requires entering a few commands, and it works only if you have already installed the necessary system components. While not as user-friendly as third-party applications, this method is free and might be useful for advanced users who are comfortable with the command line.
⚠️ Warning: Enabling NTFS write support via Terminal can cause instability and data loss if done incorrectly. It is recommended to use third-party software for more reliable results.
Steps for Enabling NTFS Write Access:
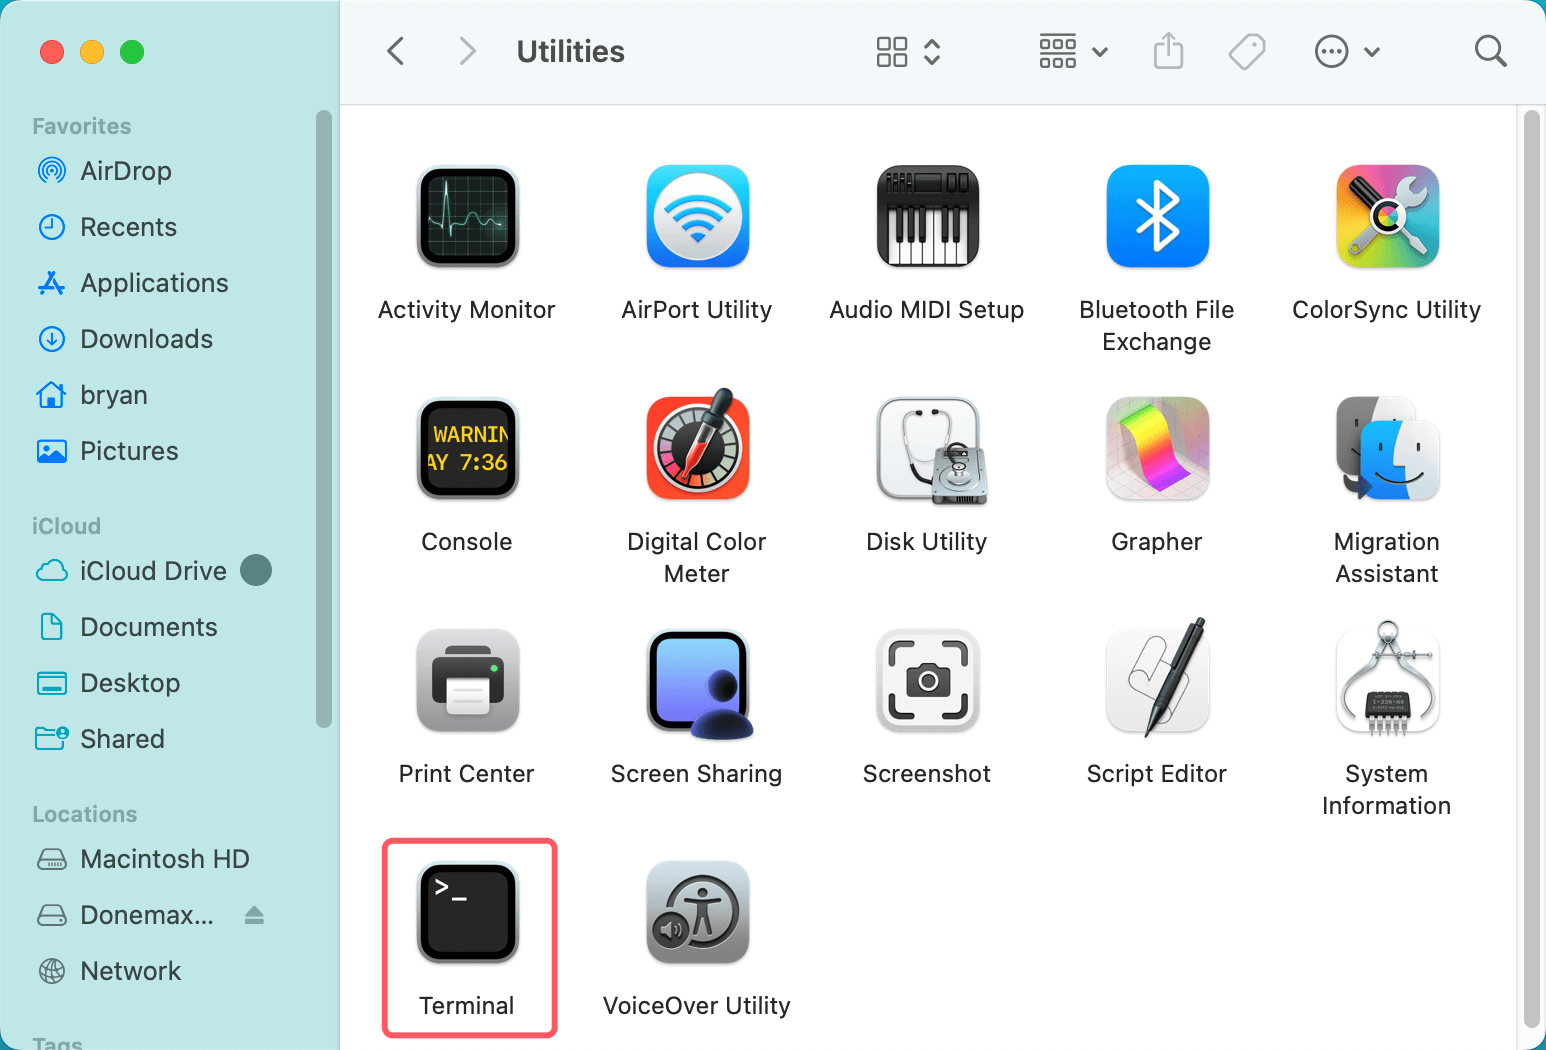
- Open Terminal (Applications > Utilities > Terminal).
![Convert or Reformat an USB Drive to NTFS on Mac]()
- Enter the following command to list your drives:
diskutil list
- Find your USB drive in the list, noting the identifier (e.g., /dev/disk2).
- Mount the NTFS drive using the following command:
sudo mount -t ntfs -o rw,auto /dev/disk2s1 /Volumes/YourDriveName
Replace /dev/disk2s1 with the appropriate disk identifier for your USB drive.
- You should now be able to write to the NTFS-formatted USB drive.
Note that this method only works temporarily. Once the drive is unmounted or the computer is restarted, you'll need to re-enable write access via Terminal.
If you want to erase the USB drive to NTFS, try command:
diskutil eraseDisk NTFS USBDRIVE /dev/diskX
Replace X with the identifier of the USB drive.
Method 3: Using Disk Utility (Only for ExFAT or FAT32)
While macOS's Disk Utility doesn't allow you to format a USB drive to NTFS, it does support formatting drives to ExFAT or FAT32, which are two file systems that offer cross-platform compatibility.
ExFAT is a preferred option if you need a file system that can handle large files (over 4GB) and works seamlessly across both Windows and macOS. ExFAT is a more modern choice, offering better performance than FAT32 and supporting larger file sizes.
To format a USB drive using Disk Utility:
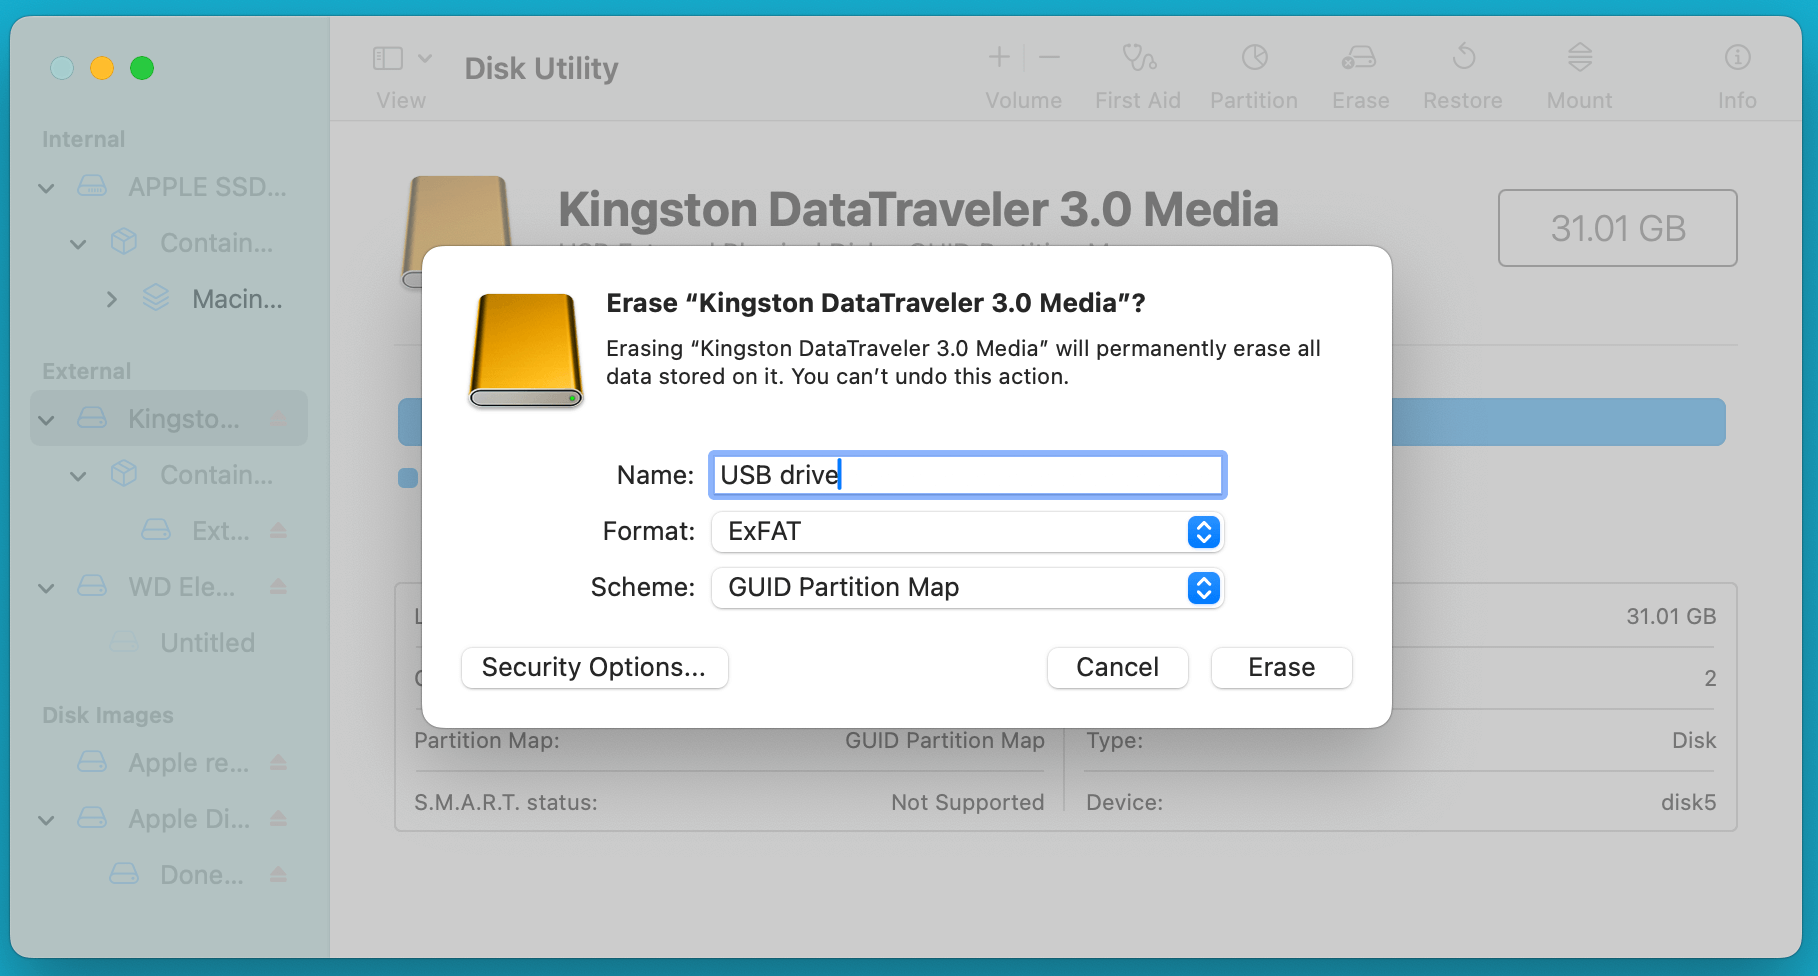
- Open Disk Utility on your Mac.
- Select your USB drive from the sidebar.
- Click the Erase button.
- Choose ExFAT or FAT32 from the format options.
![Convert or Reformat an USB Drive to NTFS on Mac]()
- Click Erase to format the drive.
Alternative Solutions for Cross-Platform Compatibility:
If you don't specifically need NTFS but want a file system that's compatible with both Windows and macOS, consider using ExFAT or FAT32.
- ExFAT: Supports large files (over 4GB) and is compatible with both Windows and macOS without the need for third-party software. It's ideal for modern drives and large file transfers.
- FAT32: An older file system that works across both platforms but has a 4GB file size limit. It's a good choice for smaller files or drives that need to be compatible with older systems.
Troubleshooting Common Issues:
- Drive Not Recognized After Formatting: If your USB drive isn't recognized after formatting, check that it's properly inserted, and try restarting your Mac.
- Slow Write Speed on NTFS Drives: If using third-party software, ensure it's up-to-date to avoid performance issues. You can also check your USB port for any potential connection issues.
- Formatting Errors: If you encounter errors when formatting the USB drive, ensure it's not physically damaged and that the drive has enough space.
Conclusion
Formatting a USB drive to NTFS on macOS isn't as straightforward as it is on Windows due to macOS's limited NTFS support. However, with the use of third-party software like Donemax NTFS for Mac, Paragon NTFS or Tuxera NTFS, or through manual Terminal commands, you can enable full read/write access to NTFS drives on your Mac.
If you prefer a cross-platform solution without the need for additional software, consider using ExFAT or FAT32. These file systems work seamlessly with both Windows and macOS, though ExFAT is generally the better choice for handling larger files.
With these methods, you can now format your USB drive to NTFS and ensure compatibility with both macOS and Windows, making it easier to manage files between different operating systems.

Donemax NTFS for Mac
An easy-to-use NTFS for Mac tool to help you enable writable for NTFS drives on Mac so that you can read-write NTFS drives on Mac without any limitation. It also can help you mount, format, repair, rename, open drive on your Mac.
Related Articles
- Oct 24, 2024How to Remove a User Account on Mac: A Comprehensive Guide
- Mar 11, 2025How to Use Seagate Expansion Desktop Hard Drive on Mac?
- Aug 07, 2024Fix Time Machine Won't Start Backup
- Feb 17, 2025Fix XQD Card Not Showing Up or Not Mounting on Mac [10 Fixes]
- Nov 20, 2024How to Make a Bootable USB Installer for macOS Big Sur?
- Jan 17, 2025Force Delete Files on Mac: A Complete Guide

Christina
Christina is the senior editor of Donemax software who has worked in the company for 4+ years. She mainly writes the guides and solutions about data erasure, data transferring, data recovery and disk cloning to help users get the most out of their Windows and Mac. She likes to travel, enjoy country music and play games in her spare time.

Gerhard Chou
In order to effectively solve the problems for our customers, every article and troubleshooting solution published on our website has been strictly tested and practiced. Our editors love researching and using computers and testing software, and are willing to help computer users with their problems
