PAGE CONTENT:
Managing user accounts is essential for anyone using a shared computer or administering a network of machines. Whether you want to remove an outdated account, declutter your user list, or enhance security by eliminating unused profiles, the process of deleting a user account on a Mac is straightforward. However, it's crucial to understand the nuances involved to avoid accidentally losing important files or access to key system features.
This comprehensive guide will walk you through everything you need to know about removing a user account on a Mac. We'll cover the types of user accounts, how to back up important data before deletion, different methods of account removal, and troubleshooting common issues that may arise during the process. By the end of this article, you'll have a clear understanding of how to efficiently and safely remove a user account from your Mac.
Understanding User Accounts on a Mac
Before jumping into the account removal process, it's essential to understand the types of user accounts that exist on a Mac. Knowing which type of account you're dealing with helps ensure that you take the proper steps without jeopardizing your system's stability.
Types of User Accounts:
- Administrator Accounts: This type of account has the highest level of access. Admins can install software, change system settings, and add or remove other user accounts. If you are removing an administrator account, make sure at least one other admin account remains to maintain system control.
- Standard Accounts: Standard accounts have fewer privileges than administrator accounts. These accounts are generally used for day-to-day tasks like running applications, browsing the internet, or managing files, but they cannot make system-wide changes.
- Managed Accounts (Parental Controls): These accounts are designed for younger users or users who need restricted access. Managed accounts can have limitations set, such as limiting app usage, websites, or screen time.
- Guest Accounts: A guest account allows users to access a Mac temporarily without logging in with a personal account. Guest accounts don't require a password and are often used in public or shared spaces. Files and preferences created under a guest account are deleted once the user logs out.
Why Remove a User Account on Mac?
There are various reasons why you might want to remove a user account on a Mac:
- Security: Leaving unused accounts on your Mac can be a security risk. If an account has access privileges, it could become a target for unauthorized users.
- Free Up Storage: User accounts take up disk space, particularly if the user has a significant amount of personal data. Deleting unused accounts can free up valuable storage space.
- Decluttering: Reducing the number of user accounts can simplify your login screen and user management tasks.
- Preparing for Sale or Transfer: If you plan to sell or give away your Mac, removing all personal user accounts is necessary to protect your data.
Now that you understand the types of accounts and the reasons for removing them, let's get into the specifics of how to safely remove a user account.
Preparing to Remove a User Account
Before deleting a user account, it's essential to take some precautionary steps, particularly if the account contains important files or system data. Here's how you can prepare.
Step 1. Back Up Important Data.
When you delete a user account, all associated files, applications, and preferences are permanently removed unless you specifically save the data. Therefore, it's essential to back up any important files before proceeding with the deletion. You can use several methods to back up user data:
- Time Machine: Apple's built-in backup utility. You can back up the entire system or just specific files from the account.
- iCloud or Other Cloud Services: Upload important files to iCloud Drive, Dropbox, Google Drive, or another cloud storage service.
- External Storage: Copy files to an external hard drive or USB stick to ensure that they are preserved.
- Disk Clone Software: Clone all data from the Mac internal disk to the external hard drive, creating a full bootable clone backup.
Step 2. Ensure There Is Another Administrator Account.
If you're removing an administrator account, make sure another administrator account exists. If you delete the only administrator account, you'll lose the ability to make system changes, install software, or manage user accounts in the future.
Creating a New Administrator Account:
- Select System Settings from the Apple Menu.
- Choose Users and Groups.
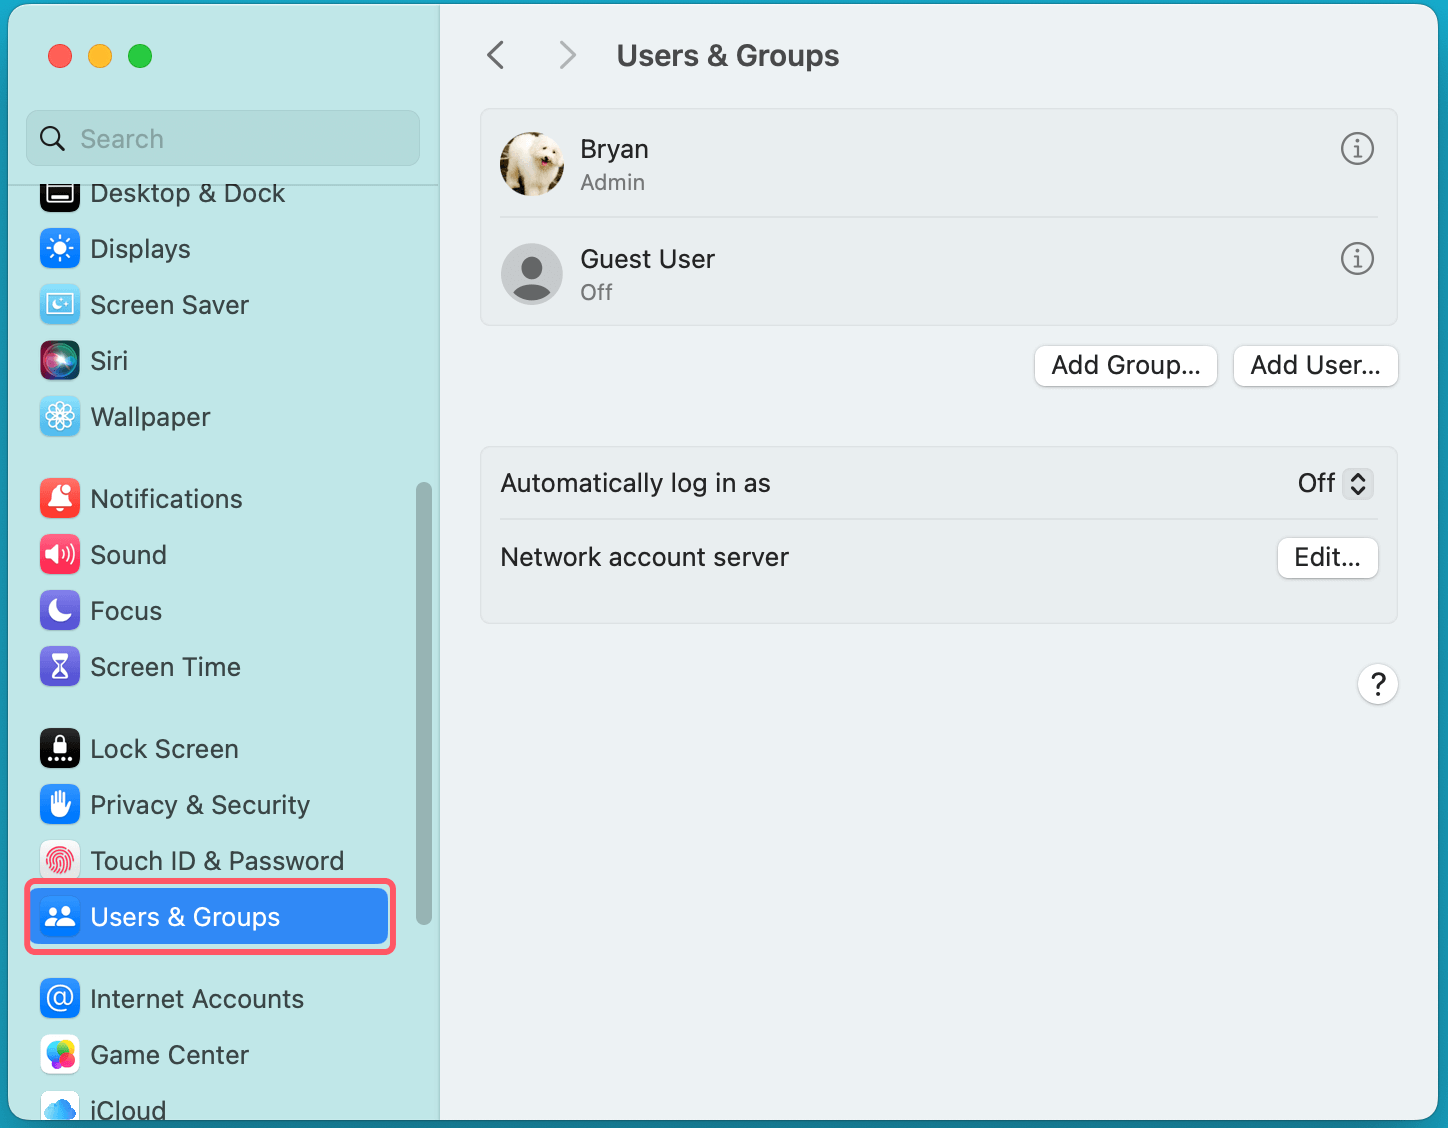
- Below the list of accounts, click the Add User option.
- Choose Administrator from the drop-down menu and follow the prompts to create the new admin account.
Step 3. Log Out of the Account to Be Deleted.
Before removing an account, ensure the user is logged out. This helps prevent file corruption or deletion errors during the removal process.
How to Remove a User Account on Mac?
Once you've prepared for the deletion, it's time to remove the user account. There are two primary methods for removing accounts on macOS, depending on the version you're using.
Method 1: Removing a User Account in macOS Ventura and Later
If your Mac is running macOS Ventura or a later version, follow these steps to remove the account.
- Open System Settings: Select System Settings by clicking on the Apple Menu in the upper-left corner.
- Go to Users & Groups: In the left-hand menu, find and click on Users & Groups.
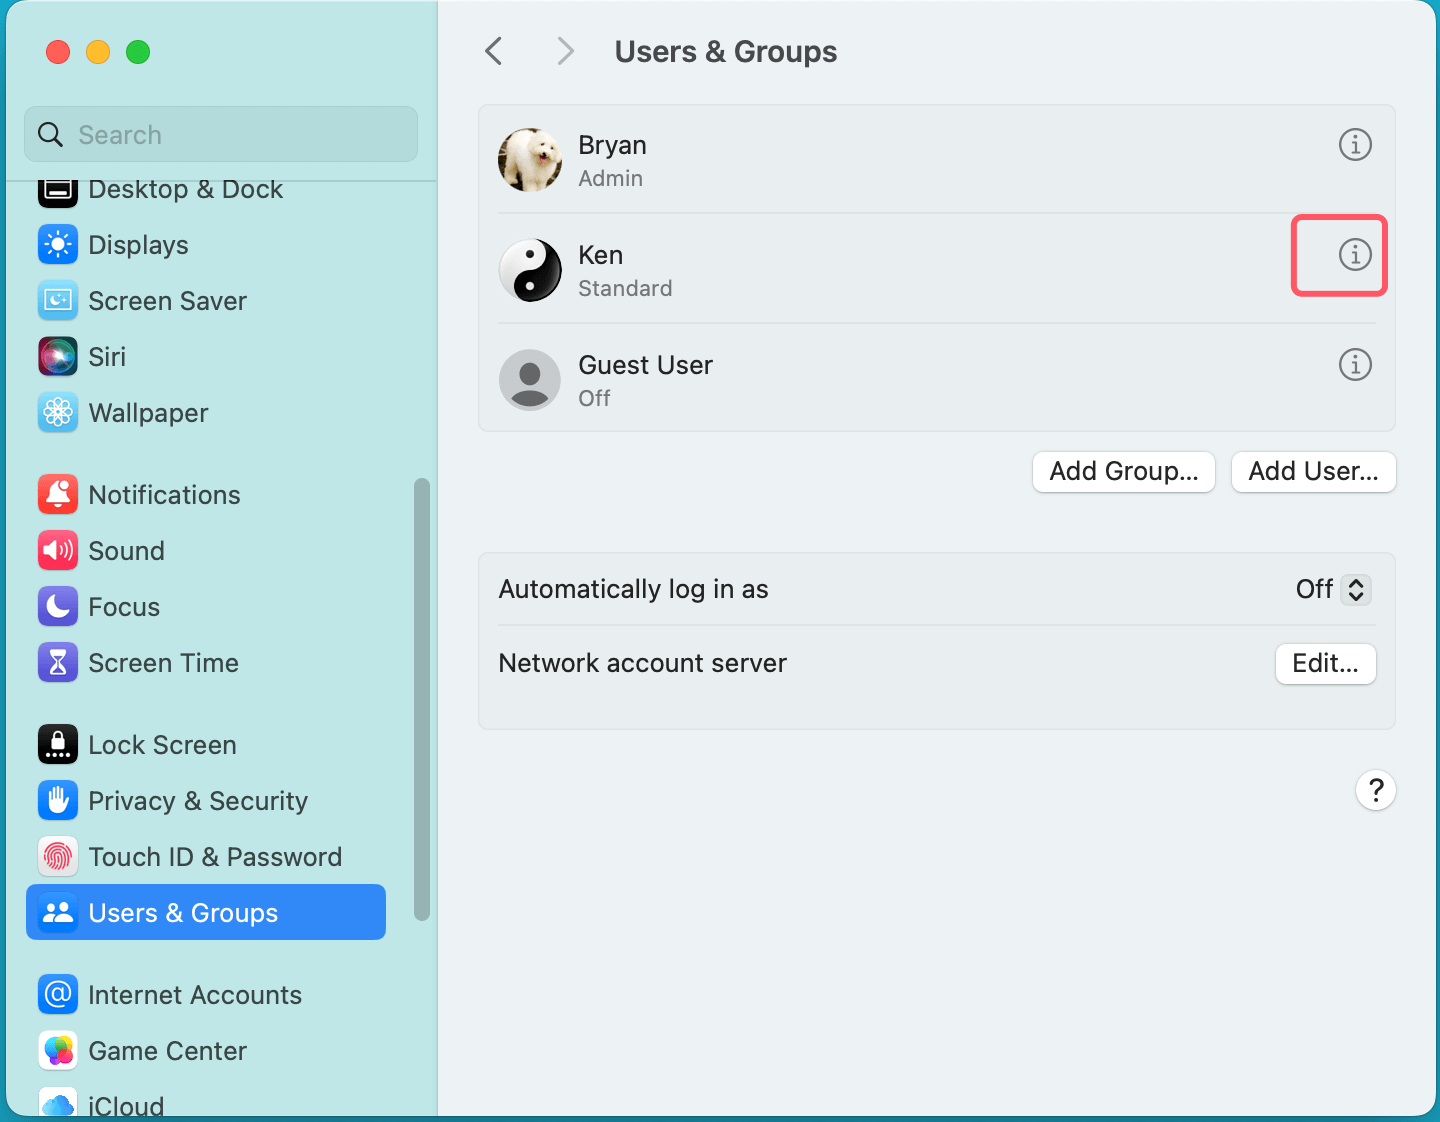
- Select the Account to Delete: Find the account you want to remove from the list of users and click the small "i" button on the right.
![Removing a User Account in macOS Ventura and Later]()
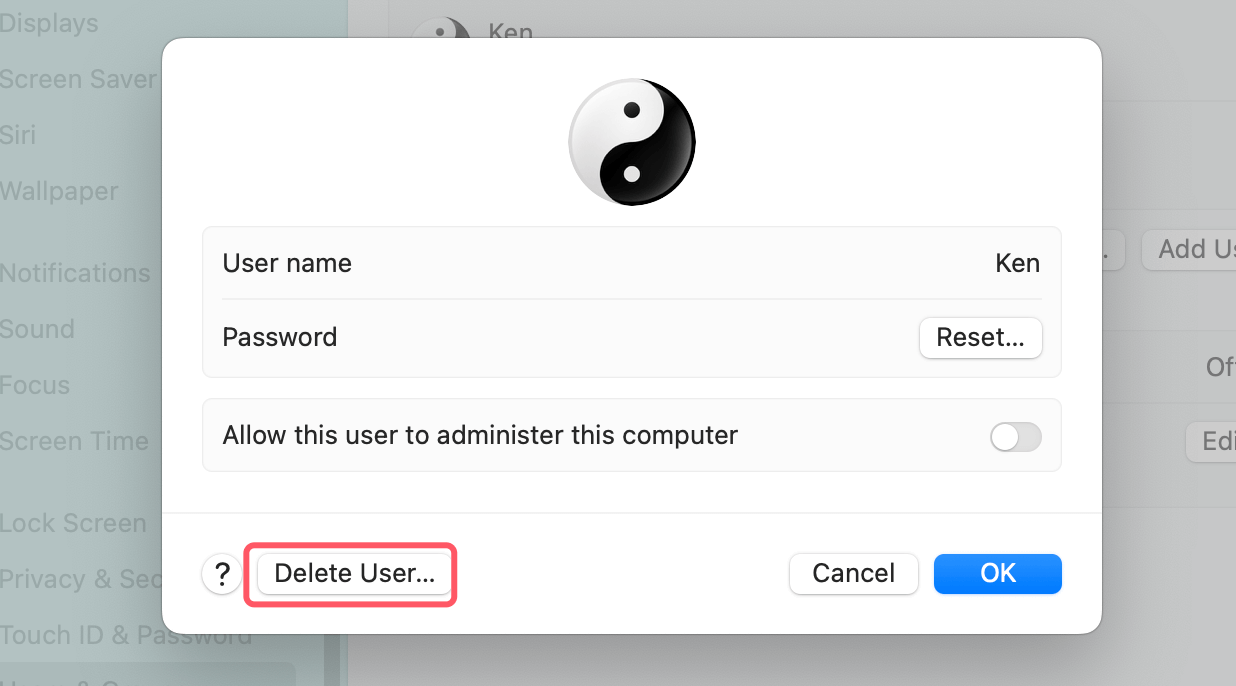
- Delete the Account: Click the Delete User button at the bottom-left corner of the pop-up window.
![Removing a User Account in macOS Ventura and Later]()
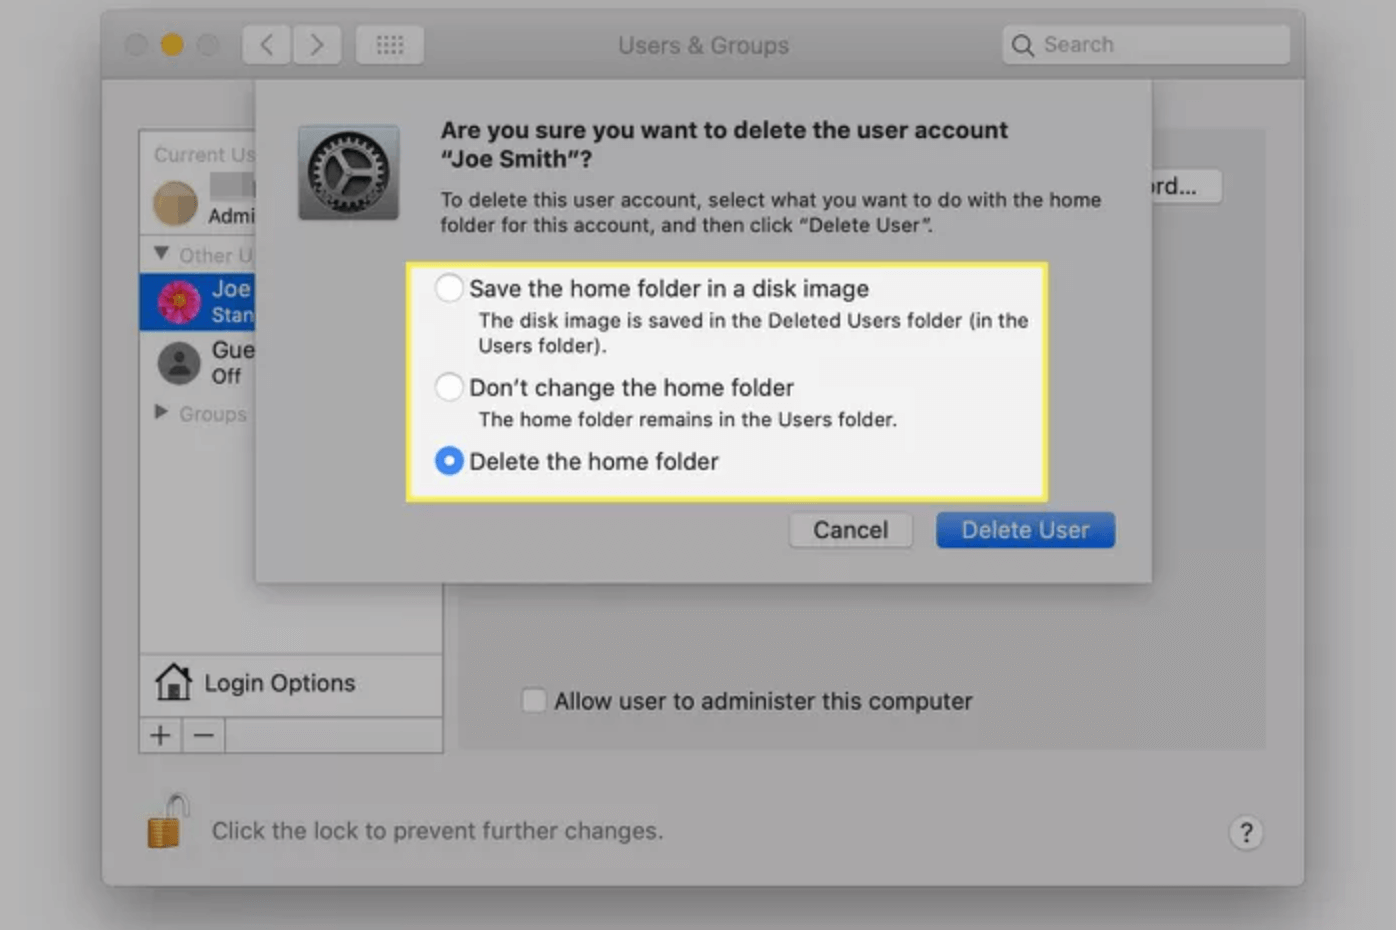
- Choose What to Do with the User's Files: You'll be presented with three options:
- Save the home folder in a disk image: This preserves the user's data in a disk image saved in the /Users/Deleted Users/ folder, allowing you to recover the files later.
- Don't change the home folder: This leaves the user's home folder intact in the /Users/ folder.
- Delete the home folder: This permanently removes all the user's files from the system.
![Removing a User Account in macOS Ventura and Later]()
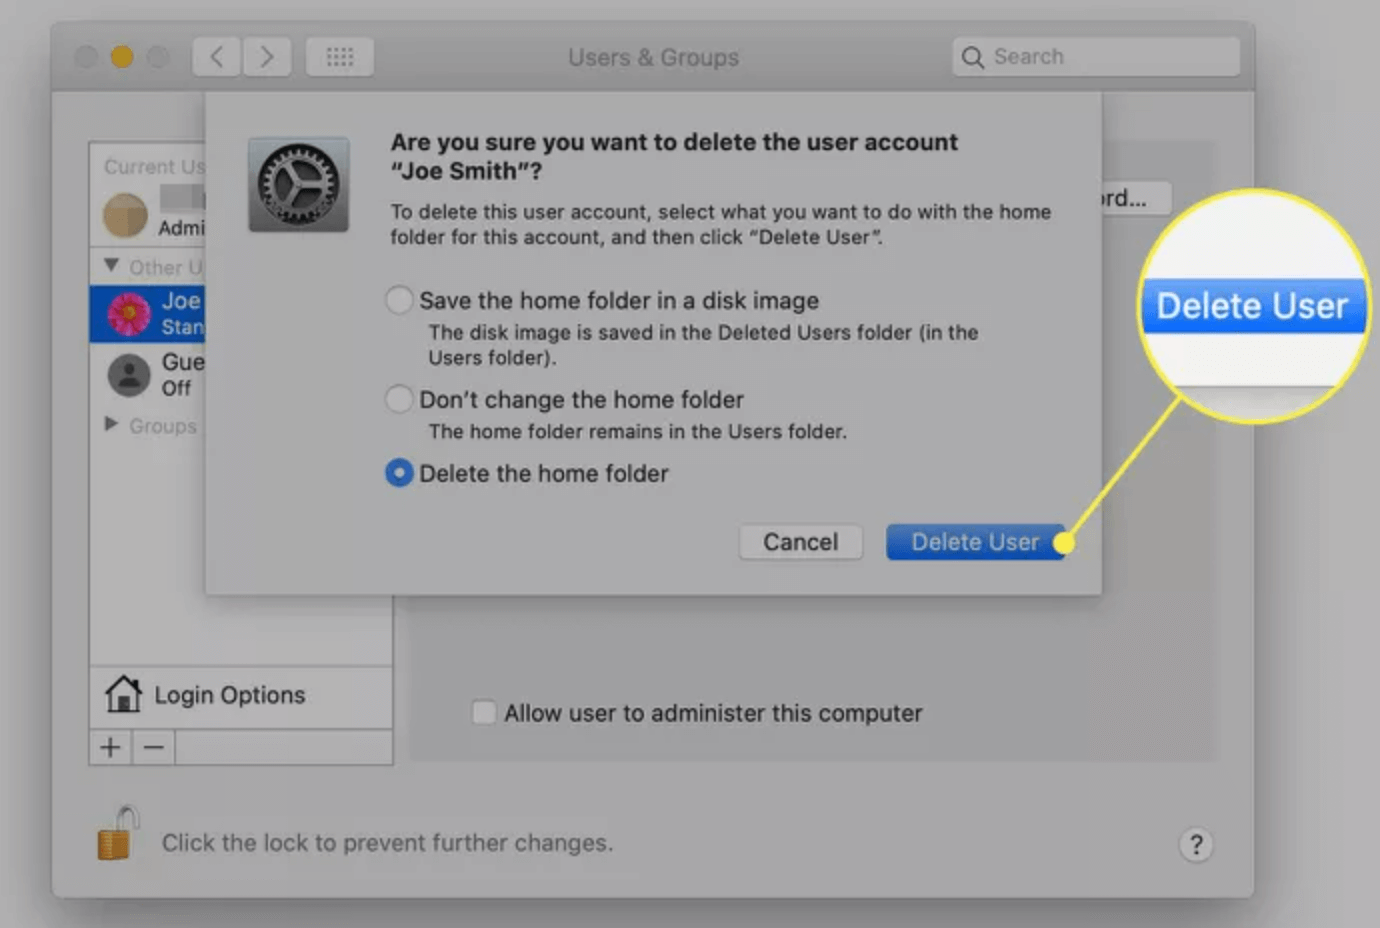
- Confirm the Deletion: After selecting one of the options above, click Delete User to confirm. The user account will be removed, and any selected data will be either deleted or saved according to your choice.
Method 2: Removing a User Account in Older Versions of macOS
For users on older macOS versions like Big Sur or Monterey, the process is slightly different but still relatively straightforward.
- Open System Preferences: Select System Preferences by clicking on the Apple Menu.
- Go to Users & Groups: Choose Users & Groups from the options.
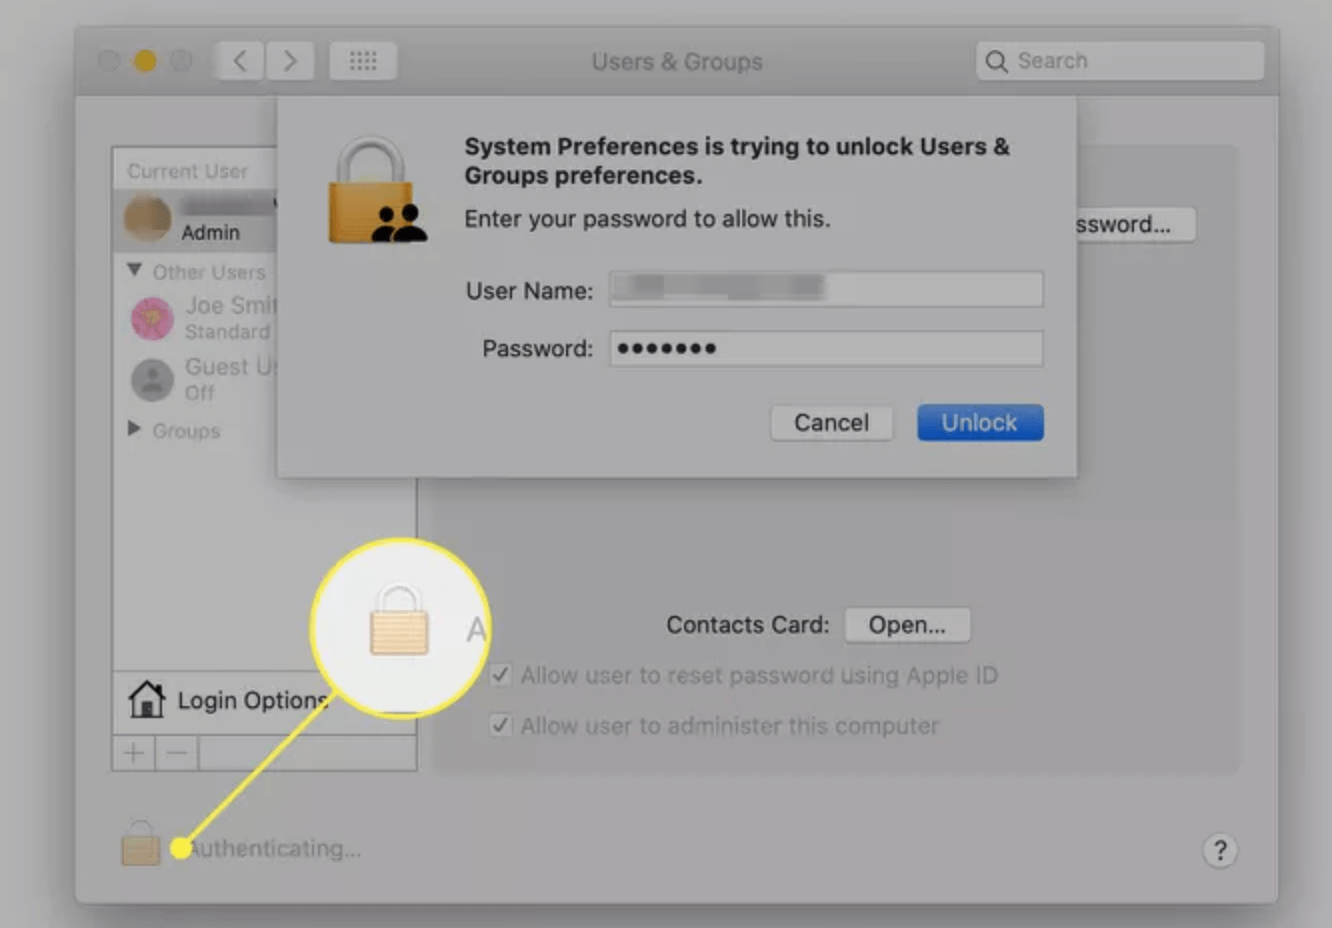
- Unlock the Settings: To unlock, click the Lock symbol in the lower-left corner of the window and input your administrator information.
![Removing a User Account in Older Versions of macOS]()
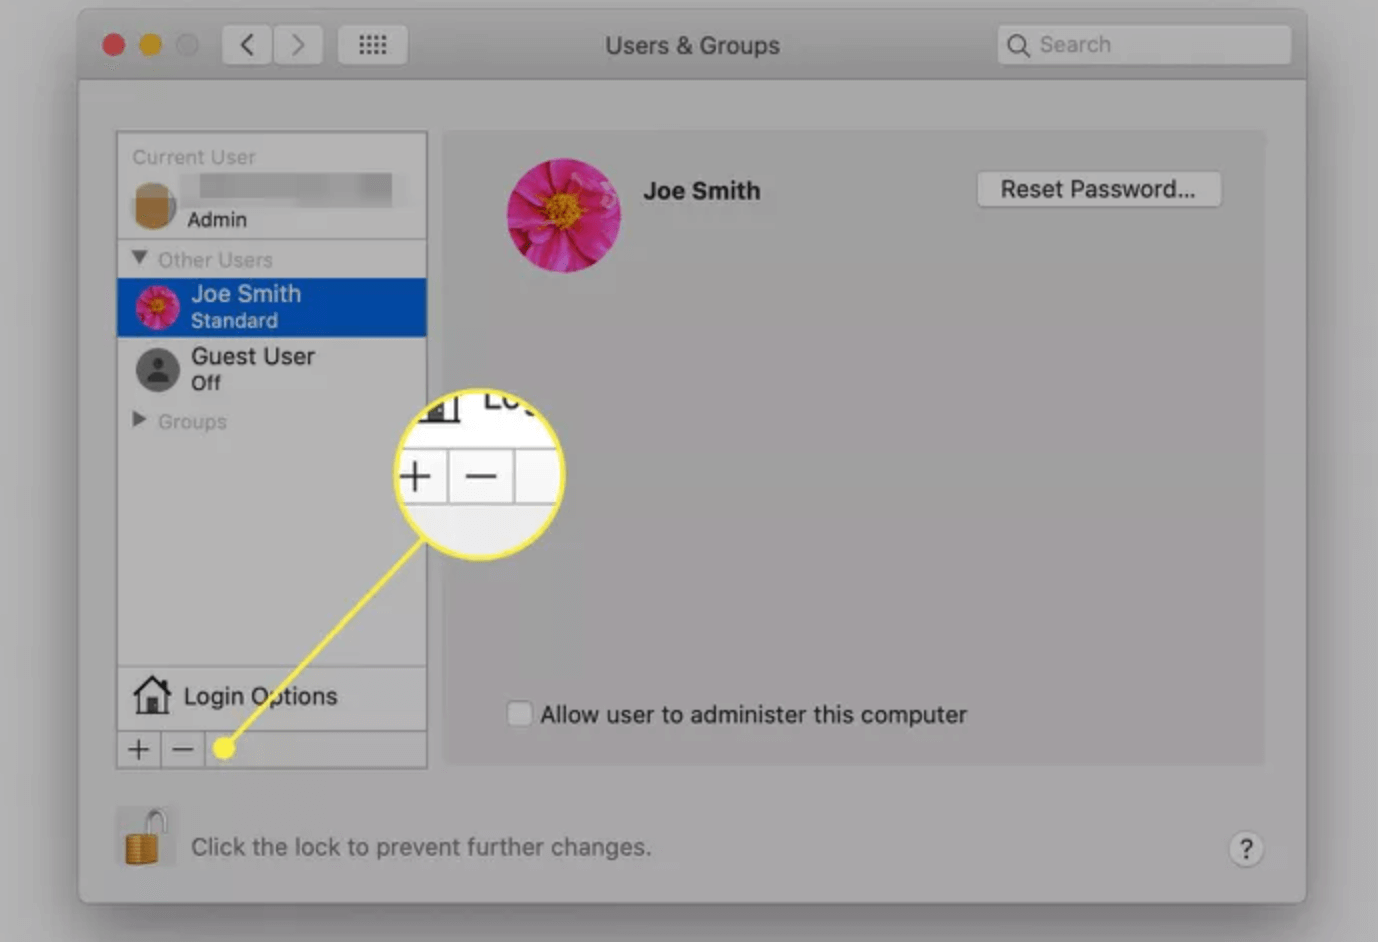
- Select the Account to Delete: Highlight the user account you wish to remove from the list.
- Delete the Account: Click the Minus (–) button under the list of user accounts.
![Removing a User Account in Older Versions of macOS]()
- Select What to Do with the User's Files: You'll be given the same three options: saving the home folder, keeping the home folder, or deleting the home folder.
![Removing a User Account in Older Versions of macOS]()
- Confirm the Deletion: Click Delete User to finalize the removal process.
Common Issues and Troubleshooting
While removing a user account on a Mac is generally a smooth process, certain issues can arise. Here are some common problems and how to address them.
Issue 1: Unable to Delete a User Account
If you're unable to delete a user account, there are several potential reasons:
- The user is currently logged in: Make sure the user is logged out before attempting to delete the account.
- Insufficient permissions: Ensure you're logged in as an administrator, as only admins can delete accounts.
- Corrupted settings: Occasionally, system files can become corrupted, preventing user account changes. In this case, try restarting your Mac and attempting the deletion again.
Issue 2: The System Hangs or Freezes During Deletion
If the system hangs or freezes during the deletion process, it could be due to a large amount of data associated with the account. Be patient, as deleting a user with many files can take several minutes. If the process takes longer than expected:
- Restart the Mac: Force a restart and try again.
- Check for background processes: Open Activity Monitor to see if any processes are using excessive resources and force quit unnecessary applications.
Issue 3: Can't Find the Deleted User's Files
If you chose to save the user's home folder as a disk image but can't find it, ensure that you're looking in the correct folder: /Users/Deleted Users/. If the files still seem to be missing:
- Search the Disk: Use Spotlight Search (Command + Space) to look for the disk image by name.
- Verify Permissions: Make sure you have the correct permissions to access the deleted user’s files, especially if it was an administrator account.
Restoring a Deleted User Account:
You may occasionally need to recover a deleted user account. If, during the deletion procedure, you saved the home folder as a disk image, you can recreate the account and restore the user’s data.
- Recreate the User Account: Go to System Settings > Users & Groups, click the Add User button, and create a new account with the same username as the deleted account.
- Restore the Home Folder: Copy the files from the disk image located in /Users/Deleted Users/ back to the newly created account’s home folder.
If you lost data due to deleting a user account on your Mac and don't have a backup, you can use Mac data recovery software to deeply scan the internal HDD/SSD and find the lost documents and files.
Step 1. Download and install Donemax Data Recovery for Mac. It can help you deeply scan the internal disk and find all recoverable files.
Step 2. Open Donemax Data Recovery for Mac, select the internal HDD or SSD to start data recovery.

Step 3. Click on Scan button to deeply scan the internal disk and find all deleted/erased/lost files.

Step 4. Once the scan is completed, you can preview all recoverable files. Then select the wanted files, click on Recover button to save them.

Conclusion
Removing a user account on a Mac is a relatively simple process when you understand the necessary steps and precautions. Whether you're trying to free up space, improve security, or prepare your Mac for a new user, following the methods outlined in this guide will help you achieve your goals safely and effectively.
Backing up critical data, ensuring there's another admin account, and selecting the right deletion method are crucial parts of the process. With this knowledge, you're now equipped to manage your Mac's user accounts like a pro, keeping your system streamlined and secure.
Related Articles
- Jul 13, 2024How to Repair An External Hard Drive on Mac?
- Jul 01, 2025[7 Fixes] Fix 'Your Computer Was Restarted Because of a Problem' on Mac
- Aug 05, 2025Fix Error Code 36 on Mac: A Comprehensive Guide
- Jun 28, 20254 Methods to Convert RAR to ZIP on Mac: A Complete Guide
- Nov 20, 2024How to Clean Install macOS Big Sur -Step-by-step Guide
- Oct 21, 2024macOS Sequoia Not Recognizing USB Flash Drives, 9 Methods to Fix It

Christina
Christina is the senior editor of Donemax software who has worked in the company for 4+ years. She mainly writes the guides and solutions about data erasure, data transferring, data recovery and disk cloning to help users get the most out of their Windows and Mac. She likes to travel, enjoy country music and play games in her spare time.

Gerhard Chou
In order to effectively solve the problems for our customers, every article and troubleshooting solution published on our website has been strictly tested and practiced. Our editors love researching and using computers and testing software, and are willing to help computer users with their problems
