PAGE CONTENT:
A clean install of macOS is one of the most effective ways to breathe new life into your Mac, fixing lingering issues and boosting performance. This comprehensive tutorial will guide you through the whole process of clean installing macOS Big Sur, guaranteeing a seamless and trouble-free experience. Whether you're upgrading from an older version of macOS, troubleshooting problems, or simply want to start fresh, this guide has you covered.
What Is a Clean Install?
A clean install refers to the process of erasing your Mac's hard drive and then installing a fresh copy of macOS. This approach contrasts with a regular upgrade, where the new macOS version is simply installed over the old one, retaining your settings and files. While an upgrade might save time, a clean install provides a fresh, optimized system, often resolving performance issues, software glitches, and providing a more stable environment.
In this article, we will focus on how to clean install macOS Big Sur, Apple's 17th major release of macOS, which debuted with significant visual changes, new features, and improved performance. A clean install of macOS Big Sur can help you optimize your system, particularly if you've been running older versions of macOS or have accumulated lots of software junk over time.
Why Choose a Clean Install of macOS Big Sur?
There are several reasons why you might choose a clean install:
- Fixing performance issues: Over time, your system may slow down due to accumulated software and system files. A clean install wipes everything and starts fresh.
- Resolving software conflicts: If apps or system processes aren't working well together, a clean install can help eliminate conflicts by removing old settings and files.
- Freeing up disk space: Unnecessary files, old applications, or residual system caches often take up precious disk space. A fresh install can reclaim that space.
- Improved stability: A clean install eliminates bloat and outdated system files, ensuring that your Mac runs as efficiently as possible.
- Upgrading/downgrading to macOS Big Sur: A clean install can often be a good idea when upgrading to a new major macOS version like Big Sur or downgrade from higher version to macOS Big Sur to avoid carrying over old system problems.
Preparation Before the Clean Install macOS Big Sur
Before jumping into the installation process, it's essential to take some important preparatory steps. These will ensure that you don't lose valuable data and that the installation process goes smoothly.
1. Backup Your Data
The most important step before performing a clean install is to back up your files. A clean install will erase everything on your Mac's hard drive, so you need to ensure that you have all your important data safely stored. There are several ways to back up your data:
- Time Machine: Time Machine is the easiest and most reliable way to back up your Mac. It automatically backs up your entire system, including apps, settings, and files. To backup your complete system, just attach an external hard drive to your Mac and run Time Machine.
- iCloud: If you have an Apple ID, iCloud is another option. iCloud will automatically back up files, documents, photos, and more. However, it doesn't back up applications or system preferences, so a Time Machine backup is preferable for a more complete backup.
- Third-party backup tools: You can also use third-party software such as Donemax Disk Clone for Mac, Carbon Copy Cloner or SuperDuper to create a complete backup of your system. These tools can create bootable backups, which can be especially helpful if something goes wrong during the installation process.
Once you've backed up your files, double-check that everything is saved. This includes any important documents, photos, videos, and software that you may need after the clean install.
2. Ensure Hardware Compatibility
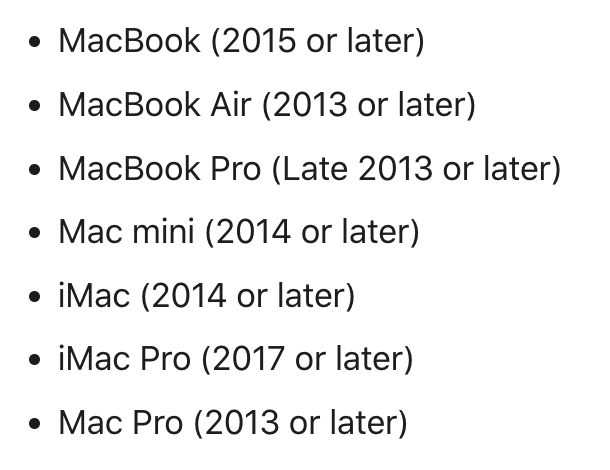
Before proceeding with the installation, make sure your Mac is compatible with macOS Big Sur. If you have an older Mac, you may need to stick with an earlier macOS version, as Big Sur might not be supported. You can find out what version of macOS your Mac is running by selecting "About This Mac," which is the menu item that appears when you click the Apple logo in the upper-left corner of your screen.
Supported by macOS Big Sur:
3. Gather the Necessary Tools
To perform a clean install, you'll need a few essential tools:
- USB Flash Drive
- A Reliable Internet Connection
- Access to the macOS Big Sur Installer
Once you've gathered these tools, you're ready to start the clean install process.
Steps to Clean Install macOS Big Sur
Step 1: Create a Bootable macOS Big Sur USB Installer
Creating a bootable macOS installer on a USB drive is the first step in the process. This allows you to install macOS Big Sur from scratch, even if your Mac can't boot into the existing operating system. Here's how to do it:
1. Download macOS Big Sur
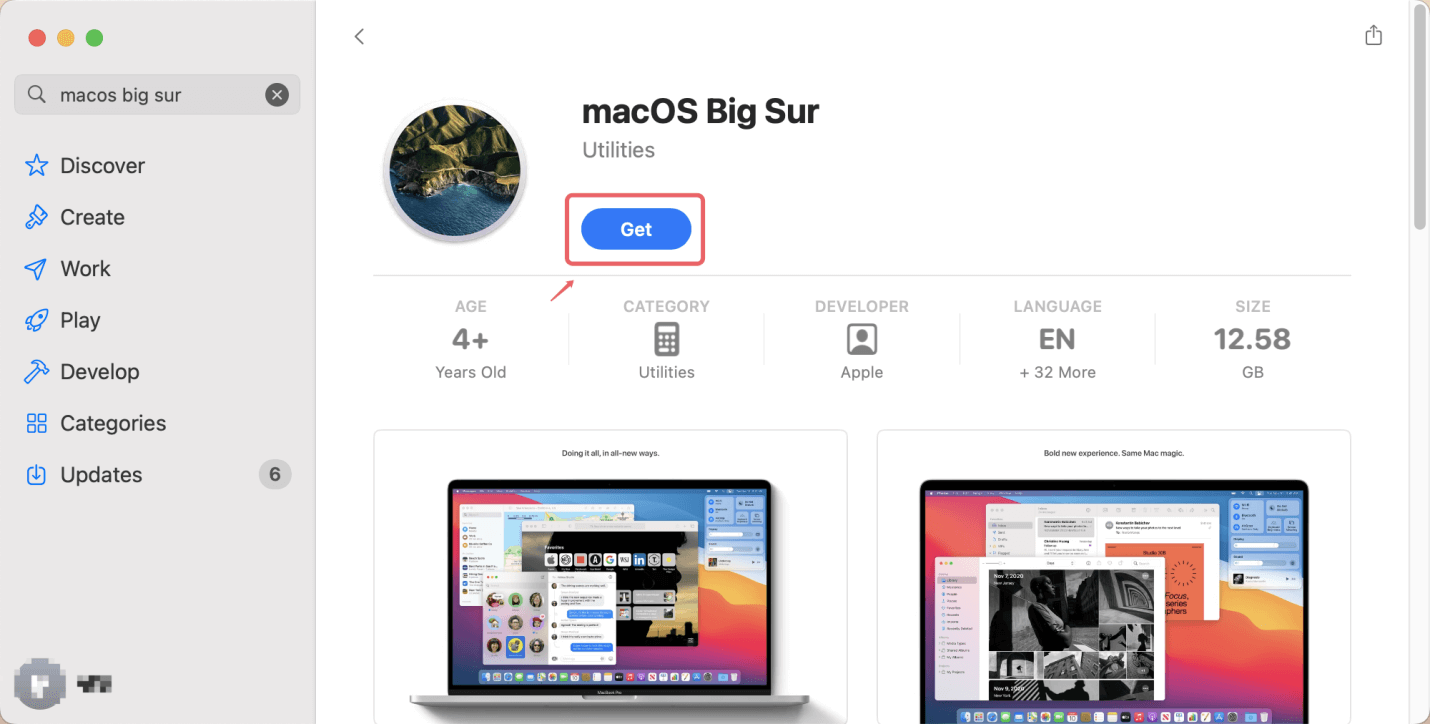
- Open the Mac App Store.
- Search for macOS Big Sur or click this link to macOS Big Sur on the App Store.
- Click Get to download the installer. The installer will automatically open after it finishes downloading.
![clean installing macOS Big Sur]()
2. Format the USB Drive
- Insert your USB drive (at least 16 GB) into your Mac.
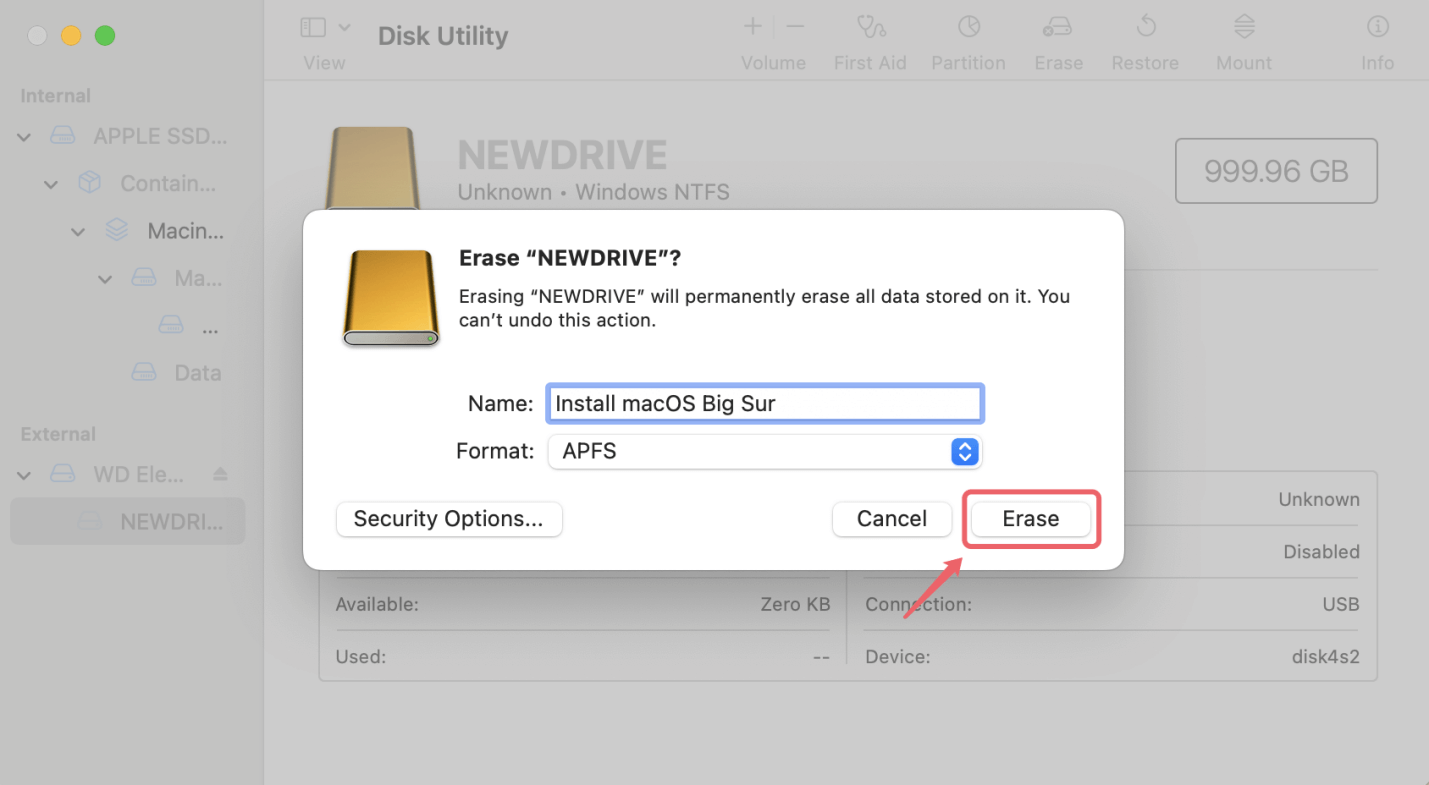
- Open Disk Utility from Utilities via Applications.
- From the list on the left, pick the USB drive.
- At the top of the window, select Erase.
- Select GUID Partition Map as the scheme and APFS or Mac OS Extended (Journaled) as the format.
- Name the drive (e.g., "Install macOS Big Sur") and click Erase.
![clean installing macOS Big Sur]()
3. Create the Bootable Drive Using Terminal
- Open Terminal from Utilities via Applications.
- Type the following command and press Enter (replace "MyVolume" with the name of your USB drive, if different):
sudo /Applications/Install\ macOS\ Big\ Sur.app/Contents/Resources/createinstallmedia --volume /Volumes/MyVolume
(Replace MyVolume with the name of your USB drive)
![clean installing macOS Big Sur]()
- Your administrator password will need to be entered. After typing it, hit Enter.
- After the lengthy process is complete, you will have a bootable macOS Big Sur USB stick that is prepared for installation.
Step 2: Perform the Clean Install of macOS Big Sur
Now that you've created the bootable USB drive, it's time to install macOS Big Sur. Follow these steps carefully:
1. Restart and Boot from USB
- Plug the bootable USB drive into your Mac.
- Hold down the Option (⌥) key while your Mac boots up after restarting.
- Select the USB drive from the boot options and press Enter.
💡 Note: If you are using a Mac with Apple silicon, shut down the Mac, then press and hold Power button to boot it into macOS Recovery mode. Select the USB installer.
2. Erase the Startup Disk
Once the macOS Utilities screen appears, follow these steps:
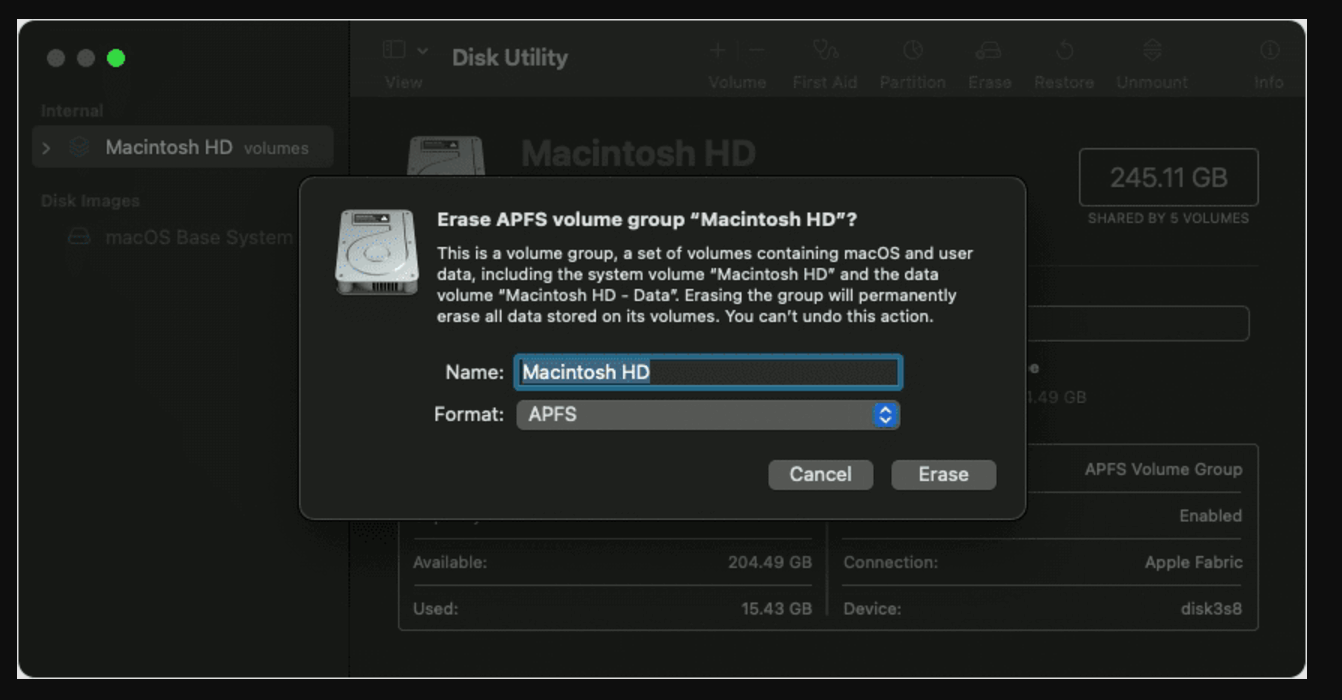
- Select Disk Utility from the options and click Continue.
- In the Disk Utility window, select your Mac's startup disk (usually named "Macintosh HD" or something similar).
- Click the Erase button.
- Choose APFS as the format if you're using a Mac with an SSD, or Mac OS Extended (Journaled) if you're using an HDD.
![clean installing macOS Big Sur]()
- Click Erase to wipe the disk. Warning: Make sure your backup is complete because doing this will remove all of your Mac's data.
- Once the process is complete, exit Disk Utility.
3. Install macOS Big Sur
- Click Continue after choosing Install macOS in the macOS Utilities window.
- To finish the installation, adhere to the on-screen directions. Select your newly erased drive (usually "Macintosh HD") as the destination.
- The installation will begin, and your Mac will restart several times. The process can take between 30 minutes to an hour, depending on your Mac's specifications.
Step 3: Set Up Your New macOS Big Sur System
Once macOS Big Sur has been installed, the system will prompt you to configure it:
- Choose your preferred language.
- Connect to a Wi-Fi network.
- Sign in with Your Apple ID: This will allow you to access iCloud, the App Store, and other Apple services.
- Restore Data: You'll be given the option to restore your files from a Time Machine backup or iCloud. Choose the appropriate method based on your backup.
Once you've completed these steps, you'll be taken to your new desktop, and your Mac will be ready for use.
Step 4: Post-Installation Steps
After the clean installation, there are a few additional steps to ensure your Mac is fully configured and running optimally.
1. Update macOS Big Sur
Even though you just installed macOS Big Sur, it's important to check for any updates. Apple frequently releases patches and improvements after a new macOS version is launched. To check for updates:
- Open System Preferences > Software Update.
- Install any available updates.
2. Reinstall Applications
Once your system is set up, you'll need to reinstall any applications you were using before. You can do this either from the Mac App Store or by downloading installers from the app's official website.
3. Restore Files and Settings
You can restore files from your Time Machine backup, iCloud, or manually by copying over important files from your backup. For Time Machine restores, follow these steps:
- Open Migration Assistant (Applications > Utilities > Migration Assistant).
- Select From a Mac, Time Machine Backup, or Startup Disk.
- Follow the on-screen instructions to restore your files and settings.
4. Customize Your System Preferences
Lastly, go through the System Preferences menu to reconfigure settings, customize the dock, set up privacy options, and tweak any other system settings to your liking.
Troubleshooting
While the clean install process is generally smooth, there can be occasional hiccups. Here are some common problems and their solutions:
- Installer won't boot: Ensure the USB drive is formatted correctly and that you're holding the Option key during boot.
- Installation stuck: Try restarting your Mac and booting into macOS Recovery Mode by pressing Command + R during startup. (for Apple silicon Mac, press and hold Power button)
- Missing files after installation: Double-check your backup and restore any missing files.
💡 Note: If you lose everything after clean install macOS Big Sur and don't have a backup, try Mac data recovery software to help you recover lost data.
Conclusion
This extensive process is an excellent way to improve your Mac's performance and resolve lingering software issues. By complying the procedures described in this article, you can make sure your Mac is completely optimized and operational, as well as that the installation procedure runs smoothly. Just remember to back up your data, verify hardware compatibility, and follow each step carefully for a successful clean install.
Enjoy your fresh, fast, and stable macOS Big Sur installation!

Donemax Disk Clone for Mac
An award-winning disk cloning program to help Mac users clone HDD/SSD/external device. It also can create full bootable clone backup for Macs.
Related Articles
- Jul 19, 2025How to Find and Clear Large Files on Mac?
- Nov 04, 2024How to Create Bootable USB Installer for macOS Sequoia?
- Apr 01, 2025How to Use Seagate Ultra Compact SSD on Mac?
- Aug 12, 2025Fix macOS Tahoe Battery Drain: Complete Troubleshooting Guide
- Aug 05, 2024How to Use 1TB or 2TB SD Card on Mac?
- Mar 17, 20257 Solutions to Fix Seagate Expansion Portable Hard Drive Not Mounting on Mac

Christina
Christina is the senior editor of Donemax software who has worked in the company for 4+ years. She mainly writes the guides and solutions about data erasure, data transferring, data recovery and disk cloning to help users get the most out of their Windows and Mac. She likes to travel, enjoy country music and play games in her spare time.

Gerhard Chou
In order to effectively solve the problems for our customers, every article and troubleshooting solution published on our website has been strictly tested and practiced. Our editors love researching and using computers and testing software, and are willing to help computer users with their problems

