PAGE CONTENT:
Creating a bootable USB installer for macOS Sequoia can be incredibly beneficial for a variety of scenarios, whether you need to upgrade, reinstall, or troubleshoot your Mac. A bootable USB drive provides a convenient way to install macOS on multiple devices or recover your system when facing issues. In this article, we will guide you through the process step by step, ensuring you can create your own bootable installer with ease.
In this modern world, having a trustworthy backup and installation method for your operating system is essential. Whether you're planning to upgrade to macOS Sequoia or need to perform a clean installation, a bootable USB installer serves as a powerful tool. Not only does it allow for quicker installations, but it also enables troubleshooting and recovery when your Mac encounters problems. This guide will cover everything you need, from gathering your materials to using the installer once it's created.
Requirements:
Before diving into the process, let's outline the essential items you'll need:
1. USB Drive
A USB drive is a crucial component for creating your bootable installer. Here are some specifications:
- Capacity: At least 16GB is recommended. Ensure that the drive has enough space for the macOS installer and any additional files you may want to include. Keep in mind that any data on the USB drive will be erased during formatting, so back up any important files before proceeding.
- Speed: A USB 3.0 drive is preferable, as it will speed up the process significantly compared to USB 2.0. USB 3.0 drives offer faster data transfer rates, which can reduce the time it takes to create the bootable installer and during the installation process itself.
2. macOS Sequoia Installer File
You will need the macOS Sequoia installer file, which you can download from the App Store. Here's how:
- Open the App Store on your Mac.
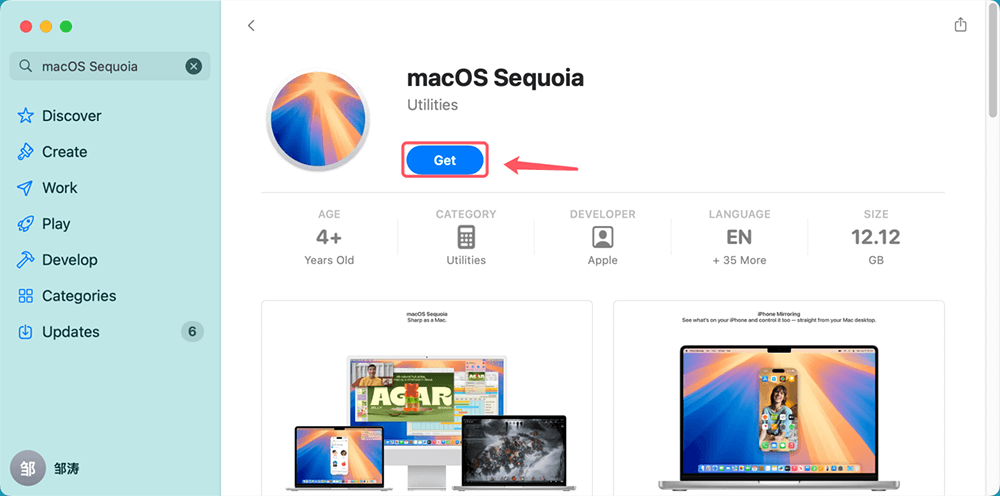
- Search for macOS Sequoia and click on the Get button to download it.
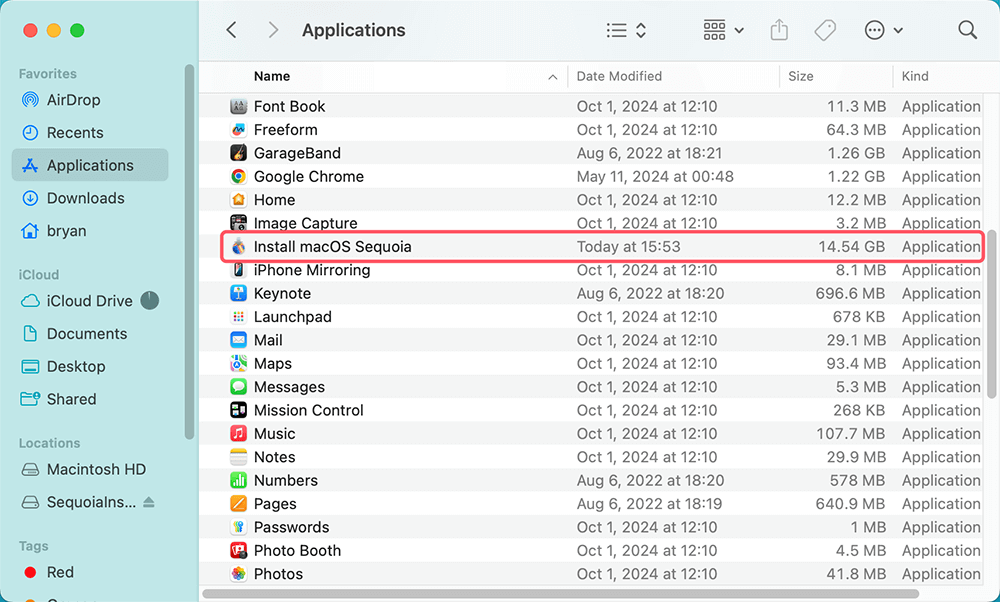
- Once downloaded, the installer will be located in your Applications folder.
Download link: macappstores://apps.apple.com/app/macos-sequoia/id6596773750?mt=12
3. Mac Computer
You'll need a Mac to perform the installation and create the bootable USB. Ensure that you have administrator access to the machine. If you're using a newer Mac with Apple Silicon, the steps remain the same, but you may need to adjust settings for security and boot options.
4. Terminal Application
The Terminal app, included with macOS, is required to execute the command that creates the bootable installer. Don't worry if you’re not familiar with it; the steps will be detailed here.
Step-by-Step Guide to Download macOS Sequoia
Download the macOS Sequoia Installer:
To begin, let's make sure you have the macOS Sequoia installer ready. Follow these steps:
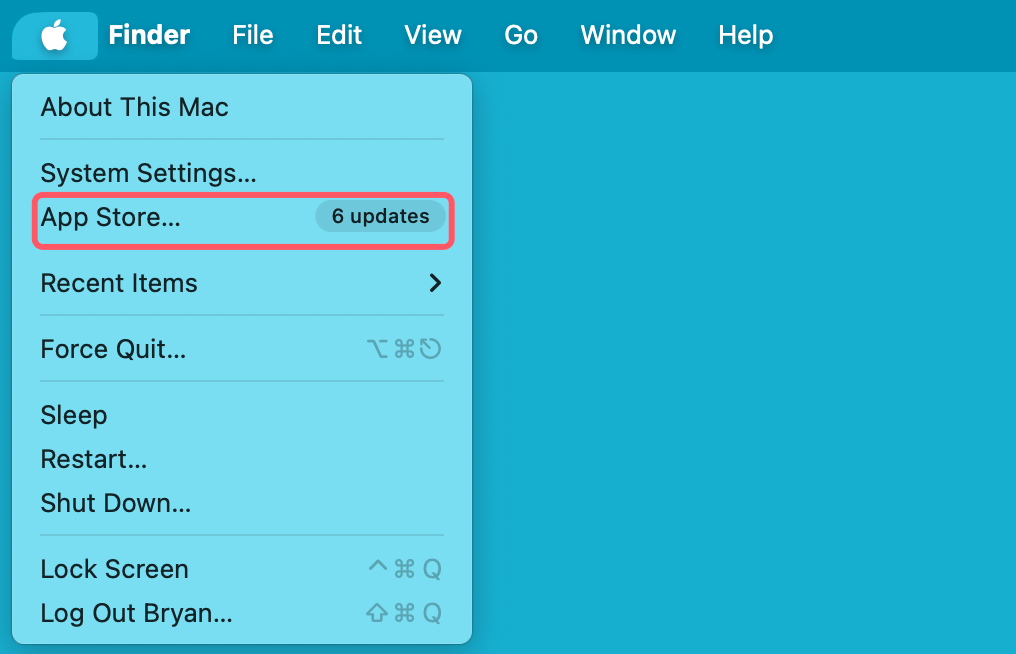
- Open the App Store: To access the App Store, click the Apple logo located in the upper left corner of your screen.
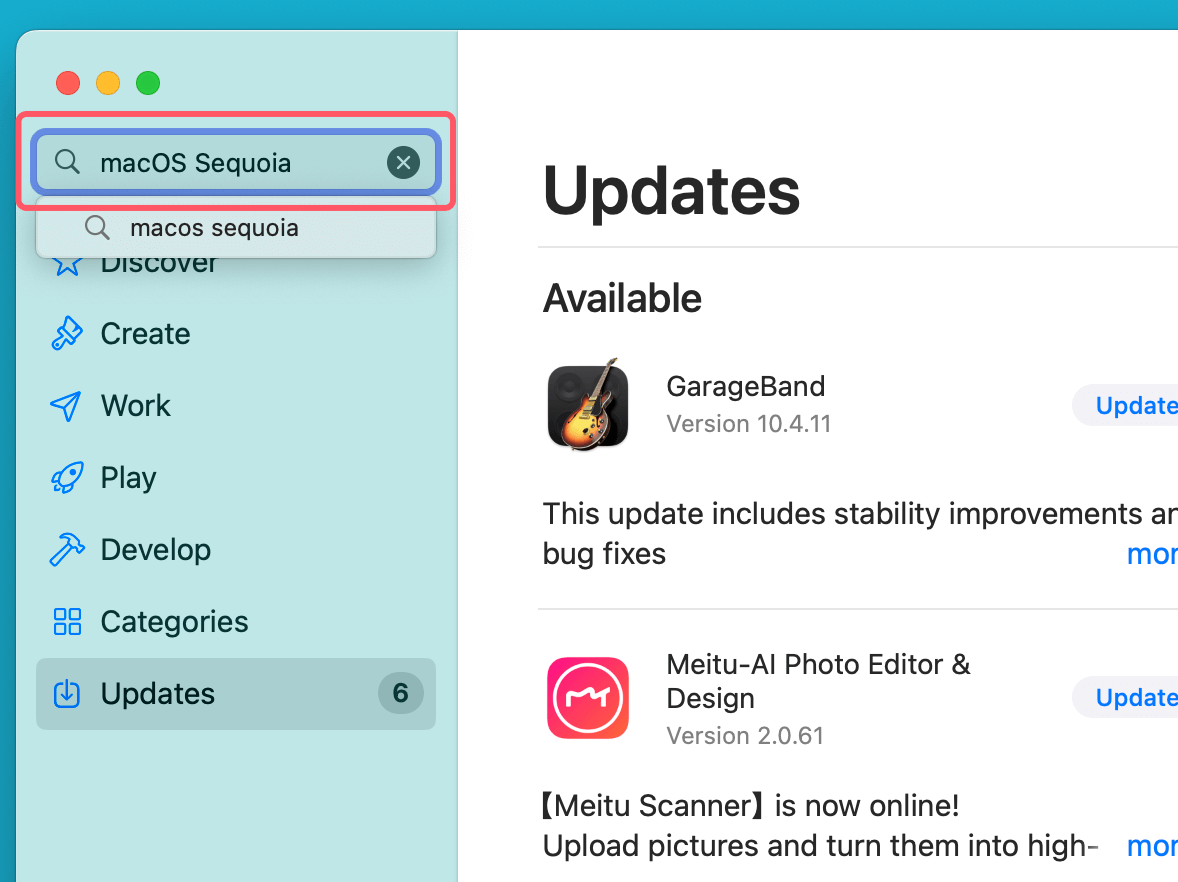
- Search for macOS Sequoia: Type "macOS Sequoia" in the search bar and hit enter.
![Search for macOS Sequoia]()
- Download: Click the Get button. The download will start, and you can track its progress in the Launchpad or Applications folder once complete.
![Download]()
Once the download finishes, the installer will be located in your Applications folder as Install macOS Sequoia.app. It's important to ensure that you're downloading the official version from Apple to avoid potential issues with corrupted files or incomplete installations.
Steps to Create Bootable USB Installer for macOS Sequoia
#1 Prepare the USB Drive
Before creating your bootable installer, you must format the USB drive. This step is crucial to ensure that it can be used for the installation process.
Format the USB Drive:
- Open Disk Utility: Go to Disk Utility from Utilities via Applications. This built-in macOS application allows you to manage your drives, including formatting and partitioning them.
- Select the USB Drive: In the left sidebar, find and select your USB drive. Make sure to choose the correct drive to avoid data loss, as formatting will erase all data on the selected drive.
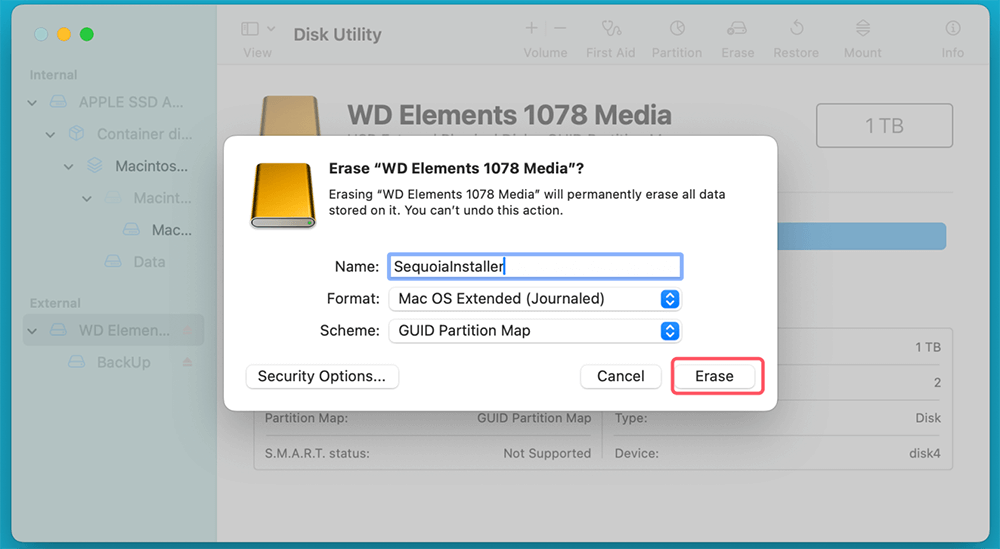
- Erase the USB Drive: Click on the Erase button in the toolbar.
- Name: Give your drive a name (e.g., "SequoiaInstaller").
- Format: Choose APFS or Mac OS Extended (Journaled). The two formats are compatible with macOS installations and ensures that the drive can be read during the boot process.
- Scheme: Set the scheme to GUID Partition Map. This setting is necessary for booting macOS on Intel-based Macs and is the standard for modern macOS installations.
- Erase: Click the Erase button to format the drive. This process will delete all data on the USB drive. Wait for the process to complete, which usually takes just a few seconds.
![Format the USB Drive]()
Once the formatting is complete, you can proceed to the next step.
#2 Create the Bootable Installer Using Terminal
Now that you have your USB drive prepared and the macOS Sequoia installer downloaded, it's time to create the bootable installer.
Open Terminal:
- Open Terminal: Navigate to Applications > Utilities > Terminal. Terminal is a powerful tool that allows you to control your Mac using command-line instructions.
Enter the Createinstallmedia Command:
To create the bootable installer, you'll need to enter a specific command in Terminal. Here's how:
- Type the Command: Copy and paste the following command into Terminal. Make sure to replace "MyVolume" with the name of your USB drive (the name you set during formatting).
sudo /Applications/Install\ macOS\ Sequoia.app/Contents/Resources/createinstallmedia --volume /Volumes/MyVolume
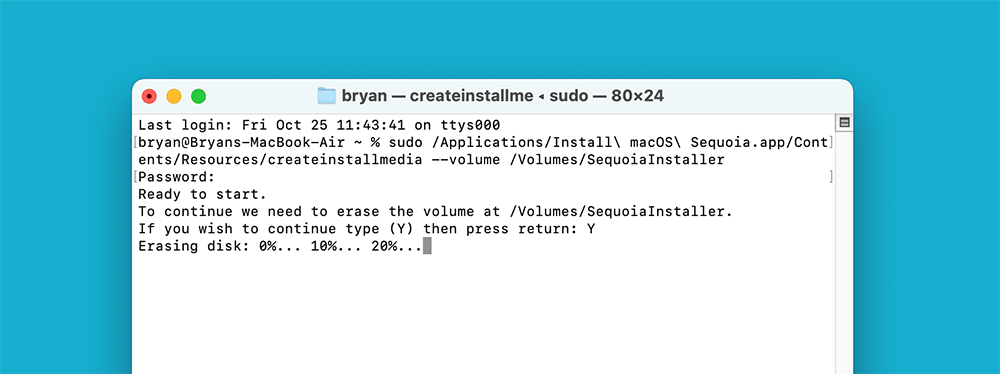
For example: sudo /Applications/Install\ macOS\ Sequoia.app/Contents/Resources/createinstallmedia --volume /Volumes/SequoiaInstaller
Here's a breakdown of the command:
- sudo: This command gives you administrative privileges to execute the next command.
- /Applications/Install\ macOS\ Sequoia.app/Contents/Resources/createinstallmedia: This specifies the path to the createinstallmedia tool within the macOS Sequoia installer.
- --volume /Volumes/MyVolume: This tells the command which volume to use as the bootable installer, so make sure to replace MyVolume with the actual name of your USB drive.
![Type the Command]()
- Run the Command: Press Enter. Your administrator password will need to be entered. There won't be any characters on the screen while you input your password. This is normal; just type it out and hit Enter again. Type Y and hit Enter.
![Run the Command]()
Wait for the Process to Complete:
Once you execute the command, Terminal will begin creating the bootable installer. This process may take some time (around 15-30 minutes), depending on your USB drive's speed. You will see progress indicators in Terminal as it works. You might see messages indicating that the drive is being erased and then the process of copying the installer files to the USB drive.
Completion Notification:
When the process is complete, Terminal will display a message confirming that the process has finished, and your USB drive is now a bootable installer for macOS Sequoia. At this point, you can safely eject your USB drive by typing the following command:
diskutil eject /Volumes/MyVolume
This ensures that all data has been written to the USB drive before physically removing it.
#3 Verify the Bootable USB Installer
Check Your USB Drive:
To ensure that your bootable USB installer was created successfully:
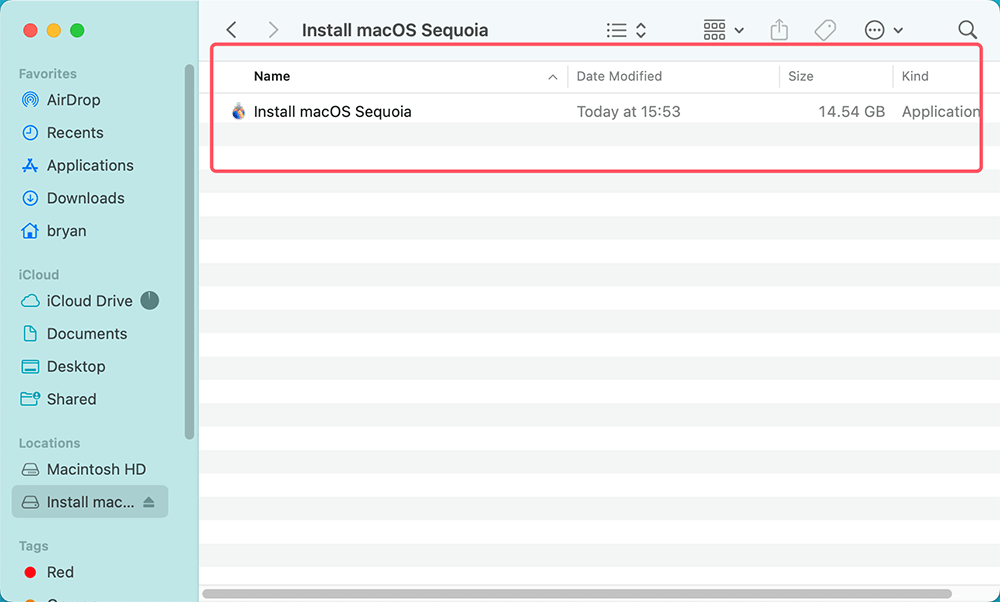
- Open Finder: Go to Finder and locate your USB drive.
- Check Contents: Open the USB drive to see if it contains the macOS Sequoia installer.
![Check Your USB Drive]()
If everything looks good, you're ready to use your bootable installer!
Use the Bootable USB Installer to Install macOS Sequoia
Boot from the USB Drive and Install macOS Sequoia:
Now that you have your bootable USB installer, let's discuss how to use it:
- Insert the USB Drive: To install or troubleshoot the Mac, connect the bootable USB drive to the computer.
- Restart the Mac: Choose Restart after clicking the Apple logo in the upper left corner. If you're installing macOS on a Mac that is currently off, just turn it on with the USB drive already plugged in.
- Access Startup Options: As soon as the Mac begins to restart, hold down the Power button until you see the Loading Startup Options. When the Mac boots into macOS Recovery mode, select the USB installer, click Continue.
![Boot from the USB Drive and Install macOS Sequoia]()
- Install macOS Sequoia: When macOS Sequoia installer opens, follow the onscreen instructions to install macOS Sequoia.
Troubleshooting Common Issues
While creating and using a bootable USB installer is generally straightforward, you may encounter a few issues. Here are some common problems and solutions:
Issue 1: "Command not found" in Terminal
If you see a "command not found" error when entering the createinstallmedia command, double-check the path to the installer and ensure that the macOS Sequoia installer is located in the Applications folder. If it’s not, move it there and try again.
Issue 2: USB Drive Not Appearing in Startup Manager
If your USB drive doesn't appear when Mac boots into macOS Recovery mode, ensure that:
- The USB drive is correctly formatted (Mac OS Extended (Journaled) and GUID Partition Map).
- You followed the steps to create the bootable installer accurately.
- The USB drive is functioning properly; try a different USB port or a different Mac if necessary.
Note: To prevent data loss, you'd better make a full backup before or after you install macOS Sequoia on your Mac. Mac disk cloning software - such as Donemax Disk Clone for Mac can help you securely and quickly create a full bootable clone backup for macOS Sequoia, Sonoma, Ventura, etc.
Conclusion
Creating a bootable USB installer for macOS Sequoia is a straightforward process that can save you time and hassle when upgrading or troubleshooting your Mac. With this guide, you now have the knowledge to prepare your USB drive, create the installer using Terminal, and use it for installations or repairs. Whether you're setting up a new Mac or reinstalling macOS on an existing one, having a bootable installer at your disposal will make the process much smoother. Happy installing!
Related Articles
- Nov 19, 2024How to Perform Clean Install of macOS Sonoma?
- Jul 08, 2025Fix Your Startup Disk Is Almost Full on Mac – Complete Guide
- Jul 27, 2025How to Back Up Mac Data to iCloud?
- Aug 04, 2025Fix macOS Tahoe Issues: Complete Troubleshooting Guide
- Aug 12, 2025How to Turn Off Mac Notifications on Mac: Complete Guide for All macOS Versions
- Oct 17, 2024Fix Command + Shift + 4 Not Working for Screenshot on Mac: A Comprehensive Guide

Maria
Maria is one of the senior writers & editors of Donemax who lives and works in Sydney, Australia. She loves PC, Mac and Internet Technology. She has 6 years of writing articles about data recovery on PC/Mac, disk cloning solution, data eraser and computer OS optimization, etc. She is also interested in testing various software and digital products.

Gerhard Chou
In order to effectively solve the problems for our customers, every article and troubleshooting solution published on our website has been strictly tested and practiced. Our editors love researching and using computers and testing software, and are willing to help computer users with their problems

