PAGE CONTENT:
Creating a bootable USB installer for macOS Big Sur can be a lifesaver in many scenarios - whether you're performing a clean installation, recovering from a system failure, or upgrading your Mac. The full process of creating a bootable USB drive that you may use to install or reinstall macOS Big Sur on any compatible Mac will be covered in this guide.
Making a Bootable USB Installer: Overview
Apple's macOS Big Sur (version 11) introduced several notable changes, including a new user interface, improved performance, and a slew of security and privacy enhancements. While upgrading to a newer version of macOS is relatively straightforward, there may be times when you need to perform a clean installation or reinstall the OS. In these cases, having a bootable USB installer can be an invaluable tool.
A bootable USB installer allows you to install macOS without relying on an internet connection or the macOS Recovery feature. It also offers an efficient way to install macOS on multiple Macs or troubleshoot issues with macOS without worrying about time-consuming downloads.
This post will walk you through the process of making a macOS Big Sur bootable USB installer step-by-step. Whether you're preparing for a clean install or troubleshooting a system problem, this guide will give you the tools you need to get started.
Requirements for Creating Bootable USB Installer for macOS Big Sur
Before you begin, there are a few things you'll need to ensure that you can successfully create a bootable USB installer for macOS Big Sur.
Hardware Requirements:
- A USB Drive: You'll need a USB drive with at least 16GB of free space. It's essential that the USB drive has enough space to accommodate the macOS Big Sur installer, which is about 12GB in size.
- A Mac Computer: This process requires access to a Mac running macOS, as the macOS Big Sur installer must be downloaded from the Mac App Store.
Software Requirements:
- macOS Big Sur Installer: You need to download the macOS Big Sur installer from the Mac App Store. If you're upgrading from an older version of macOS, it is crucial to download the correct version of macOS Big Sur.
Backup Your Data:
Before you begin the process of creating a bootable USB installer for macOS Big Sur, it's essential to backup your data. While the process of creating the bootable installer itself is relatively straightforward and safe, the installation of macOS Big Sur on your system can lead to the erasure of your hard drive, especially if you're performing a clean installation or formatting your drive as part of the process. This means that any data stored on your Mac - documents, photos, music, applications, and system settings - can be lost if it’s not backed up first. Once you've got everything ready, let's dive into the steps of creating the bootable USB installer.
Step-by-step Guide: Create a Bootable USB Installer for macOS Big Sur
Step 1: Download macOS Big Sur from the Mac App Store
The first step is to download the macOS Big Sur installer. You can do this easily from the Mac App Store.
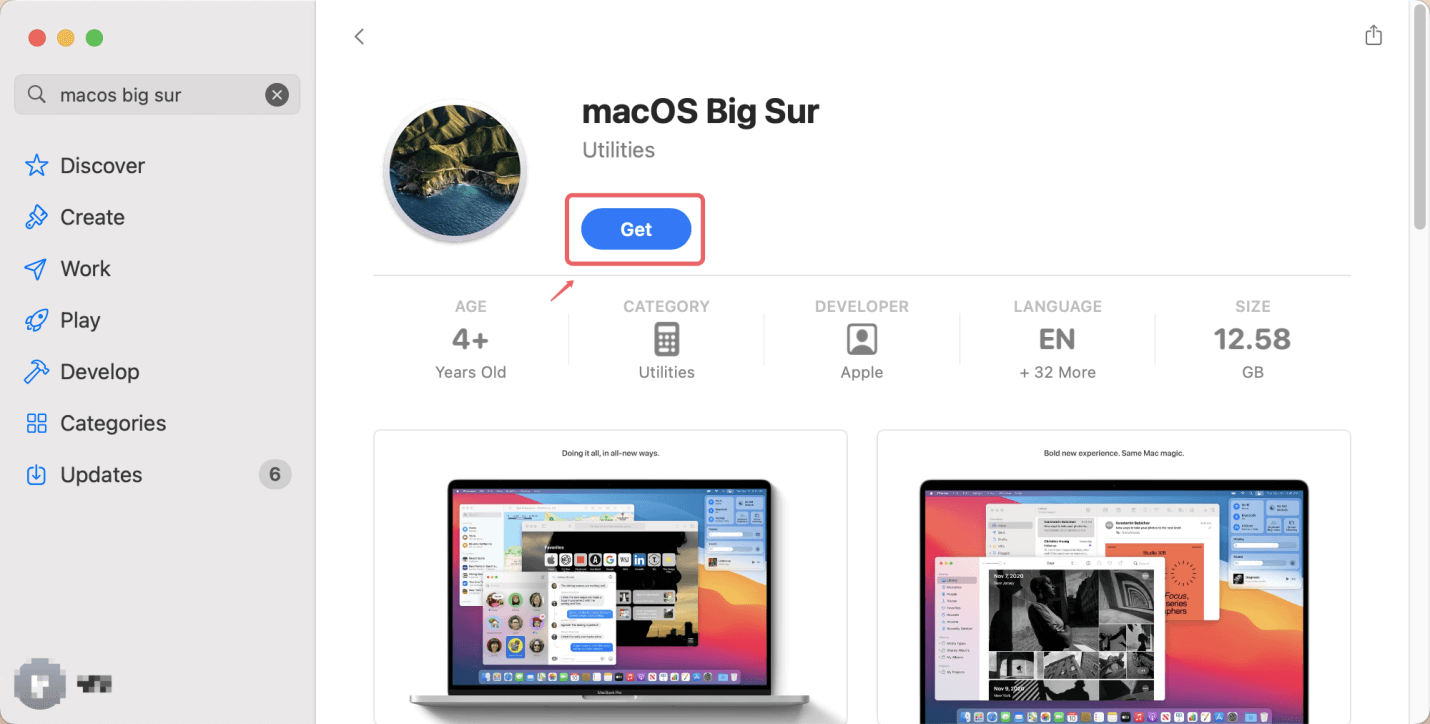
- Open the Mac App Store on your Mac.
- In the search bar, type "macOS Big Sur" and press Enter. You also can use this link to download macOS Big Sur: macappstores://apps.apple.com/app/macos-big-sur/id1526878132?mt=12
![Creating a bootable USB installer for macOS Big Sur]()
- Click on the "Get" button (or "Download" if you've already downloaded it in the past).
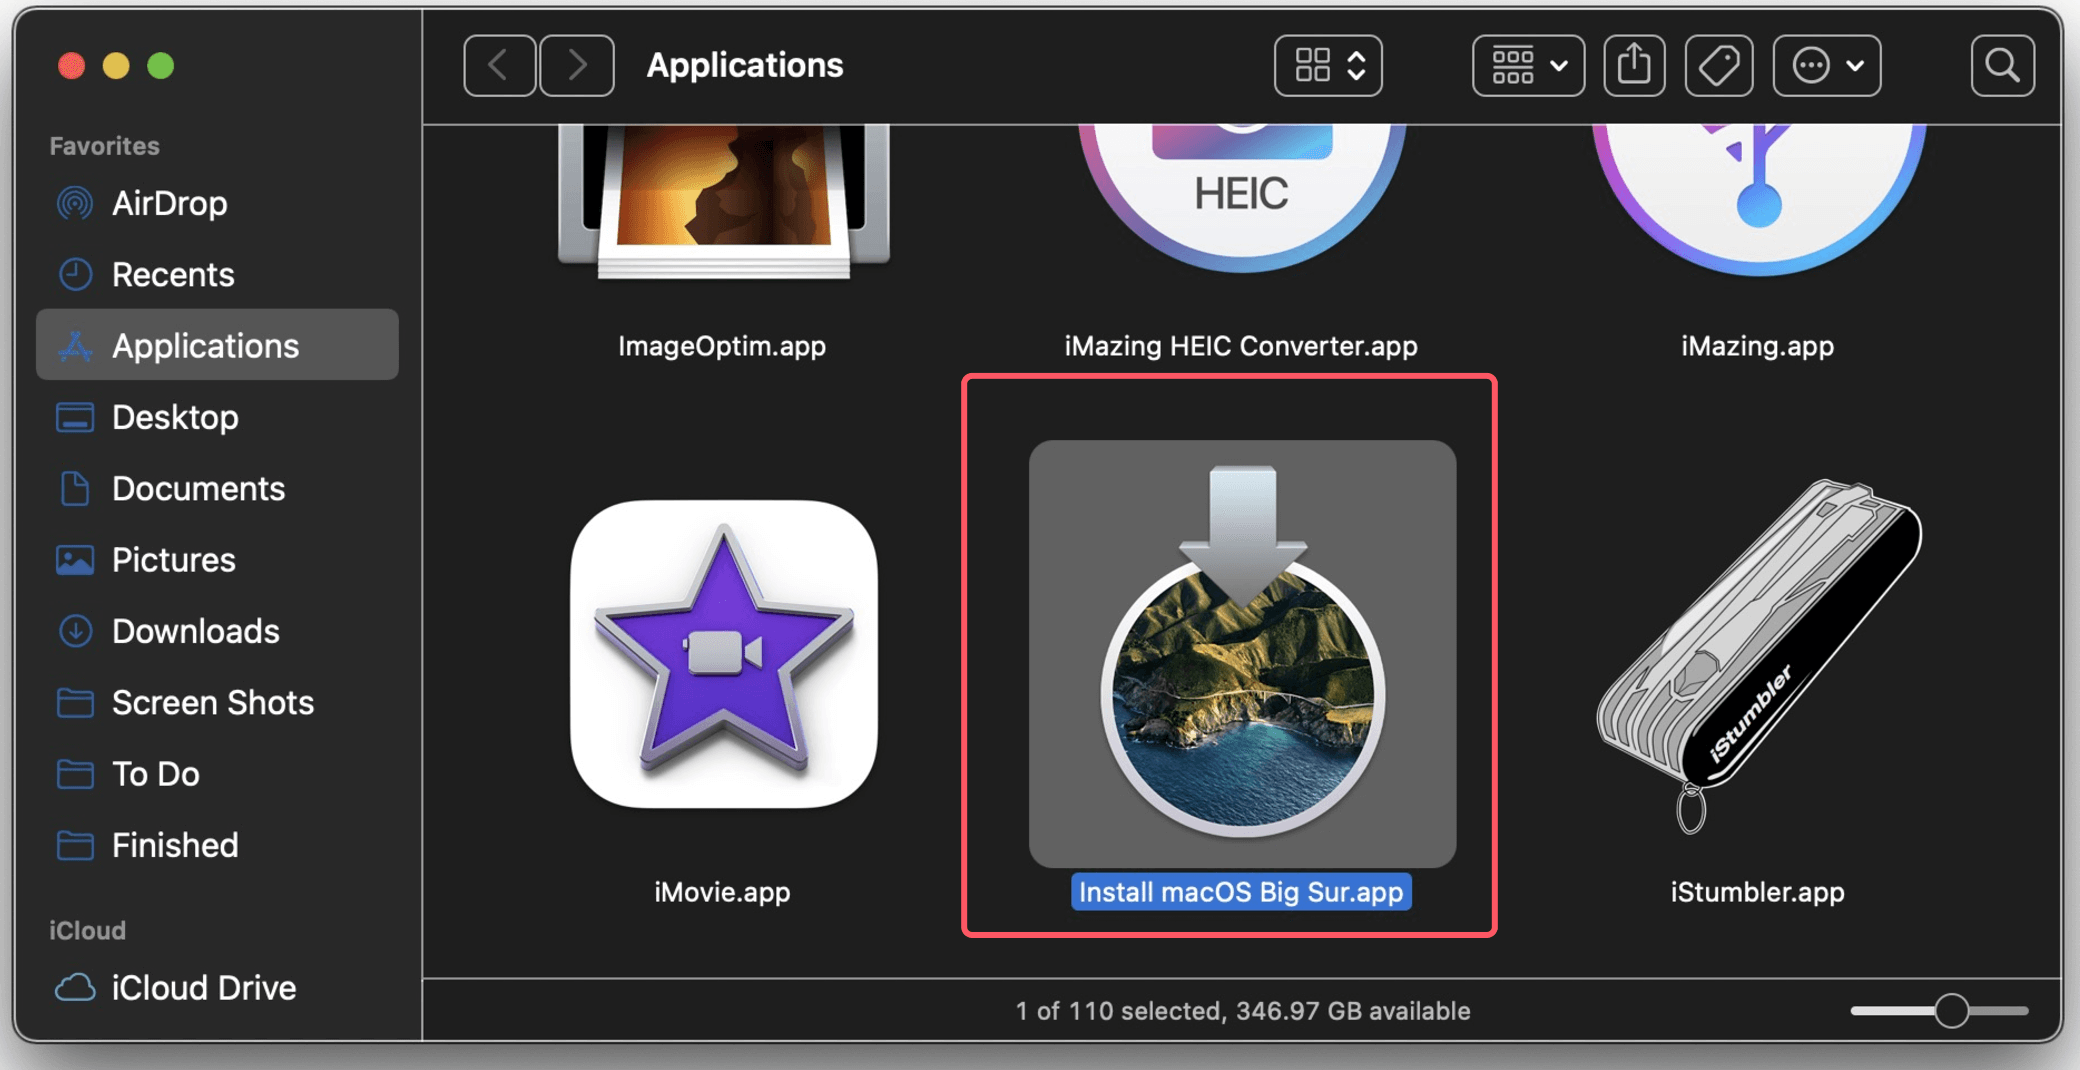
- The installer will start downloading and will appear in the Applications folder once the process is complete.
![Creating a bootable USB installer for macOS Big Sur]()
Once the download is complete, you'll see the macOS Big Sur installer (usually named Install macOS Big Sur.app) in your Applications folder. Leave this file in place, as it will be used in the next step to create your bootable USB installer.
Step 2: Prepare the USB Drive
Now that you have macOS Big Sur downloaded, you need to prepare your USB drive for use. This involves formatting the USB drive so that it can be used for the installation process.
Format the USB Drive:
- Insert the USB drive into one of your Mac's USB ports.
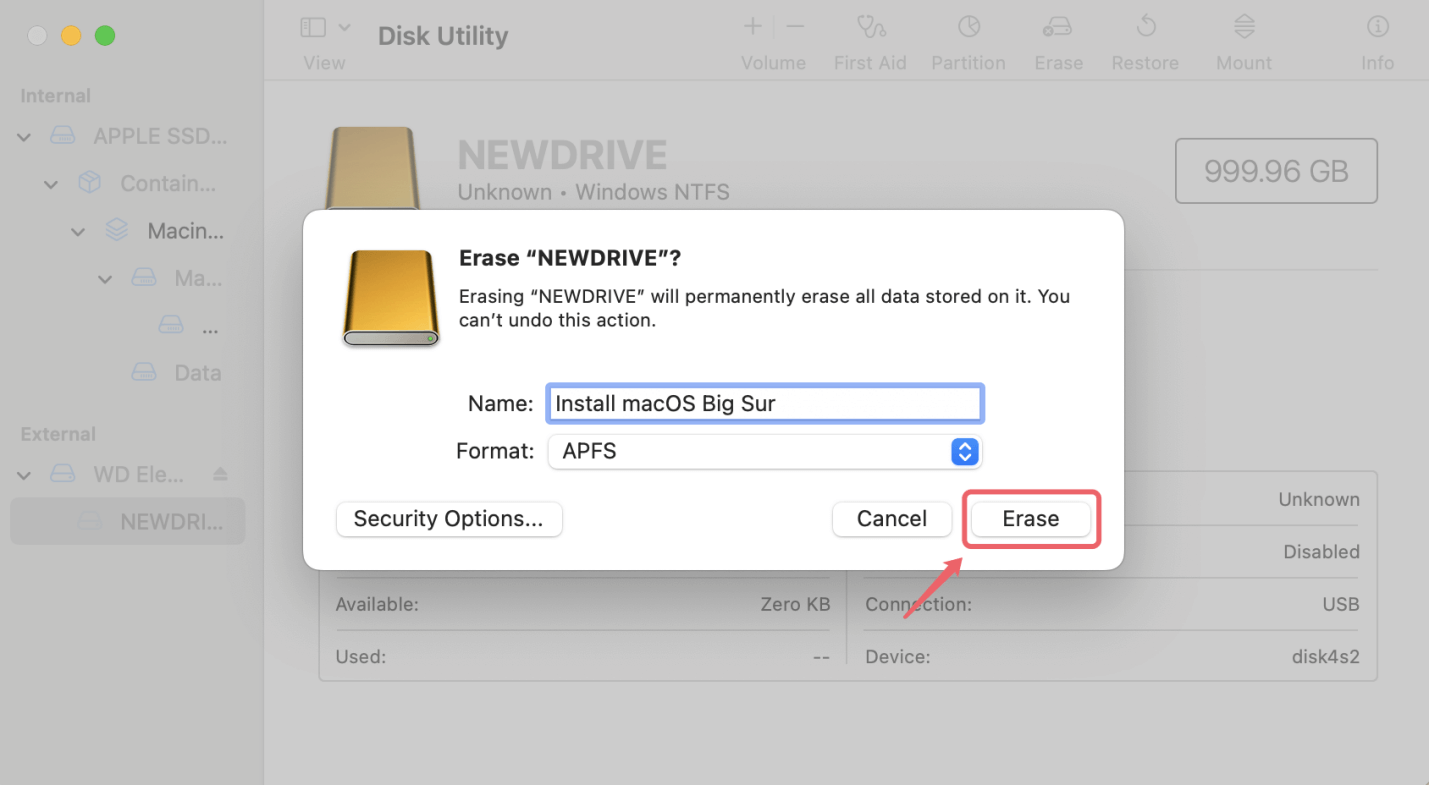
- Open Disk Utility (located in Applications > Utilities).
- In Disk Utility, select your USB drive from the list on the left. Be sure to choose the correct drive to avoid formatting the wrong one.
- Click the "Erase" button at the top of the Disk Utility window.
- In the dialog box that appears:
- Set the Format to Mac OS Extended (Journaled) if you're using an older Mac (pre-APFS systems).
- For newer Macs with APFS support, APFS is recommended.
- Set the Scheme to GUID Partition Map.
- You can give the drive any name, but for this guide, we'll use "Install macOS Big Sur."
![Creating a bootable USB installer for macOS Big Sur]()
- Click the Erase button to format the drive. This process may take a few minutes.
Now your USB drive is ready to be used for the installation.
Step 3: Create the Bootable USB Installer Using Terminal
With the USB drive prepared and the macOS Big Sur installer downloaded, it’s time to use the Terminal to create the bootable installer. The Terminal is a command-line tool that allows you to interact with macOS on a deeper level.
- Open Terminal (located in Applications > Utilities).
- To create the bootable USB installer, type the following command into Terminal:
sudo /Applications/Install\ macOS\ Big\ Sur.app/Contents/Resources/createinstallmedia --volume /Volumes/Install macOS Big Sur
Let’s break down the components of this command:
- sudo: This command grants administrative privileges to execute the following task.
- /Applications/Install\ macOS\ Big\ Sur.app: This is the path to the macOS Big Sur installer that was downloaded earlier.
- createinstallmedia: This is the utility used to create a bootable media from the installer.
- --volume /Volumes/Install macOS Big Sur: This tells the utility where to install the bootable macOS. "Install macOS Big Sur" is the name of the USB drive you just formatted. If your drive has a different name, substitute "Install macOS Big Sur" with your drive's name.
![Creating a bootable USB installer for macOS Big Sur]()
- Press Enter, and you will be asked for your administrator password. Type it and press Enter again. Note that when typing your password in Terminal, it won’t show any characters or asterisks - this is normal.
- The process will begin, and you'll see several lines of text in Terminal as the system creates the bootable installer. This can take 15 to 30 minutes depending on the speed of your Mac and USB drive.
- Once the process is complete, Terminal will notify you that the installer has been created successfully, and the USB drive will now be bootable.
Step 4: Boot from the USB Installer
Now that you have a bootable USB installer, it's time to use it to install macOS Big Sur on your Mac. Here's how you can boot from the USB drive.
1. Restart the Mac:
- Shut down your Mac completely and turn it back on.
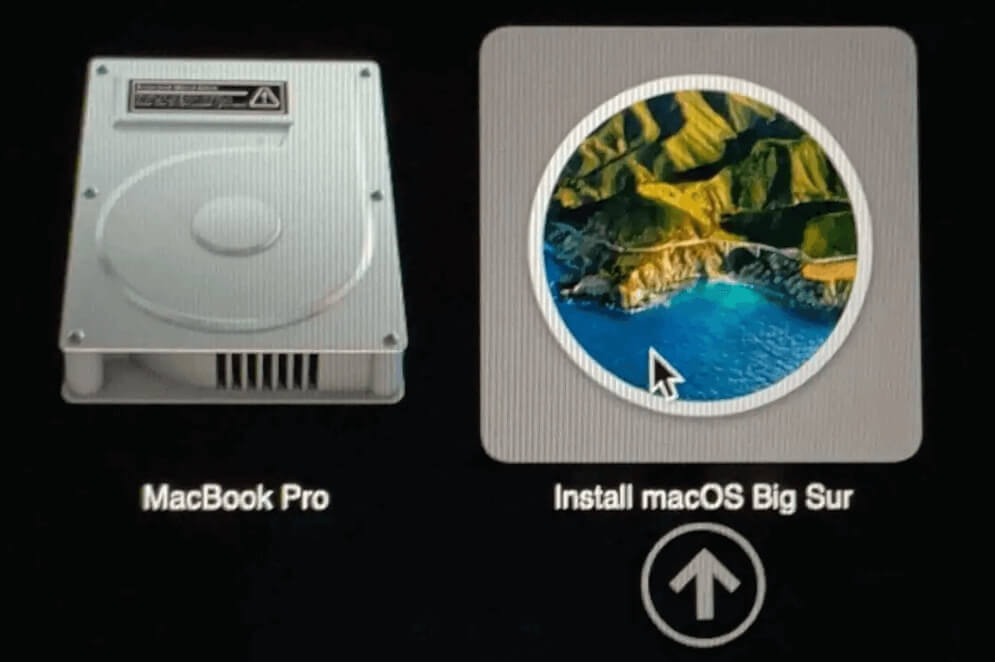
- As your Mac starts up, immediately press and hold the Option (⌥) key on your keyboard. This will bring up the Startup Manager, which allows you to choose which drive you want to boot from. (If you are using a Mac with Apple silicon, press and hold power button until it boots into macOS Recovery mode.)
2. Select the USB Drive:
- After holding the Option key, you'll see a list of bootable drives. Use the arrow keys to select the USB drive, which should be labeled something like "Install macOS Big Sur".
![Creating a bootable USB installer for macOS Big Sur]()
- Press Enter to boot from the USB drive.
3. Install macOS Big Sur:
- Once the Mac boots from the USB installer, you will see the macOS Utilities screen.
- From here, you can choose to Install macOS, Disk Utility (for partitioning), or Restore from Time Machine Backup.
- To install macOS Big Sur, select Install macOS, and follow the on-screen prompts.
- Choose the drive you want to install macOS on (usually your Mac's internal hard drive).
- The installation process will begin, and your Mac will restart several times during the process.
4. Complete the Setup:
- After installation is complete, your Mac will boot into the macOS Big Sur setup assistant. Follow the steps to complete the setup, such as signing into iCloud, setting up Siri, and choosing your preferred settings.
Troubleshooting
While the process is relatively simple, you may encounter a few issues. Here are some common problems and how to solve them:
1. USB Drive Not Showing Up in Startup Manager
If your USB drive doesn't show up in the Startup Manager, double-check that the drive is properly formatted and the bootable installer was created correctly.
- Ensure that you are pressing the Option key at the right time (immediately after turning on the Mac).
- For Apple silicon Mac, press and hold Power button to start into macOS Recovery mode.
2. Installation Fails or Doesn't Start
- If the installation process fails or doesn't start, try creating the bootable installer again, ensuring that the installer was fully downloaded and that the USB drive is not corrupt.
- Also, make sure the macOS version you're trying to install is compatible with your Mac model.
Conclusion
Creating a bootable USB installer for macOS Big Sur is a simple yet powerful tool that can save you time and effort during system installations or troubleshooting. By following the steps outlined in this guide, you can easily prepare a USB drive to install macOS Big Sur on any compatible Mac.
Remember to back up your data before performing any installation, and be sure to use the appropriate tools and commands to avoid errors. With your bootable USB installer in hand, you'll be ready for any macOS installation or recovery task that comes your way.

Donemax Disk Clone for Mac
An award-winning disk cloning program to help Windows users and Mac users clone HDD/SSD/external device. It also can create full bootable clone backup for Windows PCs and Macs.
Related Articles
- Jan 02, 2025Download and Create macOS Sequoia ISO File for VMware/VirtualBox and Other Virtual Machines
- Aug 12, 2025Fix macOS Tahoe Battery Drain: Complete Troubleshooting Guide
- Aug 05, 2024How to Use 1TB or 2TB SD Card on Mac?
- Apr 18, 2025How to Fix MacBook Screen Flickering?
- Mar 21, 2025How to Use a Western Digital External Hard Drive on a Mac?
- Jan 12, 2025How to Bypass Trash When Deleting Files on Mac?

Christina
Christina is the senior editor of Donemax software who has worked in the company for 4+ years. She mainly writes the guides and solutions about data erasure, data transferring, data recovery and disk cloning to help users get the most out of their Windows and Mac. She likes to travel, enjoy country music and play games in her spare time.

Gerhard Chou
In order to effectively solve the problems for our customers, every article and troubleshooting solution published on our website has been strictly tested and practiced. Our editors love researching and using computers and testing software, and are willing to help computer users with their problems

