Before we start: If you want to permanently delete a file on Mac, you can use file shredder - Donemax Data Eraser for Mac. It can help you securely shred files/folders on Mac, force delete stubborn files, ensure they are lost forever, can't be recovered by any method.
PAGE CONTENT:
Managing files on a Mac is usually straightforward, but sometimes, you encounter files that refuse to be deleted. Whether it's a corrupted file, a permission issue, or a background process keeping it active, force deleting files becomes a necessary skill. In this guide, we'll cover everything you need to know about why files get stuck, how to delete them, and the best practices to avoid issues in the future.
Deleting files is one of the most basic tasks on any computer, but occasionally, a stubborn file won't cooperate. Messages like "The file is in use," or "You don’t have permission to delete this file," can be frustrating. In such cases, force deleting the file is often the only option.
Before you proceed, keep in mind that force-deleting files is a powerful action. Once a file is gone, it's almost impossible to recover without specialized software. Double-check that you're deleting the correct file and ensure it's not a critical system file.
Why Files Get Stuck & Can't Be Deleted from Your Mac?
Stuck files usually result from common issues that can be easily identified. Below are some of the most frequent causes:
- Files in Use: The file is currently open in an application or running in the background.
- Permission Issues: You may lack the necessary rights to modify or delete the file, especially in shared environments.
- Corruption: Files that are corrupted or partially downloaded often resist deletion.
- Background Processes: Files associated with system or third-party processes running in the background.
Understanding the root cause will help you decide which method to use to delete the file effectively.
Basic Methods to Delete Files on Mac
Before resorting to force deletion, try these basic methods to remove the file:
Method 1. Drag to Trash and Empty Trash
- Select the file or folder.
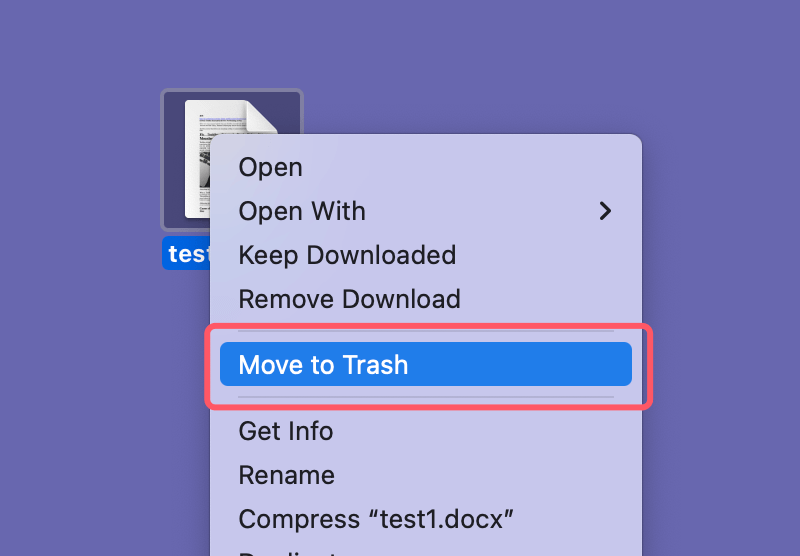
- Drag it to the Trash in your Dock or right-click and choose "Move to Trash."
![Force deleting files on Mac]()
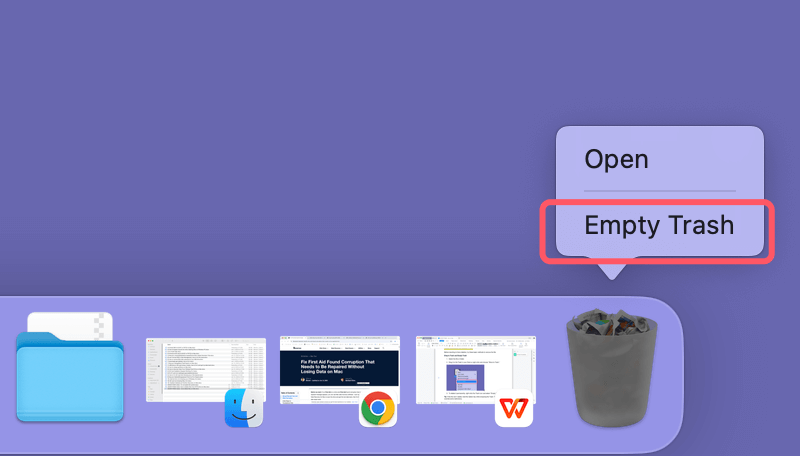
- To delete it permanently, right-click the Trash icon and select "Empty Trash."
![Force deleting files on Mac]()
💡 Tip: If the file won't delete, hold the Option key while emptying the Trash. This can override some restrictions.
Method 2. Use Keyboard Shortcuts
- Highlight the file.
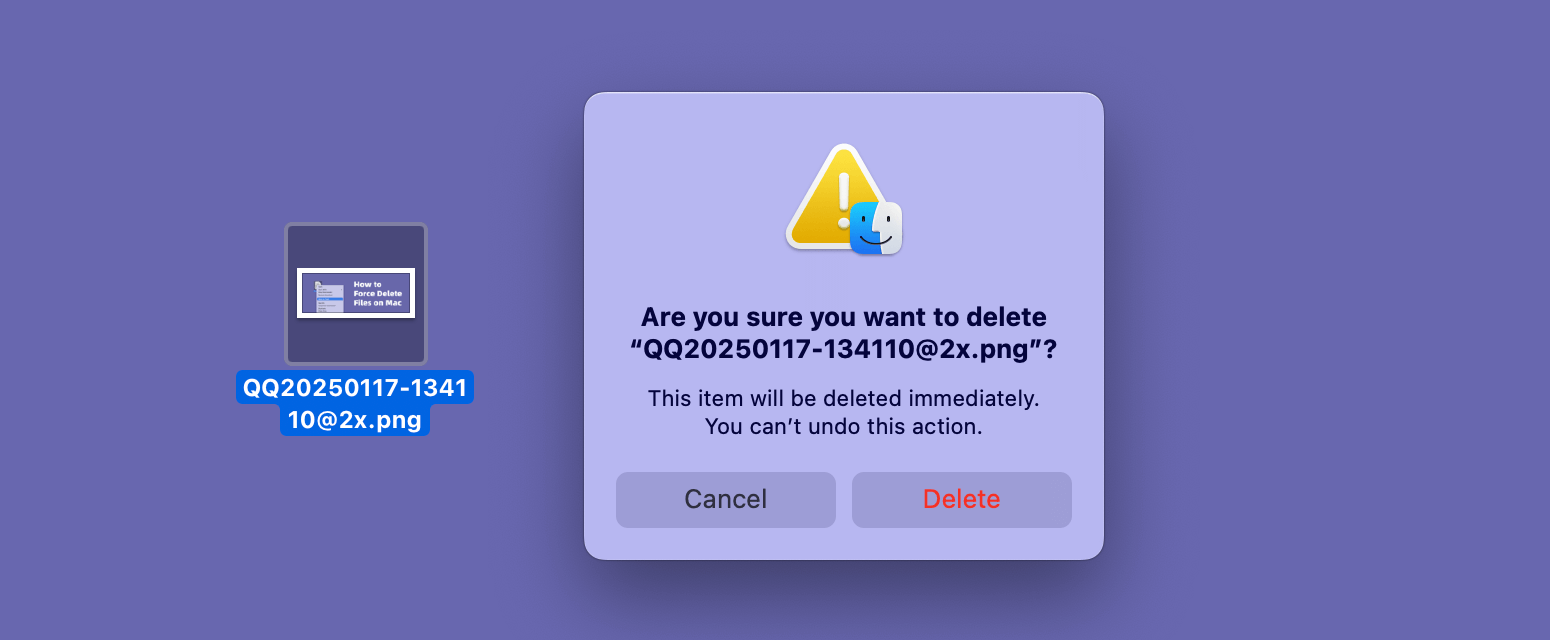
- Press Command + Delete to move it to the Trash or press Command + Option + Delete to delete it without sending it to the Trash.
![Force deleting files on Mac]()
- Empty the Trash as outlined above.
Check for Open Apps If you Can't Delete the Files:
Sometimes, background applications may be using the file. Follow these steps:
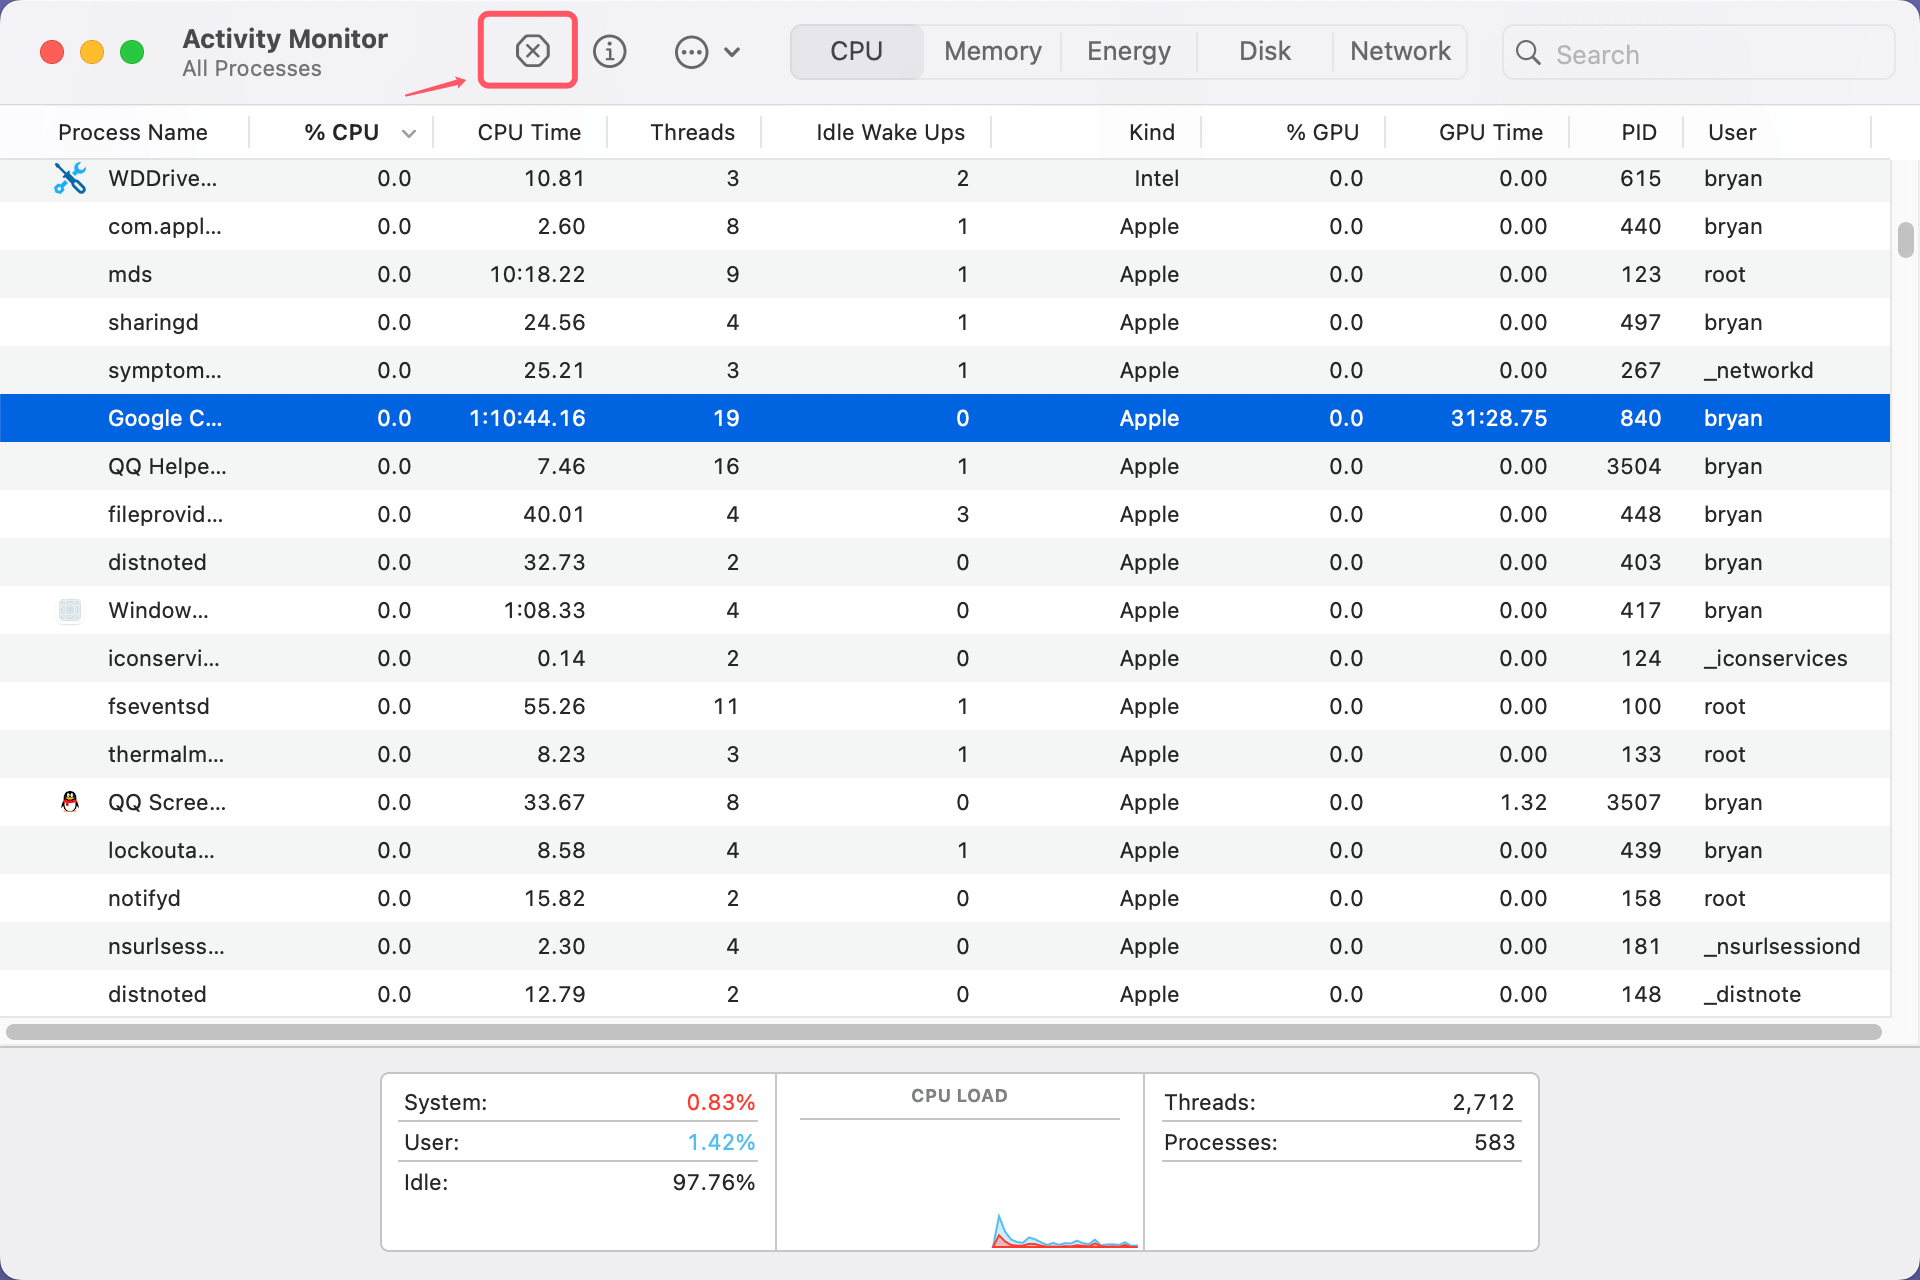
- Open Activity Monitor (Command + Space > search "Activity Monitor").
- Look for any processes that might be using the file.
- Select the process and click the "X" icon to force quit it.
![Force deleting files on Mac]()
- Retry deleting the file.
Force Deleting Files on Mac
When standard methods don't work, force deletion becomes necessary. Here are the main techniques to force delete files on a Mac.
Method 1. Use Finder Options
Sometimes, holding the Option key while performing deletion tasks in Finder can override restrictions:
- Drag the file to the Trash.
- Right-click the Trash icon while holding the Option key.
- Click "Empty Trash." This forces the deletion of locked files.
Method 2. Use Terminal
Terminal allows you to control your Mac by typing text-based commands. It's not for the faint of heart, but once you get the hang of it, Terminal is a fast and efficient way to delete stubborn files.
1. Accessing Terminal:
- Open Spotlight (Command + Space) and type Terminal.
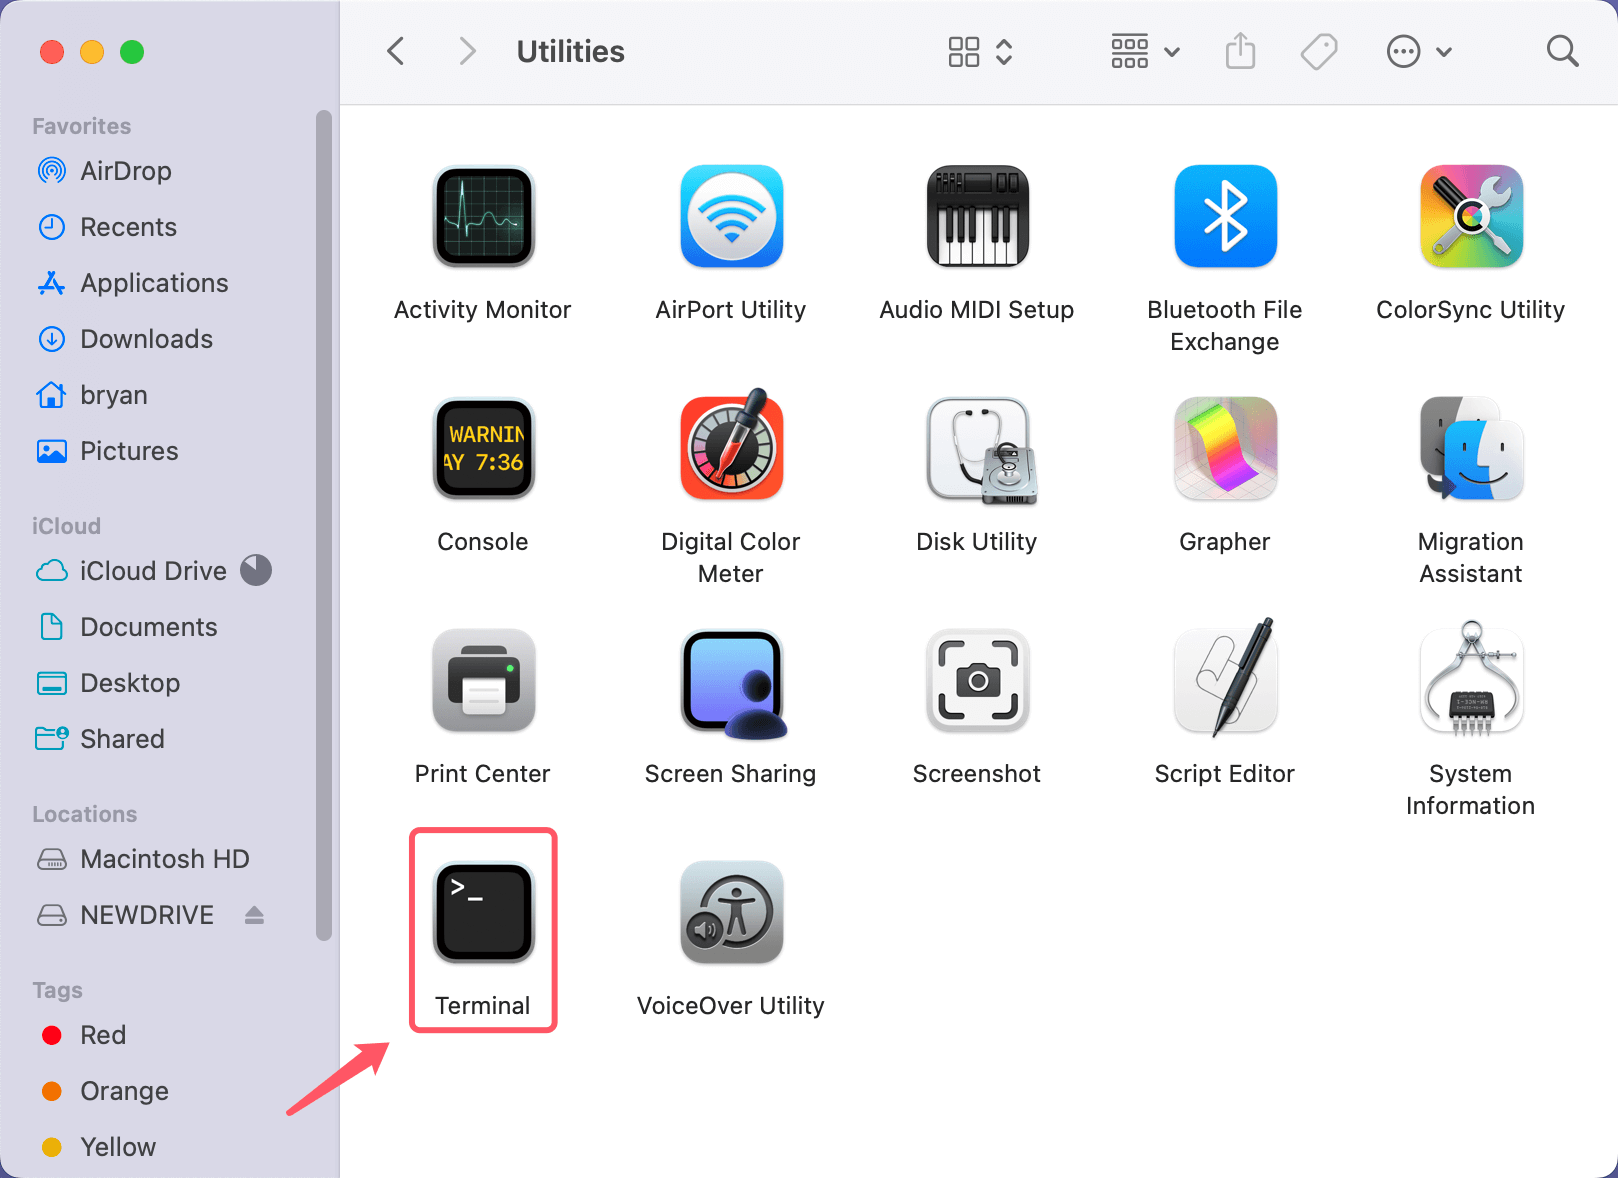
- Alternatively, you can find it in Applications > Utilities > Terminal.
![Force deleting files on Mac]()
Once the Terminal window is open, you're ready to start deleting files.
Terminal Commands for Force Deletion
There are a few commands that will help you force delete files using Terminal. Below is an explanation of each command and its associated options.
2. Navigating to the File's Directory:
To delete a file via Terminal, you first need to navigate to the folder containing the file. Use the cd (change directory) command to navigate to the folder where the file is located.
For example, if your file is in the "Documents" folder, type:
cd ~/Documents

If the file is inside a subfolder, continue the path by adding the folder name. For example:
cd ~/Documents/FolderName

You can verify your current directory by typing pwd (print working directory).
3. Deleting a File:
The rm (remove) command is used to delete files. The -f flag forces the deletion of files, ignoring warnings. Here's how to delete a file:
rm -f filename
- Replace filename with the actual name of the file, including its file extension (e.g., example.txt).
- The -f option tells Terminal to "force" the deletion without asking for confirmation.
Example: To delete a file called tt1.docx, you would type:
rm -f tt1.docx

4. Deleting a Folder:
To delete a folder (and all the files inside it), you use the rm command with the -r flag, which stands for recursive. The command deletes the folder and all files within it.
rm -rf foldername
- -r ensures that the command will delete all the contents within the folder, not just the folder itself.
- -f forces the deletion and prevents confirmation prompts.
Example: To delete a folder named Documents/test and all files within it:
rm -rf test

⚠️ Warning: Be extremely cautious when using rm -rf as it will delete everything inside the folder permanently. There is no easy way to recover files deleted this way unless you use a recovery tool.
5. Wildcards:
Wildcards allow you to target multiple files at once. For example, the * wildcard will select all files of a particular type or with a similar name.
- To delete all .log files in the current directory:
rm -f *.log
- To delete all files in the directory:
rm -f *
This will delete all files in the directory, so use it with caution.
6. Dealing with Special Characters in File Names:
Sometimes, files have spaces or special characters in their names that can make it tricky to delete them using Terminal. For example, a file named My File.txt needs to be enclosed in quotes:
rm -f "My File.txt"
Alternatively, you can escape special characters by using the backslash (\). For example:
rm -f My\ File.txt
7. Using sudo for Administrative Privileges:
If you're trying to delete a file that belongs to another user or is protected by macOS’s system-level permissions, you may need to run the rm command with elevated privileges using sudo.
For example:
sudo rm -f /path/to/file
- You'll be prompted to enter your administrator password.
- Use sudo with caution - once you delete something with sudo, it's gone for good unless you have a backup.
Precautions When Using Terminal
While Terminal is a powerful tool, it’s also dangerous if used incorrectly. Here are some precautions:
1. Double-Check the File Path:
- Before using rm -rf, ensure that the file or folder path is correct. A small typo could lead to the deletion of important files.
- Use the ls command to list the contents of the folder before deleting:
ls
This will show all files in the current directory, so you can confirm you're deleting the correct ones.
2. No Confirmation:
- Unlike Finder, Terminal won't ask for confirmation before deleting a file with rm -f. Once you hit enter, the file is gone. Always verify that you're targeting the correct file.
3. Backup Important Files:
- Before using any Terminal commands to delete files, back up your data. Time Machine or cloud storage solutions like iCloud or Google Drive are great for ensuring you don't lose important information.
4. Avoid System Files:
- Do not use rm -rf on system files or folders, especially in root directories (such as /System, /bin, /etc, /usr). Deleting these files can render your Mac unusable.
Common Problems and Solutions
Even with Terminal, there can be some challenges when trying to delete files. Below are common problems and their solutions.
1. File Is Locked:
Some files may be locked, preventing deletion. If the file is locked, you can unlock it using the chflags command: chflags nouchg filename or right click the file, choose Get Info, uncheck Locked.
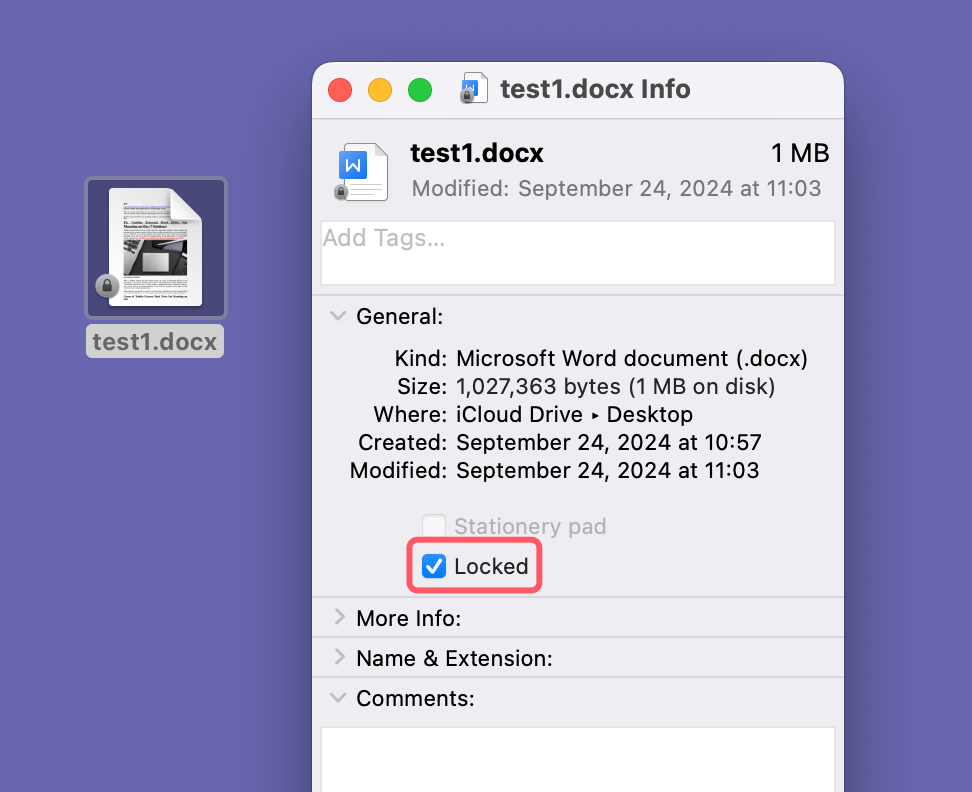
After unlocking the file, try using rm again to delete it.
2. Permission Denied:
If you get a "Permission Denied" error, it means your user account doesn't have permission to delete the file. You can change file permissions using the chmod command: sudo chmod 777 filename or right-click the file, choose Get Info. Under Sharing & Permissions, change the permission from Read only to Read & Write.
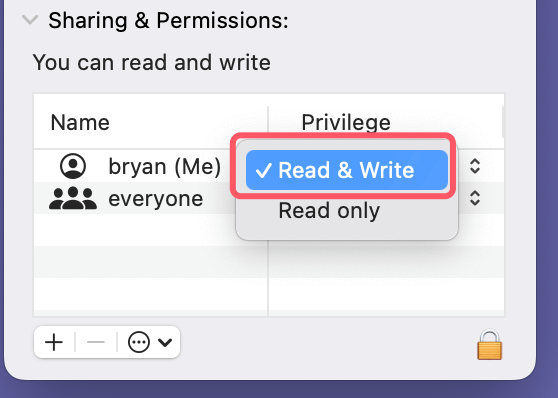
After changing the permissions, you should be able to delete the file.
3. File Is in Use by Another Process:
If the file is in use by an application or background process, you won’t be able to delete it until you close the app or stop the process.
Use Activity Monitor to find and force quit the app that's using the file.

Dealing with Stubborn Files
If even force-deletion methods fail, additional troubleshooting techniques might help:
● Safe Mode Method
Booting into Safe Mode disables most background processes and can help remove stuck files:
- Turn off your Mac.
- Boot into Safe Mode:
- For Intel-based Mac: Press and hold the Shift key as soon as you restart.
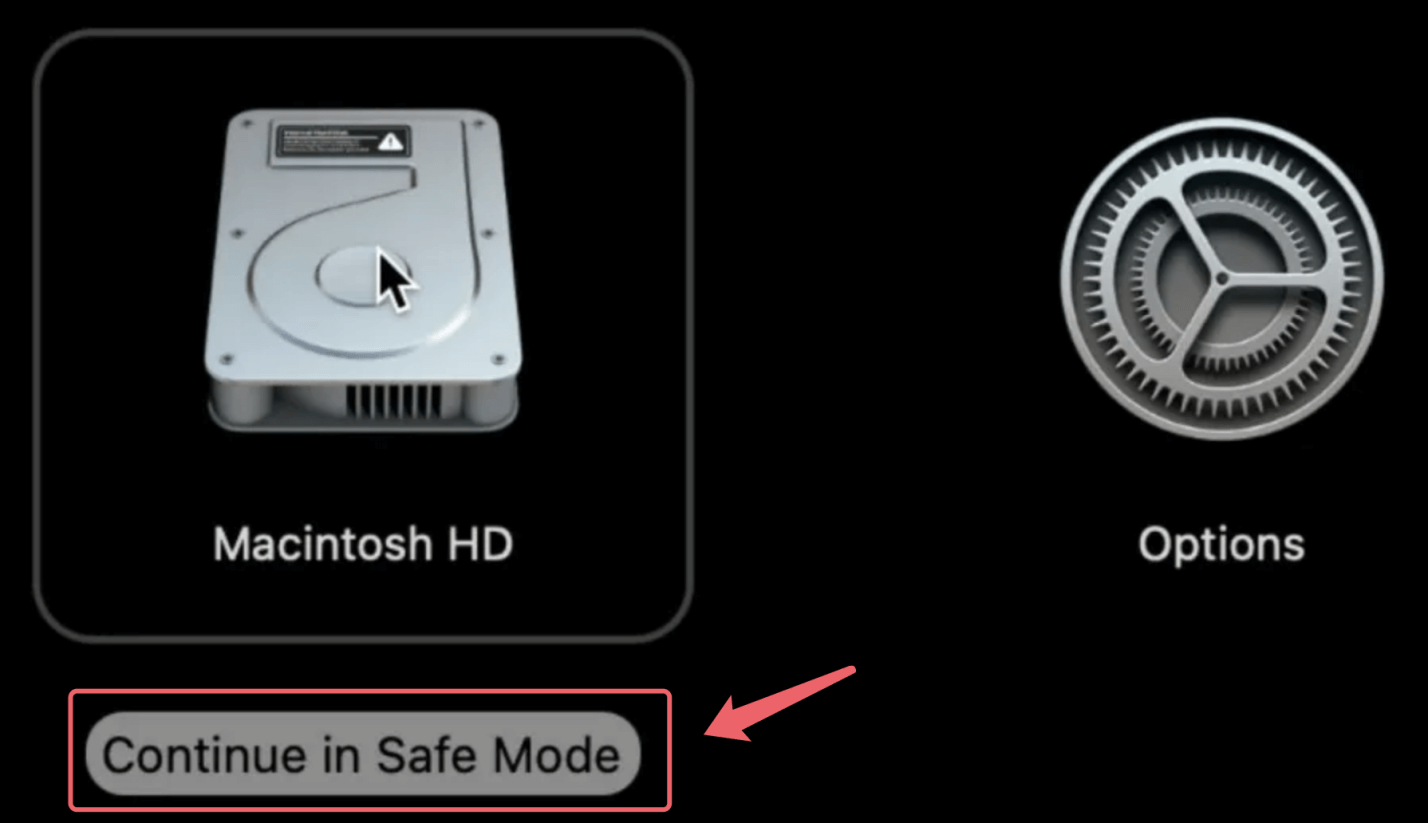
- For Apple silicon Mac: Press and hold Power button, until you see Loading startup options. Then select the startup disk, press and hold Shift key, click Continue in Safe Mode.
![Force deleting files on Mac]()
- Log in to Safe Mode and try deleting the file.
● Use Disk Utility
Disk errors can prevent file deletion. Use the "First Aid" feature in Disk Utility to resolve them:
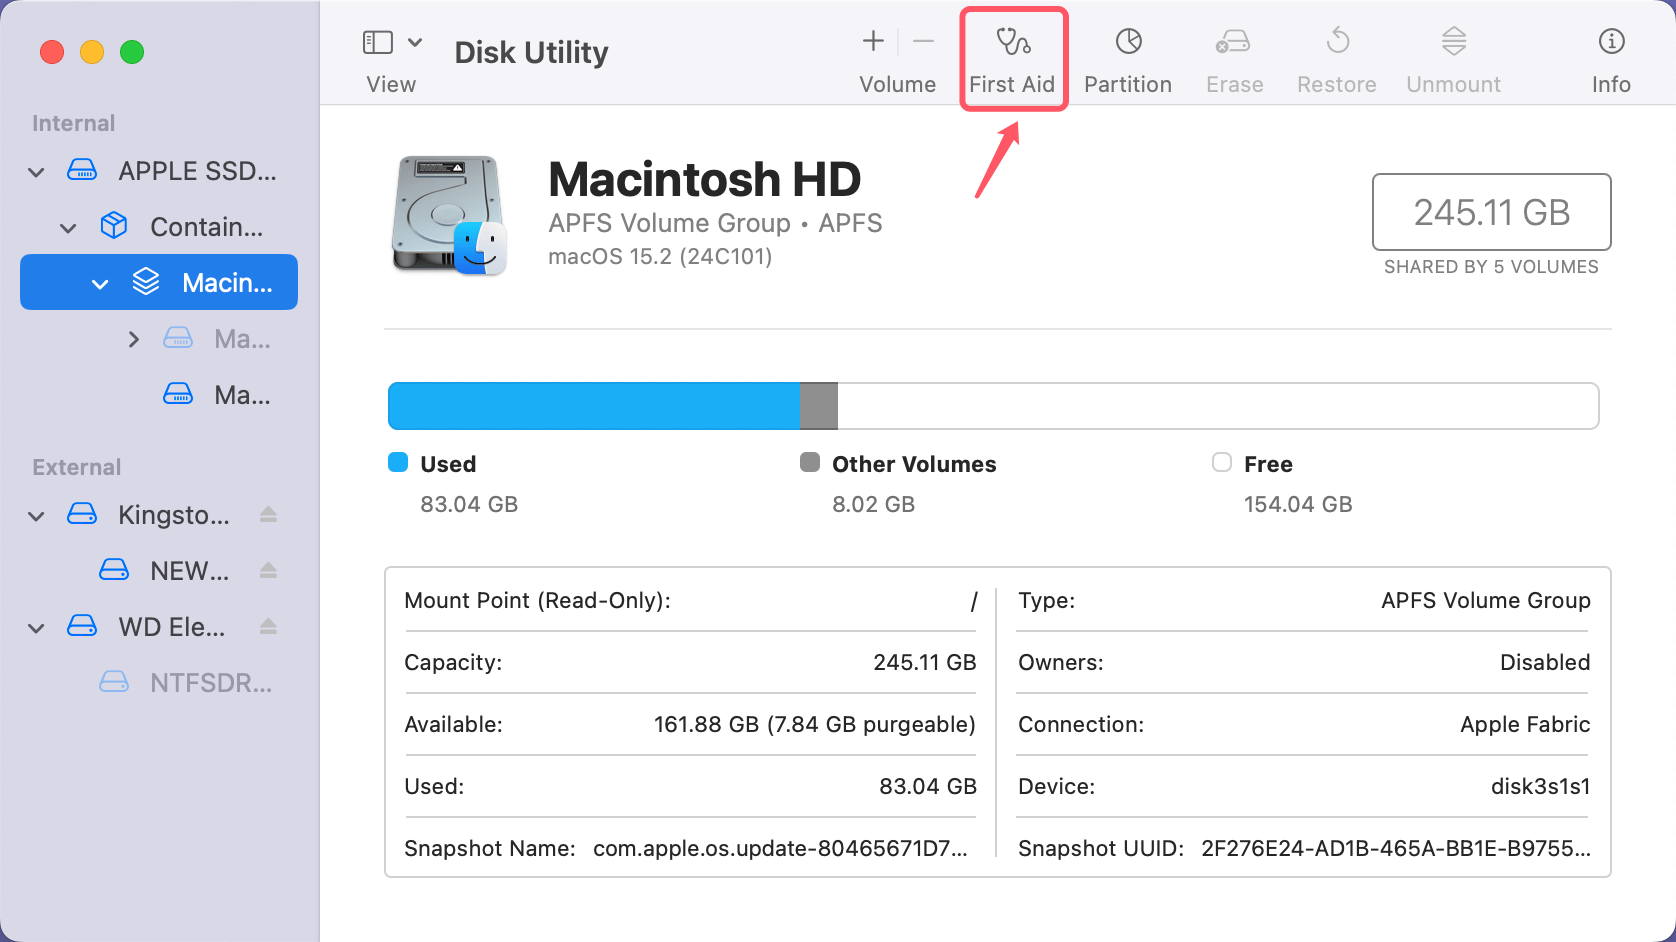
- Open Disk Utility (search for it in Spotlight).
- Select your disk and click "First Aid."
![Force deleting files on Mac]()
- Once repairs are complete, retry deleting the file.
● Adjust File Permissions
Incorrect permissions may block deletion. Fix them using these steps:
- Choose "Get Info" with a right-click on the file.
- Go to the "Sharing & Permissions" area by scrolling.
- To make changes, click the lock symbol and, if requested, enter your password.
- Set your user account to "Read & Write."
- Try deleting the file.
Alternatively, use Terminal to change permissions:
chmod 777 filename
This grants full permissions to the file.
💡 Note: If you want to force delete a file from a NTFS formatted drive or local volume, you can install an NTFS driver on your Mac, then use it to allow your Mac to read-write NTFS drive. Then you can easily delete any file from a NTFS-formatted drive.
🔗 Also read: how to delete files/folders from NTFS drive on Mac.
Prevention Tips
To avoid dealing with stuck files in the future, follow these preventive measures:
- Clean Regularly: Use tools like Donemax Mac Cleaner to clean up junk data.
- Uninstall Apps Properly: Use uninstallers instead of dragging app files to the Trash, which can leave behind residual files.
- Keep macOS Updated: Bug fixes and improvements in macOS updates can resolve system issues that cause file deletion problems.
Warnings and Best Practices
Force deletion is a powerful tool, but it comes with risks. Here are some guidelines to ensure safe usage:
- Avoid Deleting System Files: macOS relies on certain files for smooth operation. Deleting them can cause instability or prevent your system from booting.
- Double-Check Before Deleting: Always verify the file's name and location before executing a force-delete command.
- Back Up Before Making Changes: Use Time Machine or another backup solution to protect your data.
How to Securely and Permanently Force-Delete a File on Mac?
The files which are emptied from trash bin or deleted by Command+Option+Delete or Terminal commands are not lost for good. They can be easily recovered by Mac data recovery software.
If you want to permanently delete a file on Mac, just try Mac data erasure software - such as Donemax Data Eraser for Mac.
Step 1. Download and install Donemax Data Eraser for Mac. It is a 100% safe and easy-to-use Mac data erasure program.
Step 2. Open Donemax Data Eraser for Mac, select Erase Files mode. Then drag the target file or folder to the erasure area or click Add button to add the file and folder.

Step 3. Click on Erase Now button to permanently erase it.

Once the process gets finished, the file or folder is lost for good, cannot be recovered by any method.
Conclusion
Force deleting files on Mac is an essential skill when dealing with stubborn or problematic files. Whether you use Finder, Terminal, or third-party apps, each method has its strengths and should be used appropriately. Remember, prevention is the best approach, so keep your Mac clean and well-maintained to avoid future issues.
If you want to permanently delete a file on Mac, just try Mac data erasure software - such as Donemax Data Eraser for Mac.


Donemax Data Eraser for Mac
100% safe and powerful Mac data erasure program. It offers certified data erasure standards including U.S. Army AR380-19, DoD 5220.22-M ECE to help in securely and permanently erase data from Mac HDD/SSD and external storage device, making data recovery be impossible.
Related Articles
- Mar 21, 2025How to Use a Western Digital External Hard Drive on a Mac?
- Nov 04, 2024How to Create Bootable USB Installer for macOS Sequoia?
- Dec 13, 20248 Solutions to Fix WD Elements Not Showing Up on Mac
- Oct 18, 2024Check Free Disk Space on Mac: A Comprehensive Guide
- Dec 06, 2024Why Can't I Select an External Hard Drive for Time Machine Backup Disk?
- Dec 16, 2024XProtectRemediatorSheepSwap: What Is It and How to Fix It on Mac?

Charles
Charles, who lives in Sydney, Australia, is an editor & writer of Donemax Team. He is good at writing articles related with Apple Mac computers, Windows operating systems, data recovery, data erasure, disk clone and data backup, etc. He loves reading and playing tennis in his spare time and is interested in testing new digital devices such as mobile phones, Macs, HDDs, SSDs, digital cameras, etc.

Gerhard Chou
In order to effectively solve the problems for our customers, every article and troubleshooting solution published on our website has been strictly tested and practiced. Our editors love researching and using computers and testing software, and are willing to help computer users with their problems
