Before we start: Sometimes, you cannot select an external drive as Time Machine backup disk because of issues. The guide outlines the fixes for the issues and make Time Machine backup working again. Alternatively, you can choose Donemax Disk Clone for Mac to clone and back up your Mac.
PAGE CONTENT:
Backups are crucial for data protection, especially for Mac users who rely on Time Machine to back up important files and ensure their systems stay safe. Time Machine allows seamless backups, automatically saving versions of files and system data at regular intervals. To use Time Machine, an external hard drive is often required as a backup disk, but what happens when external hard drive can't be used as Time Machine backup disk?
This issue is common for macOS users and can stem from various causes. Fortunately, there are ways to troubleshoot and resolve the problem. In this article, we'll walk through the potential reasons why your external hard drive may not be selectable for Time Machine. Also the guide provides step-by-step solutions to fix the issue.
Understanding Time Machine and Its Backup Requirements
Before delving into the issue, it's important to understand how Time Machine works and what requirements. Your external hard drive must meet for it to be usable for backups.
Time Machine Overview:
Time Machine is Apple's built-in backup software designed to automatically back up your Mac. It works by creating incremental backups of your system data, applications, settings, and files. Over time, these backups form a history of your data, allowing you to restore your Mac to a previous state if needed.
Backup Requirements: For Time Machine to work effectively, there are a few requirements that need to be met:
- External Drive Connection: The external hard drive should be connected via USB, Thunderbolt, or Wi-Fi (for network drives).
- Free Space: Your external hard drive must have at least the same amount of free space as the total amount of data on your Mac, or more. A larger drive is always better for incremental backups.
- Format Compatibility: The drive must be formatted in a way that Time Machine can recognize. The two most common formats are HFS+ (Mac OS Extended Journaled) and APFS (Apple File System). Other formats, like NTFS or exFAT, are not compatible with Time Machine without third-party software.
Fixes for Issues Preventing Selection of Time Machine Disk
If these basic conditions are not met, Time Machine won't allow you to select the external hard drive as a backup disk. Let's now look at the most common reasons why your external hard drive might not be selectable.
Case 1. Incompatible Drive Format
One of the most common reasons why Time Machine can't recognize an external hard drive is because the drive is formatted in a way that is not compatible with macOS. External drives can come pre-formatted in various file systems, including NTFS (which is common for Windows users) or ExFAT, which is intended for cross-platform use.
Time Machine Format Requirements:
- HFS+: Mac OS Extended (Journaled) is the traditional file format for macOS and is widely compatible with Time Machine.
- APFS: Apple File System, which is designed for SSDs and newer macOS versions (macOS 10.13 or later), is the preferred format for Time Machine on newer systems.
If the external drive is formatted as NTFS or ExFAT, Time Machine will not recognize it as a valid backup destination. To resolve this, you will need to reformat the external drive to HFS+ or APFS using Disk Utility. Here's how:
Reformatting the Drive:
- Open Disk Utility (Applications > Utilities > Disk Utility).
- Select the external hard drive from the sidebar.
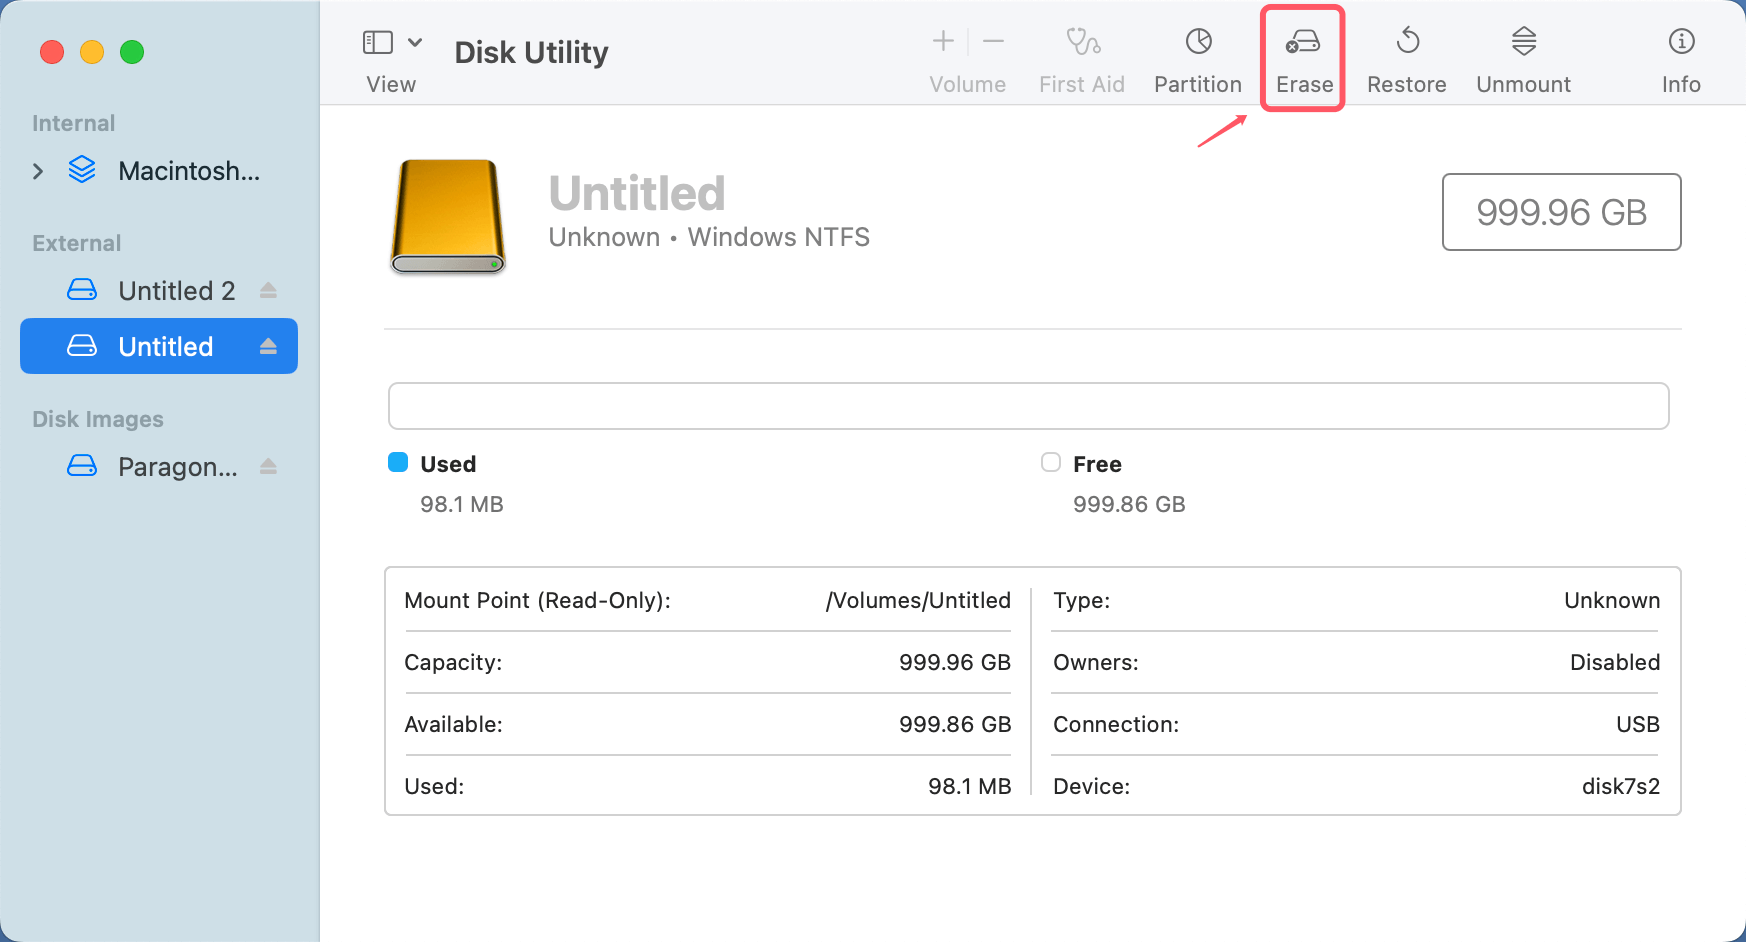
- Click Erase at the top of the window.
![Can't Select an External Hard Drive for Time Machine Backup Disk]()
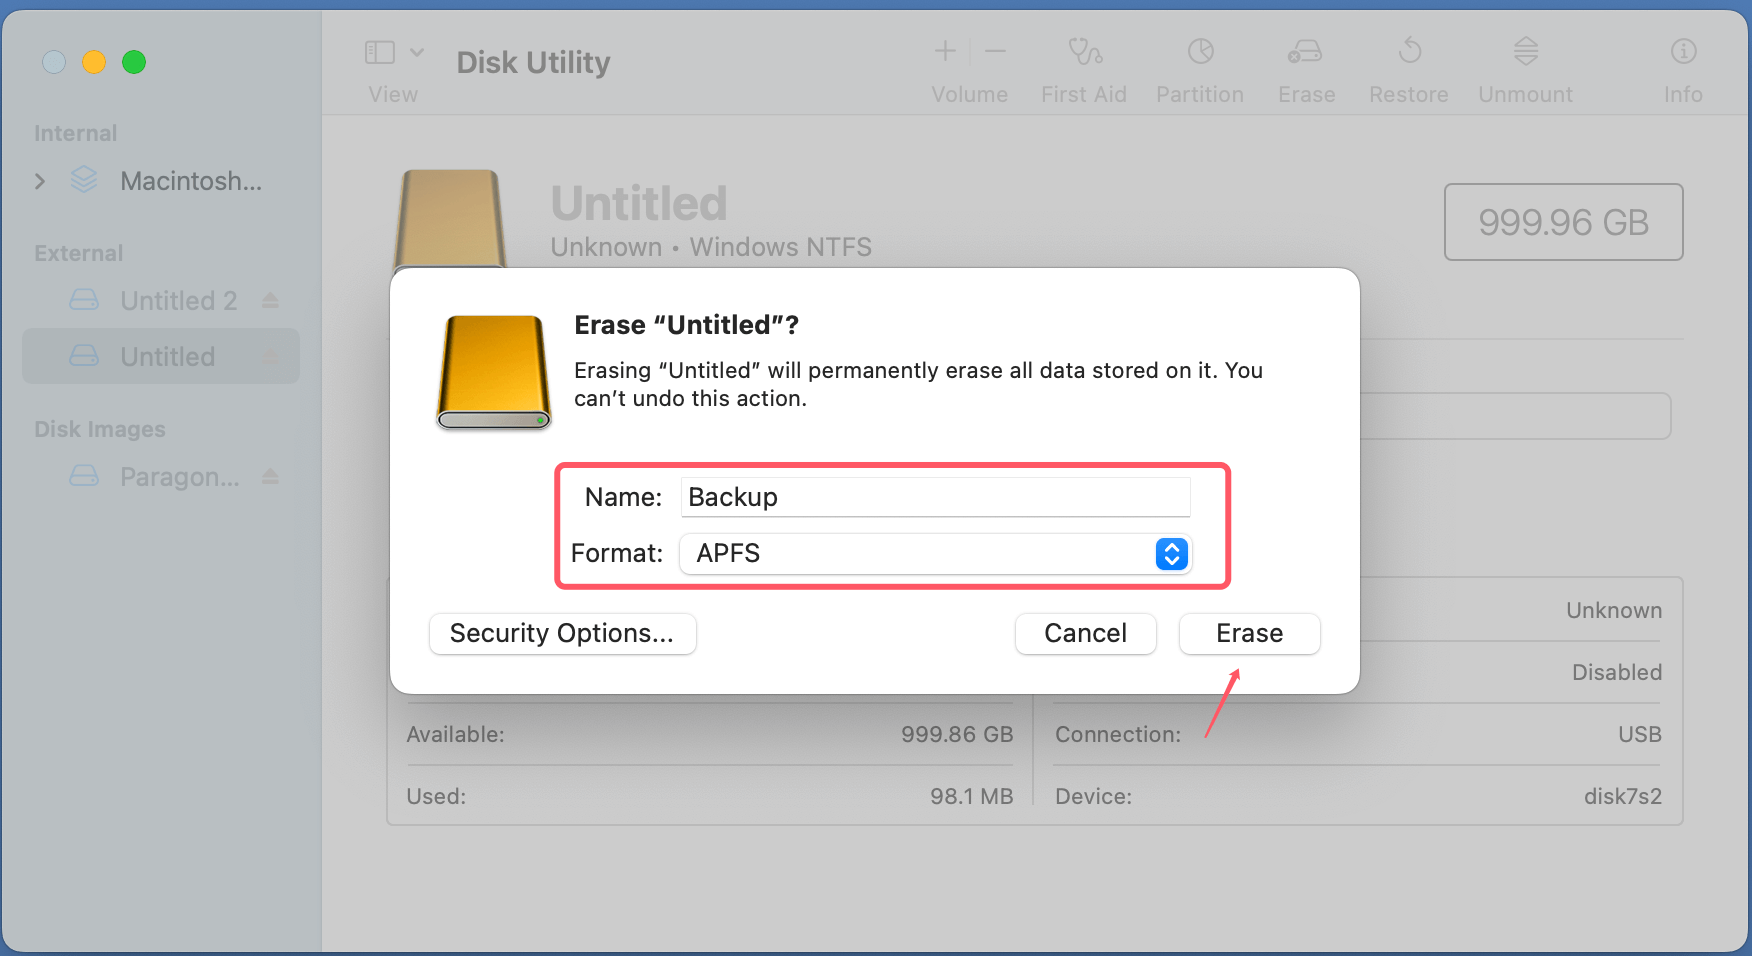
- Choose a format (APFS for newer macOS systems or HFS+ for older systems).
![Can't Select an External Hard Drive for Time Machine Backup Disk]()
- Give the drive a name and click Erase to confirm.
📒 Important Note: Reformatting the drive will erase all existing data. Make sure to back up any important files before proceeding.
If you have lost data due to reformatting the external hard drive, you can use Mac data recovery software to get all lost data back.
🔗 Also read: recover lost data from an external hard drive which is erased by Disk Utility.
Case 2. Drive Not Recognized by macOS
Sometimes, the issue might not be with the drive's format, but rather with macOS not recognizing the drive at all. This could happen for a variety of reasons, such as a faulty cable, connection issue, or even power problems with the drive.
Steps to Troubleshoot:
- Check the Connection: Ensure the external hard drive is securely connected to the Mac. Try using a different USB port or cable to rule out connection problems.
- Restart the Mac: A simple restart can sometimes resolve the issue if the drive wasn't properly detected during the initial connection.
- Test the Drive on Another Device: Try connecting the external drive to another computer or device to see if it is functioning properly. If the drive works on another device but not your Mac, it may indicate a compatibility issue with your Mac.
- Power Supply Issues: Some external hard drives require an external power supply, especially larger drives. Make sure the drive is plugged into a power source, if necessary.
Case 3. Drive is Already in Use
If the external hard drive is already being used by another program or is mounted as a read-only device, Time Machine may not be able to back up to it. For instance, if the drive is being used for file storage or running another application, it could cause conflicts with Time Machine.
How to Fix:
- Eject Other Applications: If the external drive is mounted in another application, try ejecting it from that program first.
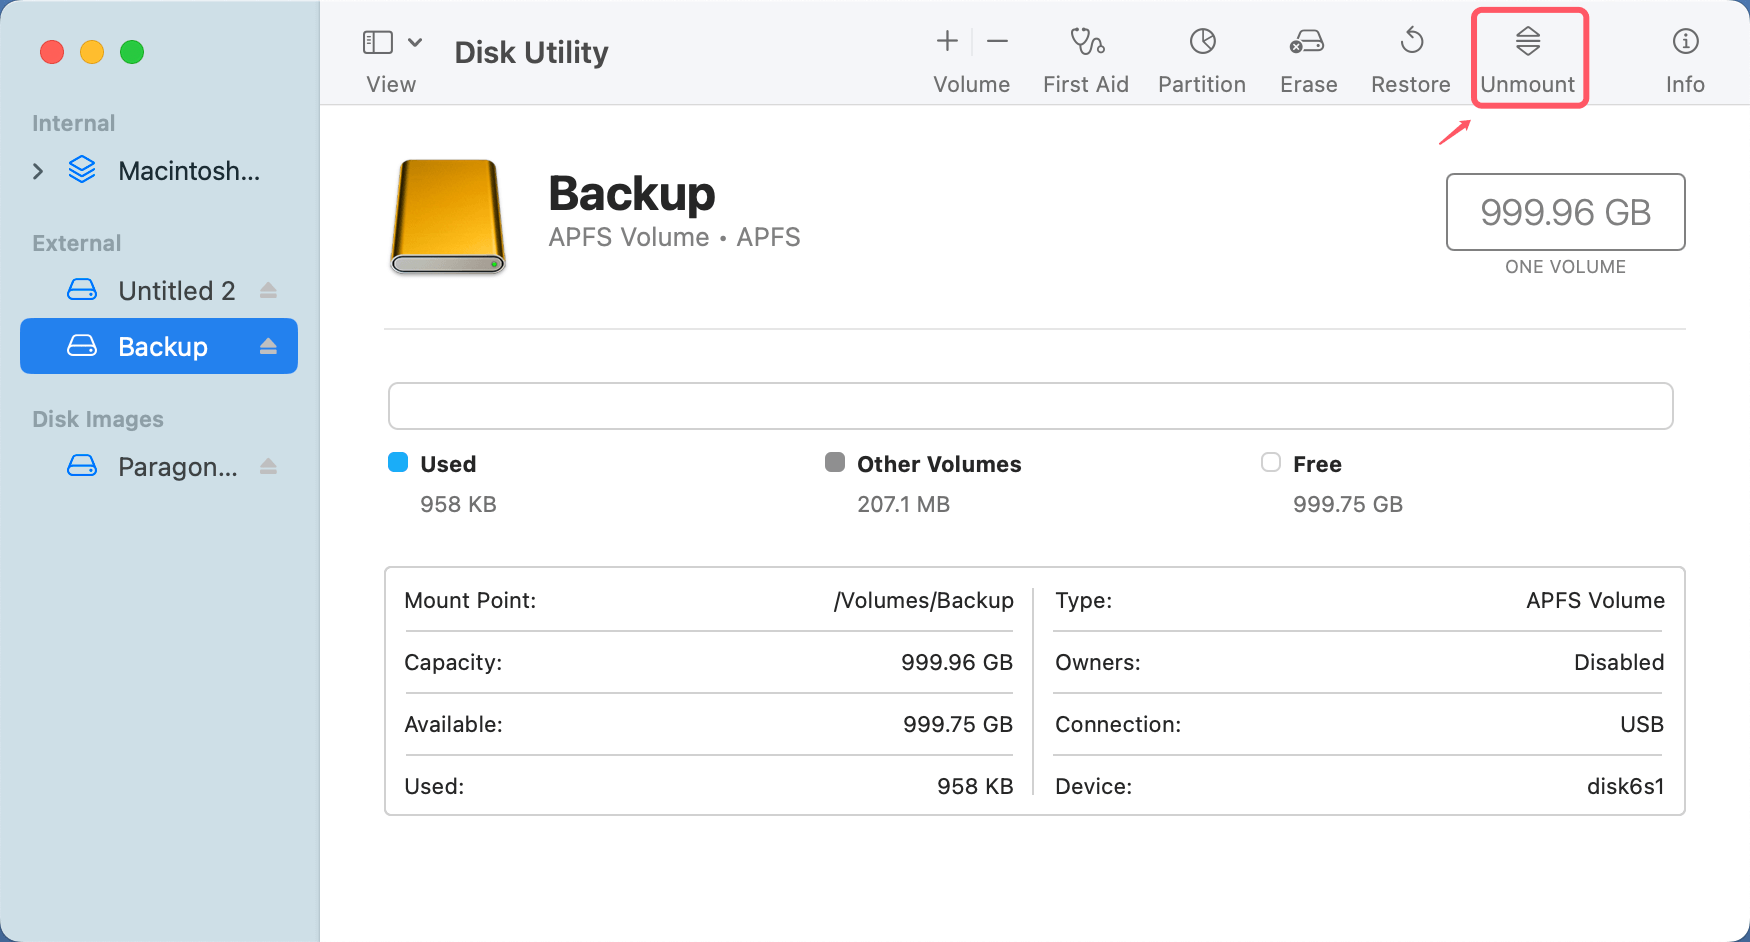
- Unmount the Drive: Open Disk Utility and unmount the external drive if it is already mounted in a way that prevents Time Machine from using it.
![Can't Select an External Hard Drive for Time Machine Backup Disk]()
Case 4. Drive Not Initialized or Unmounted
If the external hard drive is uninitialized or unmounted, macOS may not recognize it as a viable backup destination for Time Machine. This can happen if the drive has not been set up for use or was not properly ejected in the past.
Solution:
- Open Disk Utility and check if the external drive appears in the sidebar.
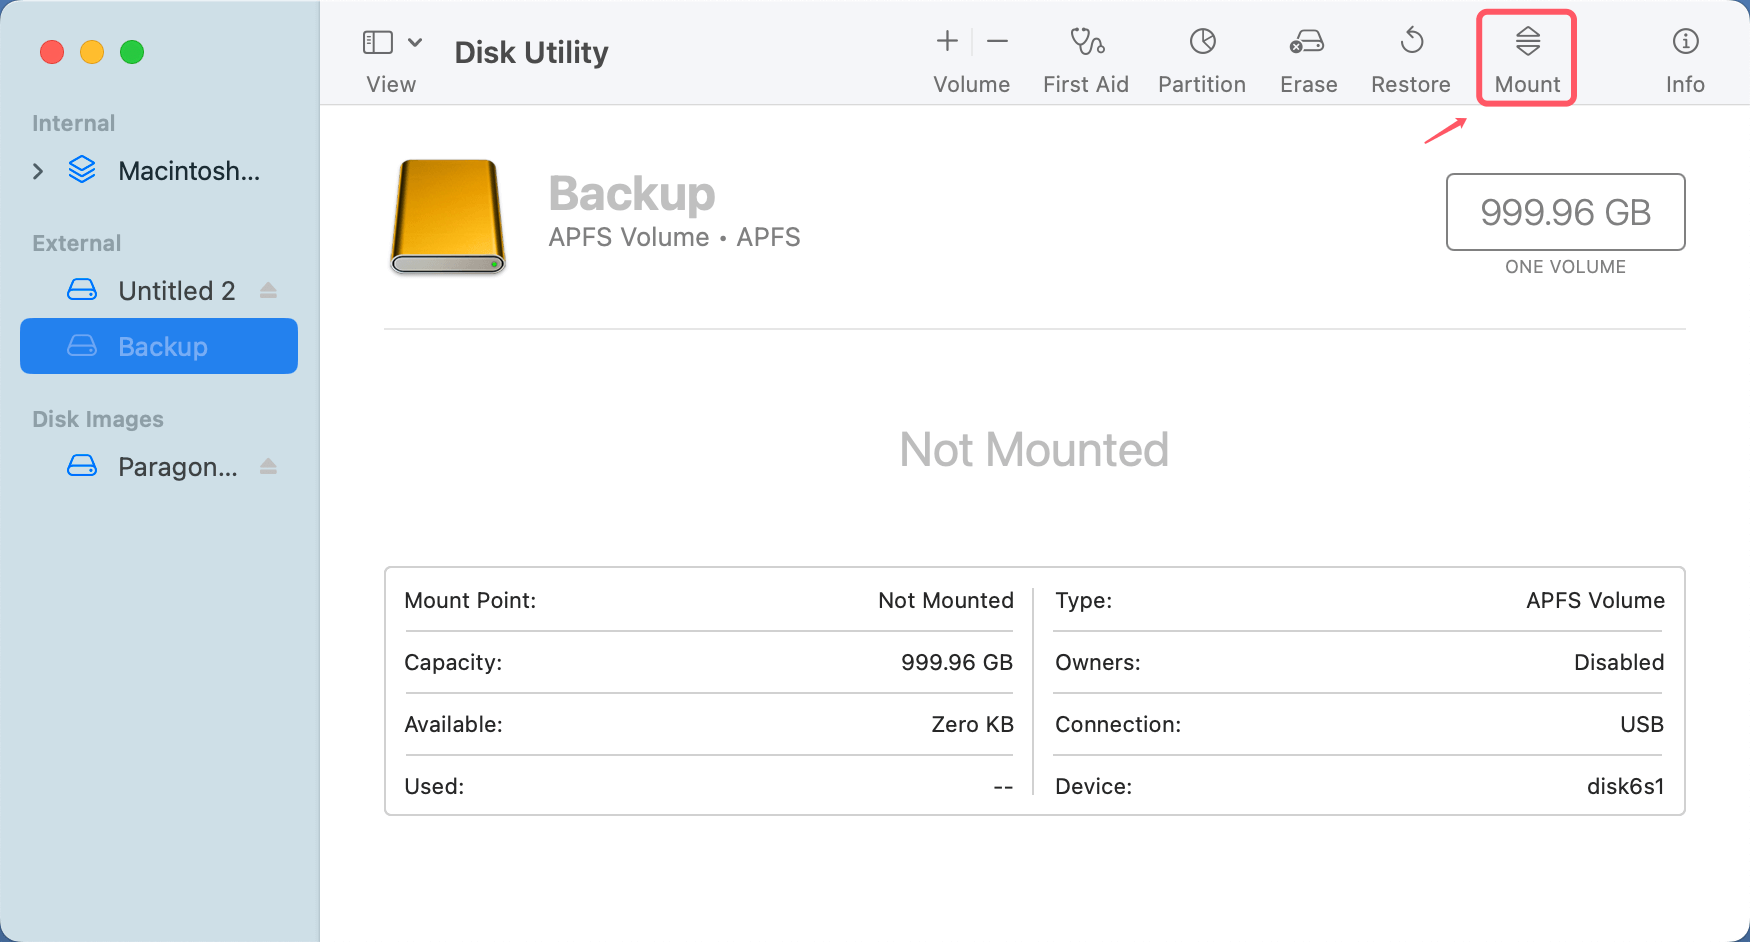
- If it does, but is not mounted, click on the Mount button to make it accessible for Time Machine.
![Can't Select an External Hard Drive for Time Machine Backup Disk]()
How to Prepare Your External Hard Drive for Time Machine?
If your external hard drive is still not selectable for Time Machine, it may require some preparation. Here's how to ensure the drive is ready:
1. Reformat the Drive (If Necessary)
As mentioned earlier, your external hard drive needs to be formatted correctly for Time Machine to recognize it. To prepare the drive, reformat it as HFS+ or APFS using Disk Utility.
2. Check the Available Space
Before using the drive with Time Machine, ensure it has enough free space to accommodate your Mac's data. If your external drive doesn't have enough free space, Time Machine will not be able to perform backups.
To check the free space on your external hard drive:
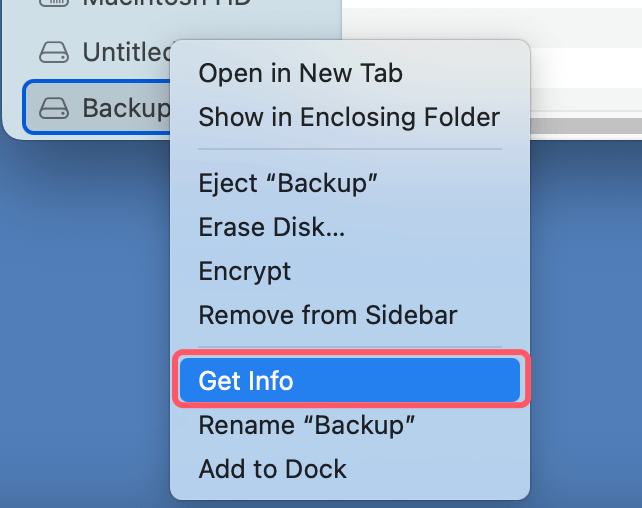
- Open Finder, then right-click on the external hard drive.
- Select Get Info to view the total capacity and available space.
![Can't Select an External Hard Drive for Time Machine Backup Disk]()
3. Make the Drive Compatible with Time Machine
Once the drive is formatted and has sufficient space, you can make it Time Machine-compatible:
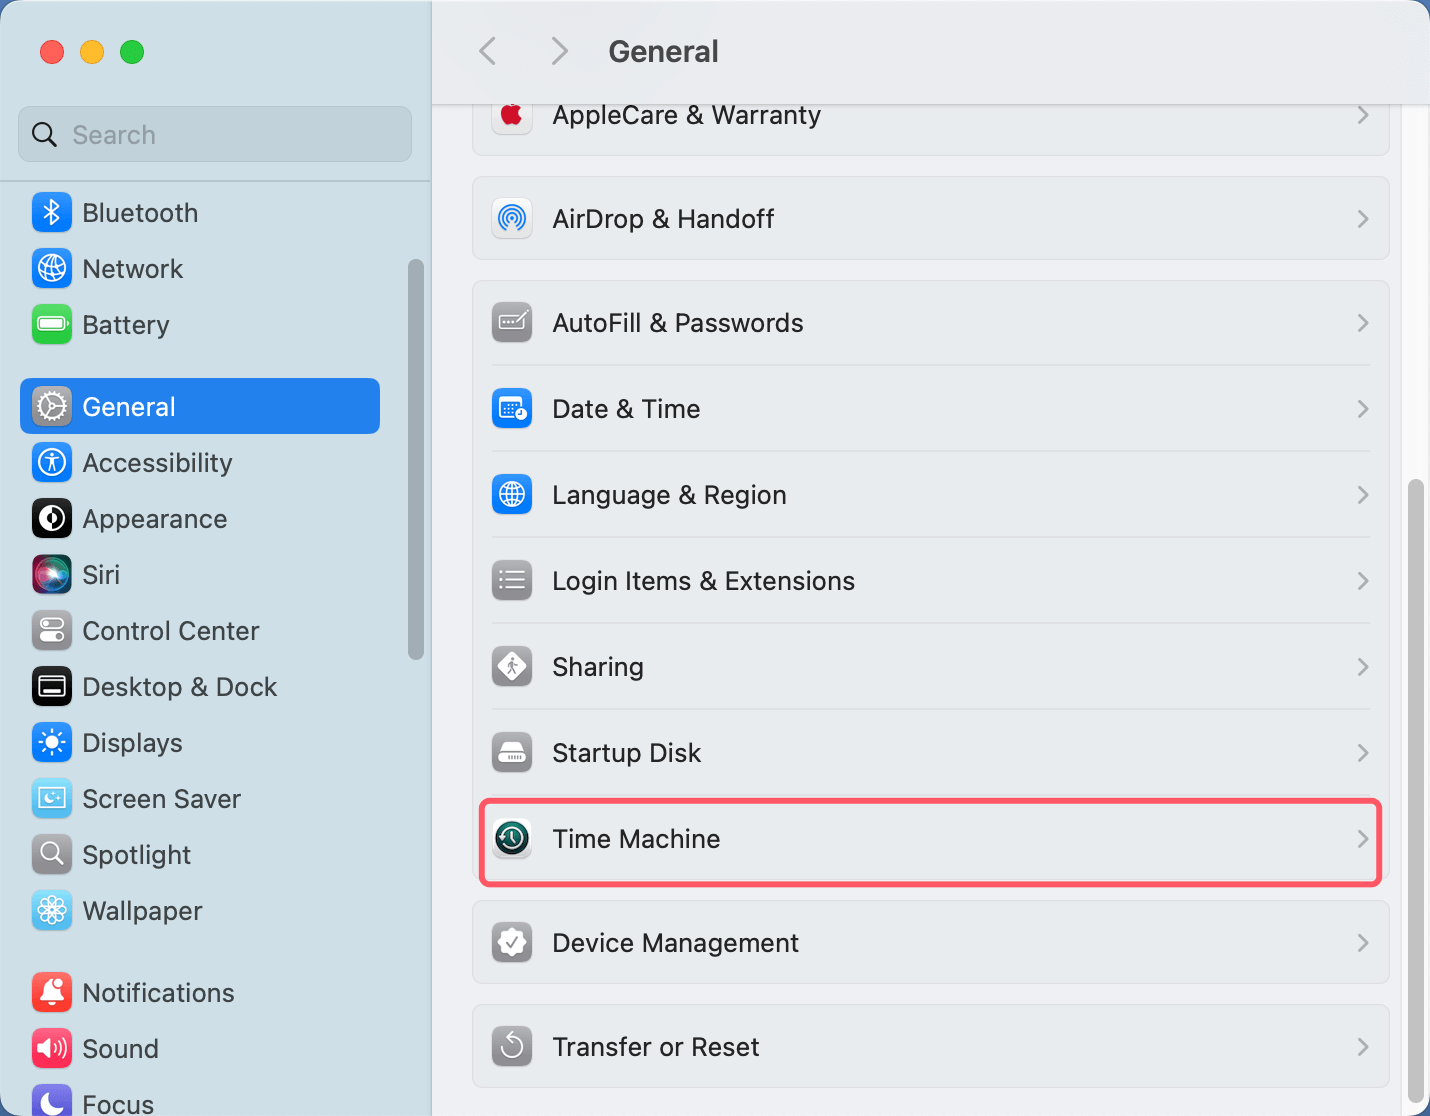
- Open System Preferences > Time Machine or System Settings > General > Time Machine (for macOS Ventura or later).
![Can't Select an External Hard Drive for Time Machine Backup Disk]()
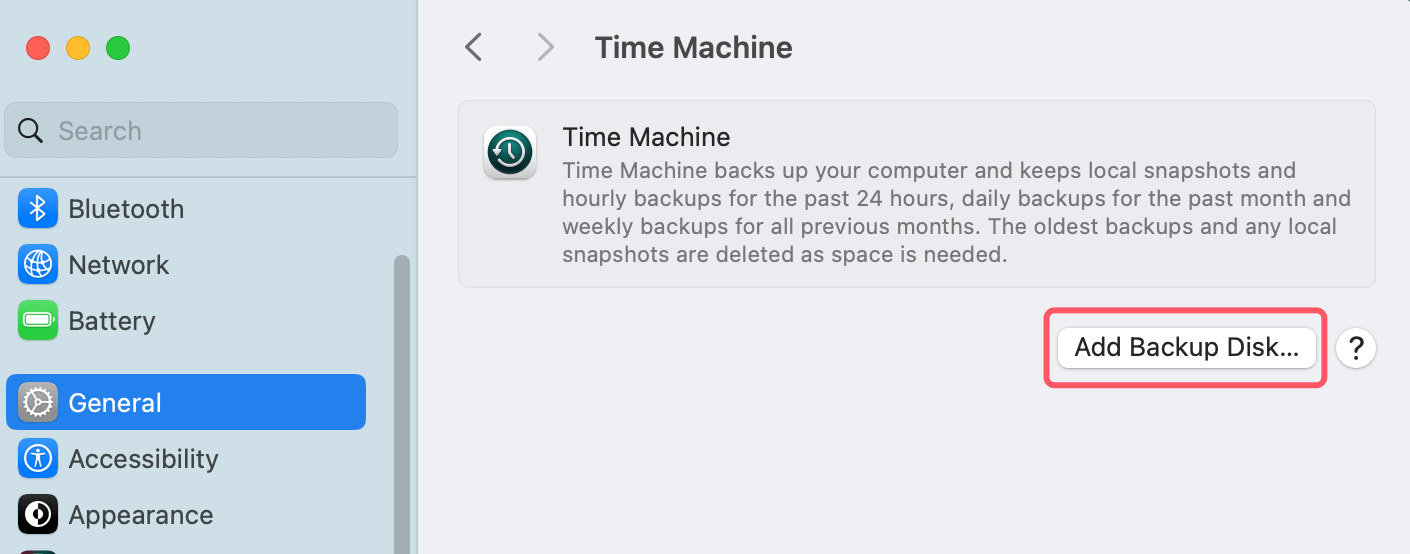
- Click Add Backup Disk.
![Can't Select an External Hard Drive for Time Machine Backup Disk]()
- Choose your external hard drive from the list of available disks.
![Can't Select an External Hard Drive for Time Machine Backup Disk]()
- Click Set Up Disk to start using the drive for Time Machine backups.
Troubleshooting Time Machine Issues
If you still can't select your external hard drive after ensuring it's properly formatted and connected, consider the following troubleshooting steps:
1. Check for macOS Software Issues
Occasionally, software bugs or outdated versions of macOS can interfere with Time Machine's ability to select a backup disk. Ensure that your macOS version is up to date.
To update macOS:
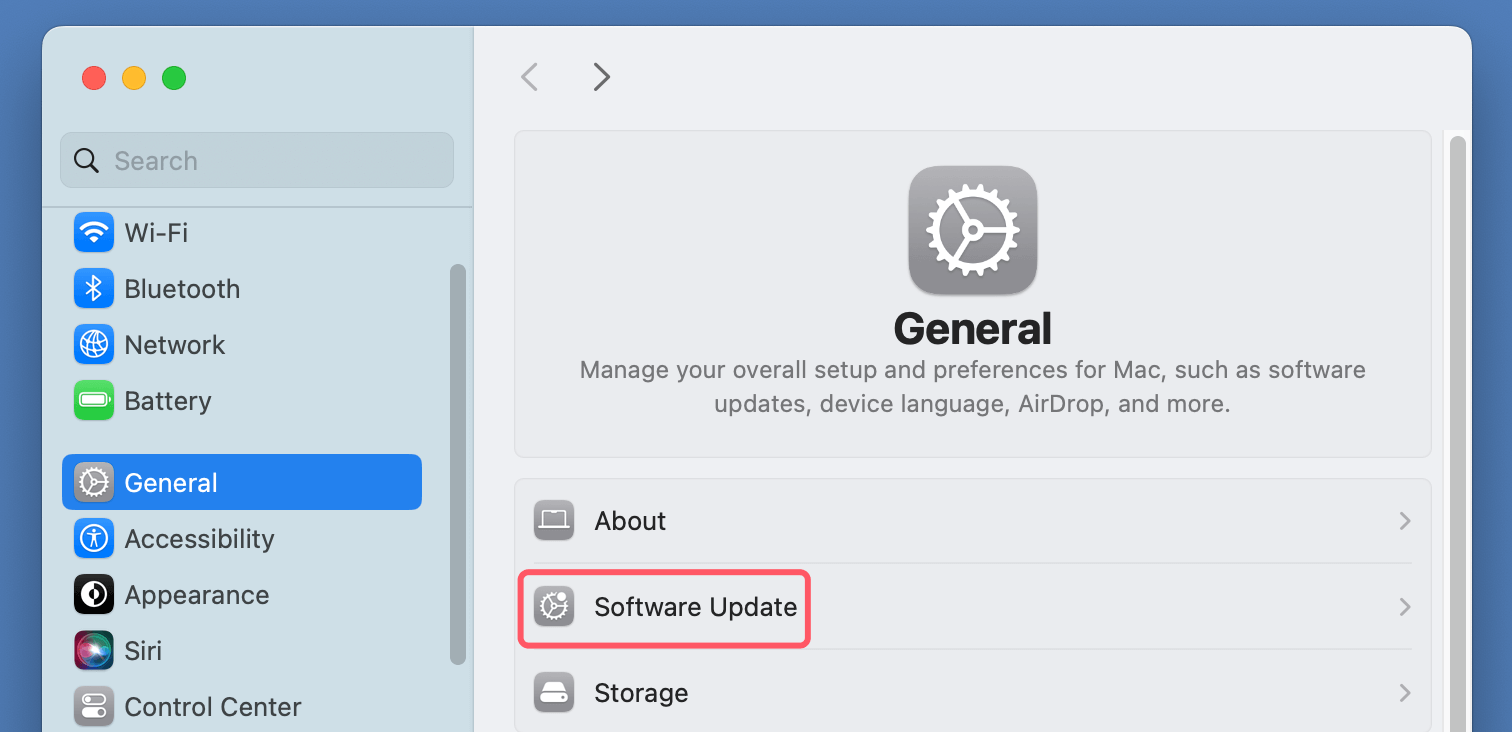
Go to System Preferences > Software Update or System Settings > General > Software Update and check if there are any pending updates.
2. Run Disk Utility
If you suspect the external hard drive is having issues, you can use Disk Utility to check and repair it:
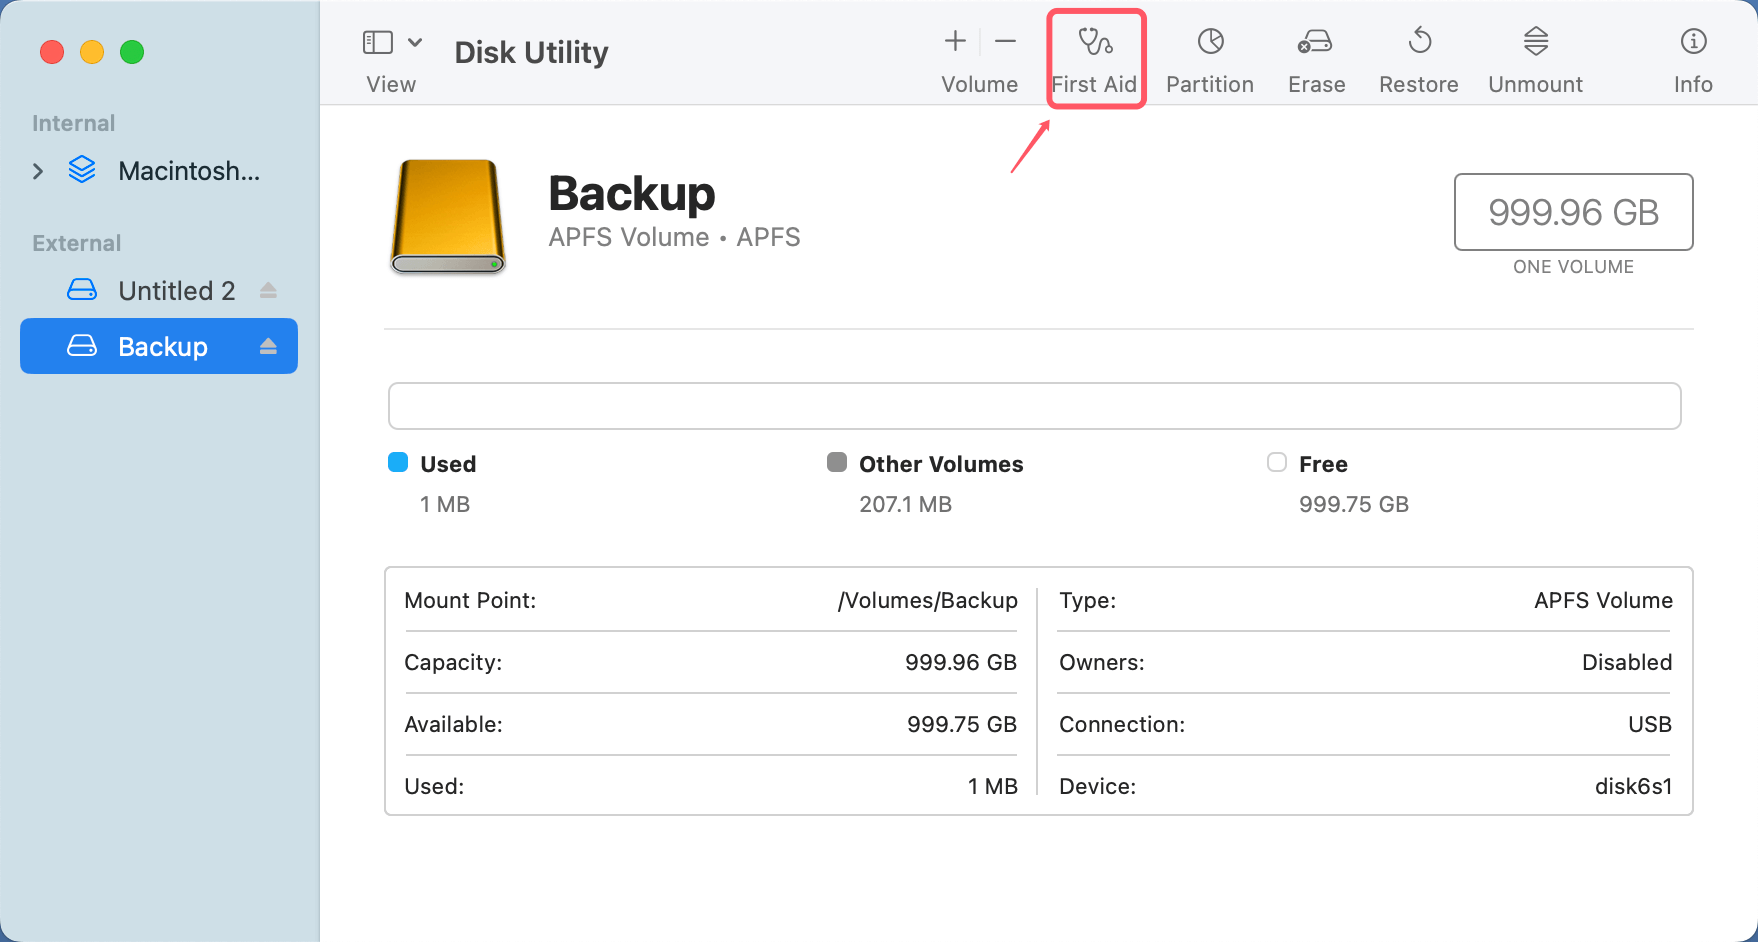
- Open Disk Utility.
- Select your external hard drive from the sidebar.
- Click First Aid to scan the drive for errors and repair them.
![Can't Select an External Hard Drive for Time Machine Backup Disk]()
3. Reset Time Machine Preferences
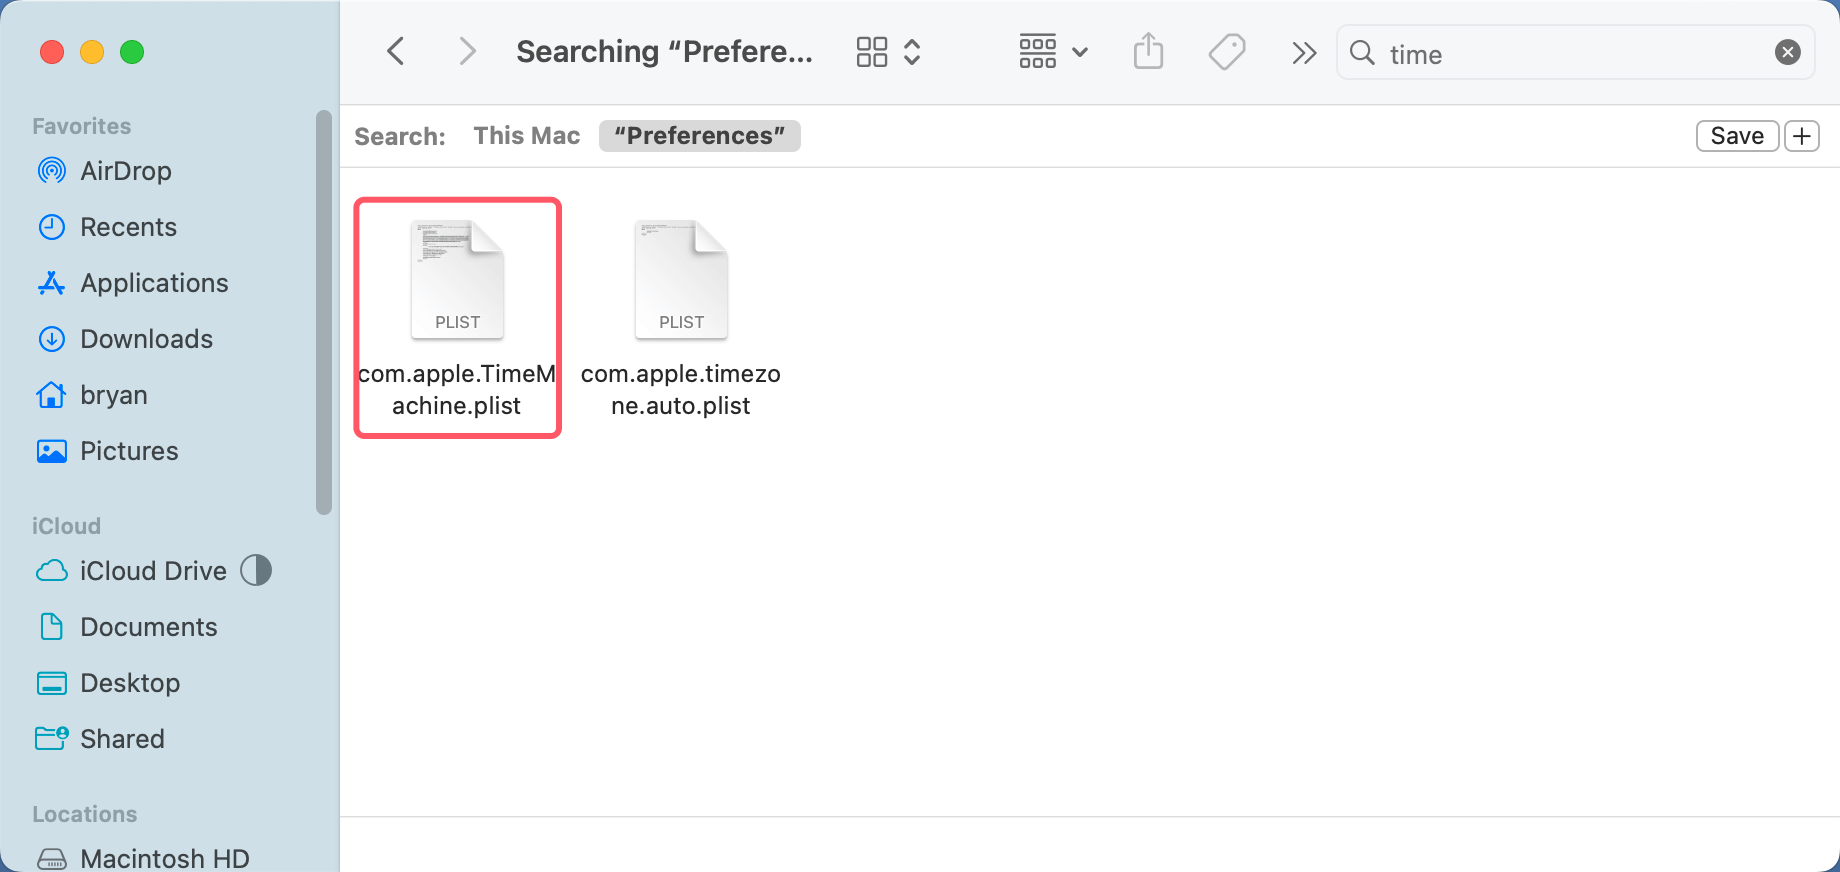
If all else fails, you may need to reset Time Machine’s preferences. This can be done by deleting the Time Machine preference file, forcing macOS to reconfigure the settings. To do this:
- Open Finder and navigate to /Library/Preferences.
- Locate the file named "com.apple.TimeMachine.plist.""
![Can't Select an External Hard Drive for Time Machine Backup Disk]()
- Delete it and restart your Mac.
Alternative Solutions:
If none of these solutions work, you may want to consider:
- Using a Different External Hard Drive: If the current external drive continues to have issues, it might be necessary to try another external hard drive.
- Network Backup: If your external drive is problematic, consider setting up a network-based backup solution with a NAS (Network-Attached Storage) or Apple's Time Capsule.
Conclusion
You can't select an external hard drive for Time Machine backups in some cases. Usually, it's because of issues with drive formatting, connectivity, or software compatibility. By following the troubleshooting steps outlined above, most users can resolve the issue and get their external hard drives working with Time Machine again.
Remember, regular backups are essential to ensuring the safety and security of your data. If all else fails, don't hesitate to reach out to Apple Support for further assistance.

Donemax Disk Clone for Mac
An award-winning disk cloning program to help Mac users clone HDD/SSD/external device. It also can create full bootable clone backup for Macs.
Related Articles
- Oct 18, 2024How to Empty or Force Empty Trash on Mac?
- Aug 19, 2025How to Delete Installed Windows OS on Mac?
- Aug 07, 2024How to Format SD Card on Mac?
- Jul 19, 2025[11 Fixes] Fix iMessage Not Working on Mac, Not Syncing on Mac
- Oct 28, 2024How to Delete Other Volumes in Container on Mac: A Comprehensive Guide
- Oct 23, 2024How to Reinstall macOS Sequoia?

Maria
Maria is one of the senior writers & editors of Donemax who lives and works in Sydney, Australia. She loves PC, Mac and Internet Technology. She has 6 years of writing articles about data recovery on PC/Mac, disk cloning solution, data eraser and computer OS optimization, etc. She is also interested in testing various software and digital products.

Gerhard Chou
In order to effectively solve the problems for our customers, every article and troubleshooting solution published on our website has been strictly tested and practiced. Our editors love researching and using computers and testing software, and are willing to help computer users with their problems
