PAGE CONTENT:
Time Machine from Apple is an important tool for Mac users because it automatically backs up your whole system, including all your papers and apps. Sometimes, Time Machine won't start its backups, leaving your info vulnerable. Several things, including insufficient storage space, connection issues, disk errors, program conflicts, or mistakes in the configuration, might cause this issue.
It's important to fix problems immediately, no matter how small or big, to keep your information safe. In this complete guide, we'll look at some of the most common reasons why Time Machine stops working and show you how to fix them step by step.
You'll also find useful tips on how to fix problems with your Time Machine backup. Following these tips can help you regain your peace of mind and keep your important information safe.
Time Machine: Built-in Backup Tool in macOS
It's helpful to know what Time Machine is and how it works before starting to fix something. Time Machine is a backup program that uses the Apple macOS operating system. Apple first released it in Mac OS X Leopard (10.5).
It can back up your system, including files, apps, music, photos, emails, and documents. It works with both internal and external drives, including network drives. You can get your files back anytime because Time Machine backs them up every hour, day, and week.
This feature gives your data a continuous layer of safety, making it very useful for returning lost or damaged files. This safety stops, though, if Time Machine fails to start a backup. It could put your data at risk. If you know how Time Machine works at its core, you can better find and fix problems, ensuring that your backups work and your data stays safe.
Common Causes for Time Machine Backup Issues
Several factors could prevent Time Machine from starting a backup:
- Insufficient Storage Space: One of the most common issues is a lack of space on the backup drive. If the drive doesn't have enough room to store new backups, Time Machine cannot proceed. It's necessary to regularly monitor and manage your backup drive's storage capacity to ensure sufficient space.
- Connection Issues: Problems connecting your Mac and the backup drive can also prevent backups from starting. It includes loose cables, faulty ports, or network issues using a network drive.
- Disk Errors: Corruption or errors on the backup disk can stop Time Machine from writing to it. Regularly running disk checks and repairs can help maintain the health of your backup drive.
- Software Conflicts: Conflicts with other software or corrupted system files can cause Time Machine to malfunction. It can be due to recently installed applications or updates interfering with Time Machine's operations.
- Configuration Problems: Incorrect settings or preferences within Time Machine can prevent backups from starting. Ensuring the backup drive is correctly selected and settings appropriately configured is crucial.
- OS Updates: Sometimes, new macOS updates can introduce temporary incompatibilities with Time Machine. Updating the macOS and Time Machine software can help mitigate these issues.
Time Machine Won’t Start Backup, Fix It Now
🔔Fix1: Cancel Backup Progress and Restart to Backup Again
When Time Machine doesn't start a backup, sometimes the simplest solution is to cancel the current backup progress and restart the process. It can clear up minor glitches and reset the backup process.
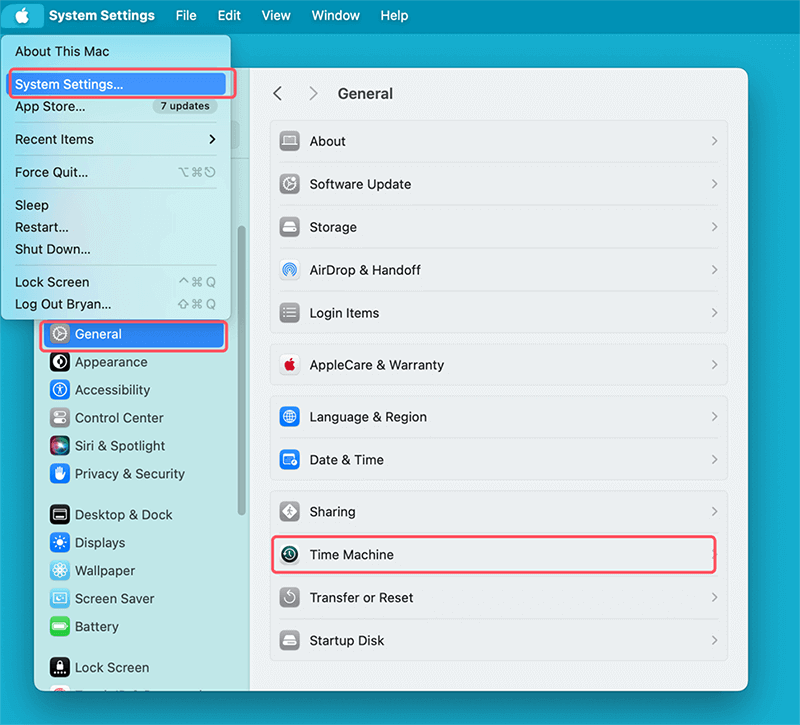
- Open Apple logo > System Settings > General and select Time Machine.
![select Time Machine]()
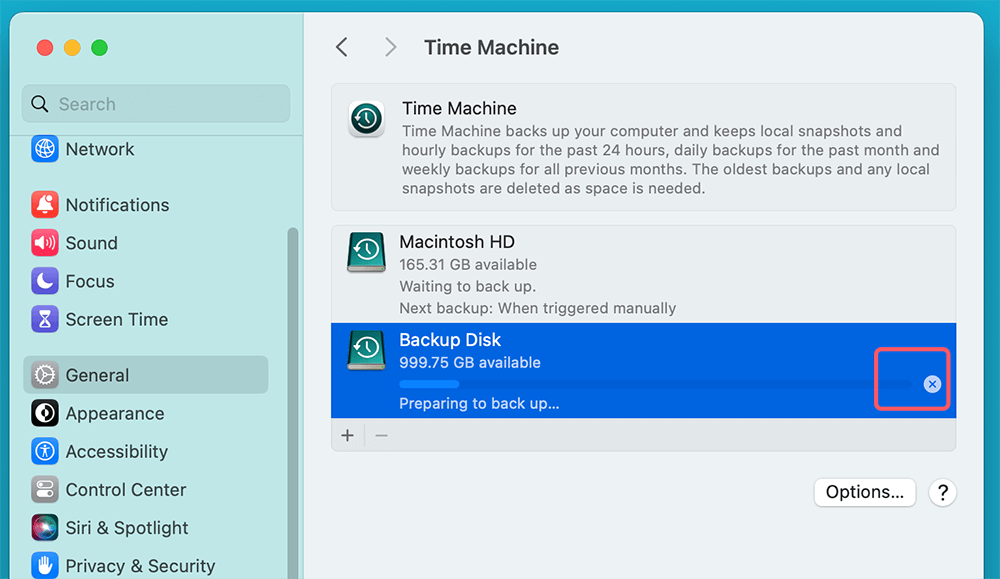
- Stop the current backup by clicking the X next to the progress bar.
![Stop the current backup]()
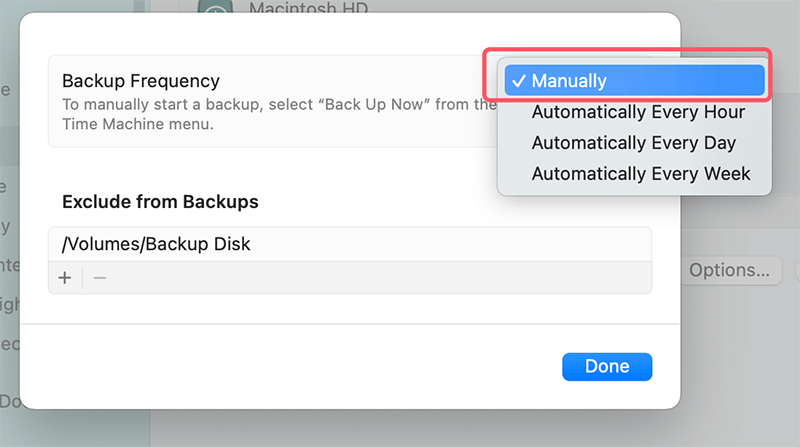
- Once the backup is canceled, turn off Time Machine by clicking Options, choosing Manually to back up your Mac
![choosing Manually to back up your Mac]()
- Restart your Mac to clear any temporary issues.
- After the restart, turn the Time Machine back on by re-selecting Back Up Automatically.
This method helps resolve issues caused by temporary system glitches or minor software conflicts that can interrupt the backup process.
🔔Fix2: Run First Aid on the Time Machine Backup Drive
Disk errors can prevent Time Machine from performing backups. Running First Aid in Disk Utility can identify and repair these errors.
- Go to Applications > Utilities and open Disk Utility.
- Select your Time Machine backup drive from the list on the left.
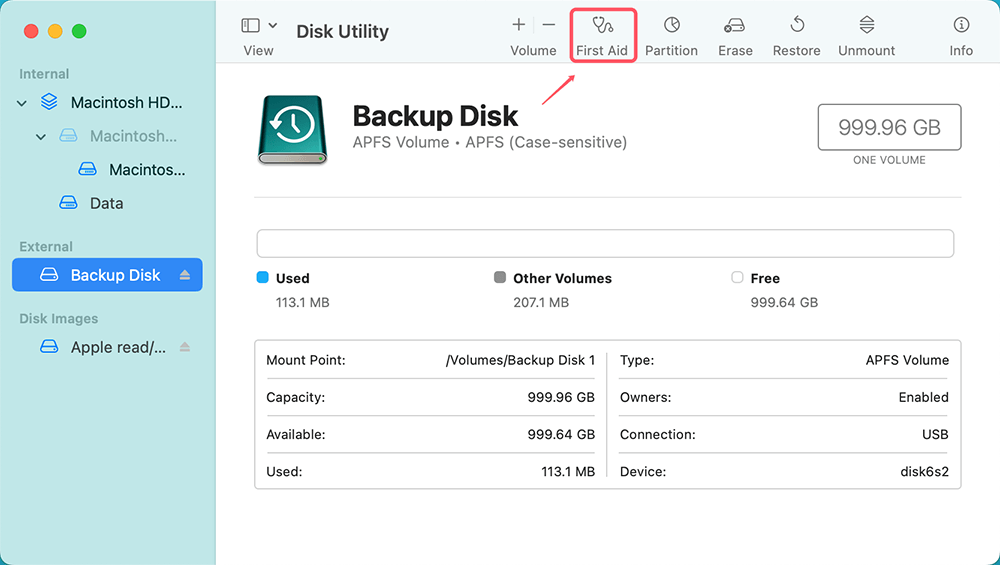
- Click on First Aid at the top of the window.
![Run First Aid on the Time Machine Backup Drive]()
- To start the process, click "Run." Then, let Disk Utility look for and fix any mistakes on the disk.
Running First Aid can fix corrupted files, bad sectors, and other disk-related issues hindering the backup process. This utility scans the drive for errors and attempts to repair them, restoring its functionality and enabling Time Machine to start backing up again.
🔔Fix3: Exclude Affected Directories for Backup
Large or problematic directories can sometimes cause Time Machine backups to fail. Excluding these directories can help you determine if they are the source of the problem.
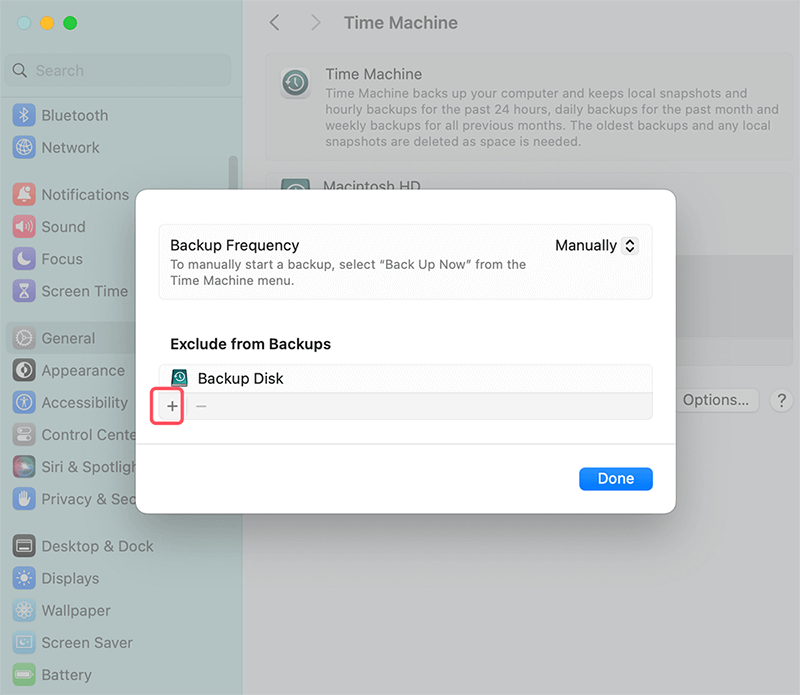
- Open System Settings > General and select Time Machine.
- Click on Options.
- Use the + button to add large or affected directories to the exclusion list.
![Exclude Affected Directories for Backup]()
- Confirm the exclusions and try starting Time Machine again.
By excluding specific directories, you can isolate and identify problematic files or folders causing Time Machine to stall or fail.
🔔Fix4: Start Your Mac in Safe Mode for First Backup
You can check to see if any third-party apps or tools are messing up your Time Machine backups by starting up your Intel-based Mac in Safe Mode.
- Shut down your Mac.
- Press and hold the Shift key as soon as you turn it on.
- When you see the login box, let go of the Shift key.
- Once logged in, try starting a Time Machine backup in Safe Mode.
If you are using a Mac with Apple silicon, follow these steps to start it into Safe mode:
- Restart the Mac, press and hold the power button until it boos into macOS Recovery mode.
- Select your startup disk (like Macintosh HD).
- Press and hold the Shift key, then click the “Continue in Safe Mode” button below your startup disk.
Safe Mode limits your Mac to essential system processes and turns off third-party software, which can help you determine whether these interfere with Time Machine.
🔔Fix5: Format The Time Machine Backup Drive to APFS
If your Time Machine backup drive faces persistent issues, formatting it to the Apple File System (APFS) might help. APFS is optimized for modern macOS versions and offers improved performance and reliability.
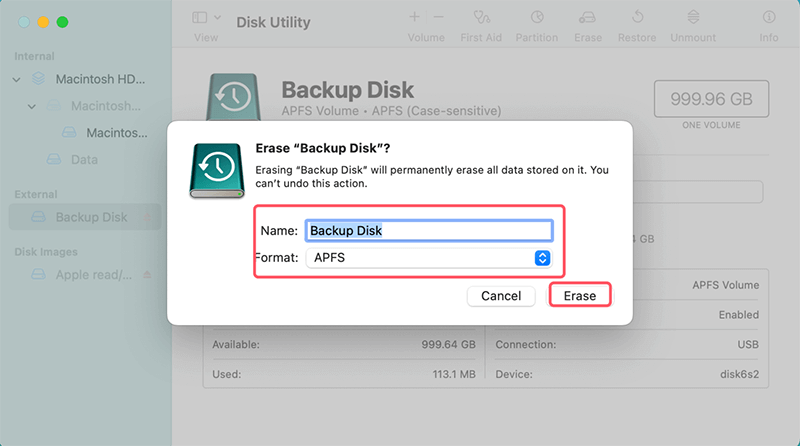
- You can open Disk Utility by going to Applications > Utilities.
- From the list on the left, pick out your Time Machine backup drive.
- Click on Erase at the top of the window.
- Choose APFS as the format type.
- Click Erase to format the drive.
Formatting the backup drive to APFS can resolve underlying file system issues and improve compatibility with the latest macOS versions. After formatting, set up Time Machine again to start a fresh backup.
Use Disk Clone Software If Time Machine Won’t Back Up Your Mac
If you cannot use Time Machine to back up your Mac, you can use disk cloning software to clone all data from your Mac to an external disk, then make a full bootable clone backup.
Step 1. Download and install one of the best Mac disk cloning software - Donemax Disk Clone for Mac, and connect an external hard drive to the Mac.
Step 2. Open Donemax Disk Clone for Mac, and select OS Clone mode.

Step 3. Select the external hard drive as the destination drive, click on Clone Now button.

Step 4. Clone all data including user data, Mac operating system, apps, settings from your Mac to the external hard drive.

Once the cloning process gets finished, you can check the cloned data on the external hard drive and you also can set the external hard drive as a startup disk.
Conclusion:
Time Machine is a very useful program for Mac users because it backs up your information automatically all the time. It can be scary when it doesn't start, but knowing the most common reasons why and how to fix them can help it work again. You can keep backups that work by correcting problems like insufficient storage space, disk failures, and software conflicts.
Many issues can be fixed by doing simple things like stopping and starting the backup, running First Aid, excluding problematic folders, using Safe Mode, and formatting the drive to APFS. If you do these things, your data will be safe, and your files will work well.
Related Articles
- Jan 12, 2025How to Bypass Trash When Deleting Files on Mac?
- Jan 05, 2025How to Disable iPhone Mirroring on Mac?
- Mar 19, 2025How to Fix Mac Error Code -8062: A Comprehensive Guide
- Oct 21, 2024macOS Sequoia Not Recognizing USB Flash Drives, 9 Methods to Fix It
- Oct 05, 2024Mac Won't Shut Down: Fix It Now
- Oct 18, 2024Check Free Disk Space on Mac: A Comprehensive Guide

Christina
Christina is the senior editor of Donemax software who has worked in the company for 4+ years. She mainly writes the guides and solutions about data erasure, data transferring, data recovery and disk cloning to help users get the most out of their Windows and Mac. She likes to travel, enjoy country music and play games in her spare time.

Gerhard Chou
In order to effectively solve the problems for our customers, every article and troubleshooting solution published on our website has been strictly tested and practiced. Our editors love researching and using computers and testing software, and are willing to help computer users with their problems
