PAGE CONTENT:
The Dock on macOS is one of the most iconic features of Apple's operating system, providing users with easy access to their favorite apps, files, and folders. It functions as a customizable toolbar that displays frequently used applications and allows for quick launching. Managing the Dock's icons effectively can improve productivity and streamline the macOS experience. Whether you want to add more apps for quick access or remove those you rarely use, understanding how to personalize your Dock will allow you to better tailor your Mac to your needs.
In this article, we'll explore everything you need to know about adding, removing, and organizing icons on your Mac's Dock. We’ll cover several methods, useful tips, and even a few lesser-known tricks to make your Dock work for you.
What is the Dock on macOS?
The Dock is the horizontal strip located at the bottom (or side, depending on preferences) of your Mac's screen. It displays both active applications and apps you’ve chosen to keep in the Dock for easy access. Along with apps, the Dock can also hold files, folders, and minimized windows, providing a convenient way to manage your workspace. By customizing the Dock, you can access the tools and resources you need most often, saving time and avoiding clutter.
The Dock is divided into two sections:
- Application Area (left side): Displays application icons, with active apps marked by a small dot underneath them.
- Document & Trash Area (right side): Contains files, folders, minimized windows, and the Trash icon.
Why Customize Your Dock?
Customizing your Dock can improve both your productivity and the overall user experience on your Mac. Here are some key benefits:
- Quick Access: By adding frequently used apps to the Dock, you can launch them with just a click.
- Clutter Reduction: Removing seldom-used apps can create a cleaner, less distracting interface.
- Personalization: Customizing the Dock allows you to make your Mac feel more personal and tailored to your needs.
How to Add Icons to the Dock on Mac?
There are several ways to add icons to the Dock, depending on whether you're dealing with apps, folders, or files. The following methods cover the most common approaches.
Method 1: Drag and Drop from Applications Folder
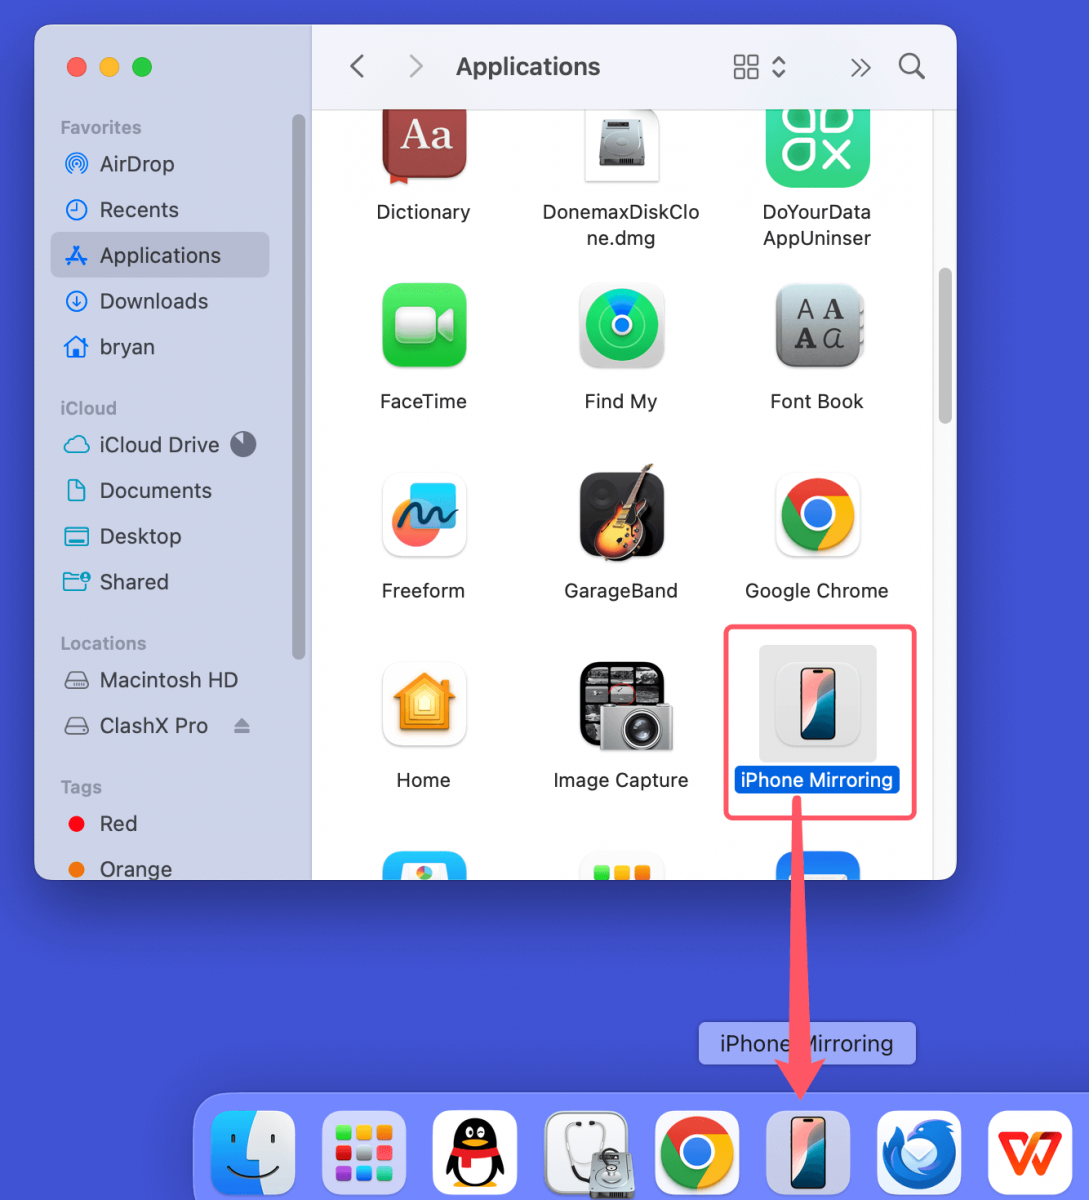
The easiest and most straightforward way to add an application to the Dock is by using the drag-and-drop method from the Applications folder.
Steps:
- Open Finder: Select the Finder icon (a blue and white happy face) from the Dock.
- Go to Applications: Click on "Applications" in the sidebar of the Finder window. This will display a list of every program that is installed on your Mac.
- Drag to Dock: Find the application you want to add, click and hold on its icon, and drag it to the Dock. Release the mouse when the Dock icons adjust to make space for the new one.

- Placement: The application will be added to the Dock's left side automatically.
Method 2: Add Files or Folders to the Dock
It's as easy to add files or folders to the Dock as it is to add programs.
Steps:
- Locate the File or Folder: Locate the file or folder you wish to add in Finder.
- Drag and Drop: Place the file or folder on the right side of the divider, next to the Trash, when you drag it to the Dock. Only apps can go on the left side, and files/folders belong on the right.
![Add Files or Folders to the Dock]()
- Access Anytime: Once added, you can click on the folder or file icon in the Dock for instant access.
Method 3: Use the "Keep in Dock" Option
This method works when the app you want to add is already open.
Steps:
- Open the App: Launch the application you want to add from Launchpad or Finder.
- Right-click on the App's Icon in the Dock: The application's icon will show up in the Dock while it's running.
- Select "Options": Hover your cursor above "Options," right-click (or control-click) the program icon, and choose "Keep in Dock."
![Use the Keep in Dock Option]()
- Permanent Placement: The app will now remain in the Dock, even after you close it.
How to Remove Icons from the Dock on Mac?
If your Dock has become too cluttered or if you have apps that you rarely use, you can easily remove them. Removing icons from the Dock doesn't uninstall the app; it just removes the shortcut.
Method 1: Drag and Drop to Remove
This is the most intuitive method for removing apps from the Dock.
Steps:
- Click and Hold the Icon: Locate the icon you want to remove from the Dock.
- Drag Away from Dock: Click and hold the icon, then drag it away from the Dock. After a second or two, you’ll see a small "Remove" or trash icon appear.
- Release the Icon: Let go of the mouse button, and the icon will disappear from the Dock. The app remains installed on your Mac, and you can always re-add it later.
Method 2: Use the "Remove from Dock" Option
For a more controlled approach, you can use the “Remove from Dock” option.
Steps:
- Right-click on the Icon: Locate the app or file you want to remove, then right-click (or control-click) on its icon in the Dock.
- Select "Options": From the pop-up menu, hover over "Options."
- Choose "Remove from Dock": Click "Remove from Dock," and the icon will be gone.
![Use the "Remove from Dock" Option]()
Method 3: Automatically Remove Recent Apps
macOS by default shows recently used apps in the Dock. If you prefer not to see these apps, you can disable this feature.
Steps:
- Go to System Settings: In the top-left corner of your screen, click the Apple menu, then choose "System Settings."
- Desktop & Dock: In the sidebar, click "Desktop & Dock."
- Turn Off Recent Applications: Turn off the option labeled "Show suggested and recent apps in Dock."
![Automatically Remove Recent Apps]()
This will stop recently used apps from automatically appearing in the Dock.
How to Rearrange Icons on the Dock?
Customizing the order of your icons allows you to keep your most-used apps and files in easily accessible positions. Rearranging the icons on the Dock is incredibly simple.
Steps to Rearrange Dock Icons
- Click and Hold: Click and hold on the icon you want to move.
- Drag the Icon: Drag the icon left or right (if the Dock is horizontal) or up and down (if the Dock is vertical). The other icons will shift to make space.
- Release: Once the icon is in the desired position, release the mouse button.
Note that you cannot move the Trash or Finder icons; they are fixed in their respective positions.
Advanced Dock Customization Tips
Beyond just adding and removing icons, macOS allows for more detailed Dock customization, such as adjusting its size, magnification, and position. Here are a few extra tweaks to further personalize your Dock.
Change Dock Size and Magnification:
The Dock's size and magnification settings can be adjusted to suit your preferences.
Steps:
- Go to System Settings: Open the Apple menu and choose "System Settings."
- Select "Desktop & Dock": In the sidebar, click on "Desktop & Dock."
- Adjust the Size Slider: Move the slider next to "Size" to make the Dock larger or smaller.
- Enable Magnification: Check the "Magnification" box, then adjust the magnification slider to control how large icons become when you hover over them.
![Change Dock Size and Magnification]()
Change Dock Position:
By default, the Dock is located at the bottom of your screen, but you can move it to the left or right side if that’s more comfortable for you.
Steps:
- Open System Settings: Go to the Apple menu and choose "System Settings."
- Select "Desktop & Dock": In the sidebar, click on "Desktop & Dock."
- Choose Dock Position: Under "Position on screen," select "Left," "Bottom," or "Right" to move the Dock accordingly.
![Change Dock Position]()
Auto-Hide the Dock:
If you want more screen space, you can set the Dock to hide automatically when not in use.
Steps:
- Open System Settings: Click the Apple menu and choose "System Settings."
- Go to "Desktop & Dock": Select it from the sidebar.
- Enable Auto-Hide: Turn on "Automatically hide and show the Dock."
![Auto-Hide the Dock]()
Now, the Dock will disappear when you're not actively using it, and reappear when you move your mouse to the edge of the screen.
Restoring the Dock to Default Settings
If you've customized the Dock and want to return to the default setup, it's easy to reset it.
Resetting Dock via Terminal:
You can reset the Dock using the Terminal app if you want to start fresh.
Steps:
- Open Terminal: Launch Terminal from the Utilities folder in Finder.
- Enter Reset Command: Type the following command and press Enter:
defaults delete com.apple.dock; killall Dock
- Restart: The Dock will restart, and you'll have the default Dock layout as it was when you first got your Mac.
💡 Note: If you want to hide Dock on Mac, you can use DMmenu for Mac to quickly hide and unhide Dock on Mac's desktop.

Conclusion
Customizing the Dock on your Mac can greatly improve your workflow and make using your computer more efficient and enjoyable. Whether you're adding your favorite apps for quick access, removing clutter, or reorganizing the icons to suit your style, the Dock is a flexible tool that adapts to your preferences.
By mastering the techniques covered in this guide - adding, removing, and rearranging icons, as well as adjusting advanced settings - you can create a Dock setup that's perfectly tailored to your needs. And when in doubt, you can always reset it and start again.
With these tips, your Mac's Dock will be organized, functional, and ready to enhance your productivity.
Related Articles
- Feb 12, 2025(10 Solutions) Can't Update macOS? Fix It Now
- Jan 16, 202510 Solutions to Fix Fusion Drive Not Mounting or Not Showing Up on Mac
- Mar 31, 2025Force Shut Down Mac: A Complete Guide
- Dec 02, 2024How to Fix XprotectService High CPU Usage on Mac – 7 Methods
- Jul 25, 2024How to Download and Make macOS Sonoma ISO File?
- Dec 09, 2024How to Add an External Hard Drive to Dock on Mac?

Christina
Christina is the senior editor of Donemax software who has worked in the company for 4+ years. She mainly writes the guides and solutions about data erasure, data transferring, data recovery and disk cloning to help users get the most out of their Windows and Mac. She likes to travel, enjoy country music and play games in her spare time.

Gerhard Chou
In order to effectively solve the problems for our customers, every article and troubleshooting solution published on our website has been strictly tested and practiced. Our editors love researching and using computers and testing software, and are willing to help computer users with their problems


