PAGE CONTENT:
It can be not very comforting to lose access to data on a drive that has been unmounted, especially when it comes to important files and memories. An unmounted drive is attached to your Mac but can't be accessed. It can occur for several reasons, such as a damaged file system, hardware problems, or system errors.
The good news is that if you know what to do, you can often get back the info you lost. This guide will show you the most important things you need to do to fix a problem and recover lost data from a drive that won't mount on Mac.
We'll review all the steps you need to take using powerful data recovery software. Doing this can increase the chances of returning your lost files and lessen the effects of something bad happening.

Causes of An Unmountable Drive on Mac
On a Mac, a hard drive can become unmountable for several reasons, each of which is more or less serious and difficult to fix. Understanding these reasons is important for figuring out the best way to recover.
- File System Corruption: Most of the time, this is caused by file system failure. It can happen if the drive is ejected incorrectly, there is a power surge or software crashes. The result is a damaged file system that macOS can't read or mount.
- Physical Damage: Hardware breakdowns can happen if the drive is dropped, shocked, or exposed to high or low temperatures or moisture. If parts of the drive are broken, your Mac might not be able to recognize it.
- Bad Sectors: Drives can get bad sectors over time, which are parts of the drive that can't be read anymore. The drive might not be able to mount if important parts of the file system are in these bad areas.
- Driver Problems: The drive might not mount if the drivers are outdated or unsuitable. It is especially important for older drives or drives that use special hardware.
- Malware or Viruses: Infections with malware can damage the file system or stop the drive from talking to your Mac, which means you can't mount it.
- Partition Table Errors: The system may not be able to mount the drive if there are errors in the partition table, which organizes and handles the drive's partitions.
Recover Data from A Drive That Won't Mount on Mac
Getting back data from a hard drive that won't mount on your Mac might seem hard, but the process can be simple and quick with the right tools. Donemax Data Recovery for Mac is a reliable program that can help you recover lost data from drives that aren't mounted or can't be reached. Here is a step-by-step guide on returning your important files with this software.
Step 1: Download and Install.
Click on Download button to download and install Donemax Data Recovery for Mac, then click the DMG file, drag the software icon to Applications folder, then open Launchpad, find and open this application.
Donemax Data Recovery for Mac
- Export existing files and inaccessible files from unmounted drive to Mac.
- Recover deleted or erased files from unmounted drive on Mac.
- Recover data from damaged drive on Mac.
Step 2: Connect the Unmountable Hard Drive.
Use a cord with both devices to connect the hard drive that won't mount to your Mac. Ensure there are no loose wires and the drive is turned on (if it has a different power source).

Step 3: Scan the Unmountable Hard Drive.
- You can choose from a list of drives and storage devices in the Donemax Data Recovery for Mac interface.
- Find your hard drive that won't mount from the list. It might appear as "Unallocated" or have a different name if macOS doesn't know what it is.
- To choose the drive that won't mount, click on it.
- Click the "Scan" button. The Donemax Data Recovery for Mac will begin a full search of the drive to find lost data. It might take a while to do this, based on how big and good the drive is.

Step 4: Preview and Select Recoverable Files.
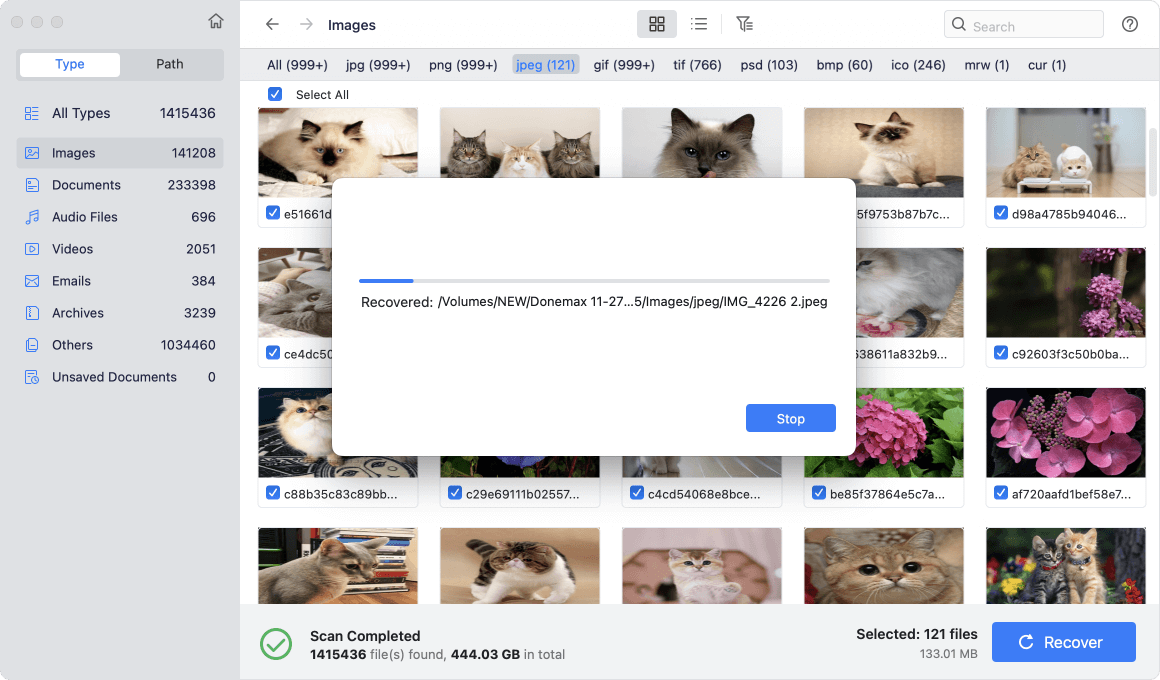
Donemax Data Recovery for Mac will show a list of recoverable files after the check. You can use the preview function to make sure the files are correct. It helps make sure the files aren't damaged and can be recovered. You can use built-in filters to reduce search results by file type, size, or date. It makes finding the exact files you need to get back easy.

Step 5: Save the Selected Files.
- Put a checkmark next to the files you want to return.
- Ensure you only choose the files you need so your restore location doesn't get too crowded.
- Click "Recover" to begin getting back what you lost.
- Pick a new place to save the recovered files (not the unmountable drive). It could be a different external drive or a folder on your Mac's hard drive.
- The Donemax Data Recovery for Mac will return the chosen files and save them where you tell them to.
- Afterward, go to the recovery spot to ensure the files were recovered.

Step 6: Verify Recovered Data.
Check the restored files by opening them to ensure they are complete and usable. Make sure that all of the important data has been retrieved.
Repair An Unmountable Hard Drive On Your Mac
To fix a hard drive that won't mount on Mac, you need to follow a set of steps to find and fix the problem. First, use the built-in Disk Utility's "First Aid" tool to look for and fix small disk errors. If the drive still doesn't mount, use Disk Utility or Terminal to try mounting it by hand.

If these steps don't work, use data recovery tools to get your files back before formatting the drive. If the problem keeps happening, it could mean problems with the tools that need to be fixed by a professional. Ensure you back up your info constantly so you don't lose it.
Conclusion:
In conclusion, you can regain lost data from a Mac drive that isn't mounted if you use the right method and tools. Knowing why a hard drive won't mount lets you take the steps needed to figure out what's wrong and fix it.
Using data recovery tools like Donemax Data Recovery for Mac, you can quickly recover important files. Before moving on to more advanced recovery options, you should try simple troubleshooting steps like using Disk Utility's "First Aid." To keep from losing data again, back it up regularly and be careful not to damage or corrupt your files.
FAQs About Recovering Lost Data from Unmounted Drive on Mac
1. How to recover lost data from an unmountable drive on Mac?
Donemax Data Recovery for Mac can scan the unmountable drive and find all existing files, deleted or lost files:
- Download and install Donemax Data Recovery for Mac.
- Connect the drive to your Mac.
- Select the unmountable drive.
- Click on Scan button.
- Select the wanted files.
- Click on Recover button to save these files.
2. How to fix unmounted drive on Mac?
Just open Disk Utility, select the drive and click on Mount button. If the Mount button is grayed out, click on First Aid button to repair it.
3. How to mount and use an NTFS external hard drive on your Mac?
NTFS for Mac tool can help you mount external hard drive which has been formatted to NTFS and enable writable for NTFS drive on your Mac.
Step 1. Download and install Donemax NTFS for Mac and connect the NTFS external hard drive to your Mac.
Step 2. Open Donemax NTFS for Mac, then select the NTFS external hard drive, click on Mount button.

Step 3. Click on Enable Writable button if you want to read-write NTFS drive on your Mac.

Related Articles
- Jan 14, 2025How to Recover Lost Data from Fusion Drive on Mac?
- Nov 29, 2024Mac Trash Recovery: A Comprehensive Guide to Recovering Deleted Files on Mac
- Nov 13, 2024How to Recover Lost Data from Apple M4 Chip Mac [4 Methods]
- Mar 26, 2025How to Recover Replaced Files or Folders on Mac?
- Nov 01, 2024How to Recover Deleted or Lost MP4 Videos on Mac?
- Jul 05, 2024How to Recover Lost Data on macOS Sequoia? [5 Methods]

Christina
Christina is the senior editor of Donemax software who has worked in the company for 4+ years. She mainly writes the guides and solutions about data erasure, data transferring, data recovery and disk cloning to help users get the most out of their Windows and Mac. She likes to travel, enjoy country music and play games in her spare time.

Gerhard Chou
In order to effectively solve the problems for our customers, every article and troubleshooting solution published on our website has been strictly tested and practiced. Our editors love researching and using computers and testing software, and are willing to help computer users with their problems