Written byStevenUpdated on Jul 05, 2024
How to Recover Lost Data on macOS Sequoia? [5 Methods]
Approved byGerhard Chou
PAGE CONTENT:
It isn't very comforting to lose important data on macOS Sequoia, but with the right tools and methods, it's often possible to get it back. Several things can cause data loss, such as deletion by mistake, formatting hard drive without backup, system crashes, or hardware failures. Figuring out these reasons helps you choose the best way to recover.
If you've lost data, this guide will show you how to regain it, including using Time Machine, Terminal, and third-party macOS Sequoia data recovery programs. We'll also talk about professional data recovery services for really bad cases and ways to keep your data safe in the future. By acting quickly and using these tips, you can recover your data and keep your important files safe.

Before Doing macOS Sequoia Data Recovery
Prevention Strategies:
Before getting into data recovery, it's important to talk about some ways to keep data from getting lost:
- Regular Backups: Back up your info regularly with Time Machine, iCloud, or another backup service. For example, you can clone your macOS Sequoia Mac to an external hard drive and create a full bootable clone backup.
- Antivirus Software: Get protection software you can trust to protect your Mac from malware.
- Avoid Unsafe Links and Downloads: Be careful when downloading files or clicking links from places you don't know.
- Proper Shutdowns: Always properly shut down your Mac so that data doesn't get lost when the power goes out.
Initial Steps After Data Loss:
If you find you've lost data, you should act quickly and take these first steps to improve your chances of getting it back:
- Please stop Using the Device: Using your Mac again after losing data can erase it, making it harder to return.
- Check the Trash: Things you delete will remain in the Trash occasionally. First, look there.
- Restore from Backup: If you have a recent backup, use that to get back the things you lost.
Best 5 Methods to Recover Lost Data on macOS Sequoia
Here are 5 methods to help you recover deleted files, unformat hard drive and recover lost data after upgrading to macOS Sequoia.
Method 1. Check the Trash Bin
When you delete files on your Mac, the deleted files will be moved to the Trash bin. So, you can check the Trash bin, find the deleted files and put them back if you have not emptied the files from the Trash bin.
Step 1. Click on Trash icon on Dock and open Trash.
Step 2. Find the deleted files you want to recover, then select them and right-click them, choose Put Back or you can just drag the files from the Trash to desktop.
Method 2. Restore Files from Time Machine Backup
If you have backed up your Mac with Time Machine and there is a backup that contains the lost files, you can restore the lost files from Time Machine backup.
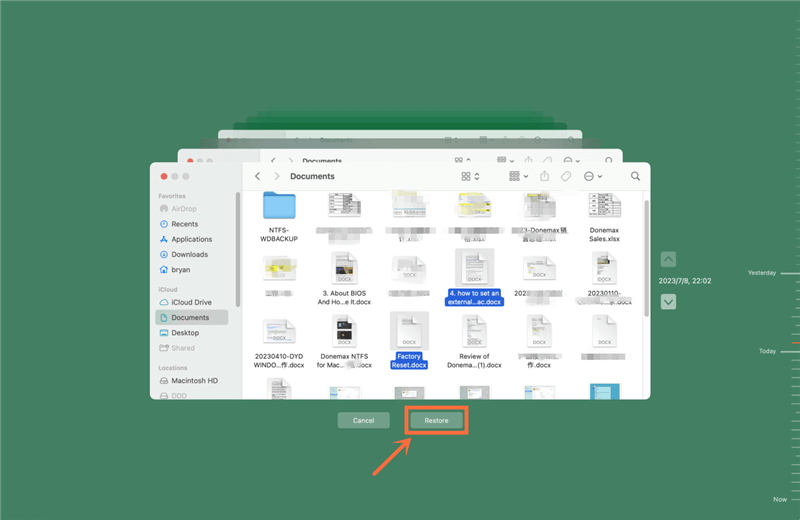
Step 1. Open the location where you lose your files. If you lose files on desktop, you don’t need to open a location.
Step 2. Connect the backup disk to your Mac. Go to Launchpad > Other > Time Machine, open Time Machine. Use the arrows and timeline to browse the local snapshots and backups.
Step 3. Find the files you want to recover, then select them and click on Restore button to restore them.
Method 3. Use Terminal Commands to Restore Deleted Files
Terminal tools are for advanced users to help them regain lost information. These lines might be useful:
Get Back Deleted Files from Trash: If you just cleared the Trash, you can use Terminal to find deleted files that haven't been overwritten yet and get them back.
"cd.Trash"
ls/la
Revert a Recent Delete:
Move to /Users/YourUsername/.Trash
copy filename to /path/to/restore
Method 4. Recover Lost Data with Data Recovery Software
If you have emptied the Trash or don’t have a backup, you can use data recovery software to help you recover lost data on macOS Sequoia. First of all, find a data recovery program which is compatible with macOS Sequoia and Apple silicon Macs, then you can run it to help you get the lost data back.
Donemax Data Recovery for Mac is a reliable data recovery program for macOS Sequoia. It can help you scan any drive and find all recoverable files.
Donemax Data Recovery for Mac
- Recover permanently deleted files on macOS Sequoia.
- Unformat hard drive to recover formatted and erased data.
- Recover lost data from damaged drive on Mac.
- Best data recovery software for macOS Sequoia.
Follow the steps below to recover lost data on macOS Sequoia:
Step 1. Download and install Donemax Data Recovery for Mac, then open it from Launchpad. Select the drive where you lose your files to start data recovery. If you lose data on your Mac, just select the internal disk - such as Macintosh HD.

Step 2. Click on Scan button to deeply scan the drive and find all recoverable files.

Step 3. Once the scan is completed, you can preview all recoverable files. Then select the desirable files, click on Recover button to save them.

Other data recovery tools for macOS Sequoia:
#1 EaseUS Data recovery wizard
Step 1. Choose the location and scan.
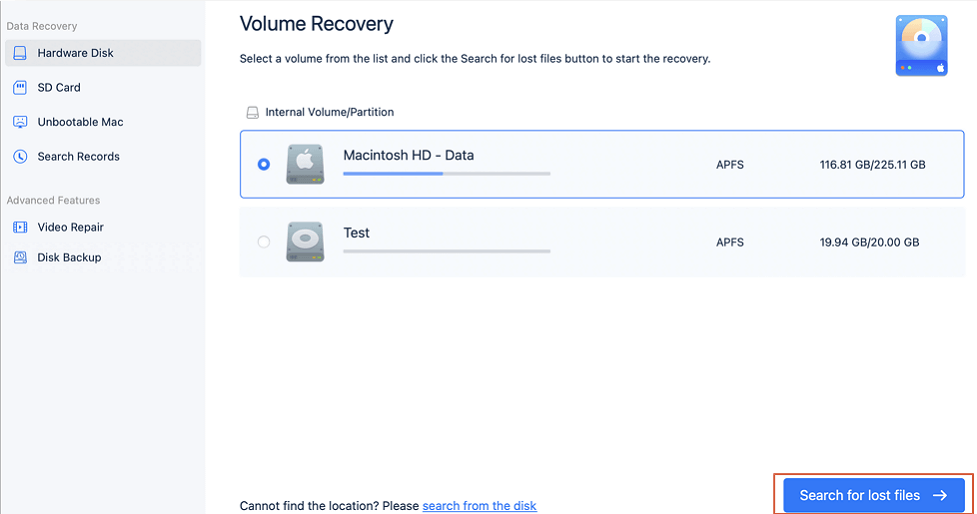
Start up EaseUS Data Recovery Wizard for Mac and pick the drive where the data was lost. Next, click "Search for lost files" to begin the search.
Step 2. Sort and view deleted files.
Once the scan is done, use the file format filter on the left or top right to get back the lost files.
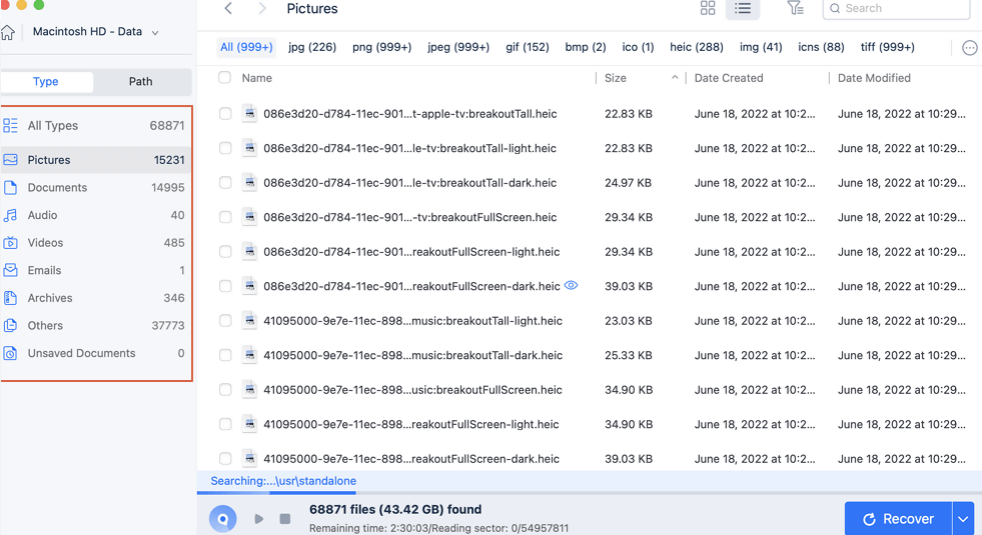
Step 3. Recover deleted files or data.

You can double-click on a file to see what's inside it or select several files once to get them back. Click "Recover" to return the lost files on a local or cloud drive.
#2 Disk Drill data recovery for Mac
People love Disk Drill because it can get back lost data quickly and well. You can look for lost data in great detail with the software's "deep scan," but it may take longer if the drive is big. Regarding recent data loss, the quick scan gives you more information. This data recovery software works with macOS Sequoia and can retrieve lost data from Apple Silicon Macs.
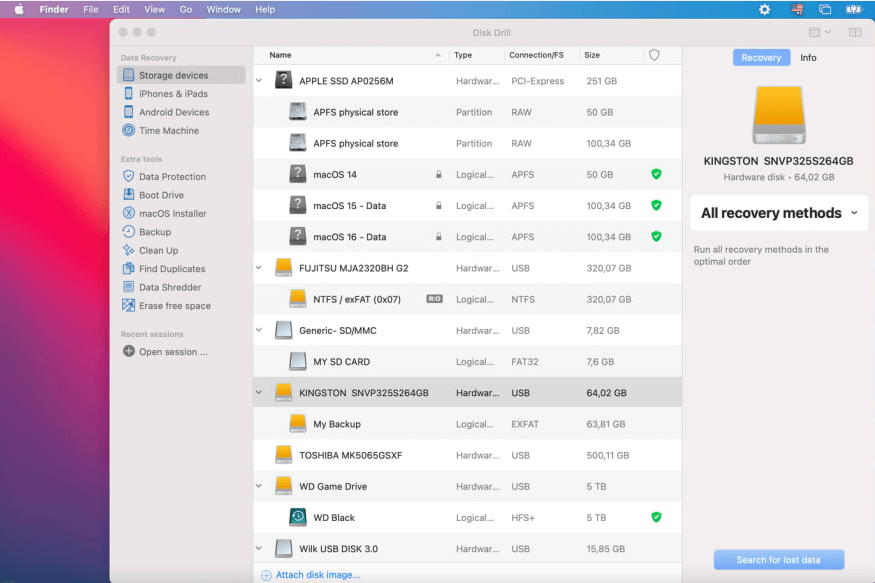
Key Features:
- Full File Recovery: It can return lost papers, photos, videos, music files, and more.
- Quick and Deep Scans: It has both quick and deep search modes that can help you find lost info.
- Partition Recovery: Able to get back sections that were lost.
- File Preview: Users can see examples of the things that can be sent back to them before they are returned.
- Data Protection Tools: Tools like Recovery Vault and Guaranteed Recovery keep you from losing your data again.
- Ease of Use: One that is easy for new and experienced users.
#3 Magoshare Data Recovery for Mac
Magoshare Data Recovery for Mac has helped many people get back lost info. If you lost files on macOS Sequoia when you cleared the trash or formatted the hard drive, you only have to download and run this software on your Mac. It can help you thoroughly search the Mac SSD or HDD and find all the files you have lost or removed.
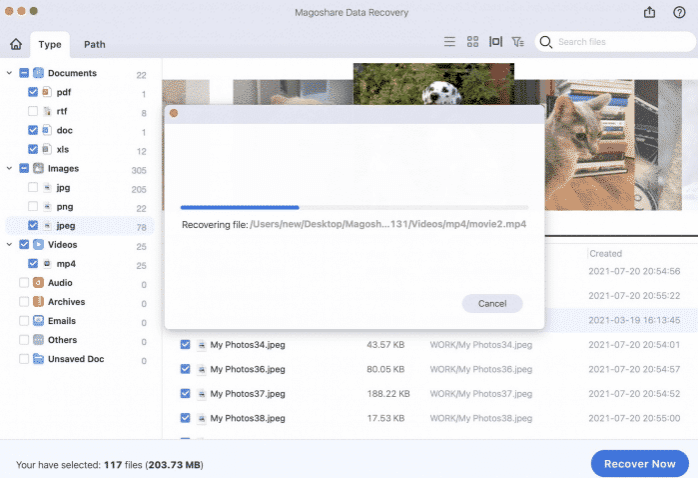
Key Features:
- Wide File Type Support: Finds and brings back lost things like videos, photos, emails, documents, etc.
- Quick and Deep Scans: It can do both quick and deep scans.
- Preview Functionality: Before you get the files back, look at them.
- Bootable Media: Make a USB drive that works to get back info from Macs that won't start.
- User-Friendly Interface: The style is simple and easy to use.
#4 Stellar Data Recovery for Mac
Stellar Data Recovery is popular because it works well and can retrieve many files. It takes longer, but the deep scan finds everything. Faster, though, the quick scan finds files that were just removed.
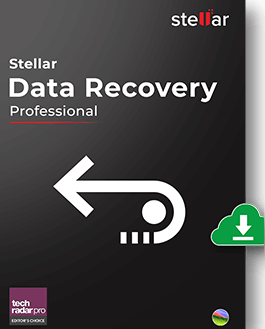
Key Features:
- All-in-One Recovery: Bring back pictures, movies, music, emails, papers, and more.
- Advanced Scanning: You can check quickly or deeply.
- File Preview: Before you restore files, look at what they look like.
- Disk Imaging: Make copies of disks to retrieve data from failed drives.
- Bootable Recovery Drive: Get info off Macs that won't turn on.
Method 5. Recover Lost Data Using Data Recovery Service
If your Mac gets damaged and can’t boot into macOS Sequoia, you can send your Mac to a professional data recovery store. The IT Pros will detect the drive and help you get the lost data back.
Preventing Future Data Loss:
After getting your info back, you should take steps to make sure you don't lose it again:
- Regular Backups: To keep your files safe, use Time Machine, iCloud, or some other backup service.
- Disk Maintenance: Use Disk Utility to check and keep your disks regularly to avoid errors.
- Update macOS: Always have the most recent version of macOS installed to get the most out of the latest security and stability changes.
- Use Reliable Antivirus: To keep your Mac safe from malware, install security software and keep it up to date.
FAQs About macOS Sequoia Data Recovery
1. How to recover permanently deleted files on macOS Sequoia?
Donemax Data Recovery can help you recover permanently deleted files and recover formatted data on macOS Sequoia:
- Download and install Donemax Data Recovery on your Mac, open it.
- Select the target drive, click on Scan button.
- Deeply scan the drive.
- Preview and recover lost files.
2. What is the best data recovery software for macOS Sequoia?
Here are best 5 data recovery software for macOS Sequoia:
- Donemax Data Recovery for Mac
- EaseUS Data Recovery for Mac
- Stellar Data Recovery for Mac
- Magoshare Data Recovery for Mac
- Disk Drill
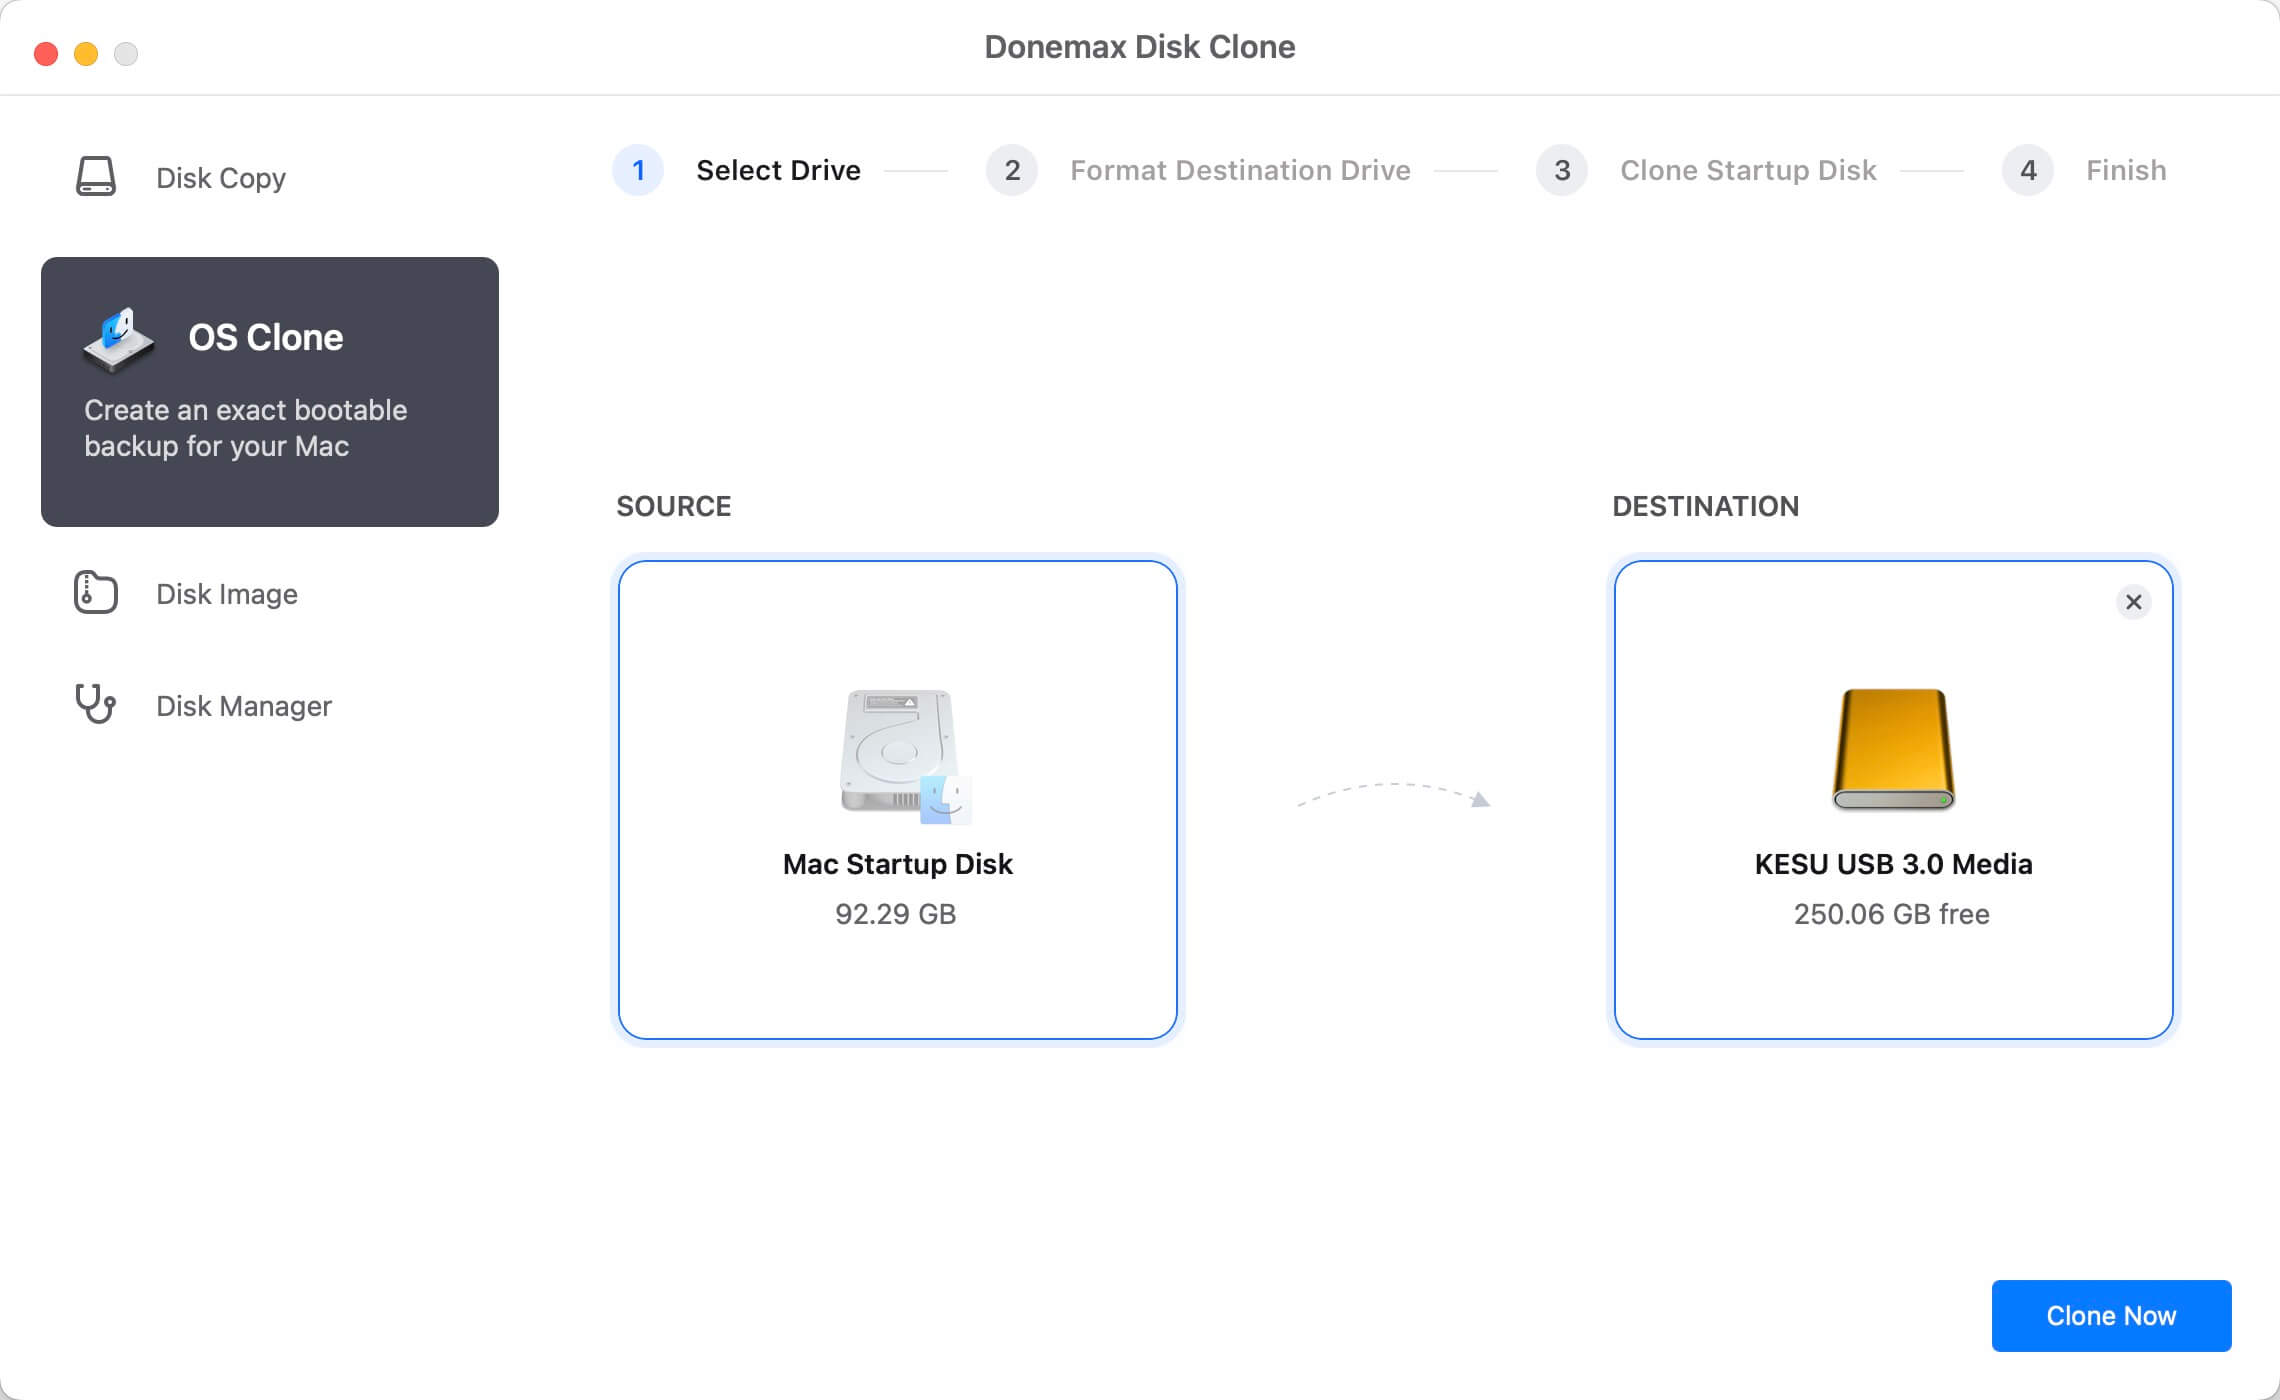
3. How to make a bootable clone for macOS Sequoia?
You can use disk cloning software, such as Donemax Disk Clone for Mac, to help you make a full bootable clone for your Mac.
- Download and install Donemax Disk Clone for Mac, connect an external hard drive to your Mac.
- Open Donemax Disk Clone for Mac, choose OS Clone mode.
- Select the external hard drive as the destination drive.
- Click on Clone Now button.
- Clone all data including macOS Sequoia, apps, user files, settings from your Mac to the external hard drive and create a full bootable clone backup.
4. What is the best methods to recover lost data after upgrading to macOS Sequoia?
Here are efficient methods to help in recovering lost data on macOS Sequoia:
- Recover deleted files from Trash.
- Restore lost files from Time Machine backup or clone backup.
- Recover lost files from iCloud.
- Recover lost data with data recovery software.
- Recover deleted files with Terminal commands.
- Recover lost files by using professional data recovery service.
Conclusion:
Losing data on macOS Sequoia can be stressful, but you can usually get it back with the right steps. First, use tools like Time Machine and Terminal with macOS. If that doesn't work, use third-party data recovery software. You may need to use skilled data recovery services in the worst situations. You can protect your data in the future and increase the chances of successfully recovering lost data by taking preventative steps and moving quickly after data loss.
Related Articles
- Dec 31, 2024Can't Find a File on Mac? Get It Back By Searching or Recovering
- Nov 01, 2024Best 5 Mac Data Recovery Software: Recover Lost Files Quickly and Safely
- Mar 04, 2025[5 Methods] Recover Deleted or Unsaved TextEdit Files on Mac
- Mar 26, 2025Recover RAW Files from SD Card or Other Device on Mac [4 Methods]
- Jan 21, 2025How to Recover Data From FileVault Hard Drive on Mac?
- May 06, 2024What Is RTF File? How to Recover Deleted RTF Files on Mac?

Contributing Writer
Steven
Steven has been a senior writer & editor of Donemax software since 2020. He's a super nerd and can't imagine the life without a computer. Over 6 years of experience of writing technical solutions and software tesing, he is passionate about providing solutions and tips for Windows and Mac users.

Editor in chief
Gerhard Chou
In order to effectively solve the problems for our customers, every article and troubleshooting solution published on our website has been strictly tested and practiced. Our editors love researching and using computers and testing software, and are willing to help computer users with their problems