Written byStevenUpdated on Jun 19, 2024
How to Clone Hard Drive On macOS Sequoia?
Approved byGerhard Chou
PAGE CONTENT:
Cloning a hard drive on macOS Sequoia is a good way to keep your files safe or transfer data between different machines. You can be sure that your operating system, apps, and personal data are safe by making an exact copy of your drive. It can also be used to move your data to a new drive. You can clone your data easily and quickly, whether switching to a bigger drive, moving to a new Mac, or keeping it safe.
This guide tells you everything you need to know about cloning hard drive on macOS Sequoia, from getting ready to pick the right software like Donemax Disk Clone for Mac, Carbon Copy Cloner, SuperDuper!, or Disk Utility, as well as detailed steps to ensure the process goes smoothly. Learn this important skill by following along; your personal information will be safe.

Preparing for the Cloning Process:
Before you start the cloning process, make sure you have these things:
✦ Target Drive: Choose a target drive with enough space to hold all the data from the source drive. The target drive should be at least as big as the source drive, if possible.
✦ Backup (Optional): A second copy of your data is always a good idea, but it's especially important if you're cloning your main drive. You might want to use cloud files or external hard drives for this.
You can start the cloning process once you have all the tools you need and the target drive is ready.
Clone Hard Drive on macOS Sequoia with Donemax Disk Clone for Mac [100% Successful]
Donemax Disk Clone for Mac is a powerful Mac disk cloning application which is fully compatible with macOS Sequoia. It can help you securely clone hard drive on macOS Sequoia, create bootable clone for your Mac and make disk image backup, etc.
Donemax Disk Clone for Mac
- Clone HDD/SSD/External device on macOS Sequoia.
- Make a full bootable clone backup for macOS Sequoia.
- Make disk image such as ZIP or DMG backup for macOS Sequoia.
Download and install Donemax Disk Clone for Mac on your macOS Sequoia machine, then choose a disk clone mode to help you clone hard drive:
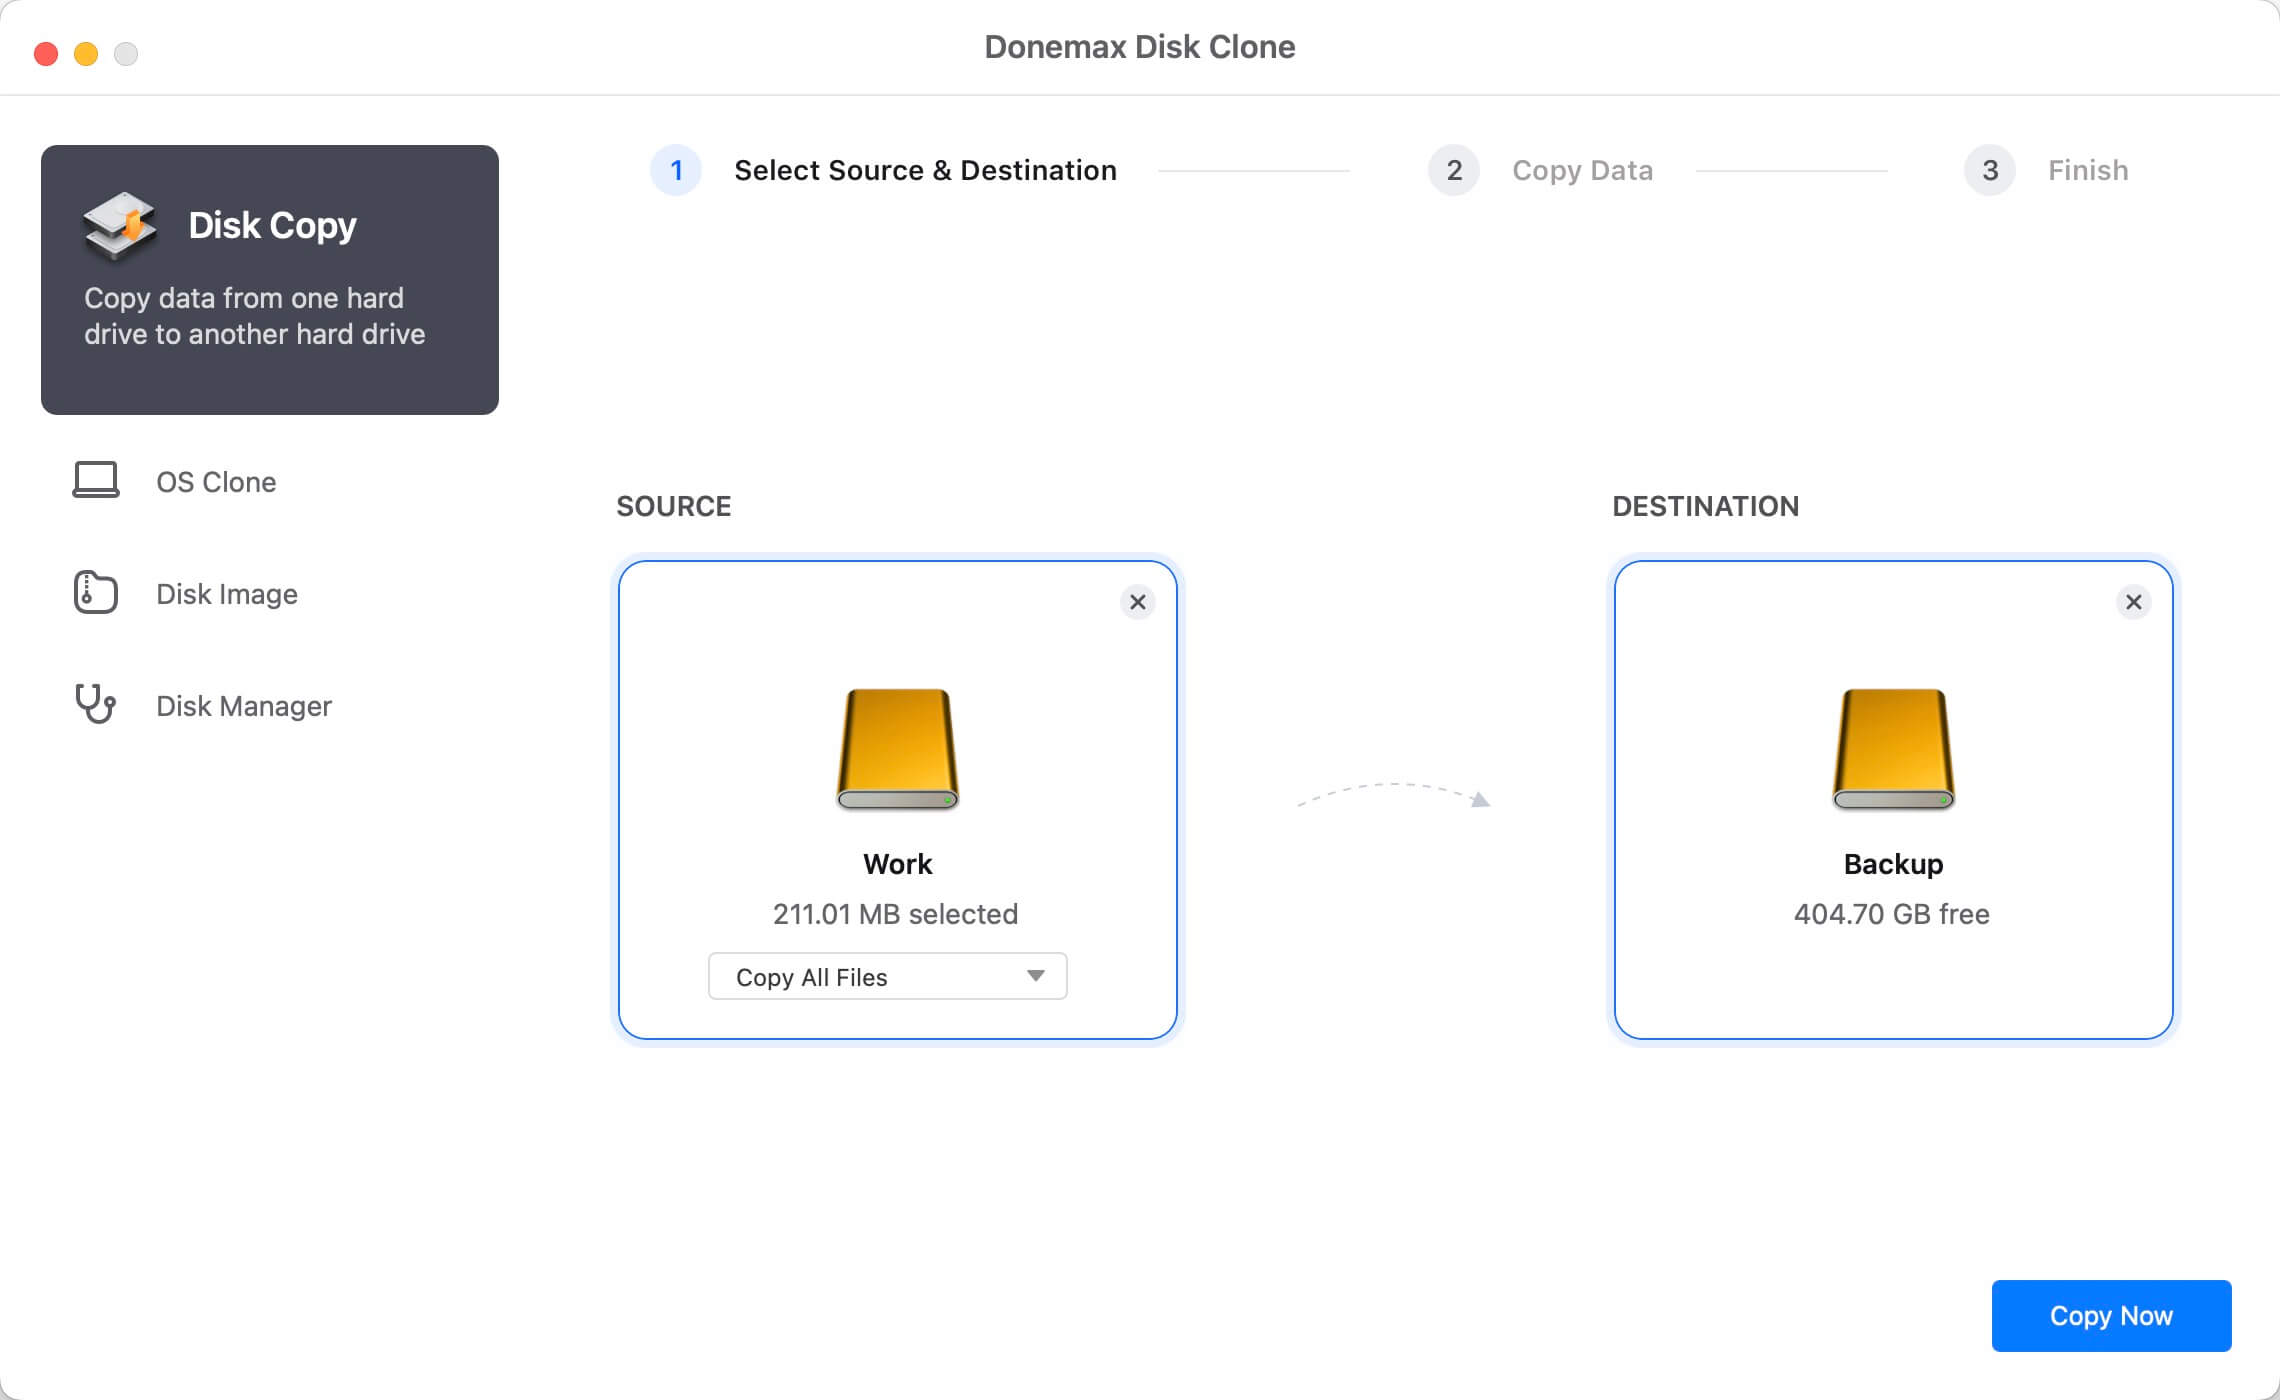
Mode 1. Disk Copy
This mode can help you securely copy data from one hard drive to another drive. If you want to make a backup for your hard drive, this mode is a good option. Just connect the backup drive to your Mac. Then select the source drive and the destination drive, click on Copy Now button to quickly copy data from the source drive to the destination drive.
Mode 2. OS Clone
OS Clone mode is able to clone everything of the Mac internal drive to an external hard drive and create a full bootable clone backup. If you want to make a bootable clone backup for macOS Sequoia, just choose this mode.
Step 1. Open Donemax Disk Clone for Mac, choose OS Clone mode. Connect an external hard drive to the Mac.
Step 2. The internal SSD or HDD has been selected as the source drive by default, you just need to select the external hard drive as the destination drive.
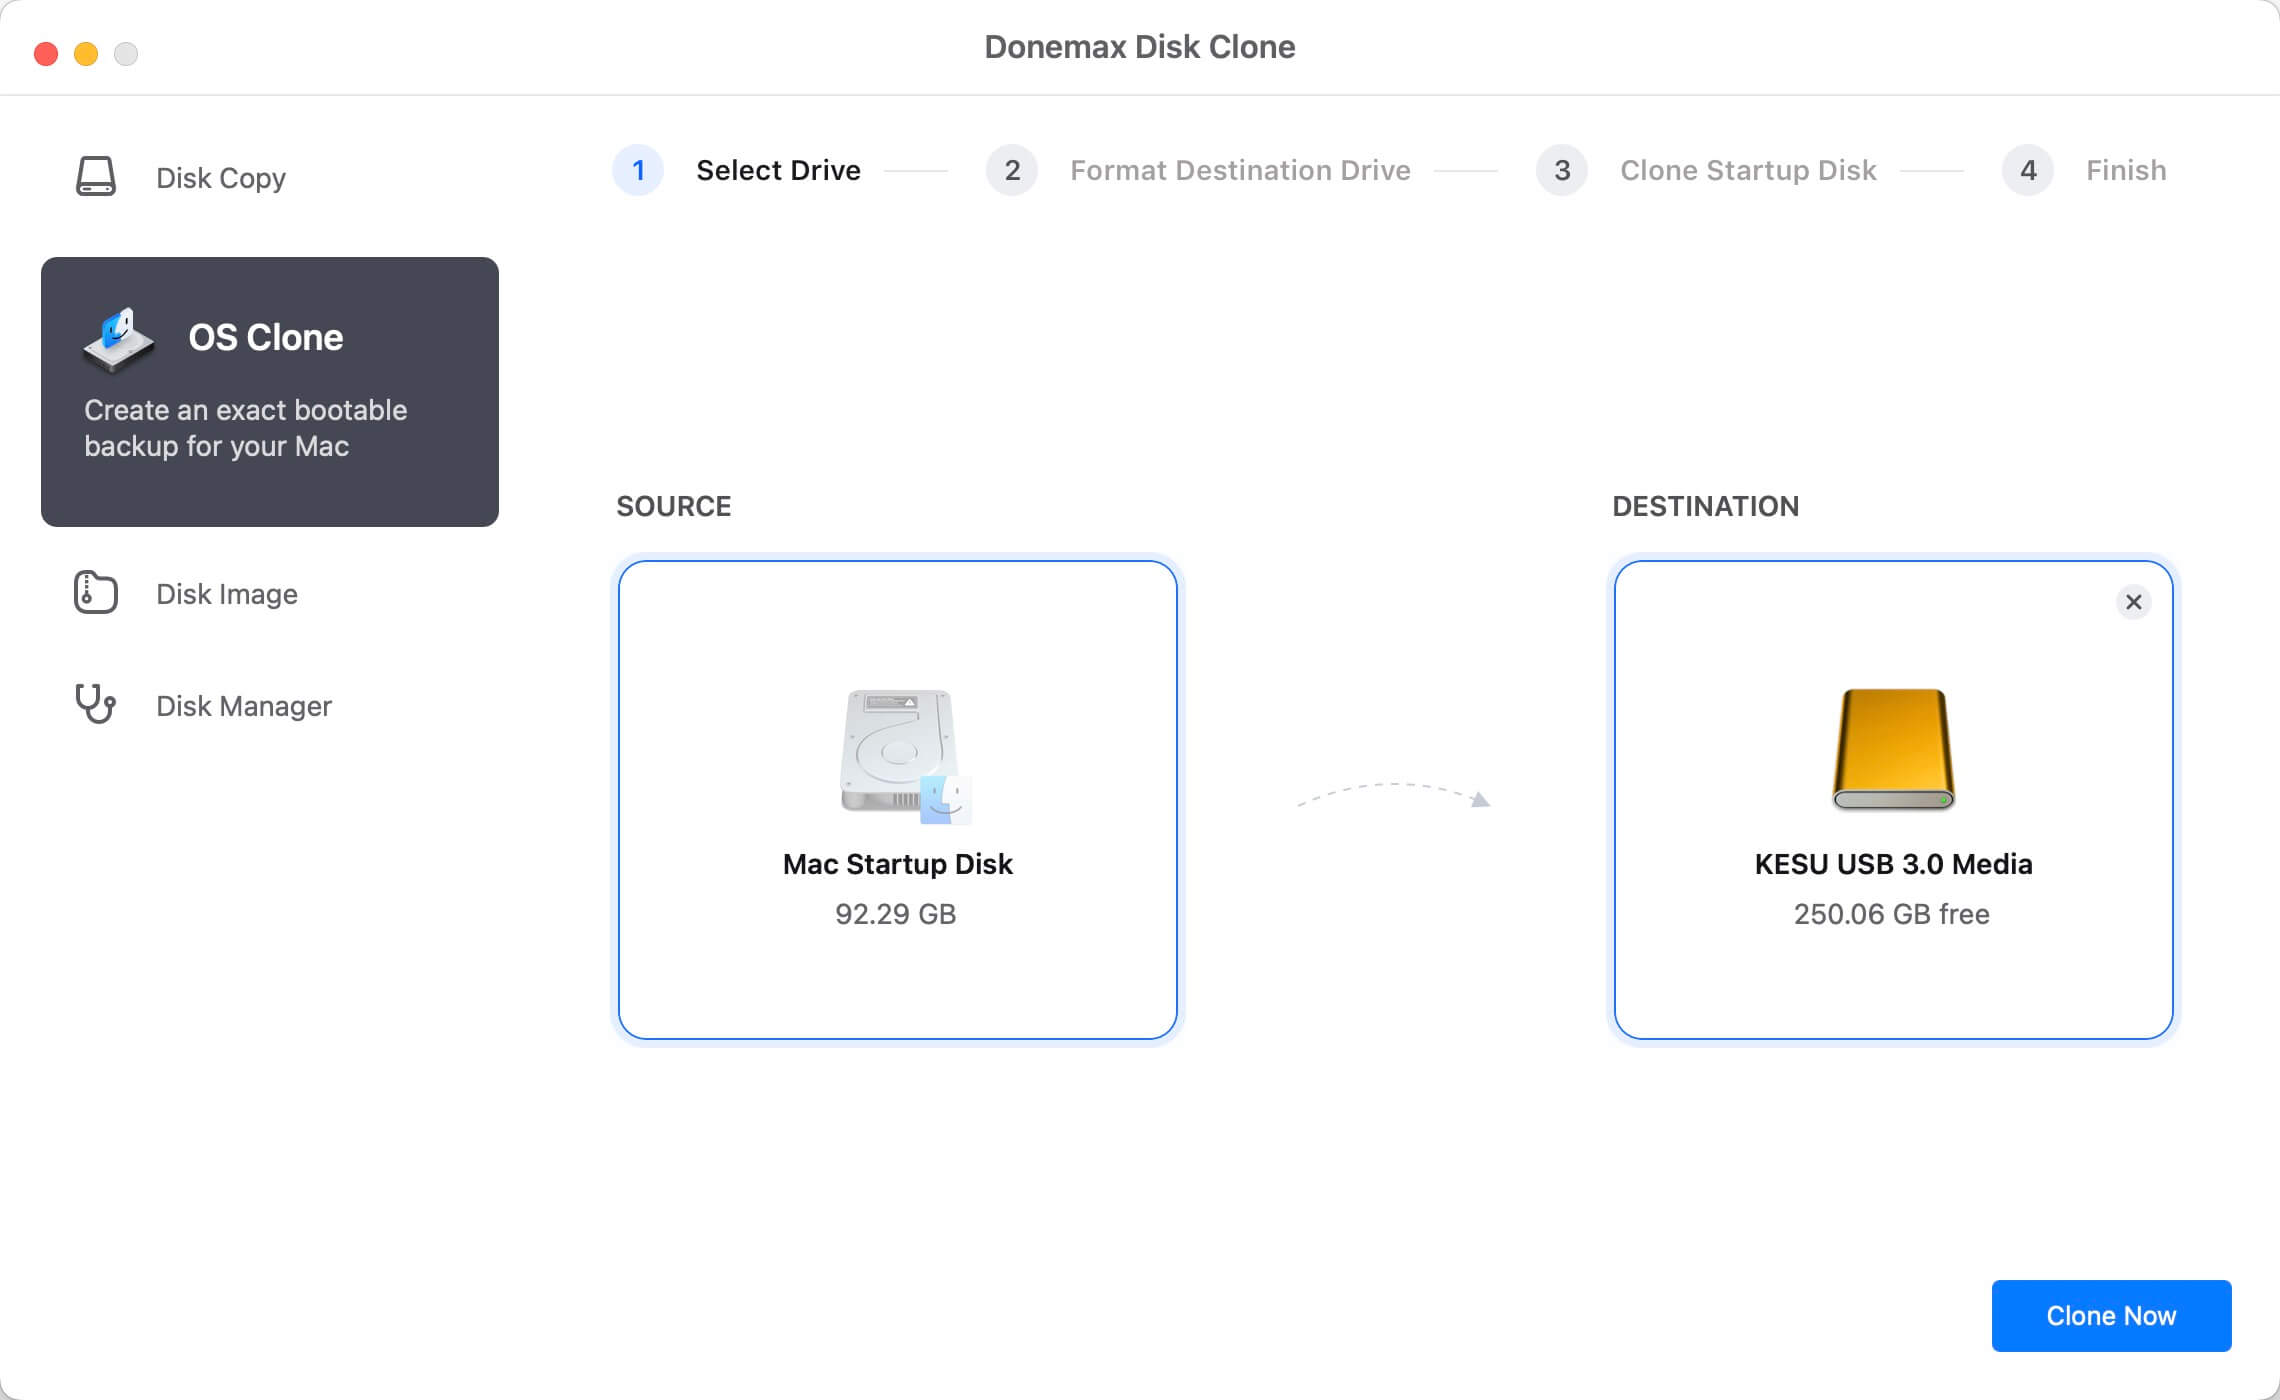
Step 3. Click on Clone Now button to clone everything including macOS Sequoia operating system, apps, settings, user files from the Mac disk to the external hard drive and create a full bootable clone backup.
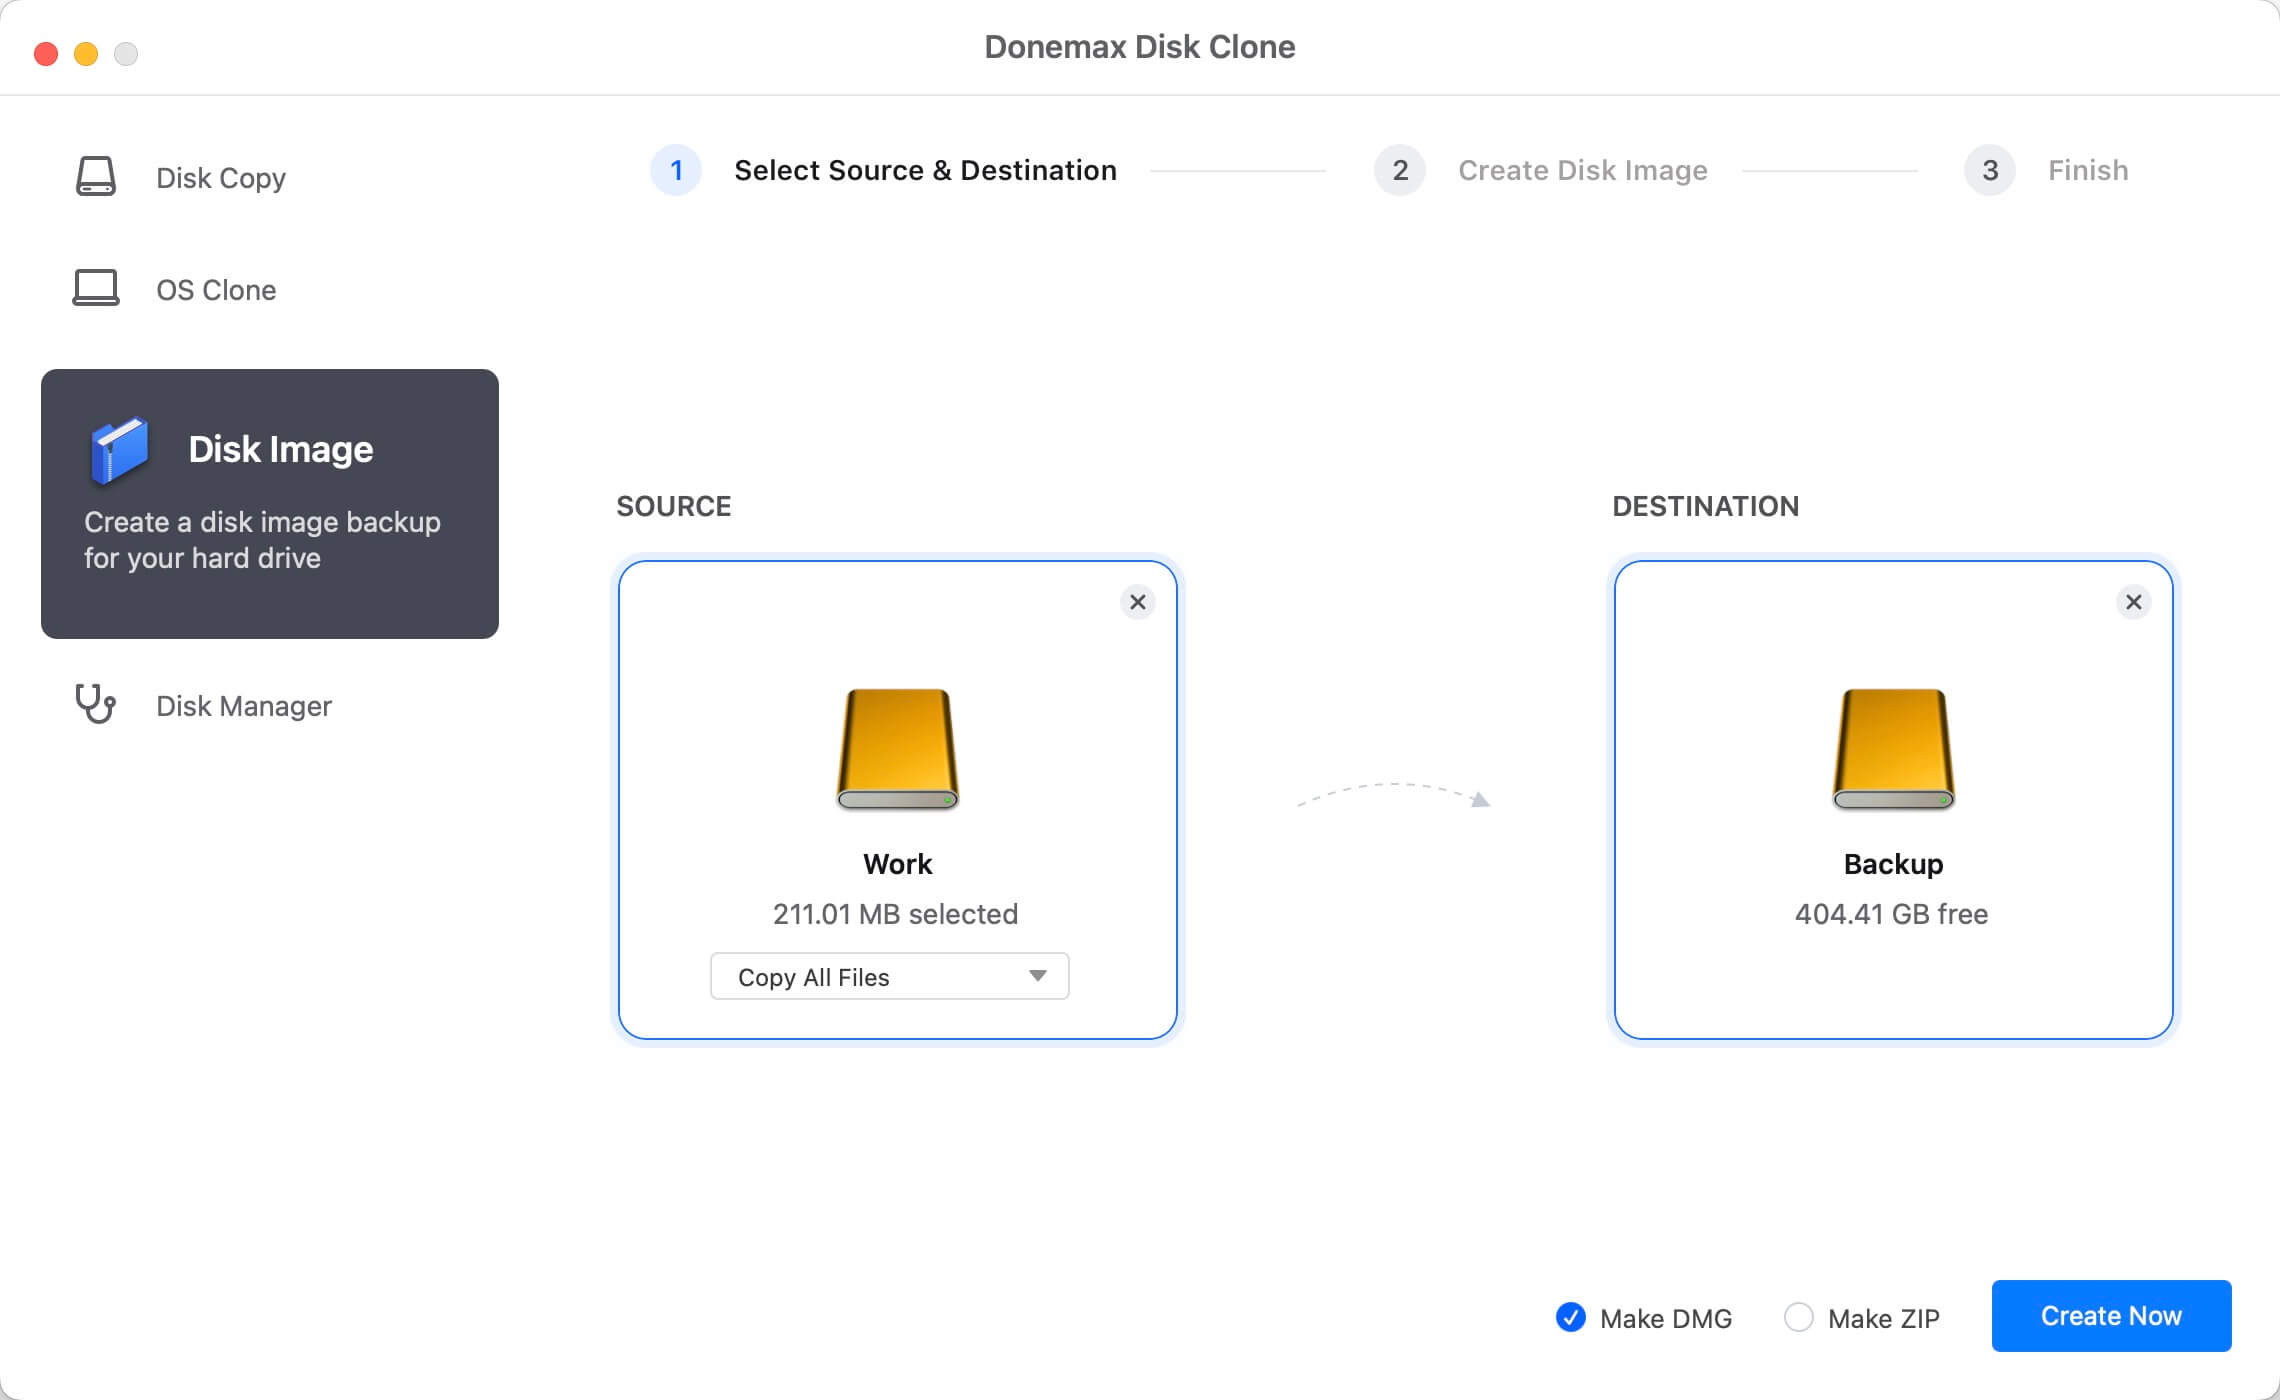
Mode 3. Disk Image
It can help to create a DMG or ZIP backup for your Mac. Just connect an external hard drive to the Mac, select the Mac disk as the source drive and select the external hard drive as the destination drive. Click on Create Now button to create a disk image backup for the Mac and save it to the external hard drive.
Other Methods to Clone Hard Drive on macOS Sequoia
Method 1. Use Carbon Copy Cloner
Step 1: Install Carbon Copy Cloner
- Download CCC: Get the newest version of the software by downloading the Carbon Copy Cloner website and downloading it.
- Install CCC: Install the downloaded file to put CCC on your Mac.
Step 2: Prepare the Destination Drive
- Connect the Drive: Use the right connection (USB, Thunderbolt, etc.) to connect your target drive to your Mac.
- Format the Drive: Choose the drive you want to format as "Mac OS Extended (Journaled)" or "APFS" in Disk Utility. That will rely on the format of the drive you are currently using.
Step 3: Launch Carbon Copy Cloner
- Open CCC: Go to your Applications area and open Carbon Copy Cloner.
- Create a New Task: To make a new cloning task, click the "+" button.
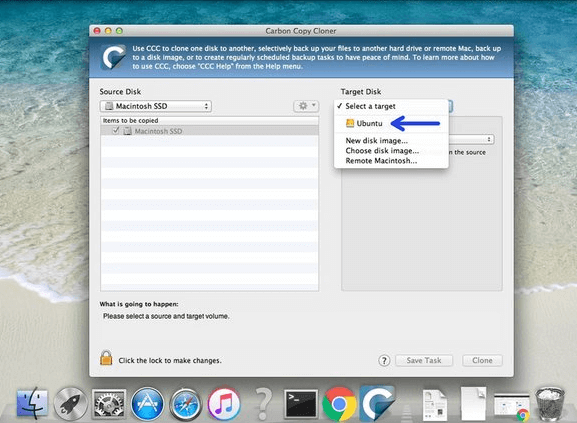
Step 4: Select Source and Destination

- Choose Source Drive: Click on the "Source" dropdown menu and pick the drive you want to copy.
- Choose Destination Drive: Click on the "Destination" dropdown menu and pick the drive you want to copy to.
Step 5: Configure Cloning Options
- Clone Everything: To make an exact copy of your source drive, check that "Clone all files" is checked.
- Schedule Clones (Optional): Use the organizing tools to make backups happen if you want to do them automatically.

Step 6: Start Cloning
- Begin the Clone: To begin the cloning process, click the "Clone" button. The time it takes may depend on how big your drive is.
- Monitor Progress: CCC will show the progress of the clone. Make sure there are no mistakes in the process.
Step 7: Verify the Clone
- Check the Clone: Check the target drive to ensure all the files have been copied when the process is complete.
- Boot from Clone: Restart your Mac and hold down the Option key to ensure the clone can start. From the boot window, choose the copied drive.
Method 2. Use SuperDuper!
Step 1: Install SuperDuper!
- Download SuperDuper: Get the most recent version of the software by going to the SuperDuper website and downloading it.
- Install SuperDuper: Install the downloaded file to install SuperDuper on your Mac.
Step 2: Prepare the Destination Drive
- Connect the Drive: Use the right link (USB, Thunderbolt, etc.) to connect your destination drive to your Mac.
- Format the Drive: Choose the drive you want to format as "Mac OS Extended (Journaled)" or "APFS" in Disk Utility. That will rely on the format of the drive you are currently using.
Step 3: Launch SuperDuper!
- Open SuperDuper!: Open SuperDuper! from the "Apps folder."
- Configure Backup: Choose your source drive from the "Copy" dropdown menu in the main window. Then, choose your target drive from the "to" dropdown menu.
Step 4: Start Cloning
- Begin the Clone: To begin the cloning process, click the "Copy Now" button. The time it takes may depend on how big your drive is.
- Monitor Progress: It will show how the clone is doing. Make sure there are no mistakes in the process.
Step 5: Verify the Clone
- Check the Clone: Check the target drive to ensure all the files have been copied when the process is complete.
- Boot from Clone: Restart your Mac and hold down the Option key to ensure the clone can start. From the boot window, choose the copied drive.
Method 3. Use Disk Utility
Step 1: Prepare the Destination Drive
- Connect the Drive: Use the right link (USB, Thunderbolt, etc.) to connect your destination drive to your Mac.
- Format the Drive: Choose the drive you want to format as "Mac OS Extended (Journaled)" or "APFS" in Disk Utility. That will rely on the format of the drive you are currently using.
Step 2: Launch Disk Utility
Open Disk Utility: You can access Disk Utility by going to Applications > Utilities.
Step 3: Clone the Drive
- Choose Source Drive: Choose your source drive on the left in Disk Utility.
- Select Restore: Tap the "Restore" button.
- Choose Destination: Pick your source drive in the "Restore from" field. Choose the drive you want to restore to in the "Restore to" field.
- Start the Clone: Click the "Restore" button to begin the cloning process. The time it takes may depend on how big your drive is.
- Monitor Progress: Disk Utility will show how the clone is going. Make sure there are no mistakes in the process.
Step 4: Verify the Clone
- Check the Clone: Check the target drive to ensure all the files have been copied when the process is complete.
- Boot from Clone: Restart your Mac and hold down the Option key to ensure the clone can start. From the boot window, choose the copied drive.
Conclusion:
If you have the right tools and are ready, cloning a hard drive on macOS Sequoia is simple. There is a safe way to make an exact copy of your hard drive with each tool: Donemax Disk Clone for Mac, Carbon Copy Cloner, SuperDuper!, and Disk Utility.
Following the steps in this guide, you can ensure that your data is backed up and moved easily or moved to a new drive without any problems. Regularly Cloning your hard drive can save you time and keep your files safe if something goes wrong with the hardware.
FAQs About macOS Sequoia Disk Clone
1. How to create a bootable clone for macOS Sequoia?
- Download and install Donemax Disk Clone for Mac.
- Open this disk cloning software, choose OS Clone mode.
- Select the external hard drive as the destination drive.
- Click on Clone Now button.
- Clone all data from your Mac to the external hard drive and create a full bootable clone backup.
2. What is the best disk cloning software for macOS Sequoia?
Here is the list of top 5 disk cloning software for macOS Sequoia:
- Donemax Disk Clone for Mac
- Carbon Copy Cloner
- SuperDuper!
- AweClone for Mac
- DoYourClone for Mac
3. How to clone internal SSD to an external SSD after upgrading to macOS Sequoia?
Donemax Disk Clone for Mac can help you clone all data including macOS Sequoia, settings, apps and user files from the internal SSD to the external SSD.
Related Articles
- Nov 19, 2024How to Create a Bootable Clone for macOS Monterey? [Step-by-step Guide]
- Apr 12, 2024Carbon Copy Cloner Clone Won't Boot, How to Fix It
- Nov 11, 2024[Easy Steps] Clone Hard Disk on iMac with Mac Disk Cloning Software
- Feb 11, 2025Disk Copy on macOS Sequoia – 1:1 Copy Disk on macOS Sequoia
- Feb 25, 2024How to Make A Backup or Bootable Clone for M3-chip Mac?
- Mar 25, 2024Easy Way to Clone Hard Drive on macOS Mojave

Contributing Writer
Steven
Steven has been a senior writer & editor of Donemax software since 2020. He's a super nerd and can't imagine the life without a computer. Over 6 years of experience of writing technical solutions and software tesing, he is passionate about providing solutions and tips for Windows and Mac users.

Editor in chief
Gerhard Chou
In order to effectively solve the problems for our customers, every article and troubleshooting solution published on our website has been strictly tested and practiced. Our editors love researching and using computers and testing software, and are willing to help computer users with their problems