Summary: Can't create bootable clone backup for macOS 12 Monterey with Time Machine? Don't worry, you can use Mac disk cloning software - Donemax Disk Clone for Mac to securely create an exact bootable clone backup for macOS Monterey.
PAGE CONTENT:
In today's digital age, data security and system reliability are essential. Whether you're a casual Mac user or a professional, having a bootable clone of your macOS installation is a smart move. A bootable clone allows you to easily recover your system in case of failure, move to a new Mac, or quickly perform troubleshooting tasks without worrying about losing your data. In this article, we'll walk you through the process of creating a bootable clone for macOS Monterey, one of the most popular macOS versions.
What Is a Bootable Clone, and Why Do You Need One?
A bootable clone is essentially an exact copy of your entire macOS system, including the operating system, applications, settings, and all files. It's stored on an external drive (like a USB drive or external SSD), which you can use to boot your Mac in case of emergency, such as a system crash or hard drive failure. Having a bootable clone of macOS Monterey ensures that you can restore your system, retrieve important files, or even migrate to a new machine with minimal hassle.
Prerequisites for Creating a Bootable Clone for macOS Monterey
Before diving into the cloning process, you'll need to gather a few essential items:
- Mac Computer Running macOS Monterey
The process requires a Mac computer that's already running macOS Monterey or another compatible macOS version. If you're planning to use this clone for system recovery or migration, it should have the same or a later macOS version.
- External Storage Device
To create a bootable clone, you'll need an external storage device such as a USB flash drive, an external hard drive, or a solid-state drive (SSD). The device should have at least 16GB of free space, but for larger systems or to store more data, you may want something with more storage capacity.
- Backup Your Data
It's always a good idea to back up your important data before starting. While cloning is a safe process, unexpected issues can arise. Time Machine is a built-in macOS tool that can create a backup of your entire system, ensuring your data is safe before proceeding. (Check how to use Time Machine >>)
- Cloning Software
There are several tools available for creating a bootable clone. Some are free, while others are paid, but they all offer reliable ways to clone your macOS Monterey system. Some of the most popular cloning tools include:
- Donemax Disk Clone for Mac (Support Intel-based, T2 and Apple silicon M-chips Mac)
- Carbon Copy Cloner (CCC) (for Intel-based Mac)
- SuperDuper! (for Intel-based Mac)
How to Create a Bootable Clone for macOS Monterey? [3 Methods]
Now that you're prepared, let's dive into the process of making a bootable clone for macOS Monterey:
Step 1: Choose the Right Cloning Software
When it comes to cloning your macOS system, you have a few options. Let's explore three of the most popular choices:
#1 Donemax Disk Clone for Mac
Donemax Disk Clone for Mac is one of the most powerful Mac disk cloning software. It supports Intel-based Macs, Apple T2 Security Macs, Apple silicon Macs. With OS Clone mode, it can easily and securely create bootable clone backups for macOS Monterey or other versions.
Key Features:
- Clone HDD/SSD/External device on Mac.
- Create full bootable clone backup for macOS Monterey.
- Make disk image backup for Mac.
- Fast cloning process.
#2 Carbon Copy Cloner (CCC)
Carbon Copy Cloner is one of the most widely used cloning tools for macOS. It’s known for its ease of use, reliability, and extra features like scheduled backups and the ability to create incremental backups (only copying files that have changed since the last backup). It offers a 30-day free trial, and after that, you'll need to purchase a license.
Key Features:
- Supports creating bootable clones.
- Allows you to schedule backups and incremental cloning.
- Easy-to-use interface for both beginners and advanced users.
- Fast and efficient cloning process.
#3 SuperDuper!
SuperDuper! is another excellent option, known for its simplicity and robust performance. It’s perfect for users who want a no-fuss cloning tool. While it’s not as feature-packed as CCC, it gets the job done well. It also offers a free version with limited functionality and a paid version for full features.
Key Features:
- Very user-friendly.
- Offers the ability to create a fully bootable clone.
- Supports scheduling and incremental backups (with the paid version).
- Free version for basic cloning tasks.
Step 2: Prepare the External Drive
Once you've chosen your cloning software, the next step is to prepare the external storage device where you'll store the bootable clone. This is a crucial step because the external drive needs to be properly formatted to ensure the clone is bootable.
#1 Format the External Drive
To format the external drive for macOS, follow these steps:
- Open Disk Utility: You can find Disk Utility by searching for it using Spotlight (Command + Space).
- Select the External Drive: In the Disk Utility sidebar, select your external drive (be sure you're selecting the entire drive, not just a partition).
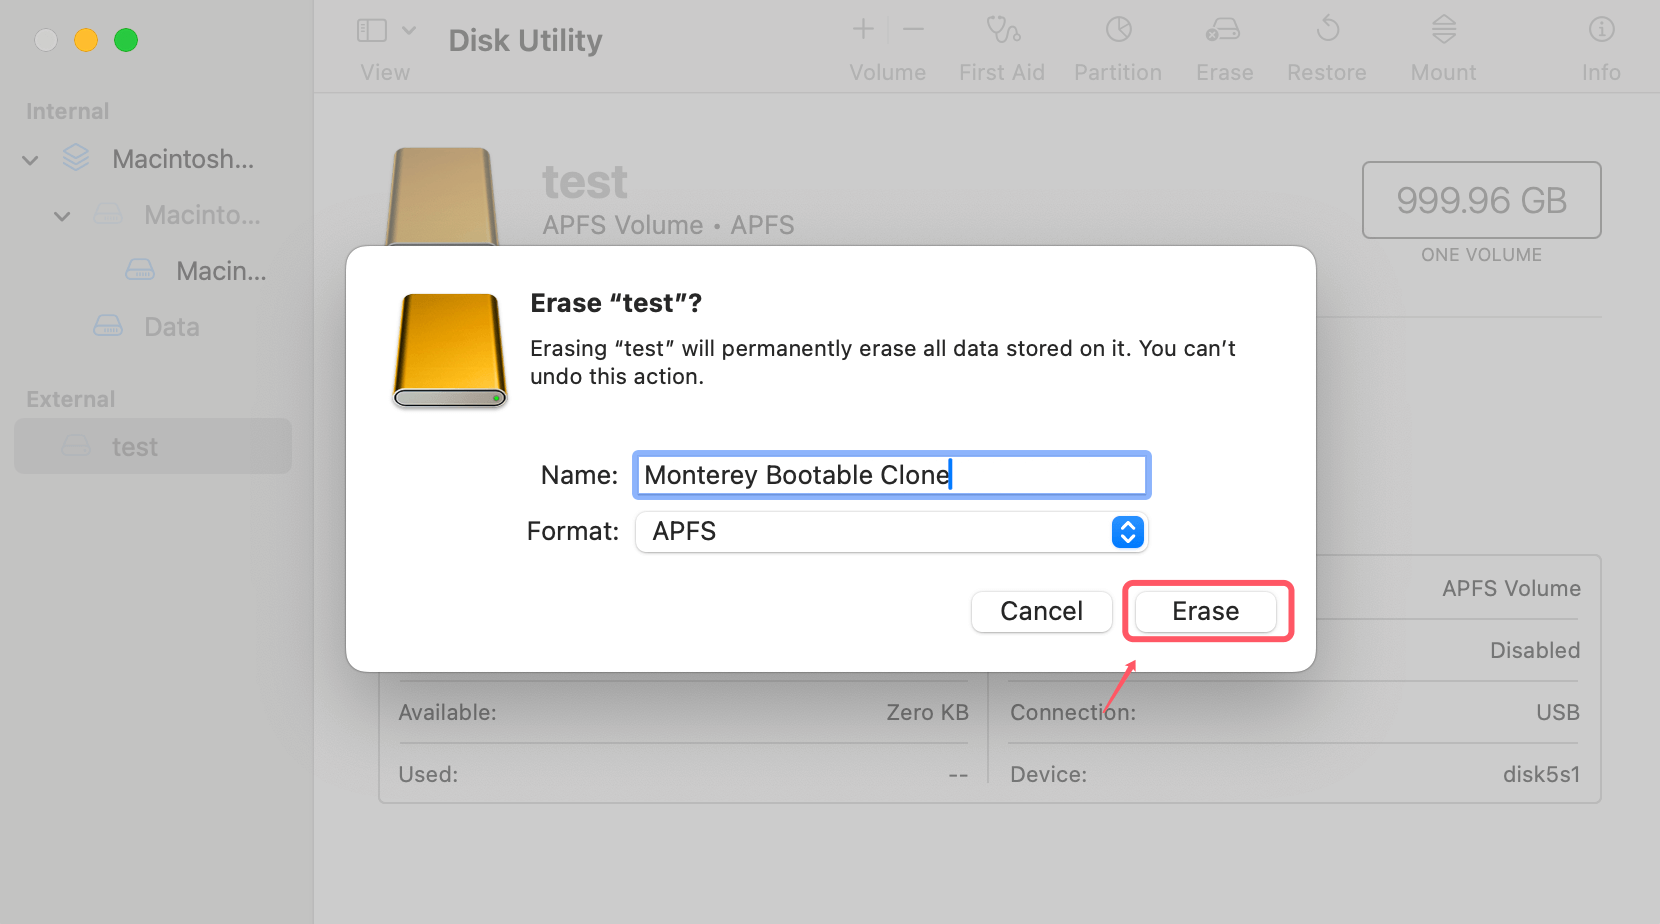
- Erase the Drive: Click on the "Erase" button at the top of the window. In the format menu, choose APFS (for newer macOS versions like Monterey) or Mac OS Extended (Journaled) if you're using older macOS versions.
- Set Partition Scheme: Choose GUID Partition Map, which is required for bootable drives.
- Confirm: Click "Erase" to format the drive. This will delete all data on the drive, so make sure you've backed up any important files beforehand.
![creating a bootable clone for macOS Monterey]()
Once formatted, your external drive will be ready to receive the bootable clone.
Step 3: Clone Your macOS Monterey System
With the external drive prepared and the cloning software installed, you're ready to create the bootable clone. We'll focus on the two most popular cloning tools:Donemax Disk Clone for Mac, Carbon Copy Cloner and SuperDuper!.
#1 Using Donemax Disk Clone for Mac
1. Download and install Donemax Disk Clone for Mac on your Mac which is running macOS Monterey.
2. Open Donemax Disk Clone for Mac and choose OS Clone mode, select the external hard drive as the destination drive.

3. Click on Clone Now button to securely clone everything including macOS Monterey, settings, apps and user data from the internal drive to the external hard drive, making a full bootable clone.

Once the process gets finished, you can set the external hard drive as the Mac's startup disk.
#2 Using Carbon Copy Cloner (CCC)
- Install CCC: Download and install Carbon Copy Cloner from the official website.
- Launch CCC: Open the application and grant it the necessary permissions.
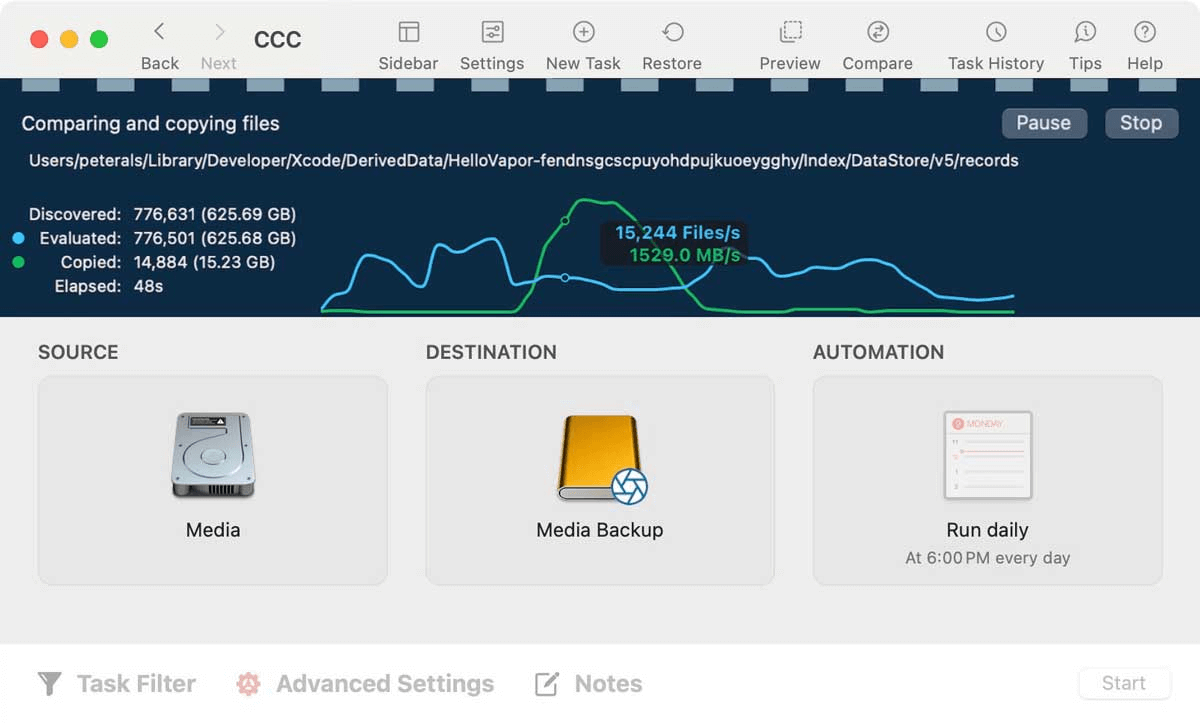
- Select the Source Drive: In CCC, click the "Source" button and choose your Mac’s internal drive (the one with macOS Monterey installed).
- Select the Destination Drive: Click the "Destination" button and select the external drive you just formatted.
![creating a bootable clone for macOS Monterey]()
- Start Cloning: Click the "Clone" button. CCC will start copying all data from your Mac’s internal drive to the external drive. This process may take some time depending on the size of your system and the speed of your drives.
- Verify Bootability: After cloning, restart your Mac and hold the Option (⌥) key while booting. You should see the external drive listed as a bootable option. Select it to boot from the cloned drive and ensure everything works properly.
#3 Using SuperDuper!
- Install SuperDuper!: Download and install SuperDuper! from the official website.
- Launch SuperDuper!: Open the app and grant the necessary permissions.
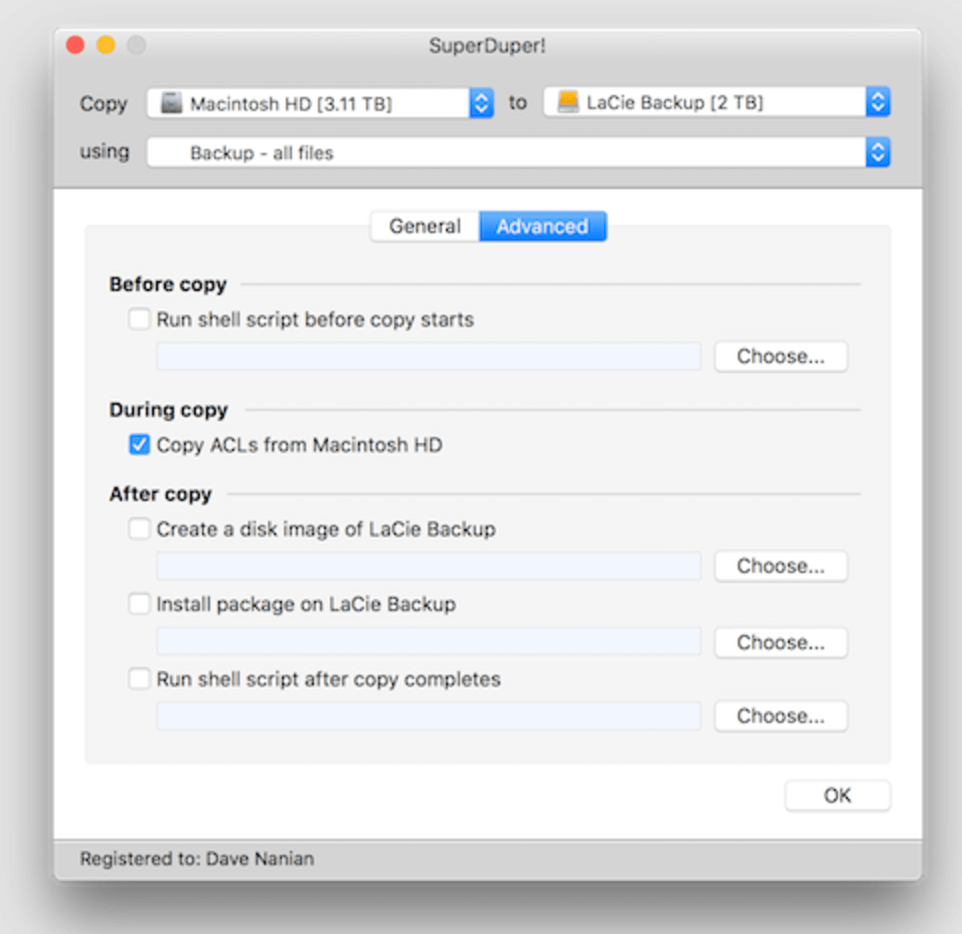
- Select the Source and Destination: Choose your internal drive as the source and the external drive as the destination.
![creating a bootable clone for macOS Monterey]()
- Choose the Backup Type: Select "Backup – all files" for a complete copy of your system.
- Start Cloning: Click "Copy Now" to begin the cloning process. SuperDuper! will copy all data from your Mac to the external drive.
- Test the Bootable Clone: As with CCC, restart your Mac and hold the Option key during boot to test if the external drive is bootable.
Step 4: Make the External Drive Bootable
Once the cloning process is complete, you need to ensure the external drive is bootable.
- Restart Your Mac: With the external drive plugged in, restart your Mac.
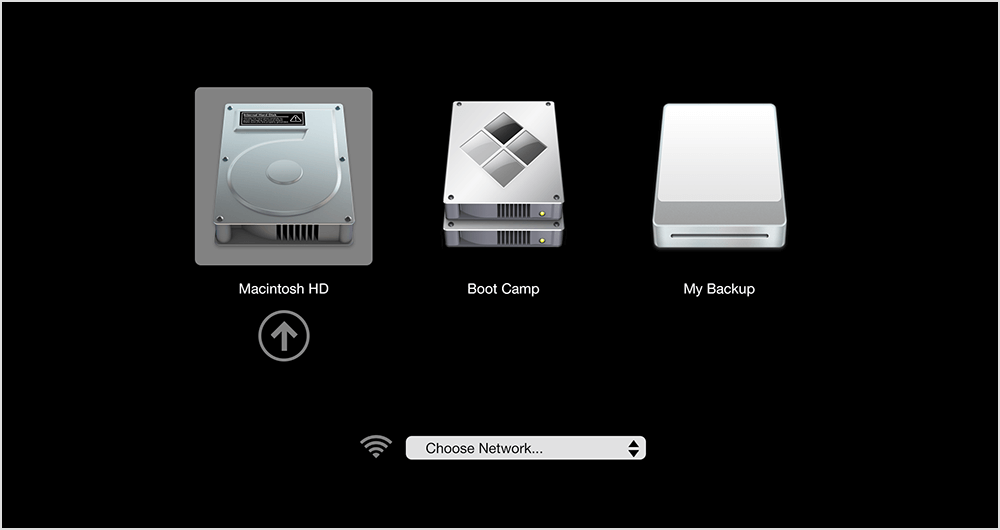
- Hold the Option Key: Immediately press and hold the Option (⌥) key during startup. (If you are using a Mac with Apple silicon, just press and hold Power button to enter into macOS Recovery mode, select the external hard drive as the startup disk.)
- Choose the External Drive: You should see a list of bootable drives. Select the external drive (usually labeled as "Macintosh HD" or whatever you named the drive).
- Boot from the External Drive: If everything went smoothly, your Mac should now boot from the external drive, and you'll be able to use it exactly like your internal drive.
![creating a bootable clone for macOS Monterey]()
Step 5: Maintain Your Bootable Clone
A bootable clone is only useful if it's up to date. Here's how you can maintain and update it regularly:
- Schedule Backups: With Carbon Copy Cloner or SuperDuper!, you can schedule regular backups to keep your bootable clone up to date.
- Update macOS: After each macOS update, create a fresh clone to ensure your external drive has the latest version of the operating system and all new features.
- Retire Old Clones: As your external drive fills up, you might want to retire older clones or clean up the drive to make room for new backups.
Conclusion
Creating a bootable clone for macOS Monterey is a wise decision for anyone who values system security and reliability. Whether you're preparing for a system failure, migrating to a new Mac, or simply keeping a backup of your current system, a bootable clone ensures you're ready for any eventuality. By following the steps outlined in this guide and using reliable tools like Donemax Disk Clone for Mac, Carbon Copy Cloner or SuperDuper!, you can ensure your macOS Monterey installation is backed up and accessible when you need it most.
Remember, a bootable clone is only as good as the last backup, so make sure to update it regularly and keep it in a safe location. Happy cloning!

Donemax Disk Clone for Mac
An award-winning disk cloning program to help Mac users clone HDD/SSD/external device. It also can create full bootable clone backup for Macs.
Related Articles
- Jun 25, 2023How to Clone an SSD on Mac?
- May 21, 2024Mac Clone Not Booting, Fix It Now
- Nov 25, 2024Steps to Create Bootable Clone for macOS Big Sur [100% Working]
- Jun 12, 2023How to Clone a USB Drive to Mac?
- Jan 01, 2024How to Create Disk Image Backup on macOS Sonoma?
- Jul 15, 2024How to Create A Bootable Clone for macOS Ventura?

Christina
Christina is the senior editor of Donemax software who has worked in the company for 4+ years. She mainly writes the guides and solutions about data erasure, data transferring, data recovery and disk cloning to help users get the most out of their Windows and Mac. She likes to travel, enjoy country music and play games in her spare time.

Gerhard Chou
In order to effectively solve the problems for our customers, every article and troubleshooting solution published on our website has been strictly tested and practiced. Our editors love researching and using computers and testing software, and are willing to help computer users with their problems
