Written byStevenUpdated on Sep 21, 2024
How to Format External Hard Drive or SSD on Mac?
Approved byGerhard Chou
PAGE CONTENT:
Formatting an external hard drive or solid-state drive (SSD) on a Mac is a basic job ensuring your storage device works with macOS and meets your needs. It's important to understand the process, whether you're getting a new drive ready, fixing disk problems, or ensuring the drive works with multiple platforms.
Disk Utility in macOS that makes editing easier and lets you choose from different file systems, such as APFS, ExFAT, (FAT32) MS-DOS (FAT), or (HFS/HFS+) Mac OS Extended (Journaled). Follow this guide's step-by-step instructions to format your external hard drive or SSD on Mac. It will protect your info and make sure the drive works best for your Mac.
Once you know these steps, you can effectively handle your external hard drive and make smart choices about file systems and partitioning.

Understanding Disk Formatting
Formatting an external drive deletes all the data that is already on it and sets up a new file system. It's like making a blank canvas ready for your Mac to see the drive's storage area and use it.
File Systems:
Each file system has its benefits and is best used for certain tasks. On macOS, there are two main types of file systems, which are broken down below:
- APFS (Apple File System): The newest file format from Apple, which Mac users with macOS High Sierra or later can use. It's the best Mac format because it encrypts files, but Windows and Linux computers can't read it.
- HFS+ (extended for macOS): HFS+ (Mac OS Extended) is the usual format for Macs running macOS versions earlier than High Sierra. It was the format that came before APFS. HFS+ hard drives can be protected as APFS drives can, but it might not be the best choice if you also work with Windows or Linux devices.
- FAT32: Because it works with macOS, Windows, and Linux, this file format is the best choice for people who often share files between devices that use different operating systems. Some problems with the FAT32 type are its lack of protection features and that files can only be a certain size.
- ExFAT: The ExFAT format is similar to FAT 32 in every way, but it can create and store files bigger than 4 GB.
- NTFS: These files come with Windows and can be read by macOS machines. But you won't be able to write to NTFS files on your Mac.
Choosing the Right Format:
How you plan to use your external drive will help you choose the right format:
- Pick "Mac OS Extended (Journaled)" or "APFS" for exclusive use with your Mac for smooth speed and compatibility.
- Sharing files between Mac, Windows, and PCs: Pick "ExFAT." Even though it's not built into macOS, ExFAT works with many different operating systems. Also, remember that ExFAT might not work as quickly as APFS or Mac OS Extended.
Important considerations:
- Case-sensitivity: If you want to use Windows to reach the drive, pick a format that doesn't care about the case, like ExFAT. By default, macOS cares about the case.
- Drive encryption: For extra safety, you should enable disk encryption while formatting. It will ensure your data is safe if the drive is lost or stolen.
- Backup: Always make a copy of important files before you format them.
- Partitioning: If you need more than one partition, you can make more by using the Partition tab in Disk Utility after you've erased it.
- Compatibility: Pick the file system (APFS, ExFAT, FAT32, etc.) based on how well you want it to work with other computers or devices.
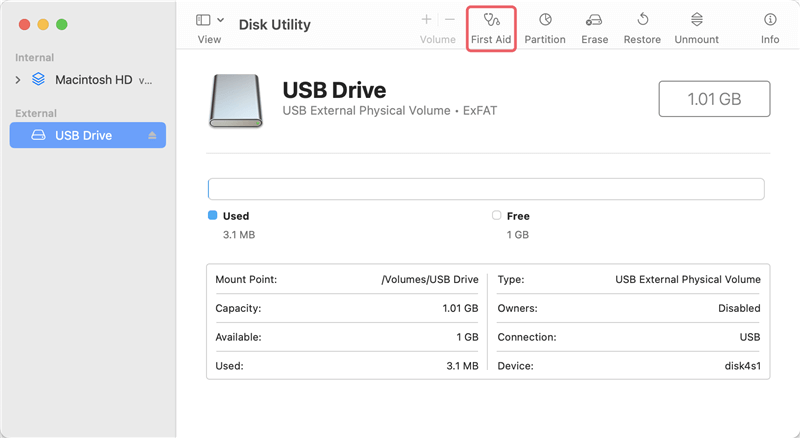
- Disk Utility Troubleshooting: If Disk Utility finds errors or the drive is not recognized, restart your Mac or fix the disk with Disk Utility's "First Aid" tool.
How to Format External Hard Drive (HDD/SSD) on Mac?
There is a tool built into Mac that you can use to format an external hard drive for Mac right on your Mac. Disk Utility is a simple Mac app that can format an external hard drive. It can handle external HDDs, SSDs, USB drives, format them, or change the file system. Not only that, but it is also easier to use than terminal tools. Here are the steps we need to follow.
Step 1. Connect the external hard drive to your Mac.
Step 2. In the Mac Finder, open Applications > Utilities and look for Disk Utility.
Step 3. Click Erase on the page that shows up after you choose the external hard drive on the left.
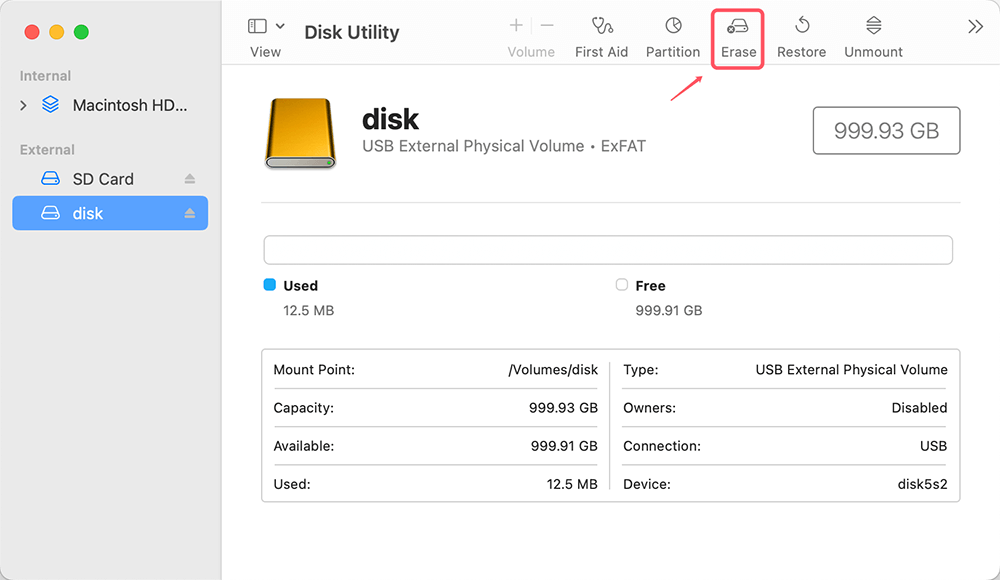
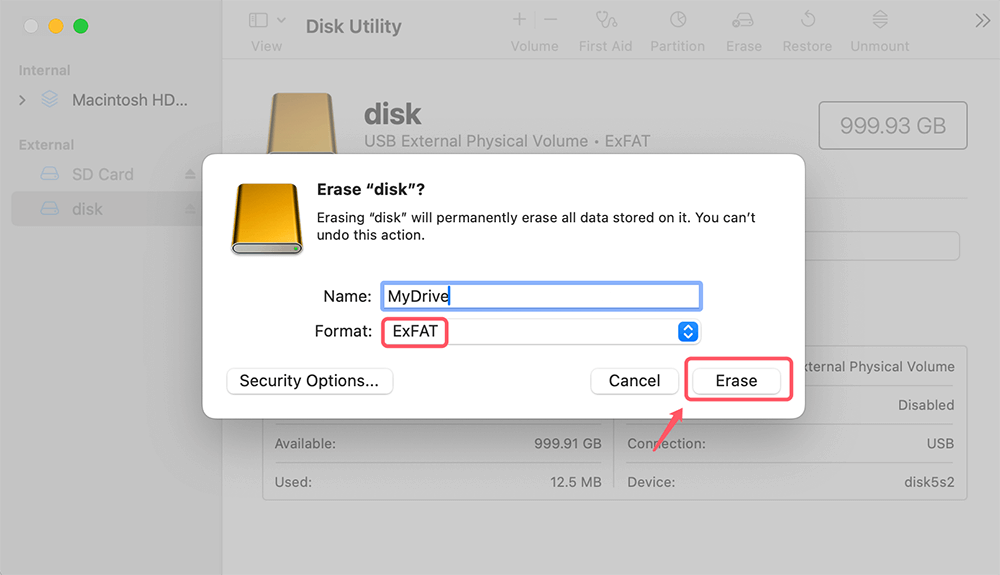
Step 4. Name the external hard drive and pick the Format you want to use.
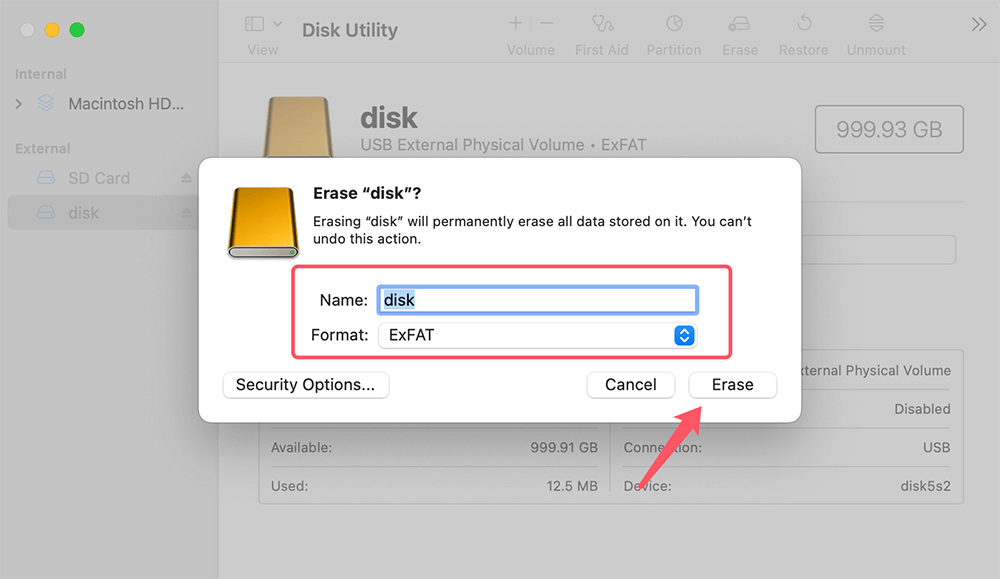
Step 5. Click Erase again to securely format the external hard drive.
Additional Considerations:
- Partitioning: Most external drives come with only one partitioned disk, but you can use Disk Utility to partition more than one disk on the drive. You can also also format each folder using a different file system. On the other hand, splitting is usually not needed for simple storage needs.
- Troubleshooting: If you encounter formatting problems, consult the documentation or help materials for Apple's Disk Utility to determine the correct steps to fix them.
- Formatting for Time Machine: If you want to use your external drive for Time Machine backups, macOS will format it immediately when you set it up.
- SD Cards and Flash Drives: Converting SD cards and flash drives are the same process as converting the same process as converting external hard drives. However, some SD cards may have a write-protect switch that needs to be turned off before the card can be formatted.
Note: If the Erase button is not available, you can click First Aid button to repair the external hard drive or click Partition to create a new volume on the external hard drive.
Erase Button Greyed Out in Disk Utility
Find out why Disk Utility cannot erase your disk and fix this issue so that you can erase your disk by using Disk Utility.
Formatting External Hard Drive Tips for Mac Users
1.How to Format External Drive for both Windows and macOS?
You can change the file system from NTFS/APFS/Mac OS Extended to ExFAT for direct use on a Mac or a Windows PC.
Step 1. Go to Launchpad > Other > Disk Utility, open Disk Utility.
Step 2. Select the external hard drive and click on Erase button.
Step 3. Select ExFAT as the file system, click on Erase again.
Step 4. Once the process gets finished, click on Done button.
2.How to Use Terminal to Format an External Hard Drive on Mac?
Terminal is another built-in tool that can help you format an external hard drive on Mac:
Step 1. Go to Applications > Utilities > Terminal, open this app.

Step 2. Type diskutil list, find the external hard drive and get the disk identifier.
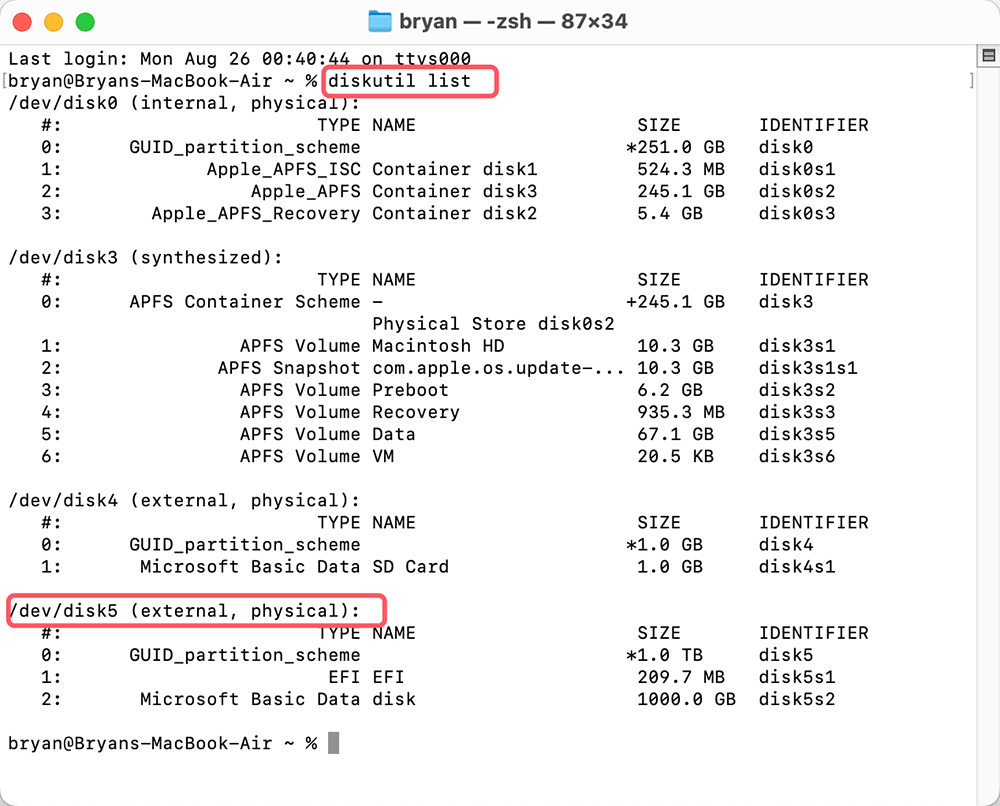
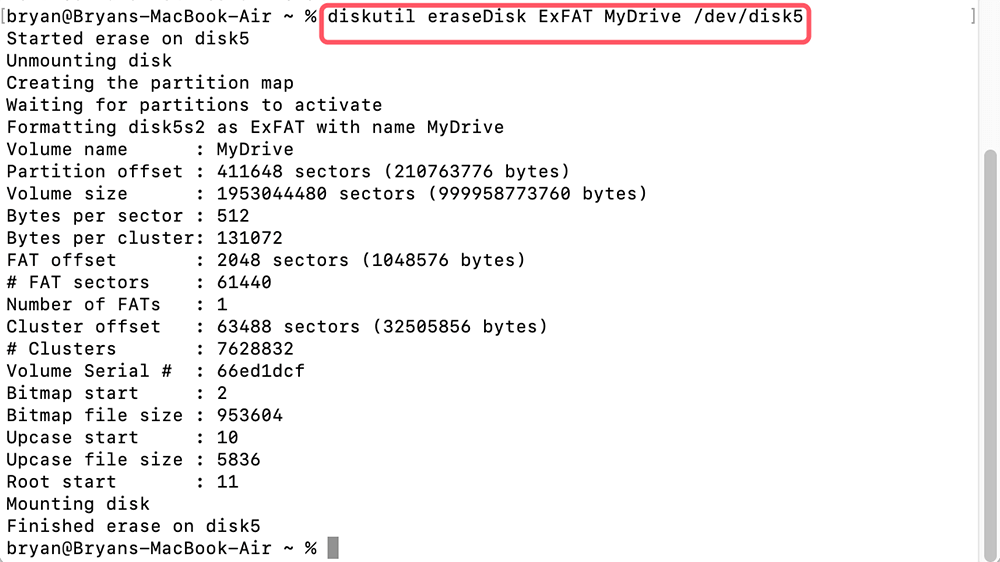
Step 3. Use command diskutil eraseDisk FILE_SYSTEM DISK_NAME DISK_IDENTIFIER to erase a disk, for example, type diskutil eraseDisk ExFAT MyDrive /dev/disk5 to format the external hard drive to ExFAT.
3.How to format an external hard drive to NTFS on Mac?
Normally, Disk Utility and Terminal cannot format an external hard drive to NTFS because NTFS is not available in macOS. If you want to force an external hard drive to NTFS, you can use third-party NTFS for Mac tool.
Step 1. Download and install the best NTFS for Mac tool - Donemax NTFS for Mac on your Mac and connect the external hard drive to your Mac.
Step 2. Open Donemax NTFS for Mac, select the external hard drive, click on Format button.
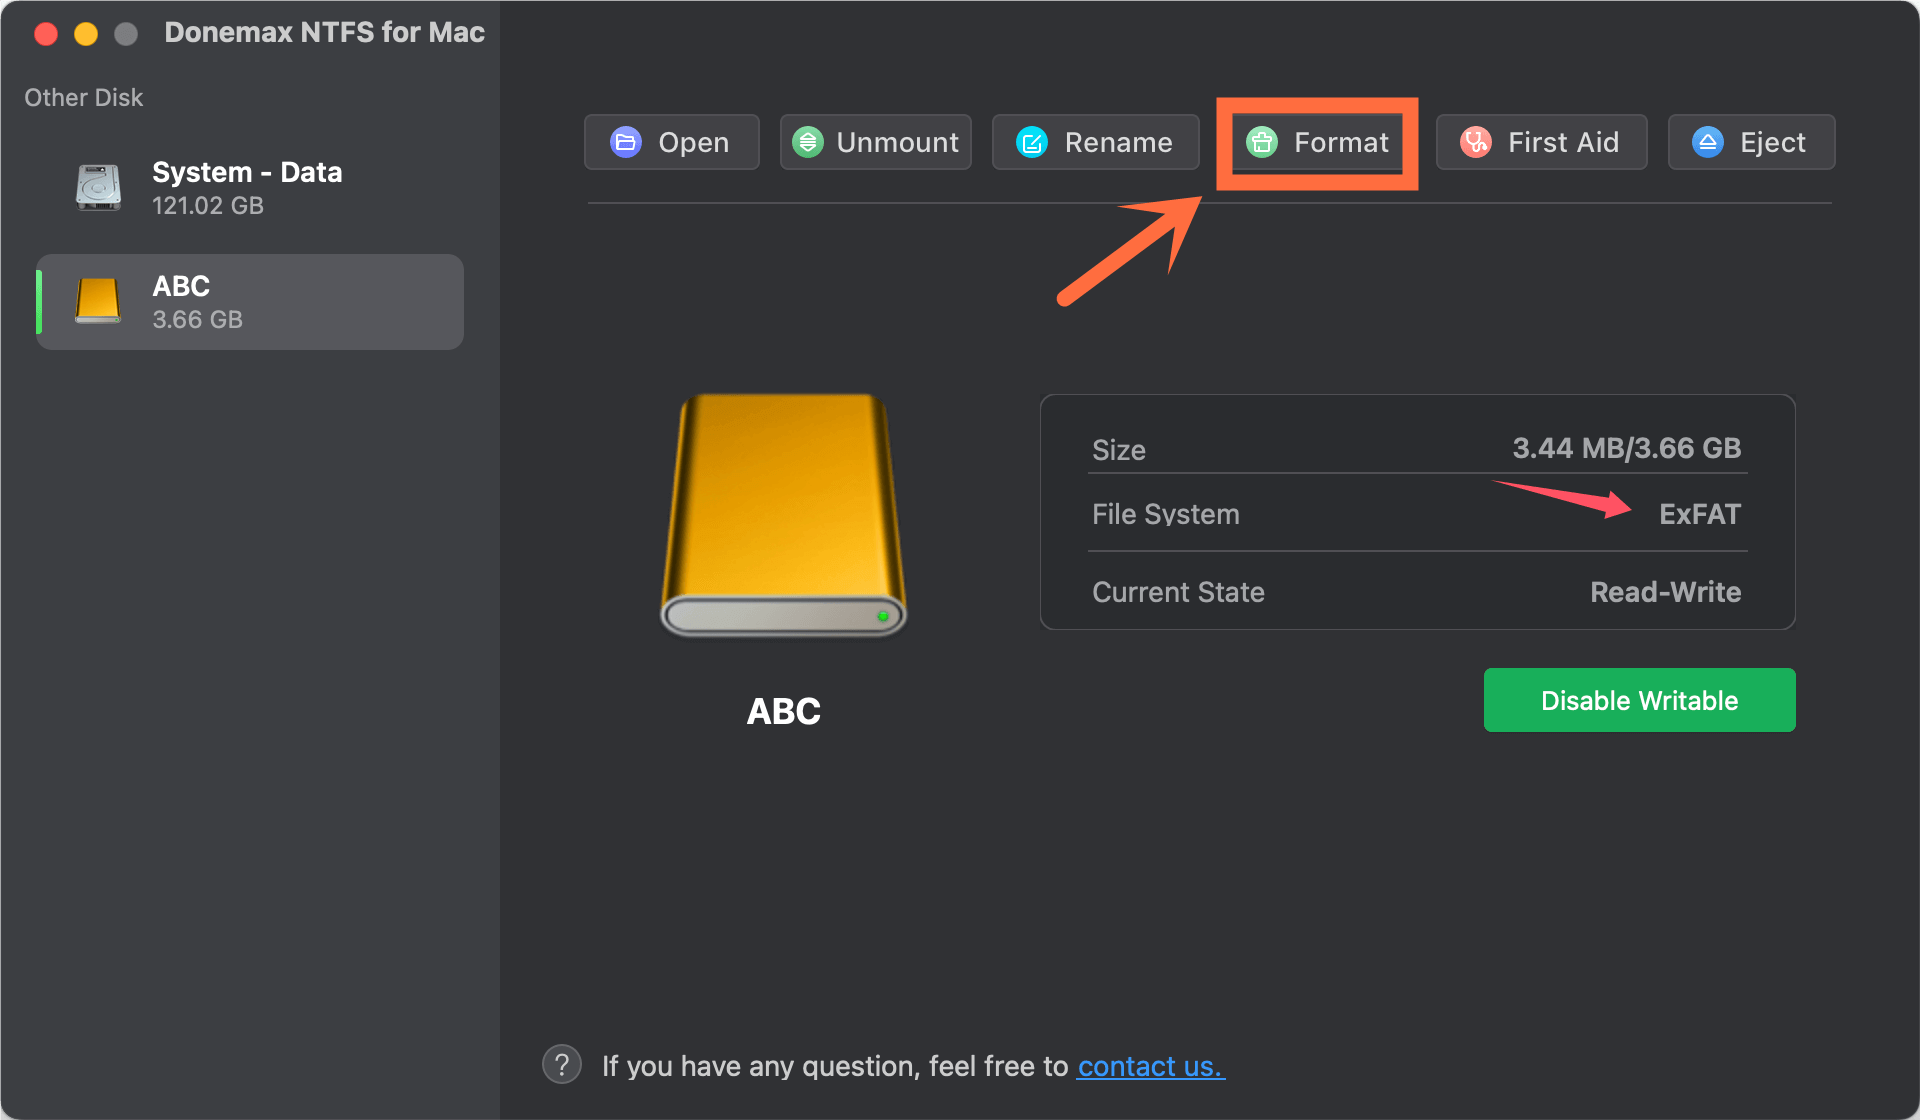
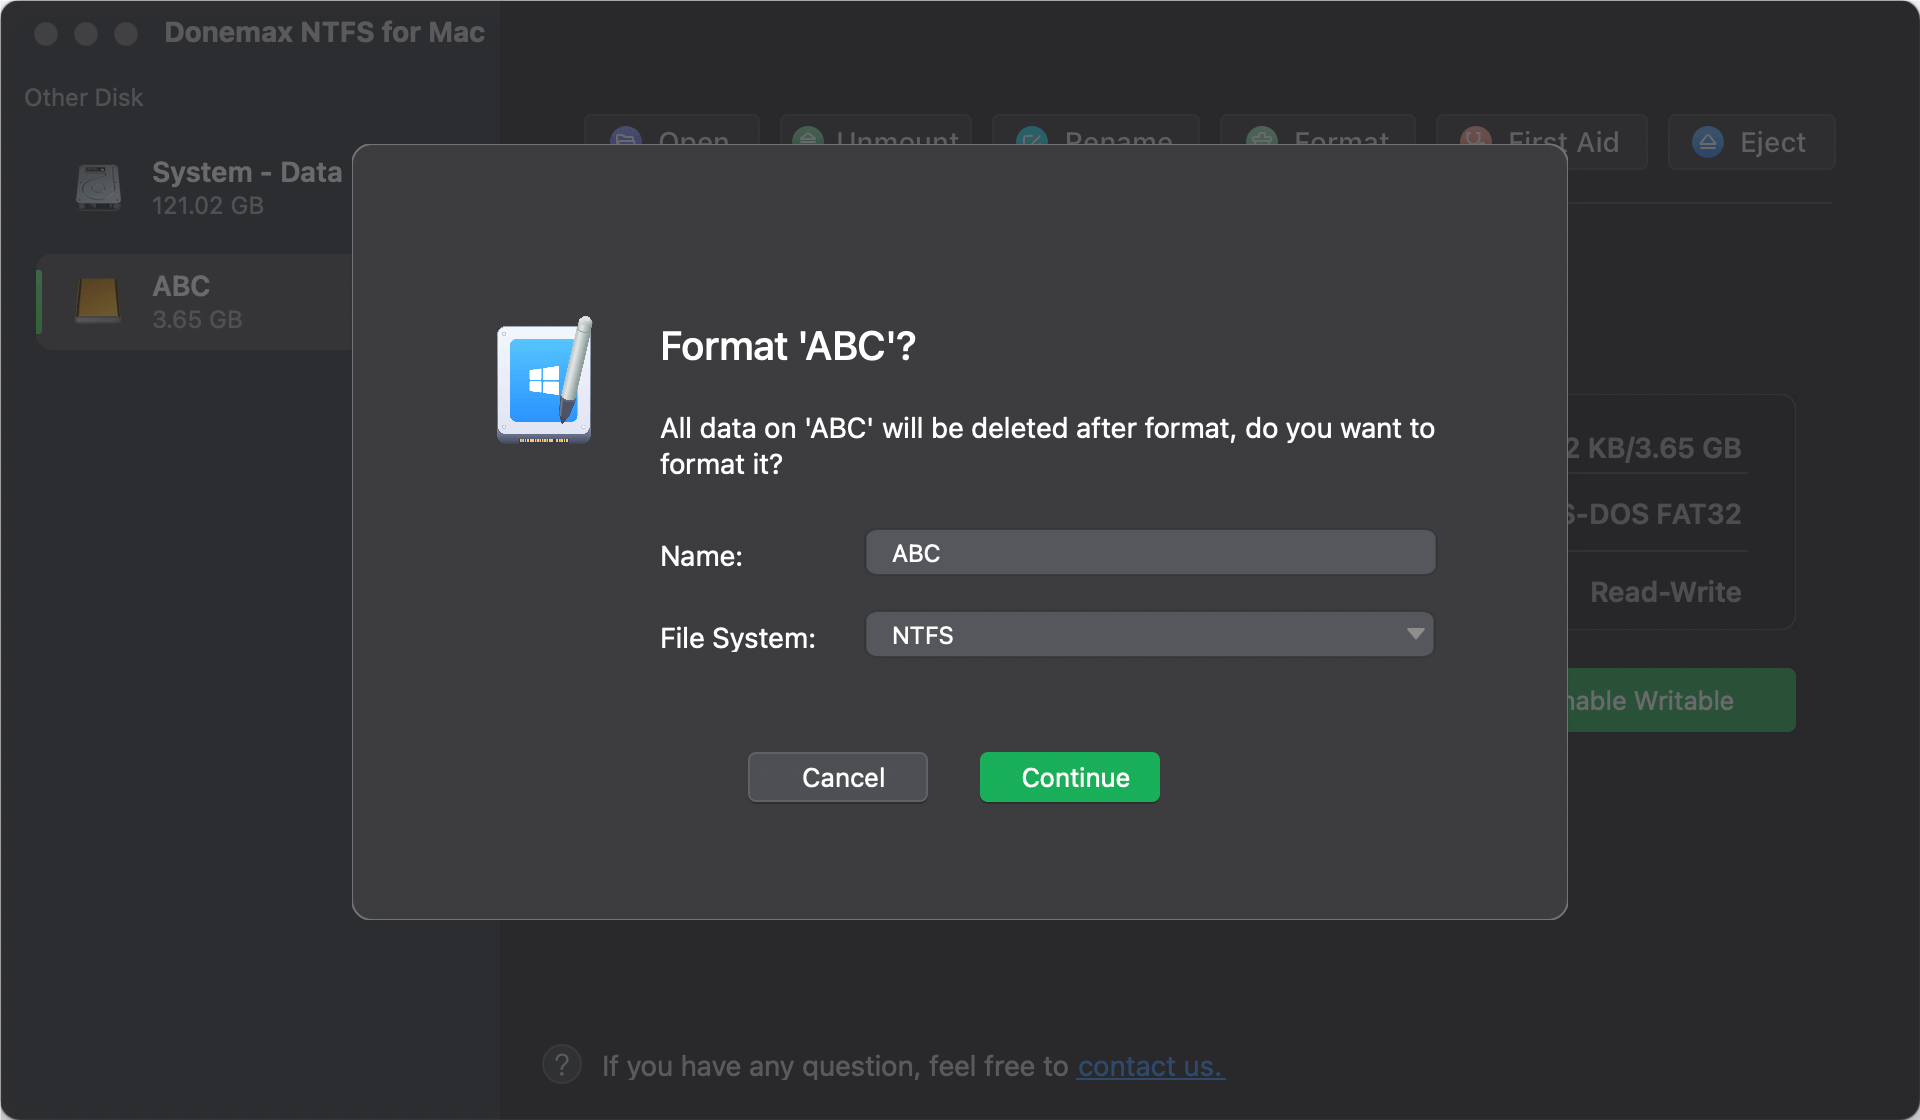
Step 3. Select NTFS as the Format, then click on Continue button to format the external hard drive to NTFS.
How to Unformat External Hard Drive on Mac?
If you have lost data due to formatting your external hard drive on Mac and you don't have a backup, you can use data recovery software to unformat the external hard drive and get all erased files/lost files back.
Step 1. Download and install Donemax Data Recovery for Mac, make sure the formatted external hard drive has been connected to your Mac.
Step 2. Open Donemax Data Recovery for Mac, select the formatted external hard drive to start data recovery.

Step 3. Click on Scan button to deeply scan the formatted external hard drive and find all recoverable files including erased files, deleted and lost files.

Step 4. Select the wanted files, click on Recover button to save them.

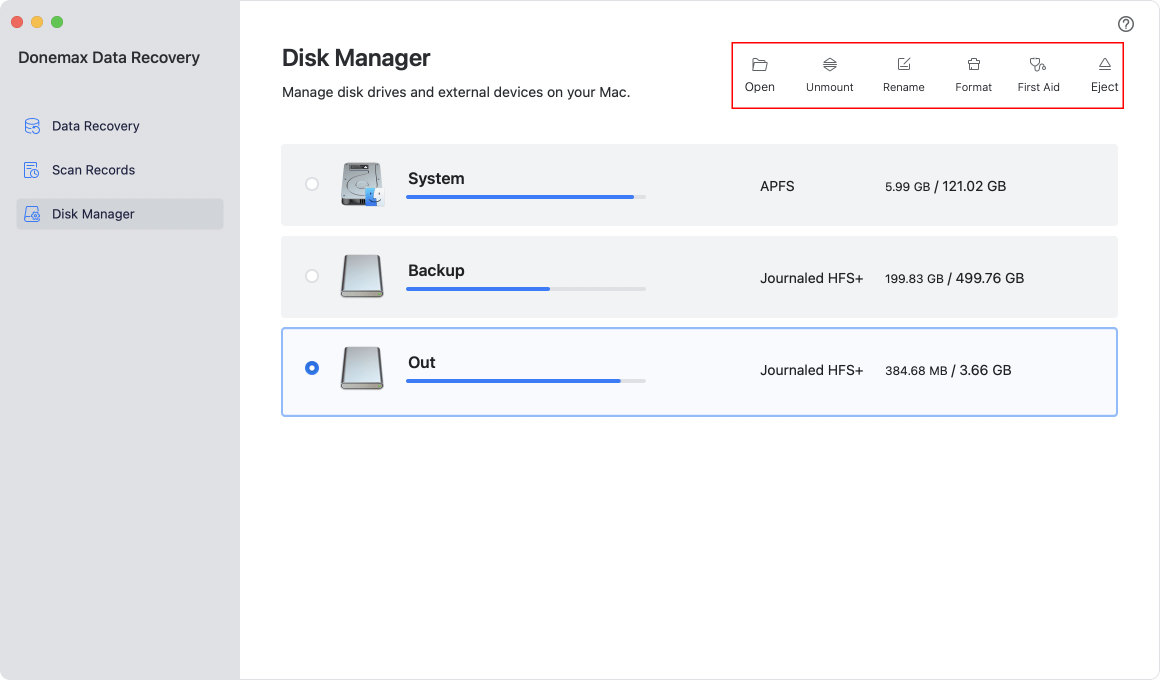
Donemax Data Recovery for Mac also can help you format an external hard drive on Mac:
- Choose Disk Manager.
- Select the external hard drive.
- Click on Format button.
- Select a file system, then click on Continue button to format the external hard drive.
How to Wipe an External Hard Drive on Mac?
Before you sell, donate or dispose of your old external hard drive, you should permanently erase all data from it. Mac disk wipe software can help you format and wipe the external hard drive, ensure no data is recoverable.
Step 1. Download and install the reliable Mac disk wipe software - Donemax Data Eraser for Mac on your Mac.
Step 2. Open Donemax Data Eraser, choose Erase Hard Drive mode, select the external hard drive, click on Erase Now button.

Step 3. Select a data erasure standard, then click on Continue button to securely wipe the external hard drive.
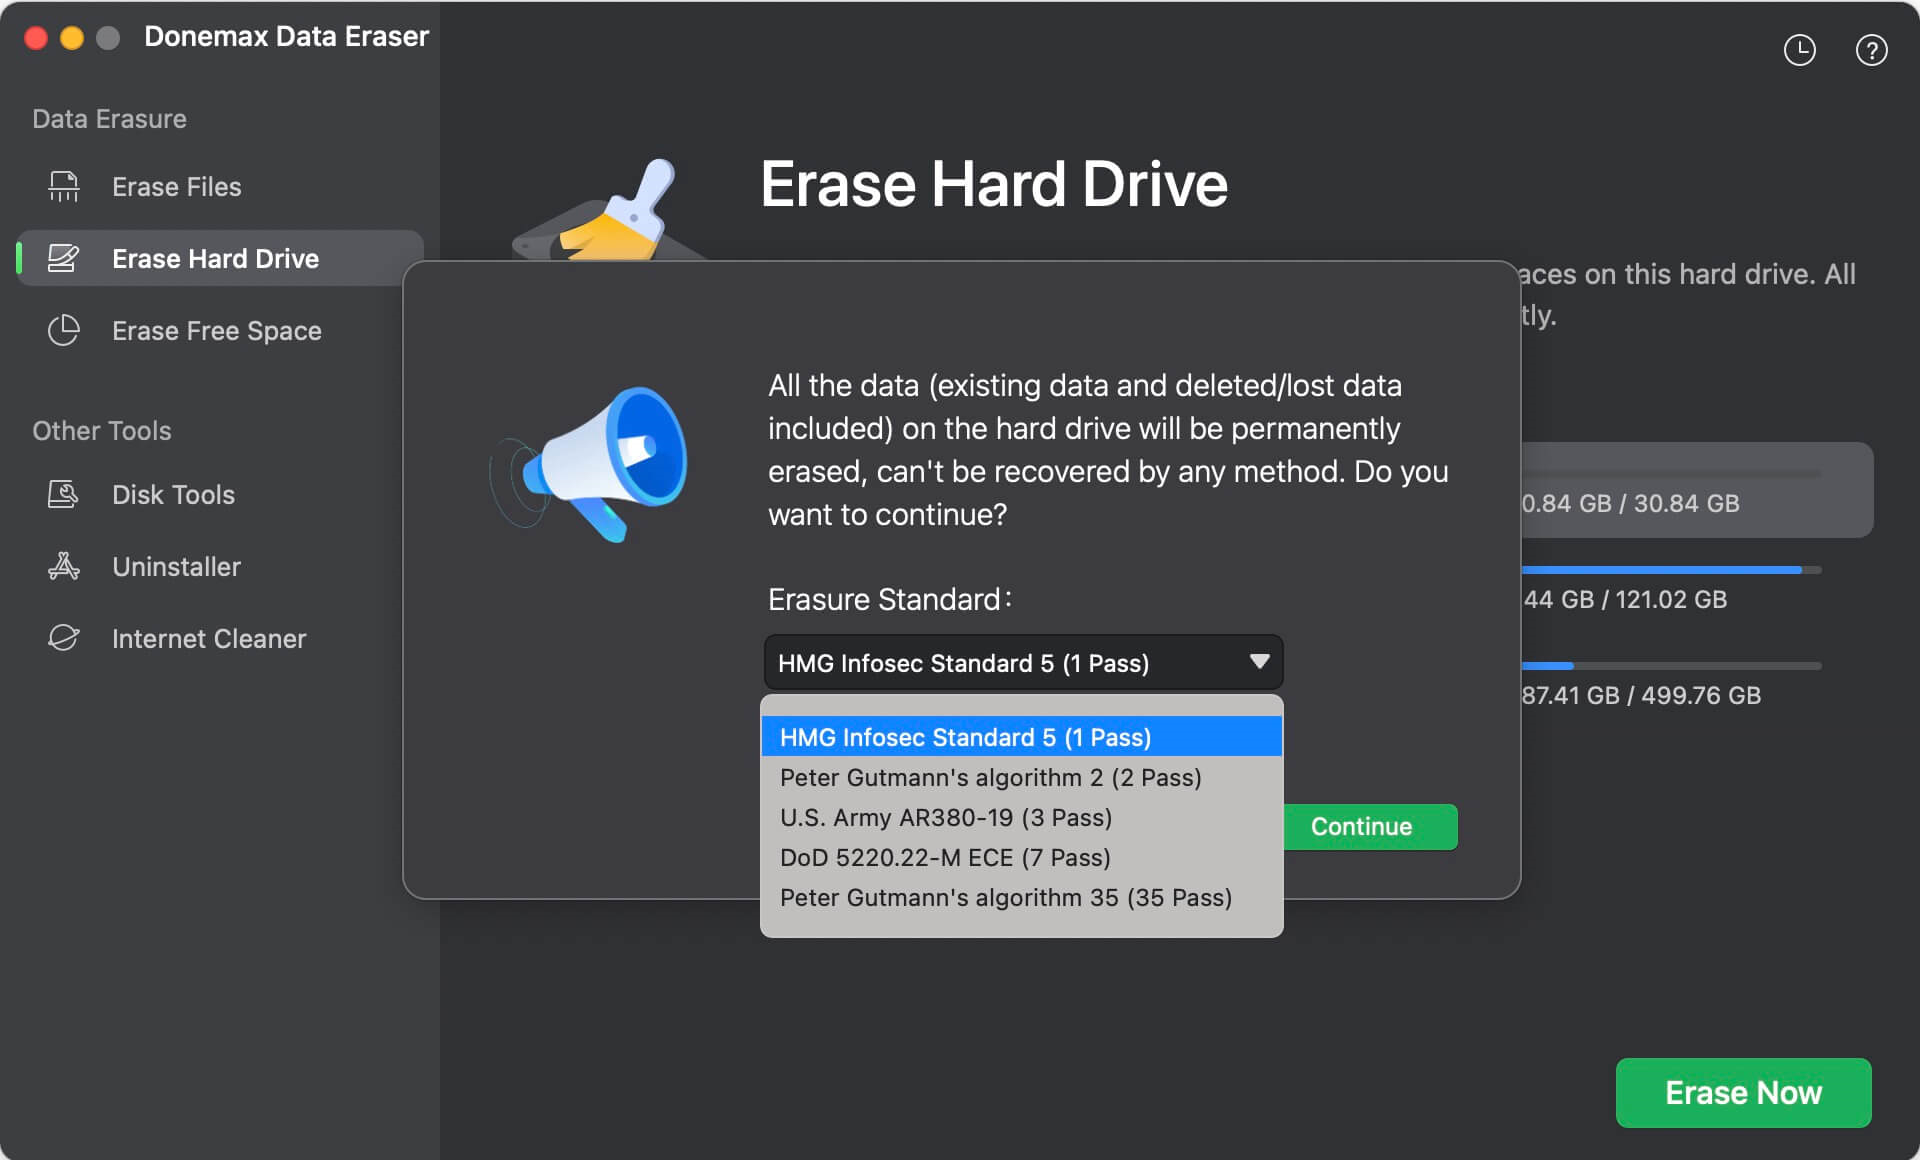
Note: Once the process gets finished, all data (including existing data, deleted/formatted/lost data) stored on the external hard drive is lost for good, cannot be recovered by any method.
Conclusion:
Finally, using Disk Utility to format an external hard drive or SSD on your Mac is a simple process that lets you make your storage device fit your needs. Disk Utility has the tools to fix disk problems, make your computer more compatible with other systems, or prepare for backups.
Following the steps in this guide, you can easily and effectively handle and improve your external storage to work well with your Mac. Always make a copy of your important files before formatting, and think about which file system and partitioning choices will work best for your work and the devices you want to use.
FAQs About Formatting an External Hard Drive (HDD/SSD) on Mac
1. How to format an external hard drive on Mac?
Disk Utility is an easy-to-use disk management tool for macOS, it can help you securely and easily format an external hard drive on Mac:
- Connect the external hard drive to your Mac and open Disk Utility.
- Select the external hard drive, click on Erase button.
- Select a file system (Mac OS Extended for macOS 10.12 or earlier, APFS for macOS 10.13 or later, ExFAT for both Windows and macOS), then click on Erase button again.
- Once the process gets finished, click on Done button.
2. What is the best disk formatting tool for Mac?
Here are some disk formatting tools for you to format external hard drives on Mac:
- Disk Utility
- Terminal
- Donemax NTFS for Mac
- Donemax Data Recovery for Mac
- Donemax Data Eraser for Mac
3. How to wipe an external hard drive on Mac?
Mac disk wipe software can help you securely wipe an external hard drive on Mac:
- Download and install Donemax Data Eraser on your Mac.
- Open Donemax Data Eraser, choose Erase Hard Drive mode.
- Select the external hard drive, click on Erase Now button.
- Wipe all data from the external hard drive.
Related Articles
- Nov 19, 2024How to Perform Clean Install of macOS Sonoma?
- Jul 29, 2024How to Fix Mac Cannot Mount An ExFAT Drive?
- Mar 06, 2025Repair an External Hard Drive with Terminal on Mac
- Jan 14, 2025Reset or Change Encrypted APFS Drive's Password
- Aug 05, 2024How to Use 1TB or 2TB SD Card on Mac?
- Nov 12, 2024[Step-by-step Guide] Create a Bootable USB Installer for macOS Mojave

Contributing Writer
Steven
Steven has been a senior writer & editor of Donemax software since 2020. He's a super nerd and can't imagine the life without a computer. Over 6 years of experience of writing technical solutions and software tesing, he is passionate about providing solutions and tips for Windows and Mac users.

Editor in chief
Gerhard Chou
In order to effectively solve the problems for our customers, every article and troubleshooting solution published on our website has been strictly tested and practiced. Our editors love researching and using computers and testing software, and are willing to help computer users with their problems