Written byMariaUpdated on Jul 19, 2024
Only Can Select APFS Format When Erasing A Drive on Mac? Fix It Now
Approved byGerhard Chou
PAGE CONTENT:
It can be unclear to see only APFS (Apple File System) as a choice when using Apple's Disk Utility to erase a drive. That is especially true when other formats, such as Mac OS Extended (HFS+), ExFAT, and FAT32 or even NTFS, are needed to make the drive work with older macOS or other operating systems. The drive type, partition scheme, and view settings in Disk Utility or the macOS version could cause this problem. For debugging to work, you need to understand these factors.
This article will explain why Disk Utility might only let you format in APFS and give you a full, step-by-step guide to regaining all your format choices. Whether you're working with internal or external files, this guide will help you format them correctly.
The Problem: Only Seeing APFS in Disk Utility
When you use Disk Utility to erase a drive, you may see a list of format choices, such as APFS, Mac OS Extended, ExFAT, and FAT32. Some users, though, say that the only format they can choose is APFS. This limitation can be a problem, especially if you need to reset the drive so that it works with older versions of macOS or other operating systems.
Possible Causes:
There are a few reasons you might only see APFS in the file list:
- Drive Type and Connection: The file choices may be different depending on the type of drive (SSD vs. HDD) and how it is connected (internal vs. external). APFS works best with SSDs, and macOS may choose to use it first for these drives.
- Partition Scheme: The drive's partition scheme, which can be GUID Partition Map, Master Boot Record, or Apple Partition Map, can change the choices for formatting. Some partition methods may limit the file systems that can be used.
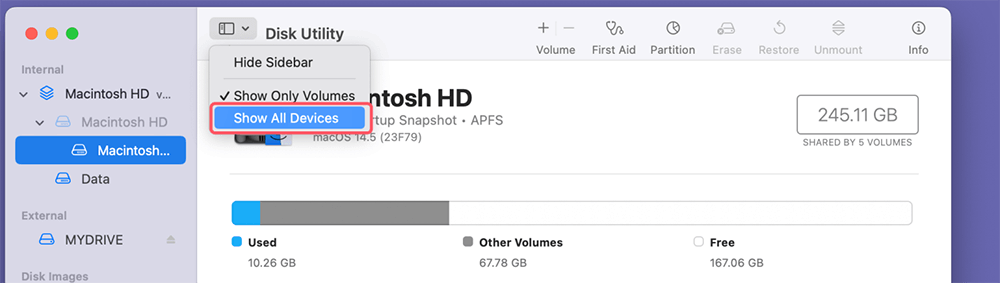
- Disk Utility View Settings: You can view disks in Disk Utility in two ways: "Show Only Volumes" or "Show All Devices." The formatting choices can change depending on the view that is chosen.
- macOS Version: Your formatting choices may also depend on your version of macOS. In newer versions of macOS, some files may be set to APFS by default.
Fix Can Only Select APFS Format Issue: Step-by-Step Guide
Step 1: Check Disk Utility View Settings.
There are two ways to open Disk Utility: go to Applications > Utilities or search for it using Spotlight.
For "Show All Devices," go to Disk Utility, click "View" in the menu bar, and then choose "Show All Devices." That will show the whole device structure, which includes the hard drives and their partitions.
Step 2: Change the Partition Scheme.
- Select the Drive: In Disk Utility, choose the drive (not the volume) that you want to remove.
- Erase the Drive: Press the "Erase" key. When the dialog box comes up, there will be a choice for "Scheme." If "GUID Partition Map" hasn't already been chosen, make sure it is. This way of dividing up the disk is needed for macOS to support all file system types.
- Choose the Format: Once you've chosen the partition method, you should see all the format choices, such as APFS, Mac OS Extended, ExFAT, and FAT32.
Step 3: Use Terminal for Advanced Options.
If Disk Utility still doesn't show you the format choices you want, you can use the Terminal to have more control over the process.
- Open Terminal: The Terminal is in the Applications > Utilities folder, or you can use Spotlight to find it.
- List Disks: Type diskutil list and press Enter. This program shows a list of all the connected drives and their names.
- Erase the Drive: It is possible to erase and reset the drive with the diskutil eraseDisk command. To set up a drive named disk2 to Mac OS Extended (Journaled), for example, type the following command:
diskutil eraseDisk HFS+ "NewVolumeName" disk2
Change "NewVolumeName" to the name you want for your drive and "disk2" to the right name for your drive.
- Confirm the Format: The drive should be changed to the chosen file system after the command is run.
Step 4: Ensure macOS is Updated.
- Check for New Content: Make sure that macOS is up to date. Updating to the latest version of macOS can sometimes fix layout and compatibility problems.
- Update macOS: Install any changes that are available by going to System Preferences or System Settings > General > Software Update.
Step 5: Use Partition Tool.
If the drives has been formatted to APFS, click on Partition button, then select the desirable file system format, click on Partition button.

Step 6: Use Third-party Disk Formatting Tool.
You could use a third-party disk control tool if Disk Utility and Terminal don't fix the problem. These are some common choices:
- Donemax NTFS for Mac: It can help you securely and quickly format external device to FAT32, ExFAT, APFS, Mac OS Extended or NTFS.
- Paragon Hard Disk Manager: A complete program that works with many file systems and has advanced features for managing disks.
- GParted: The editor can be run from a live CD or USB and is free to use. It supports many file systems and is a good choice for advanced users.
Disk Utility Only Shows APFS and ExFAT? Fix This Issue
If the drive isn't empty and you've already formatted it several times, make sure you copy all of its data to a safe place before you plug it into your Mac's USB port. Then, go to the next step.
Launch Disk Utility:
All the magic happens in Disk Utility. To open it, press the Command and Spacebar keys together, then type "Disk Utility" and press the Return key.
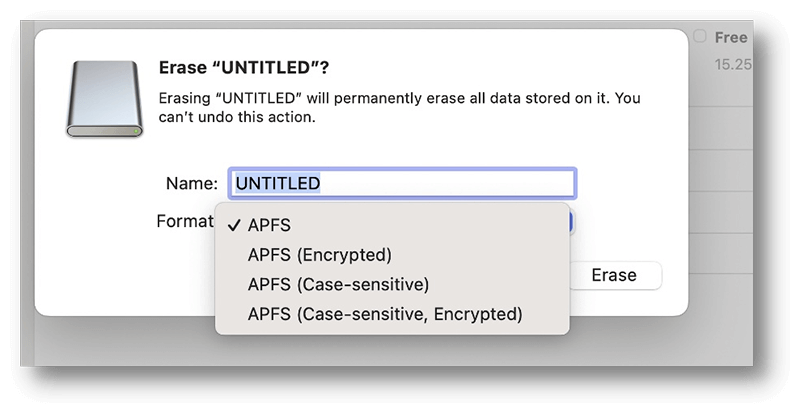
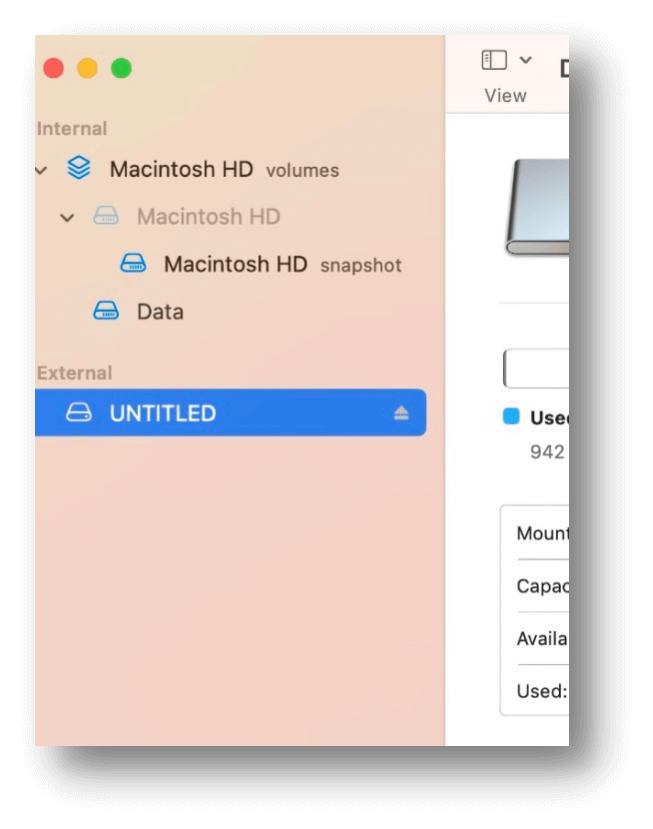
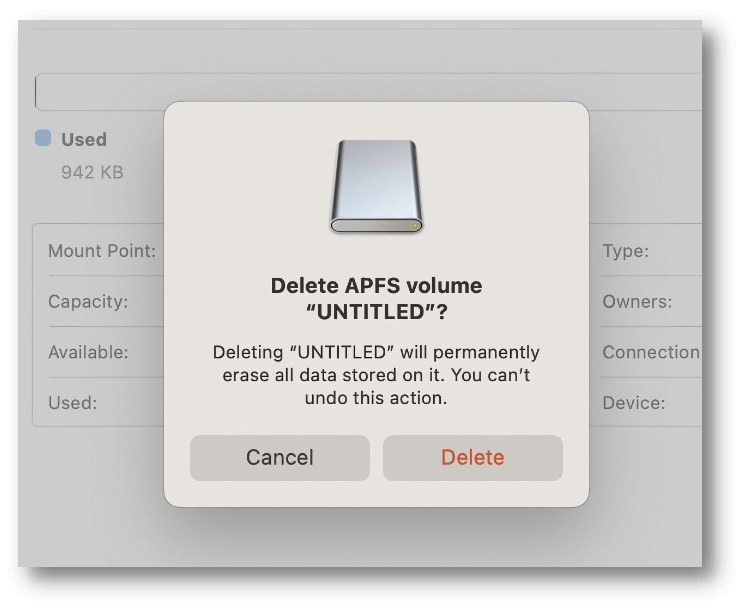
After making sure the disk you want to format is connected to your Mac and visible on the left under "External," click on it to see its choices. The disk has been named UNTITLED.
Delete the Volume:
Clicking on "Erase" won't help you at this point, and you'll see the four scary APFS choices below.
- After making sure the disk you want to format is connected to your Mac and visible on the left under "External," click on it to see its choices. The disk has been named UNTITLED for me because I'm very plain and dull.
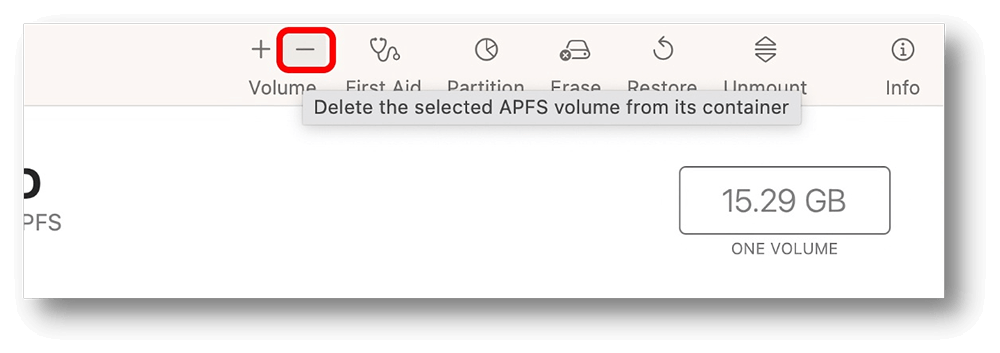
- You should click on the "- Volume" button next to "First Aid" at the very top. When a window pops up, click on Delete.
![click on the - Volume button]()
- After the volume has been deleted, click on "Done," as shown in the picture below.
![click on Done]()
Recover Lost Data from An Erased Drive on Mac
If you have lost data due to erasing a hard drive on your Mac, you can use Mac data recovery software to help you get the lost data back.
Step 1. Download and install Donemax Data Recovery for Mac, then connect the erased hard drive to your Mac.
Step 2. Open Donemax Data Recovery for Mac, then select the erased or formatted hard drive to start data recovery.

Step 3. Click on Scan button to deeply scan the erased hard drive.

Step 4. Once the scan is completed, you can preview the recoverable files. Then select the wanted files and save them.

Conclusion:
It cannot be very pleasant to see only APFS in the format choices when you try to erase a drive in Disk Utility, but there are a few ways to fix this. You can get back to all the file system formats you want by checking the Disk Utility view settings, ensuring the partition scheme is right, using Terminal commands, keeping macOS up to date, and using third-party disk formatting tools. Knowing why this problem is happening can help you fix it faster and ensure your drives are set the way you need them.
Related Articles
- Mar 26, 2025Turn On or Turn Off Mac Firewall: A Complete Guide
- Oct 28, 2024How to Delete Other Volumes in Container on Mac: A Comprehensive Guide
- Oct 17, 2024Fix Command + Shift + 4 Not Working for Screenshot on Mac: A Comprehensive Guide
- Feb 06, 2025[4 Methods] Fix The Volume Macintosh HD Was Found Corrupt and Needs to Be Repaired
- Jan 04, 2025How to fix fsck_msdos on Mac without Data Loss?
- Feb 07, 2025(7 Solutions Solved) Can't Format or Erase an SD Card on Mac

Contributing Writer
Maria
Maria is one of the senior writers & editors of Donemax who lives and works in Sydney, Australia. She loves PC, Mac and Internet Technology. She has 6 years of writing articles about data recovery on PC/Mac, disk cloning solution, data eraser and computer OS optimization, etc. She is also interested in testing various software and digital products.

Editor in chief
Gerhard Chou
In order to effectively solve the problems for our customers, every article and troubleshooting solution published on our website has been strictly tested and practiced. Our editors love researching and using computers and testing software, and are willing to help computer users with their problems