Before we start: Mac disk cloning software - Donemax Disk Clone for Mac can help you clone old SSD to new SSD and create bootable clone backup. Once the clone is completed, you can set the new SSD as the startup disk of your Mac.
PAGE CONTENT:
Upgrading your Mac's storage by cloning your old SSD to a new one can significantly enhance your system's performance and efficiency. This process not only allows you to retain all your data, applications, and settings but also provides a seamless transition to a more spacious and faster drive. In this article, we will explore the process of cloning an old SSD to a new SSD on your Mac, including prerequisites, step-by-step instructions, and post-cloning tips.
Compared to conventional Hard Disk Drives (HDDs), Solid State Drives (SSDs) are faster and more dependable, making them the industry standard for data storage. If you're finding that your old SSD is running out of space or isn't performing as well as it used to, upgrading to a new SSD can breathe new life into your Mac. Cloning your SSD means creating an exact copy of your current drive, ensuring that all your files, applications, and settings are preserved during the upgrade process.
This article will walk you through the steps necessary to clone your old SSD to a new SSD on your Mac, making the transition smooth and hassle-free.
Requirements for Cloning SSD to New SSD on Mac
Prior moving to the cloning process, it's essential to gather the necessary equipment and software. Here's what you'll need:
Hardware Requirements:
- New SSD: Ensure that your new SSD is compatible with your Mac model. Check the specifications and consider factors like size (2.5, M.2) and interface (SATA, NVMe).
- External Enclosure or Adapter: If you're using a 2.5 SSD, you'll need an external enclosure or SATA-to-USB adapter to connect it to your Mac. For M.2 SSDs, an M.2 to USB adapter will suffice.
- Screwdriver Set: Depending on your Mac model, you may need specific screwdrivers to access the SSD compartment.
Software Requirements:
- Time Machine: A backup tool to move everything from Mac to an external SSD
- macOS Disk Utility: This built-in tool can be used for cloning if you prefer not to use third-party applications.
- Third-Party Cloning Software: Consider using tools like Carbon Copy Cloner or SuperDuper! for a more user-friendly experience and additional features.
Backup Your Data:
Prior the cloning process, it's crucial to back up your data to prevent data loss. Use Time Machine or manually copy your important files to an external drive.
Three Methods to Clone Old SSD to New SSD on Mac
Cloning your old SSD to a new SSD is a crucial process that allows you to maintain all your data and settings while upgrading your storage. Here are three methods to back up data or clone data from old SSD to new SSD on Mac.
Method 1. Use Time Machine to Copy Data
Time Machine, the built-in backup tool, can help you back up data from your Mac to another SSD. Let's see how to use it:
Step 1. Connect the new SSD to the Mac, then open Disk Utility, format it to APFS (for macOS High Sierra or later) or Mac OS Extended (for earlier macOS versions).
Step 2. Go to System Settings > General > Time Machine, then click Add Back Disk and select the SSD as the backup disk.
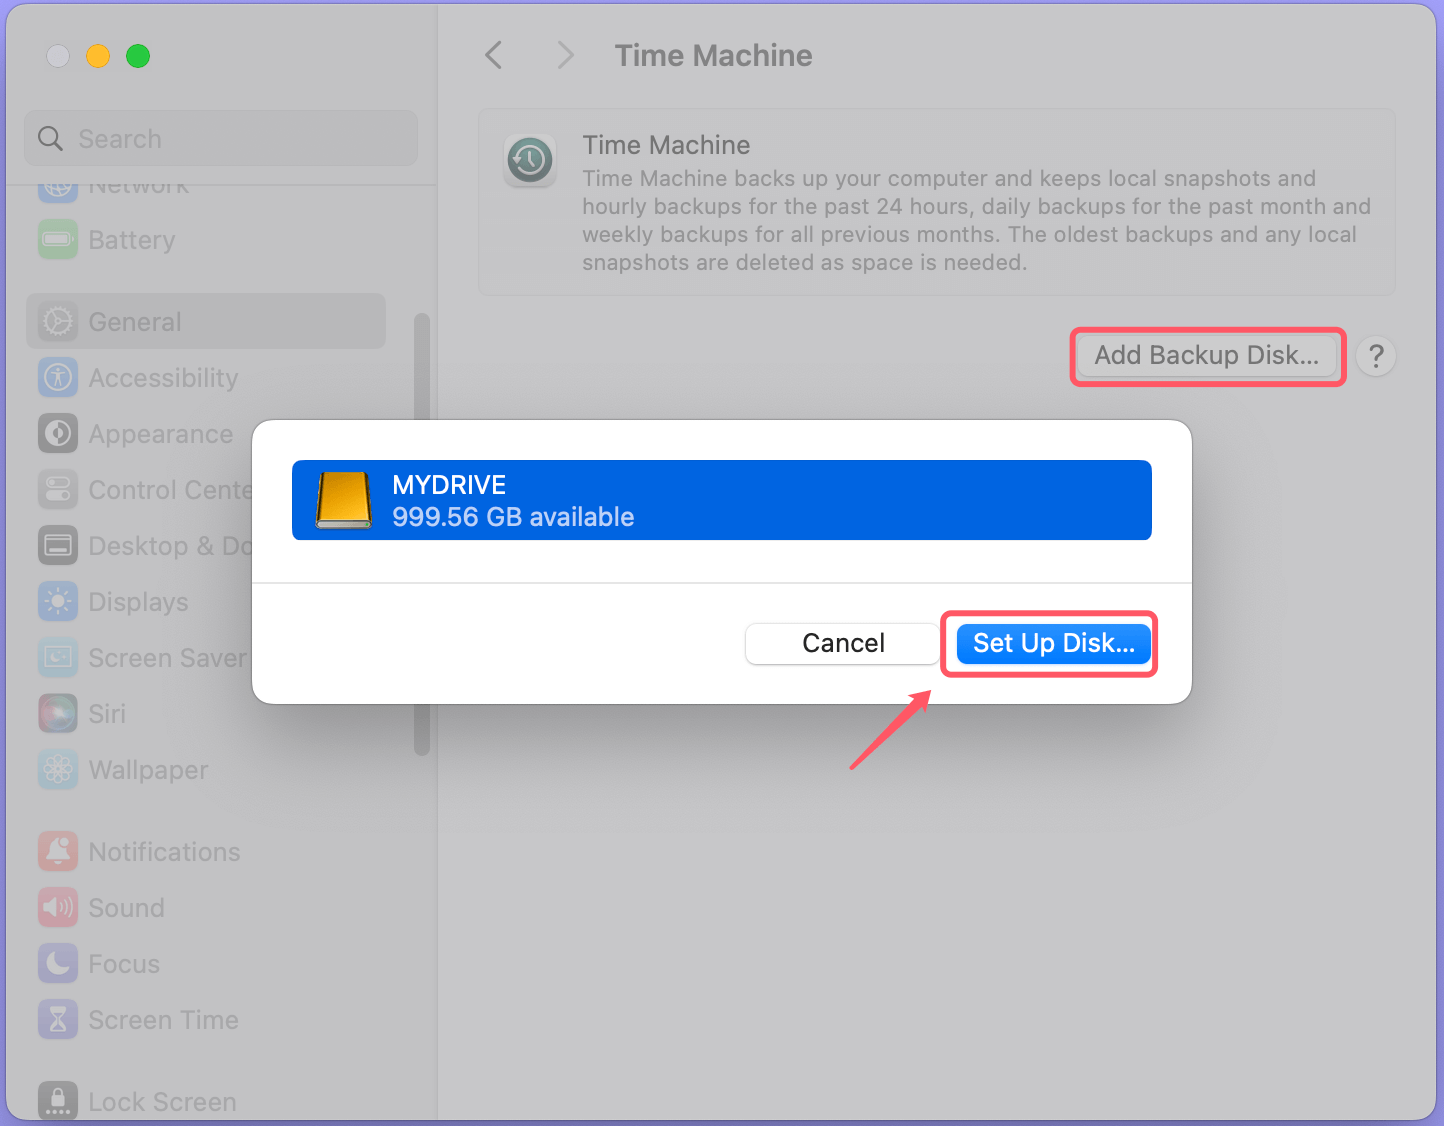
Step 3. Click Back Up Now to move all data from the Mac internal SSD to the new SSD.
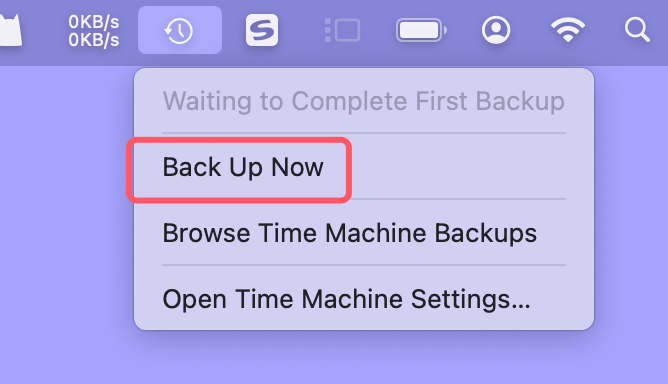
Time Machine will begin backing up your data. Depending on the size of your data and the speed of the external drive, this may take some time. Wait until the backup is complete before proceeding.
Once the backup is finished, you can verify its completion by checking the Time Machine interface, which shows the date and time of the latest backup.
Method 2. Use Disk Utility to Restore Data to New SSD
Step 1. Connect the New SSD to the Mac.
1. Insert the New SSD:
- If you're using a 2.5" SSD, place it inside the external enclosure. For an M.2 SSD, use an M.2 to USB adapter.
- Verify that the SSD is attached to the enclosure or adapter correctly.
2. Connect to Your Mac:
- Plug the external enclosure or adapter into an available USB or Thunderbolt port on your Mac.
- Wait a few moments for your Mac to recognize the new SSD. It should appear on your desktop or in Finder.
Step 2. Format the New SSD.
Formatting the new SSD is an essential step to ensure it is compatible with macOS. Here's how to format your new SSD:
1. Open Disk Utility:
- Go to Disk Utility from Utilities via Applications.
2. Select the New SSD:
- In the Disk Utility window, locate the new SSD in the left sidebar. It might be labeled as "Untitled" or with the name of the manufacturer.
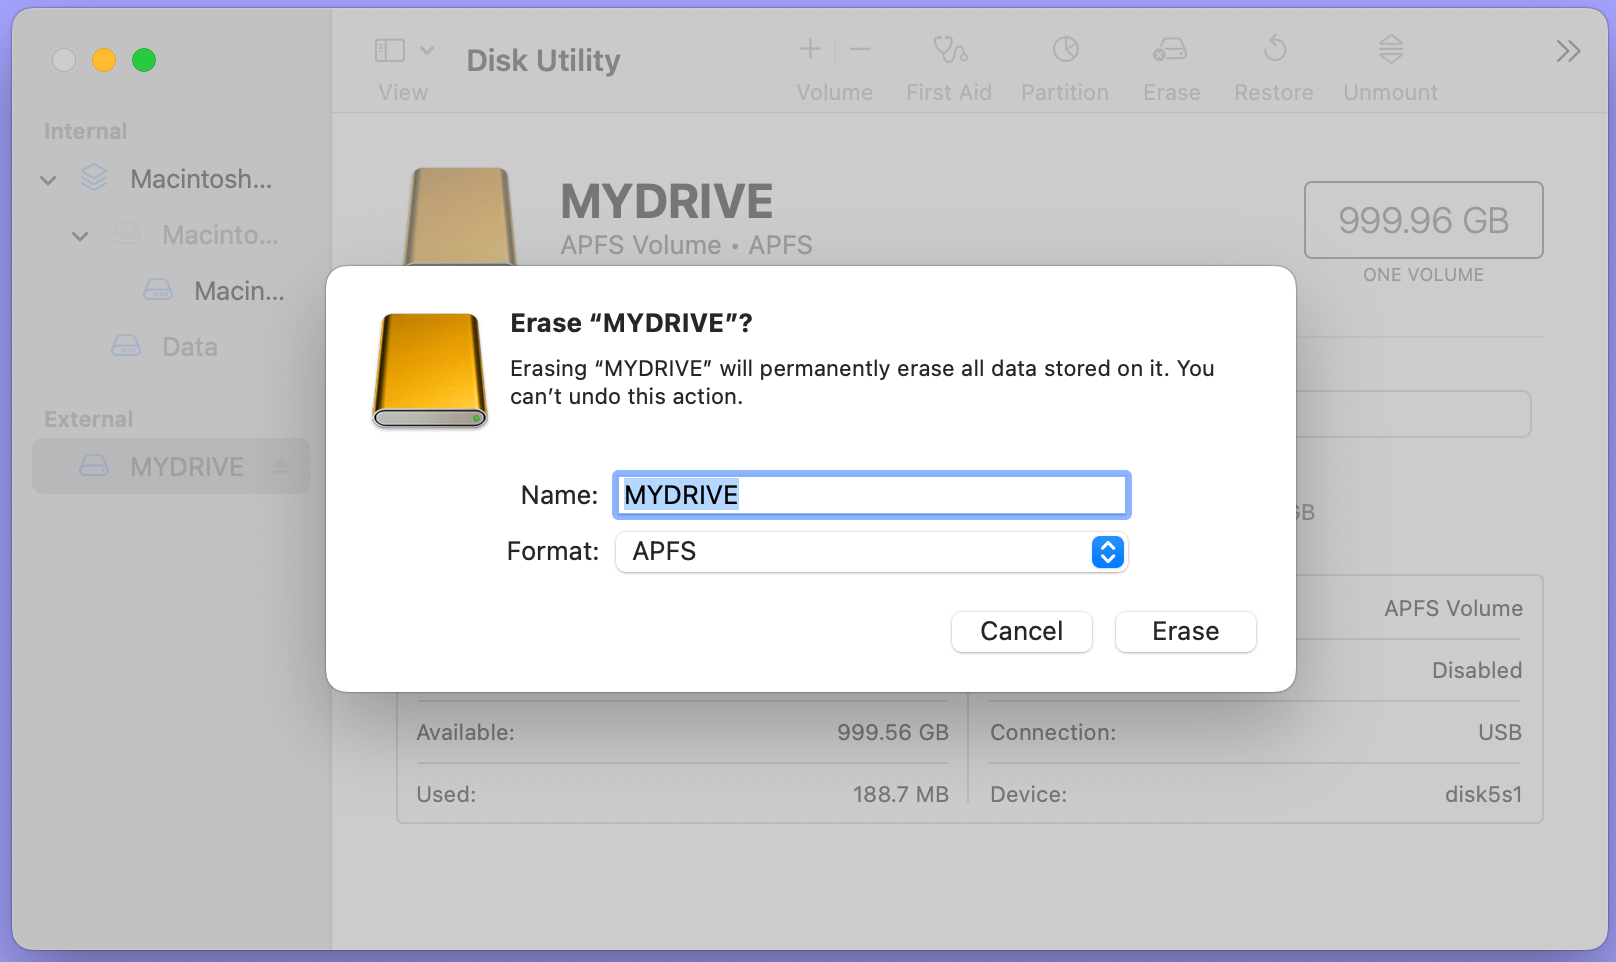
3. Erase the Drive:
- Click on the Erase button at the top of the Disk Utility window.
- In the dialog that appears:
- Name: Enter a name for your SSD (e.g., "New SSD").
- Format: Choose APFS (recommended for SSDs) or Mac OS Extended (Journaled) depending on your macOS version. APFS is optimized for SSD performance and should be selected for newer Macs.
- Scheme: Select GUID Partition Map if prompted.
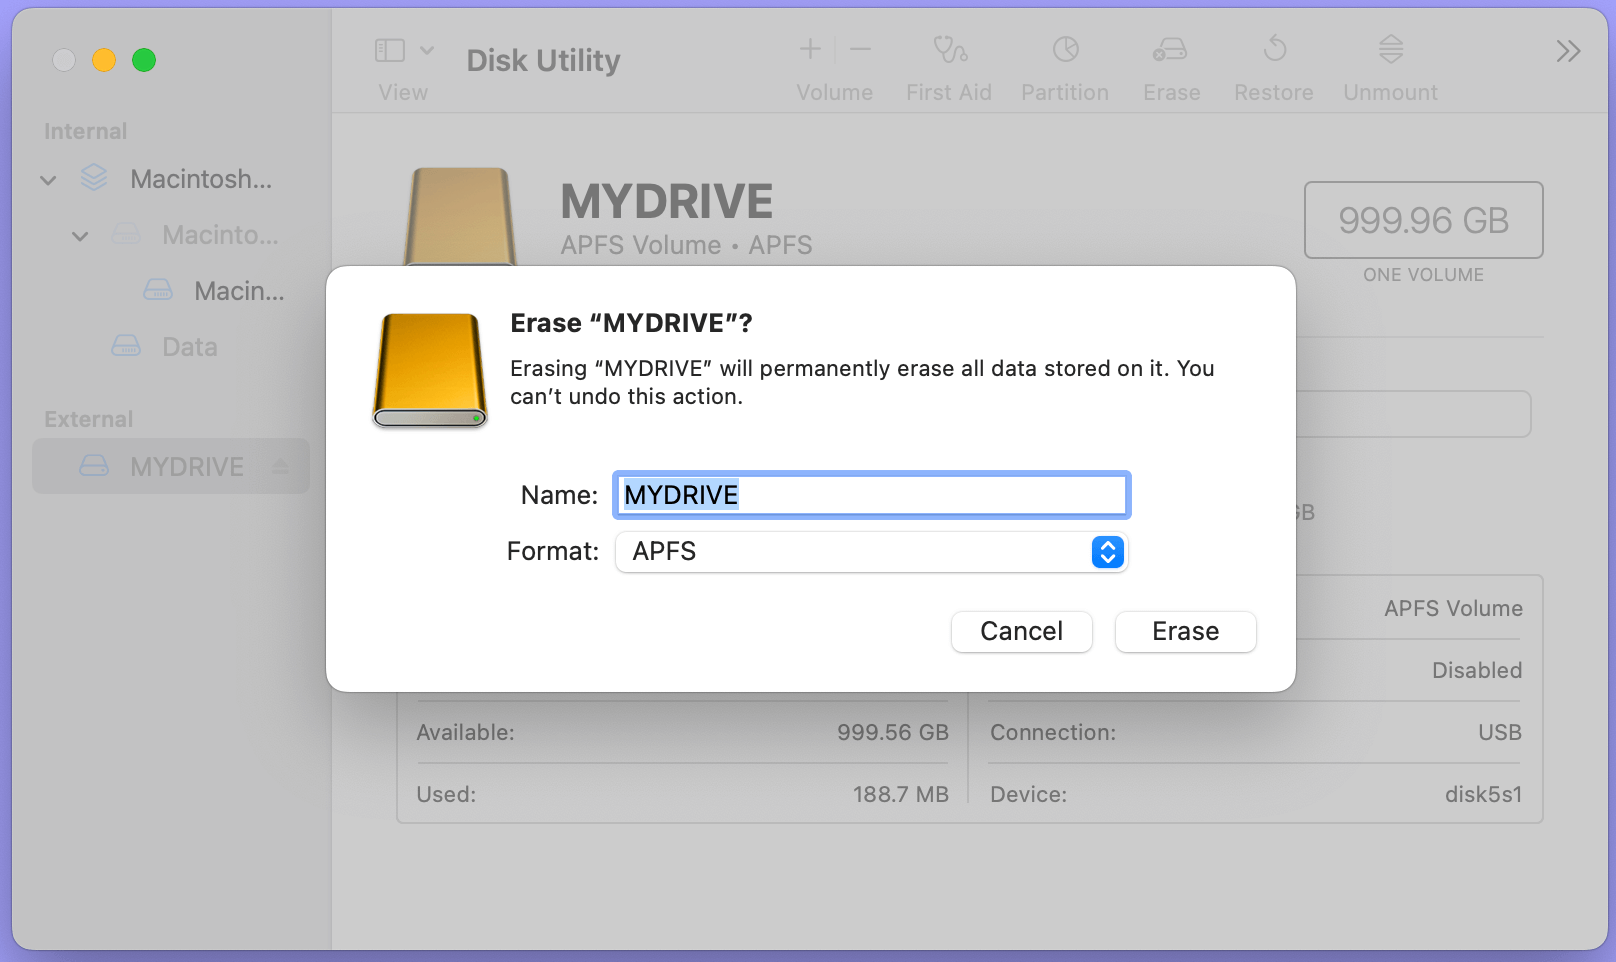
4. Confirm Erasure:
- Click on Erase to format the new SSD. This process will delete any data on the new drive, so ensure you've selected the correct drive.
- Wait for the process to complete. Once done, your new SSD is ready for cloning.
Step 3. Clone the Old SSD.
With the new SSD formatted, you can now proceed with the cloning process.
1. Open Disk Utility:
- If you haven't already done so, launch Disk Utility from Applications > Utilities.
2. Select the New SSD:
- Choose your new SSD from the left sidebar.
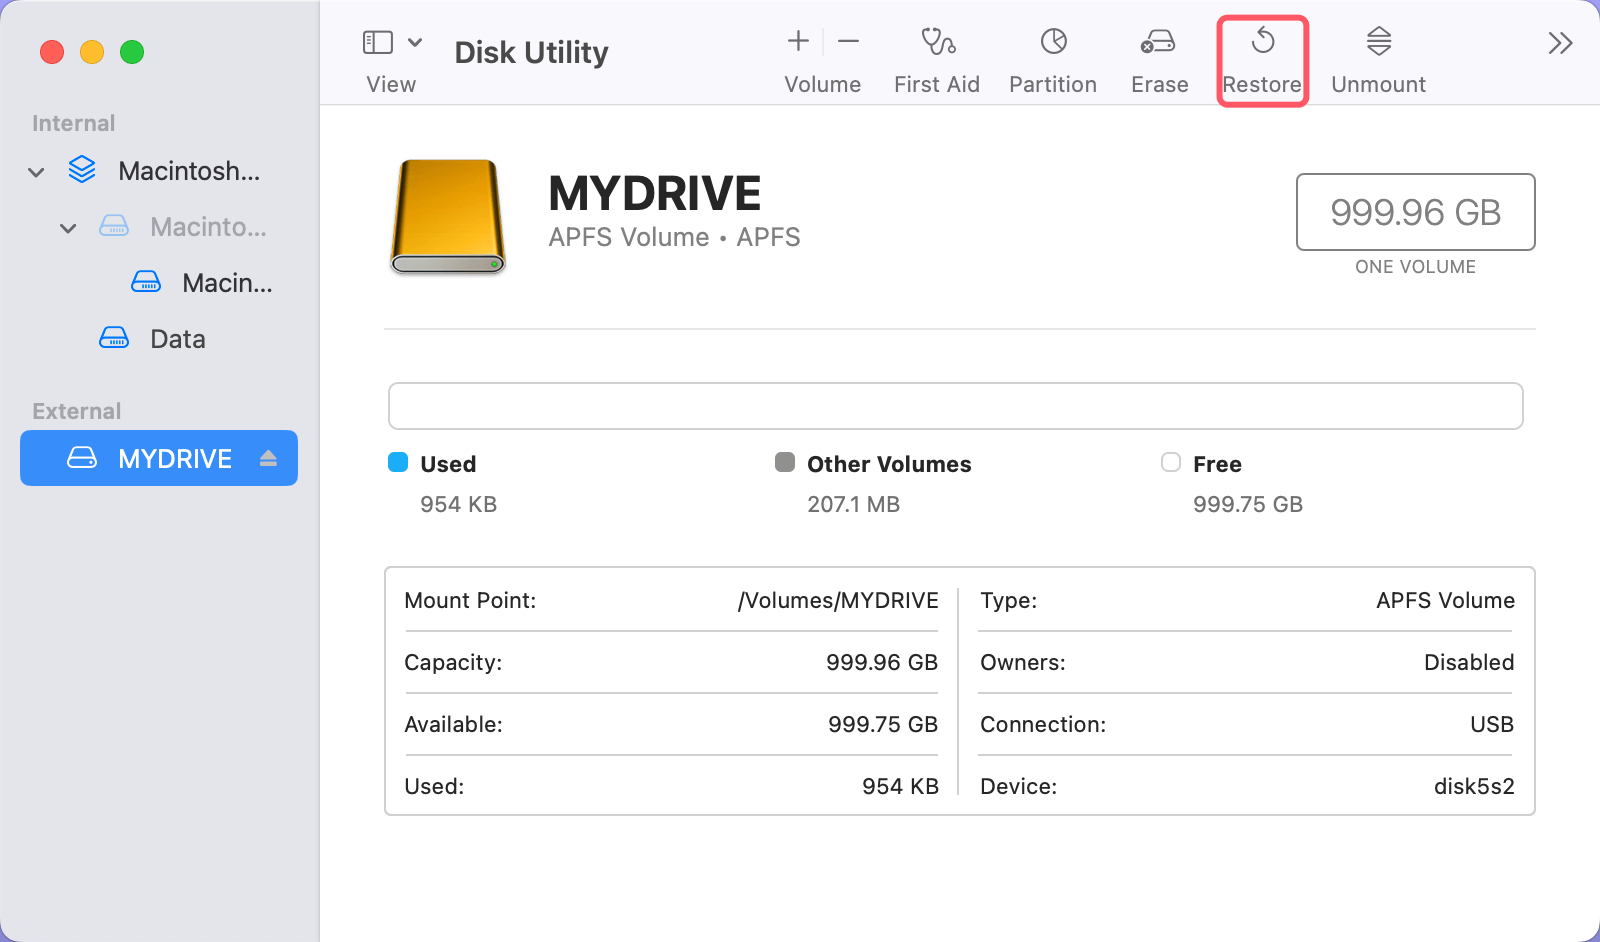
3. Use the Restore Feature:
- Click on the Restore tab in the Disk Utility window.
![clone your old SSD to a new SSD on your Mac]()
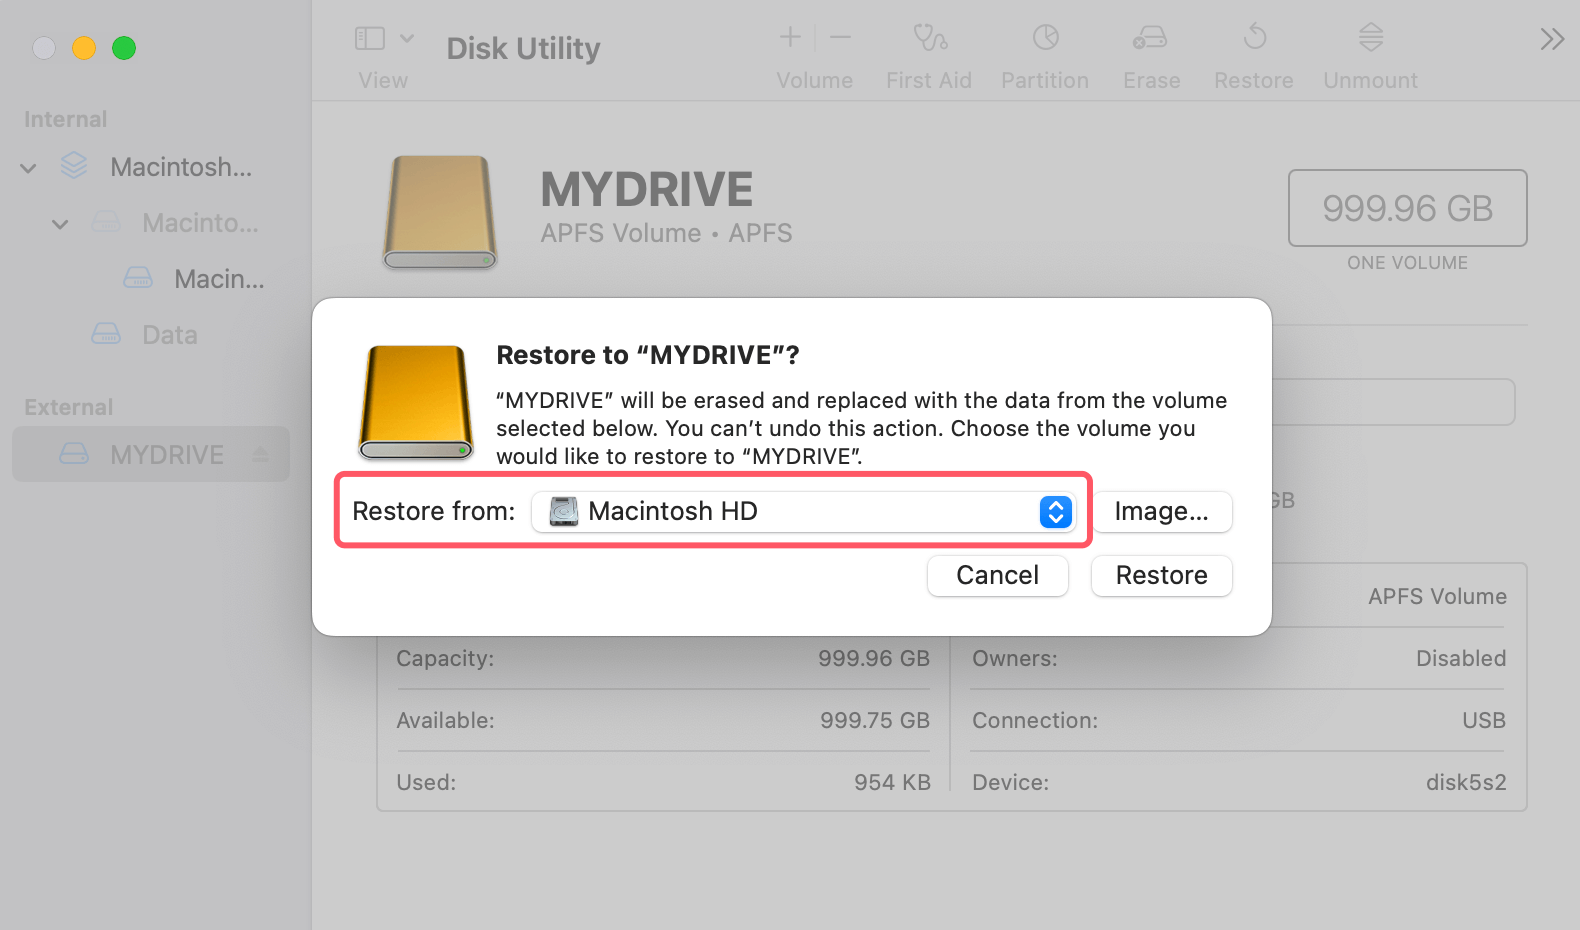
- Select Restore from the old SSD, such as Macintosh HD.
![clone your old SSD to a new SSD on your Mac]()
4. Start the Cloning Process:
- To start the cloning process, click the Restore option. Disk Utility will copy all data, including the operating system, applications, and files, from the old SSD to the new SSD.
- This process may take some time, depending on the amount of data being transferred and the speed of both SSDs.
5. Complete the Cloning:
- Once the cloning is finished, Disk Utility will notify you. You can then eject the new SSD safely.
Method 3. Use Disk Cloning Software
If you prefer a more user-friendly approach and want to create a bootable clone, using third-party Mac disk cloning software like Donemax Disk Clone for Mac can be beneficial. Here's how to use it:
Step 1. Download and install Donemax Disk Clone for Mac and connect the new SSD to the Mac.
Donemax Disk Clone for Mac
- Clone HDD/SSD and external storage device on Mac.
- Clone old SSD to new SSD on Mac.
- Create bootable clone backup for Mac.
Step 2. Open Donemax Disk Clone for Mac, then choose OS Clone mode. Select the new SSD as the destination drive.

Step 3. Click on Clone Now button to clone all data including operating system, settings, user data, apps and other data from the internal SSD to the new SSD.

Once the cloning process gets finished, you can check the cloned data on the SSD and set the SSD as a startup disk. (Start the Mac into macOS Recovery mode, then select the new SSD as the startup disk.)
Verifying the Cloning Process
Once the cloning process is complete, it's important to verify that the data has been successfully transferred.
Check the New SSD:
- Open Finder: Navigate to the new SSD in Finder.
- Review Files: Ensure all files, applications, and settings are present and accessible.
- Check Storage Capacity: Confirm that the storage capacity matches what you expected.
Troubleshooting Common Issues:
If you encounter any issues, consider the following tips:
- Inaccessible Files: Ensure that you formatted the new SSD correctly before cloning.
- Incomplete Cloning: Retry the cloning process using a different tool if data appears to be missing.
Replace the Old SSD with the New SSD
Once you've verified that the new SSD is a complete clone of your old SSD, you can replace the old drive in your Mac.
Power Down Your Mac:
- Shut Down: Click on the Apple menu and select “Shut Down.”
- Disconnect Power: Unplug your Mac from any power source.
Open Your Mac:
- Use the Correct Screwdriver: Depending on your Mac model, use the appropriate screwdriver to open the back panel.
- Locate the SSD: Find the old SSD in its slot.
Remove the Old SSD:
- Unscrew the Drive: Carefully unscrew the old SSD from its position.
- Disconnect the Old SSD: Gently pull the SSD out of its slot.
Install the New SSD:
- Insert the New SSD: Slide the new SSD into the same slot.
- Secure the SSD: Use the screws you removed earlier to secure the new SSD in place.
Close Your Mac:
- Replace the Back Panel: Put your Mac's back cover back on and fasten it with screws.
- Reconnect Power: Plug your Mac back into the power source.
Boot from the New SSD:
- Power On Your Mac: To turn your Mac on, press the power button.
- Check Boot Disk: If your Mac boots normally, it indicates the new SSD is functioning correctly. If not, boot the Mac into recovery mode and select the new SSD as the startup disk.
Post-Cloning Steps (optional)
After successfully replacing the old SSD, you may want to take the following steps:
Reinstall Applications:
Some applications may not transfer properly during the cloning process. Reinstall any necessary applications that are missing or not functioning correctly.
Check System Preferences:
Review your system preferences and settings to ensure everything is configured correctly. Pay attention to network settings, display preferences, and user accounts.
Regular Maintenance:
To keep your new SSD running smoothly, consider these maintenance tips:
- Keep Backups: Continue to back up your data regularly using Time Machine or other backup solutions.
- Optimize Storage: Use macOS tools to optimize storage by removing unnecessary files and applications.
Conclusion
Cloning your old SSD to a new SSD on your Mac is a straightforward process that can significantly enhance your system's performance and storage capacity. By following the steps outlined in this article, you can successfully clone your SSD, ensuring that all your important files and settings are preserved during the transition. Remember to back up your data before starting and take the necessary precautions while handling hardware.
With the right preparation and tools, you can enjoy a faster, more efficient Mac with your new SSD. Happy cloning!

Donemax Disk Clone
An award-winning disk cloning program to help Windows users and Mac users clone HDD/SSD/external device. It also can create full bootable clone backup for Windows PCs and Macs.
Related Articles
- Jan 15, 2025How to Estimate the Remaining Lifespan of Your SSD? [3 Methods]
- Jan 14, 2025Best 6 Solutions to Fix SSD Is Unreadable
- Apr 07, 2025How to Recover Data from SATA SSD? [3 Methods]
- Nov 05, 2024How to Upgrade HDD to SSD on Toshiba Laptop?
- Jul 20, 2024How to Format M.2 SSD Without Losing Data?
- Mar 31, 202510 Solutions to Fix SanDisk Extreme Portable SSD Not Recognized on Mac

Christina
Christina is the senior editor of Donemax software who has worked in the company for 4+ years. She mainly writes the guides and solutions about data erasure, data transferring, data recovery and disk cloning to help users get the most out of their Windows and Mac. She likes to travel, enjoy country music and play games in her spare time.

Gerhard Chou
In order to effectively solve the problems for our customers, every article and troubleshooting solution published on our website has been strictly tested and practiced. Our editors love researching and using computers and testing software, and are willing to help computer users with their problems
