PAGE CONTENT:
Changing your Toshiba laptop's hard disk drive (HDD) to a solid-state (SSD) changes everything. This easy but powerful upgrade can make your laptop run faster, work better, and be more reliable. SSDs make your computer start up faster, open apps faster and move files faster. SSDs are also more lasting and use less power, so they are a good choice for anyone who uses a laptop.
If you want to switch from an HDD to an SSD on your Toshiba laptop, this guide will show you how. No matter how much you know about technology, we'll review everything you need to know, from getting your laptop ready and backing up your data to cloning your old drive and loading the new SSD.
By the end of this guide, you'll feel confident and know how to turn your Toshiba laptop into a powerful machine. Let's begin!

Why Upgrade Your Toshiba Laptop to an SSD?
Before getting into the how-to, it's important to know why switching to an SSD is a good idea. Here are some strong reasons:
- Speed: SSDs are faster than HDDs. If you have an SSD, your laptop will start up in seconds, and apps will open almost instantly. Accessing data and sending files is much faster, which cuts down on wait times and boosts total productivity.
- Durability: SSDs don't have any moving parts like HDDs do. They will last longer and be less likely to get broken from drops or bumps. Since SSDs don't have any moving parts, they are also less likely to break down over time. It makes them last longer.
- Power Efficiency: SSDs use less electricity than HDDs. Because of this, your laptop's battery will last longer, so you can work, play, and browse for longer without charging it often. It can be especially helpful for people who move with their laptops or work from home.
- Noise Reduction: HDDs can be noisy because their disks spin and their read/write heads move around. On the other hand, SSDs don't make noise when they work, making it quieter. For example, this can be very helpful in museums and meetings where it's quiet.
Steps to Clone HDD to SSD on Toshiba Laptop
STEP 1: Preparing for the Upgrade
Backup Your Data
Before upgrading to an SSD, it's crucial to back up your data. It ensures that no important files are lost during the transition. Use an external drive, cloud storage, or both to create a copy of your data. By backing up your data, you protect valuable information and can seamlessly restore everything to your new SSD, avoiding potential data loss and ensuring a smooth upgrade process.
Gather Necessary Tools and Equipment
New SSD: Ensure you have an SSD that works with your Toshiba laptop. Check the specs to ensure the form factor (2.5-inch, M.2) and port (SATA, NVMe) are compatible.
Screwdrivers: You will need a set of precision screwdrivers to open the laptop case.
Cloning Software: To move your old system to the new SSD, you'll need solid cloning software. Donemax Disk Clone, Macrium Reflect, Acronis True Image, and DoYourClone are a few examples.
External Enclosure or Adapter: If you want to copy, you might need an outside case or a SATA-to-USB adapter to connect the SSD to your laptop.
STEP 2: Clone Your Existing Drive
Cloning your HDD to the SSD is an important step that lets you move all your files, including the operating system, apps, and settings, to the new drive without any problems.
1.Connect the SSD
To begin, connect the SSD to your laptop via a USB port using an external case or a SATA-to-USB adapter. With this setup, your laptop will see the SSD as an external drive, ready to be copied.
2.Install Cloning Software
Next, get cloning software that you can trust and install it. Donemax Disk Clone, Macrium Reflect, Acronis True Image, and EaseUS Todo Backup are all well-known choices. These tools are made to make cloning easier by having simple, step-by-step directions and easy-to-use interfaces.
Donemax Disk Clone is one of the best disk cloning programs. It can clone everything from the HDD to the new SSD and make a bootable clone backup.
3.Start The Process of Cloning
Start the cloning program, choose Disk Clone mode and find the source drive, which is your current hard drive. Pick the drive you want to go to (your new SSD). The program will tell you what to do to start the cloning process. This step could take a while, depending on how much data is sent. It's important to ensure your laptop stays on and connected throughout the process to avoid delays.

4.Verify Cloning
After the cloning, ensure all the data is moved properly to the SSD. It is important to ensure your operating system, programs, and personal files are secure and working. This step ensures that your SSD is ready to be installed and that all your data has been moved safely.
STEP 3: Upgrade the SSD
After you've made a copy of your HDD, you need to put the SSD into your Toshiba laptop.
1. Power Down and Unplug: Turn off your laptop fully and unplug everything, even the power adapter. This will keep you safe and prevent your laptop from being damaged electrically.
2. Remove the Back Panel: Carefully take off the screws that hold the laptop's back panel in place with a pair of precision screwdrivers. After taking out all the screws, carefully lift the door to see what's inside.
3. Locate the HDD: Find the current HDD. It is usually held in place with screws and kept in a box. The HDD is generally easy to spot because of its size and location in the laptop.
4. Remove the HDD: To remove the HDD, unscrew the bracket holding it and carefully separate it from the SATA port. Be careful not to damage any parts around the HDD as you remove it from the laptop.
5. Install the SSD: Put the new SSD into the HDD slot. Using screws to hold it in place will make sure it stays put. Ensure the SSD and the SATA interface link are tight and safe.
6. Reassembling the Laptop: Carefully put the back panel back on your laptop and lock it with the screws you took out earlier. Connect all of the cords again, including the power charger.
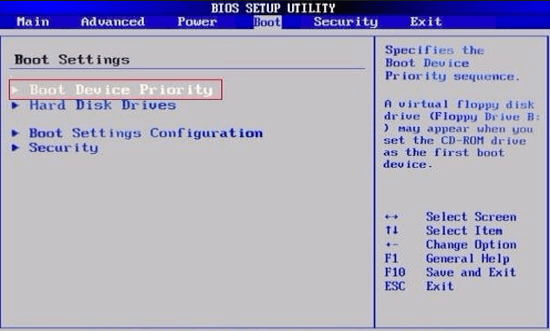
7. Set the SSD as the New Boot Disk: On the System Setup Main Menu screen, click System BIOS > Boot Settings > UEFI Boot Settings > UEFI Boot Sequence. Then select the SSD as the boot drive. Click Exit, and then click Yes to save the settings on exit

Conclusion:
Changing the hard drive in your Toshiba laptop to an SSD is a great way to make it run faster and more reliably. This guide will make it easy to back up your data, copy your current drive, and load your new SSD, making your laptop run faster.
SSDs provide a smoother and more efficient working experience. They also have faster boot times, last longer, and use less power. Take the plunge and give your laptop a new lease on life with this simple update. It will pay for itself in terms of speed and efficiency.
FAQs About Upgrading HDD to SSD on Toshiba Laptop
1. How to clone all data from HDD to SSD on Toshiba Laptop?
Disk cloning software, such as Donemax Disk Clone, can help you clone all data including operating system and user data, programs, settings from the HDD to the SSD:
- Download and install Donemax Disk Clone on your Toshiba laptop.
- Choose Disk Clone mode, select the HDD as the source disk, select the SSD as the destination disk.
- Click on Next button.
- Tick Check the option if the destination is SSD and click on Clone button.
- Clone all data from the HDD to the SSD.
2. What is the best Toshiba laptop clone software?
Here is the list of top 5 Toshiba laptop clone software:
- Donemax Disk Clone
- Macrium Reflect
- Acronis True Image
- DoYourClone
- AweClone
3. How to set the new SSD as the boot drive?
After cloning HDD to SSD on your Toshiba laptop, enter into BIOS mode to set the SSD as the boot drive:
- Restart your Toshiba laptop, press Del or F2 key.
- When it starts into BIOS mode, click Boot tab.
- Select the SSD as the boot drive.
- Save it and restart the laptop.
Related Articles
- Jul 24, 2024How to Fix SanDisk Portable SSD Not Working on Mac?
- Jul 20, 2024How to Format M.2 SSD Without Losing Data?
- Jul 19, 2024SSD Maintenance Tips: Protect SSD
- Sep 23, 2024How to Format NVMe SSD on Windows or macOS?
- Nov 13, 2024Can I Recover Data If TRIM Is Enabled on My SSD Drive?
- Jan 17, 2025How to Format an SSD to ExFAT or FAT32 on Mac: A Detailed Guide

Maria
Maria is one of the senior writers & editors of Donemax who lives and works in Sydney, Australia. She loves PC, Mac and Internet Technology. She has 6 years of writing articles about data recovery on PC/Mac, disk cloning solution, data eraser and computer OS optimization, etc. She is also interested in testing various software and digital products.

Gerhard Chou
In order to effectively solve the problems for our customers, every article and troubleshooting solution published on our website has been strictly tested and practiced. Our editors love researching and using computers and testing software, and are willing to help computer users with their problems