Written byLucienUpdated on Sep 23, 2024
How to Format NVMe SSD on Windows or macOS?
Approved byGerhard Chou
PAGE CONTENT:
Storage options in current computers have come a long way, and NVMe (Non-Volatile Memory Express) SSDs are at the front of the pack. People who use computers daily are into technology like these high-speed drives because they can move data much faster and have less latency than regular drives. But to get the most out of your NVMe SSD, you must prepare it correctly.
Formatting the drive prepares it for use, making it work better and last longer. Knowing the right way to reset or set up a new drive can make a big difference. This guide will show you how to format your NVMe SSD in a way that works on both Windows and macOS, making the setup process smooth and quick. Let's improve your computer experience with NVMe technology's speed and dependability.
NVMe SSDs: Why Users Love It
Before starting the formatting process, it is important to know what NVMe SSDs are and why they are useful. NVMe (Non-Volatile Memory Express) SSDs are a big step forward in storage technology. They offer many benefits over older storage options.
- Speed and Performance
NVMe SSDs use the PCIe (Peripheral Component Interconnect Express) link, which connects directly to the motherboard and speeds up reading and writing faster than SATA-based SSDs. Because of this, program load times are much shorter, operating system boot times are faster, and the system as a whole is more responsive. As they are so fast, NVMe drives are great for activities that need to access and send data quickly, like games, video editing, and big data analysis.
- Low Latency
Low delay is one of the best things about NVMe technology. IOPS (Input/Output Operations Per Second) goes up because NVMe cuts down on the time it takes for data to move from the SSD to the CPU. This low latency is important for high-performance computing jobs because it makes switching between tasks easier and speeds up data retrieval.
- Efficiency
Compared to SATA drives, NVMe drives use less electricity. This is great for computers and other mobile devices that need to know how long their batteries will last. Because NVMe SSDs are so efficient, they last longer on a charge and produce less heat, making the drive last longer.
Learn more about NVMe SSD vs SSD >>
Why Format an NVMe SSD?
Formatting an NVMe SSD is an important step that does more than one thing: making sure the drive is ready for the best speed and use.
1. Preparing for Use
When you buy a new NVMe SSD, it usually doesn't have any data yet. Before using it, you must prepare it so your operating system can see and work with its files. This first formatting step is important for the OS to use the drive to store and handle data effectively.
2. Data Organization
When you format an NVMe SSD, you can set up the file system you want, which makes it easier to organize your data. NTFS for Windows and APFS for macOS are two examples of different file systems. Each has its features and perks that make storing and retrieving data easier.
3. Cleaning the Drive
Formatting using NVMe SSDs is a way to start over. It removes all the info already on the drive and starts over. This is especially helpful if you want to use the drive for something else or remove all its data for security reasons.
4. Optimizing Performance
The way you prepare your NVMe SSD can have a big effect on its performance and longevity. Formatting helps keep the read and write speeds at their best and ensures the drive works well over time. It can also realign data structures to make the drive run faster overall.
Format NVMe SSD on Windows
Step 1. Install the NVMe SSD.
- Remove the power cord from your computer and turn it off.
- Open the computer case to get to the motherboard.
- Find the M.2 slot on your motherboard, take out the screw, and then put the NVMe SSD in it. Replace the screw to lock it.
Step 2. Initialize the NVMe SSD.
- Put your computer to sleep and then turn it back on.
- Click the Start button, and right-click and choose "Disk Management."
- When asked, pick the NVMe SSD and a partition style (MBR for drives under 2TB, GPT for drives over 2TB).
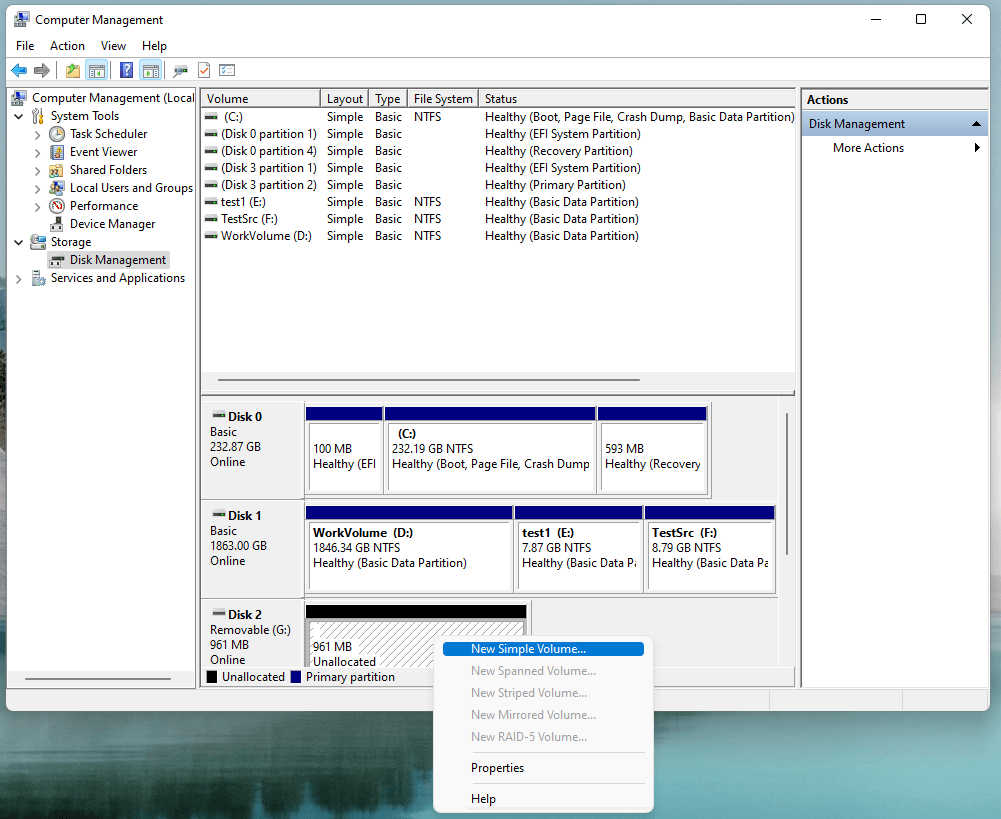
Step 3. Format the NVMe SSD.
- Make a New Volume:
Find the empty spot on the NVMe SSD and right-click it in Disk Management. Just click on "New Simple Volume."
- Follow the Wizard:
1. Keep clicking "Next" until the wizard is done.
2. Give it a drive letter.
3. Pick the file system. For Windows, NTFS is the best choice.
4. Choose the allocation unit size (the default is usually fine).
5. Name the amount if you want to.
- Finish
Click "Finish" to begin formatting the file.
Format NVMe SSD on macOS
Step 1. Install the NVMe SSD.
- Turn off the Mac: Take your Mac off the wall and turn it off.
- Open the Case: You must open the case to access the inside of a Mac desktop or some MacBooks.
- Put the NVMe SSD in: Find the right slot, insert the SSD, and then lock it.
Step 2. Boot into Recovery Mode.
- Turn the power on and go to Recovery: To get into macOS Recovery, press and hold Power button. If you are using an Intel-based Mac, press and hold Command+R.
- To start Disk Utility, Open the macOS Utilities window and choose "Disk Utility" once in Recovery mode.
Step 3. Initialize and Format the NVMe SSD.
- Select the NVMe SSD
In Disk Utility, pick the NVMe SSD from the list on the left.

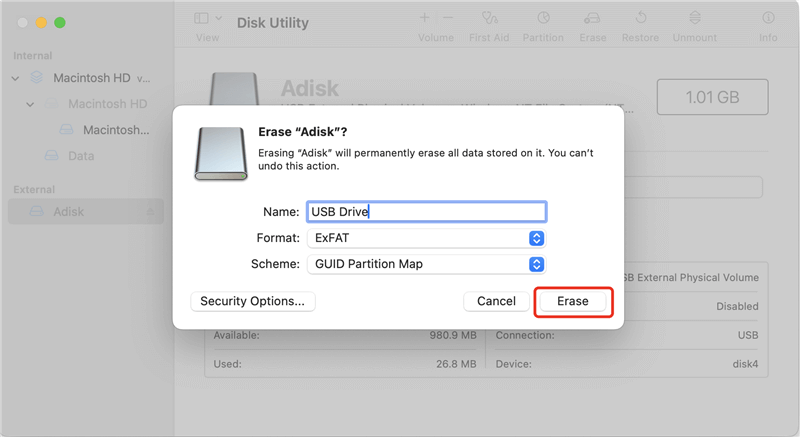
- Erase the Drive
- Press the "Erase" key.
- Give the drive a name.
- Pick out a format (APFS is best for macOS).
- You can pick the Scheme. For modern macOS computers, GUID Partition Map is usually used.
- Format
Press "Erase" to clean up the drive.
How to Unformat NVMe SSD on Windows and macOS?
Formatting will delete everything from your NVMe SSD. If you have lost data due to formatting your NVMe SSD, you can use a data recovery program to get the lost data back.
Step 1. Download and install the best NVMe SSD data recovery software - Donemax Data Recovery on your computer.
Step 2. Open Donemax Data Recovery and select the formatted NVMe SSD to start data recovery.

Step 3. Click on Scan button to deeply scan the formatted NVMe SSD and find all deleted/formatted/lost files.
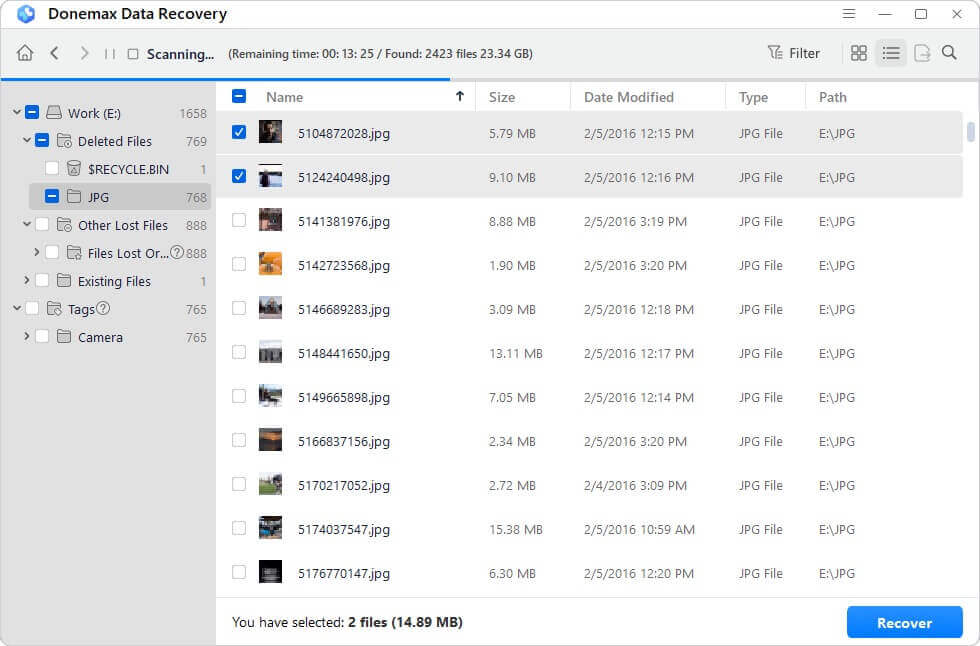
Step 4. Once the scan is completed, you can preview all recoverable files. Then select the wanted files, click on Recover button to save them.

How to Wipe NVMe SSD Before Selling or Donating?
If you are going to sell or donate your old NVMe SSD, you'd better permanently erase all data from it. Disk wipe software can help you wipe your NVMe SSD and erase everything from it.
Step 1. Download and install the best disk wipe software - Donemax Data Eraser on your computer. It can help you securely and completely wipe your NVMe SSD and erase all data from the SSD.
Step 2. Open Donemax Data Eraser, then choose Erase Hard Drive mode, select the NVMe SSD, click on Erase Now button.

Step 3. Select a data erasure standard, then click on Continue button to wipe the NVMe SSD.

It will erase all data including existing data, deleted/formatted/lost data from the NVMe SSD.
Note: Once the data is erased by Donemax Data Eraser, the data is lost for good, cannot be recovered by any data recovery method.
FAQs About Formatting NVMe SSD
1. How to format a NVMe SSD?
You can quickly format a NVMe SSD on Windows PC or Mac:
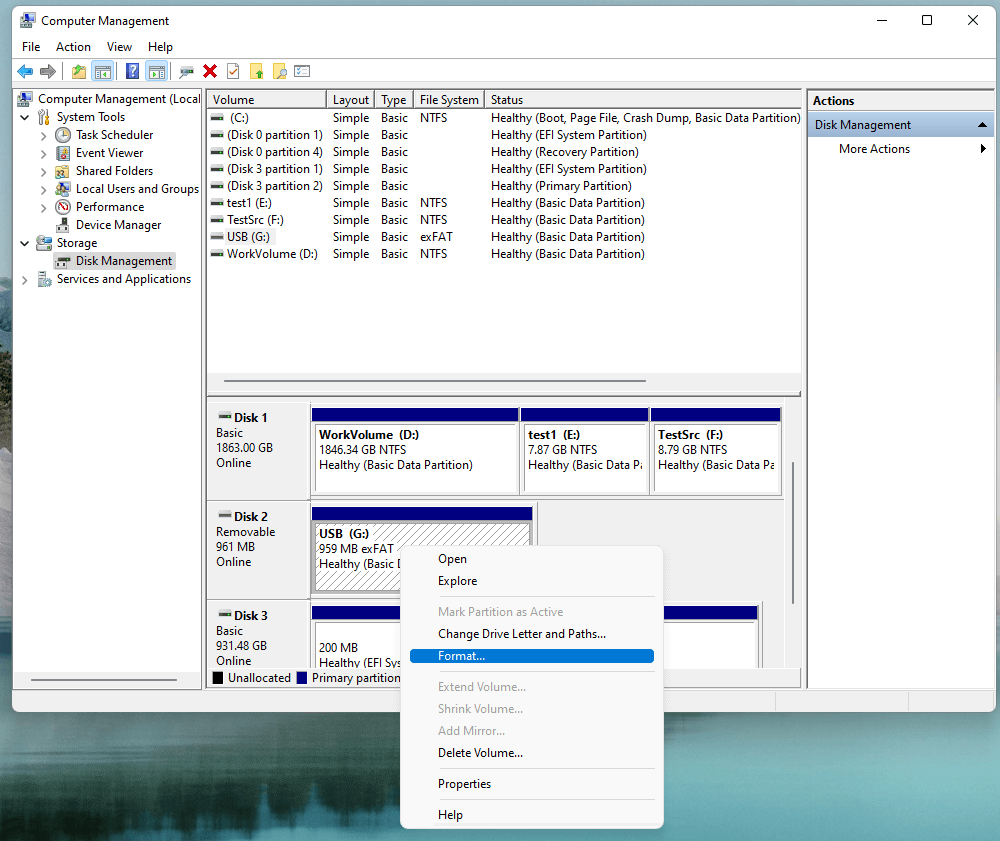
On Windows PC: open Disk Management, then find and right-click the NVMe SSD, choose Format. Follow the onscreen instructions to format the NVMe SSD.
On Mac: open Disk Utility, select the NVMe SSD, click Erase. Select a file system, then click Erase again to erase the NVMe SSD.
2. How to recover lost data from a formatted NVMe SSD?
Data recovery software can help you securely and easily recover lost data from a formatted NVMe SSD:
- Download and install Donemax Data Recovery.
- Open Donemax Data Recovery, select the NVMe SSD.
- Click on Scan button.
- Preview and recover lost files after scanning.
3. Which tool can help format NVMe SSD?
Here are top 7 NVMe SSD disk formatting tools for Windows or macOS:
- Disk Management
- Disk Utility
- Donemax Data Recovery
- Donemax Data Eraser
- DBAN
- DMmenu for Mac
- Minitool Partition Assistant
4. How to wipe a NVMe SSD?
Disk wipe software - such as Donemax Data Eraser can help you wipe a NVMe SSD:
- Download and install Donemax Data Eraser on your computer.
- Open Donemax Data Eraser and choose Erase Hard Drive mode.
- Select the NVMe SSD, click on Erase Now button.
- Wipe the NVMe SSD.
5. How to format a NVMe SSD to NTFS on Mac?
If you want to format a NVMe SSD to NTFS on Mac, you can use NTFS for Mac tool:
Step 1. Download and install Donemax NTFS for Mac on your Mac.
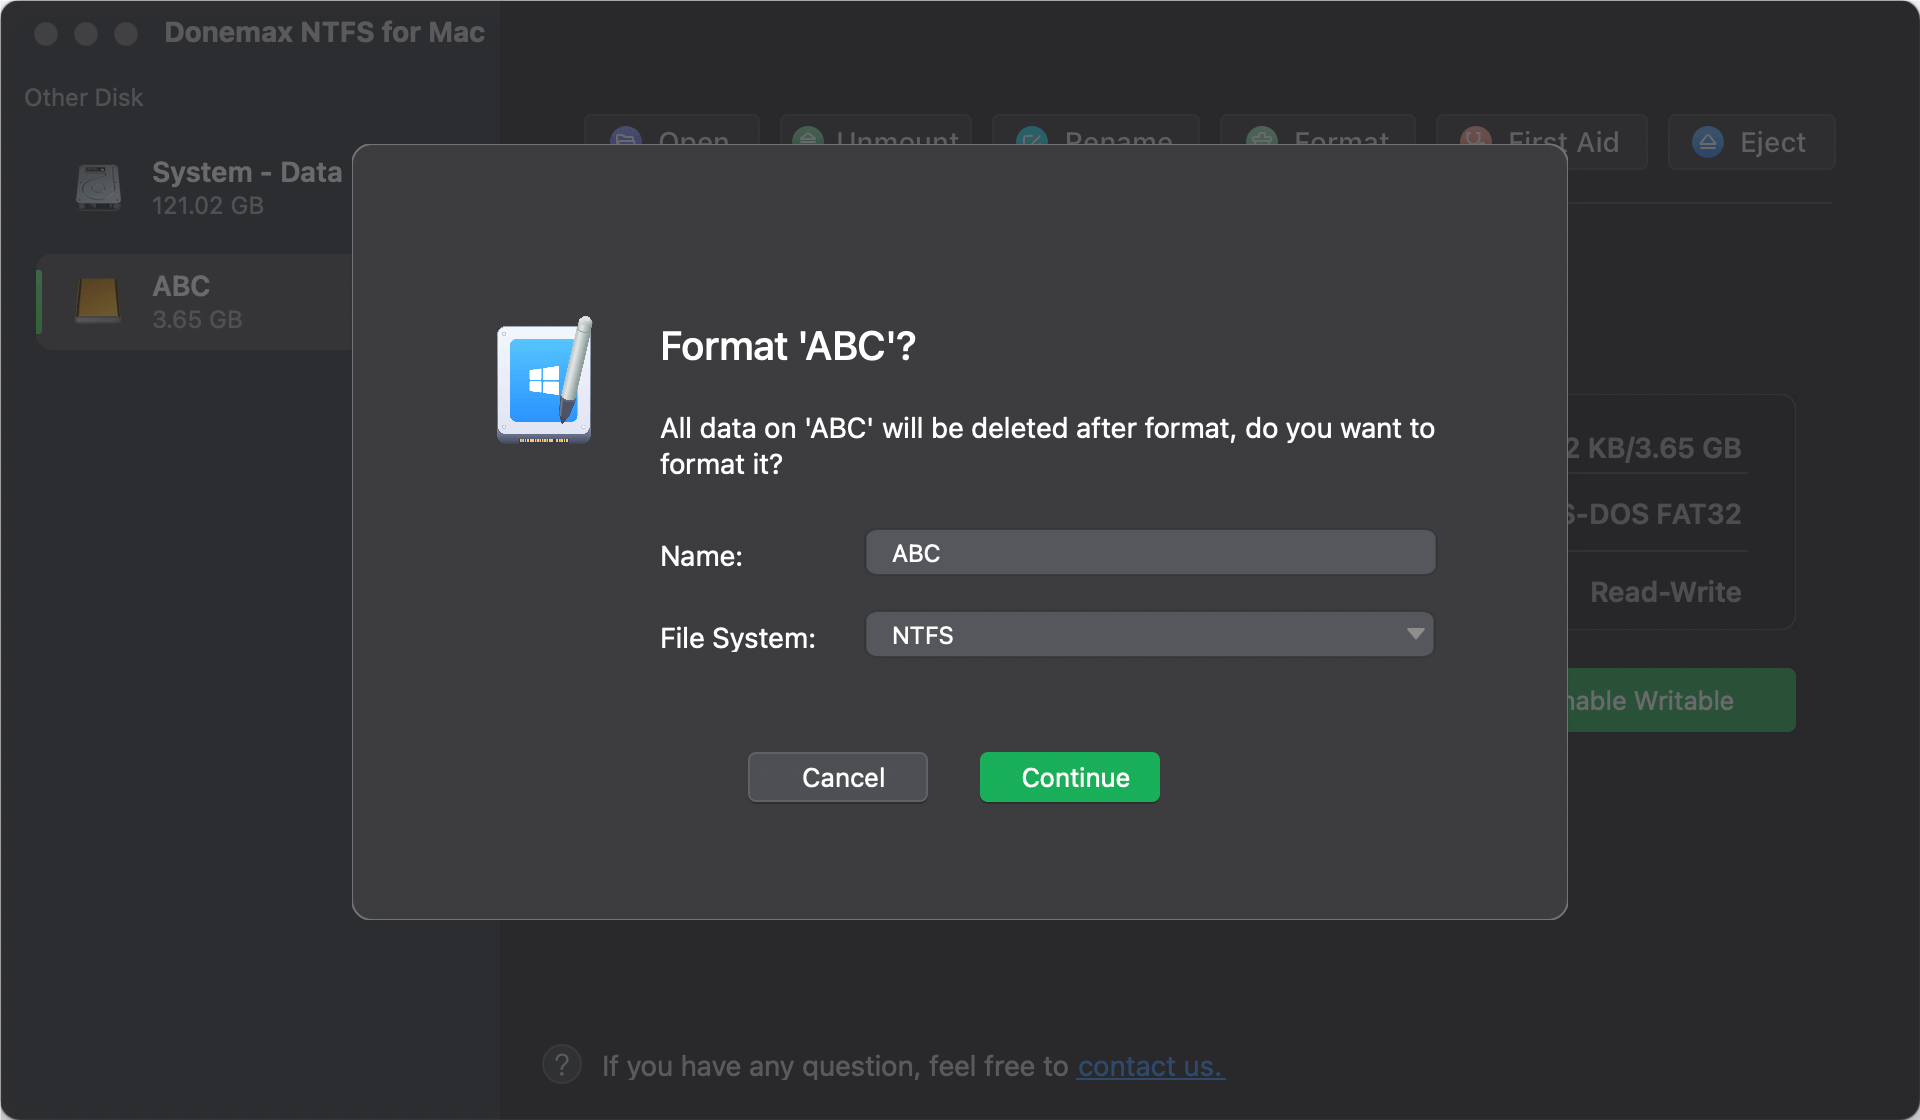
Step 2. Open Donemax NTFS for Mac, select the NVMe SSD, click on Format button.
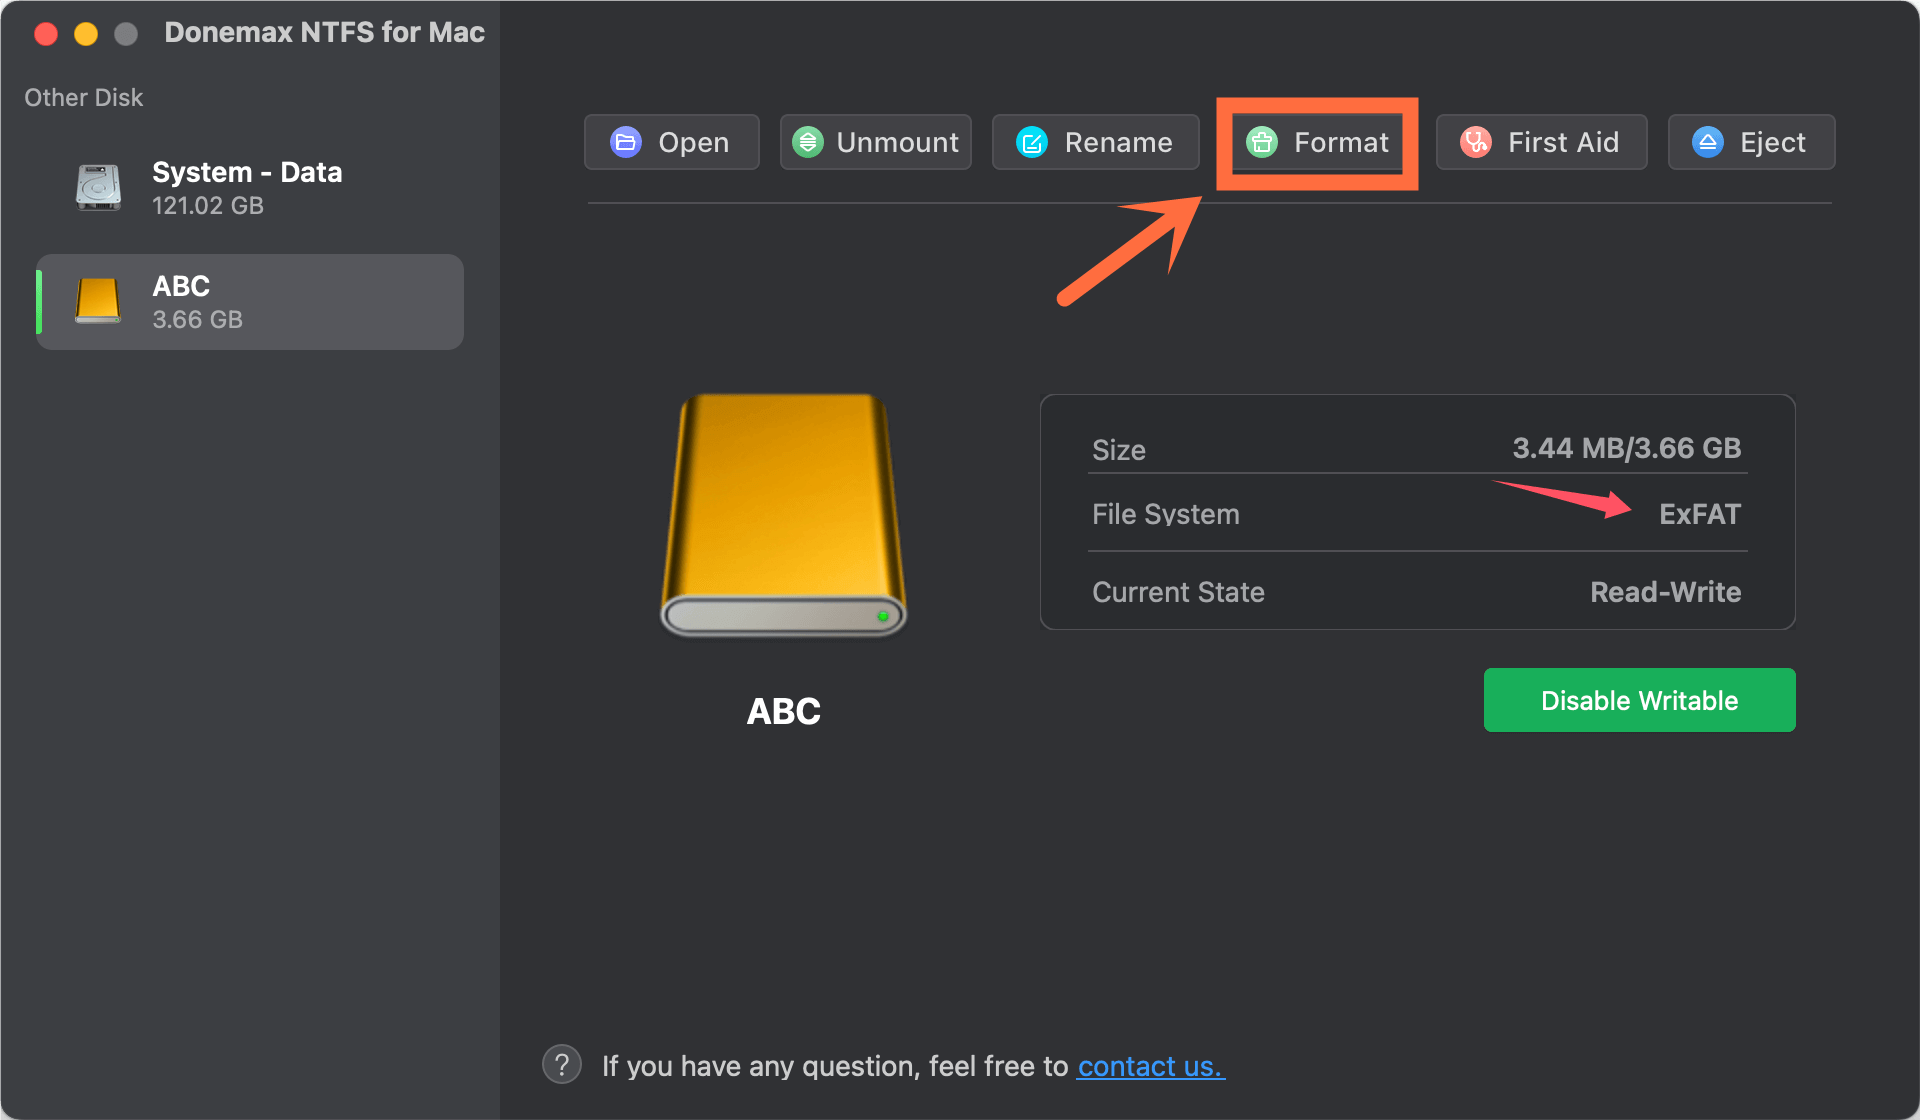
Step 3. Select NTFS as the file system. Then format the NVMe SSD to NTFS.
Conclusion:
Before you can use your NVMe SSD to its full ability, you need to format it. Setting up your drive lets you get the best speed, organize your data easily, and make it last longer. Following the steps in this guide, you can easily get your NVMe SSD up and running, whether using Windows or macOS.
Take advantage of NVMe technology's speed, low latency, and efficiency to improve your computer experience. If you properly prepare your NVMe SSD, it will load files faster, respond more quickly, and store your data safely.
Related Articles
- Nov 21, 2024Fix Bad Sectors on SSD Without Losing Data
- Jan 15, 2025How to Estimate the Remaining Lifespan of Your SSD? [3 Methods]
- Jan 14, 2025How to Fix Corrupted or Dead SSD Without Losing Data?
- Nov 19, 2024What is SSD, About SSD Types, Compare SSD to HDD
- Feb 05, 20256 Solutions to Fix Can't Format SSD in Disk Management
- Nov 05, 2024How to Upgrade HDD to SSD on Toshiba Laptop?

Contributing Writer
Lucien
Lucien is a writer and a chief programmer of Donemax software who has worked in the company for 5+ years. He has written much of the content on the site and devotes to providing troubleshooting and solution for Windows and Mac users including disk cloning, data recovery, migration, eraser, error fixes.

Editor in chief
Gerhard Chou
In order to effectively solve the problems for our customers, every article and troubleshooting solution published on our website has been strictly tested and practiced. Our editors love researching and using computers and testing software, and are willing to help computer users with their problems