Summary:
Do you need to change the boot drive in Windows 10 or Windows 11 if your are replacing the boot disk with a new solid-state drive, changing to a new disk larger in capacity or booting into another device without wiping your startup drive? In this article you will learn how to do this task and change Windows boot order in the BIOS or UEFI safely. If you're currently experiencing problems with changing the old boot drive to a new ssd or hdd, we can help. Our professional disk cloning software will be a safer and easier way to change your boot drive without reinstalling Windows OS.
We will discuss about changing boot drive on Windows from following 3 parts:
Part 1: What's a boot drive?
Generally speaking, a boot drive is a storage device that contains operating system required for a computer to start. Users can set to boot from a hard drive or SSD in your computer, as well as any device to locate the files necessary to start the computer, such as a floppy disc, a CD-ROM drive, a DVD drive, or a USB flash drive, etc. Most personal computers are configured to boot in the optical drive first and then the storage drive (HDD or SSD).
An operating system is pre-installed on the new Windows PC and users can boot successfully without changing any boot settings. Howerver, With the continuous use of PC, you may need to change the boot drive in the following 3 common situations:
- Upgrade boot drive to ssd for better performace and higher stability
- "The C drive is full and running out of disk space", and you want to change old boot drive to a larger one.
- if your old boot disk starts making clicking noise or any other indicators that signals the hard drive failing, you need to repalce with a new one in advance.
Part 2: How to change boot drive to another ssd or hdd in 2 steps?
If your are facing the problems to change the old boot drive to SSD or hdd on Windows 11/10/8/7/Vista, we can help. During this process, you'll need both your new drive and your old boot drive connected to your computer at the same time. The following is the full tutorial on how to change the boot drive without reinstalling OS in 2 Steps:
- 1. Install New SSD or HDD
- 2. Migrate OS from old boot drive to new SSD or hdd
Step 1: Install New SSD or HDD
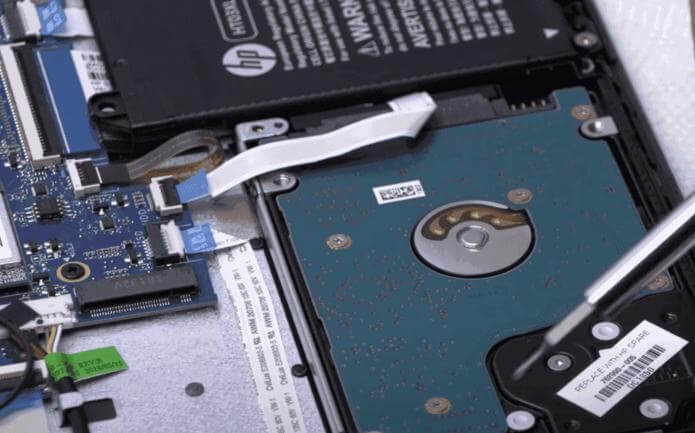
You need to connect the new boot device to computer and make sure it can be recongnized by the computer before changing boot drive. To install the new drive the following devices are needed to be prepared in advanced:
- A new SSD or HDD (It should be big enough to fit the data stored on the old boot drive)
- A SATA cable
- A screwdriver
You can start to install the new ssd or hdd as following:
Unscrew and open the case cover from your PC > Plug the SSD or hdd into your system > Connect the SSD or hdd to a spare SATA connector on the motherboard with the SATA cable > Reassemble your PC and then the new drive is installed.

Note:
- Before removing computer case, please make sure your system has been powered off, and unplug the power cable.
- Hold on the power button for 5 seconds to discharge residual electricity.
Step 2: Migrate Windows OS from old boot drive to new SSD or hdd
After installing the new drive, you can start to migrate Windows OS to the new drive in an easy and safe way with a prfessional disk clong software. Donemax Disk Clone for Windows is highly recommended for users to migrate Windows OS to new ssd or hdd without reinstalling Windows OS and programs. It works with any brand of hard drive and SSD.
To clone the boot drive to another ssd or hdd with Donemax Disk Clone for Windows:

- 1. Install Donemax Disk Clone for Windows on your PC and Launch the software
- 2. Select Disk Clone
- 3. Select the boot drive as source to clone.
- 4. Select the newly installed ssd or hdd as target disk.
- 5. Preview the disk layout of the cloned drive. You can keep the disk layout the same as the old boot disk or customize it to meet your need.
- 6. confirm Clone to start migrating the boot drive.
The system migration will take some time, please waite patiently. After the cloning process is completed, you need to set to boot from new ssd or hdd successfully.
How to change boot order in the BIOS or UEFI on Windows?
After the new boot drive on Windows is prepared, you need to change the boot order in your System Configuration and set to boot from it by default. The system can be configured to boot in Legacy BIOS Boot Mode or UEFI Boot Mode. Here is the ways to change boot order by going to the BIOS Boot Mode or UEFI Boot Mode.
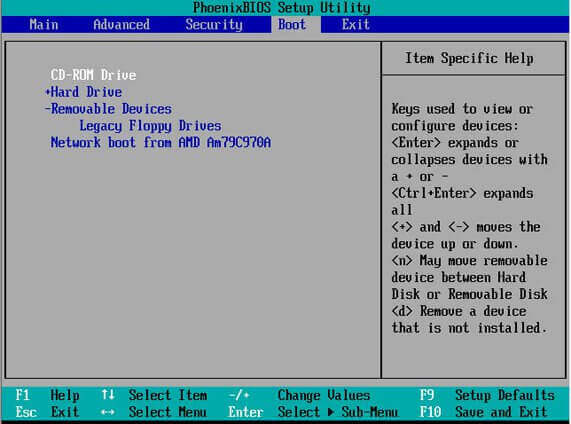
Change the boot order in the BIOS settings
- Turn on or restart the computer.
- Press and hold the function key (usually F2, F8, F12, or Del) to enter the BIOS settings When powering on.
- Switch to [Boot] tab with the arrow keys
- Set the new boot drive as the first boot item. To move the hard drive up, press the "+" key, or to move it down, press the "-" key.
- Press F10 to save your setting once the boot order is changed, and restart the computer.

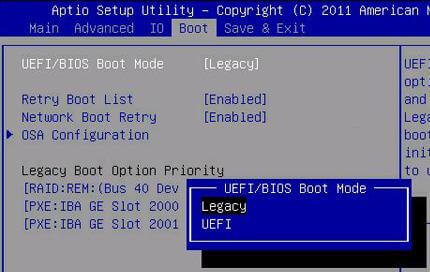
Change the boot order in the UEFI firmware
- Turn on or restart the computer.
- Press and hold the function key (usually F2, F8, F12, or Del) to enter the BIOS settings When powering on.
- Select the [Boot] tab > [UEFI/BIOS Boot Mode] and press Enter.
- Set to UEFI if you are using GPT partition. If it is MBR disk, select Legacy.
- Move the hard drive up by pressing the "+" key to set the new boot drive as the first boot item. Or move it down by pressing the "-" key.
- Press F10 to save and restart the computer.

Conclusion
Once you've gathered the necessities, it's time to follow the steps above and get started to change the boot drive on Windows 10/11 to SSD or hdd. After booting from the new ssd or hdd successfully, please remove the falling hard drive, or if your old boot drive works well, you can keep it to store persional files. Any problem about changing the boot drive, please feel free to contact the technical support via [email protected].
Change boot drive on Windows FAQs
- Install the new SSD to your PC: open the case cover from your PC > Plug the SSD into your system > Connect the SSD to a spare SATA connector on the motherboard with a SATA cable > Reassemble your PC and then the new SSD is installed.
- After installing the SSD, download and install Donemax Disk Clone on your PC
- Launch the software and select disk clone
- Select the boot disk and destination SSD
- Click "Next" to apply clone
- And then set the new SSD as a boot disk.
Related Articles
- Jun 19, 2023How to Move OS to Another Drive without Reinstalling and Data Loss
- May 07, 2025What is Rufus, What Can It Do?
- Apr 21, 2024How to Upgrade HDD/SSD to Large Disk Without Data Loss?
- Jun 16, 2024How to Upgrade SSD on Razer Blade Laptop?
- Mar 13, 2025How to Migrate Data from HDD to SSD: A Step-by-Step Guide
- Mar 28, 2024Best 3 USB Clone Tools in 2025

Lucien
Lucien is a writer and a chief programmer of Donemax software who has worked in the company for 5+ years. He has written much of the content on the site and devotes to providing troubleshooting and solution for Windows and Mac users including disk cloning, data recovery, migration, eraser, error fixes.

Gerhard Chou
In order to effectively solve the problems for our customers, every article and troubleshooting solution published on our website has been strictly tested and practiced. Our editors love researching and using computers and testing software, and are willing to help computer users with their problems
