PAGE CONTENT:
Regarding storage technology, M.2 SSDs have become a strong option because they offer great speed and efficiency in a small package. If you want to get the most out of your M.2 SSD and keep your data safe, you need to know how to format it correctly, whether you're building a new machine or upgrading an old one.
As you read this detailed guide, you'll learn everything you need about formatting an M.2 SSD, from the basics to more advanced topics. This article will teach you everything you need to know to successfully format your M.2 SSD, from the benefits of M.2 SSDs to how to use different operating systems.
No matter how experienced you are as an enthusiast, this process will help you get the most out of your storage option.
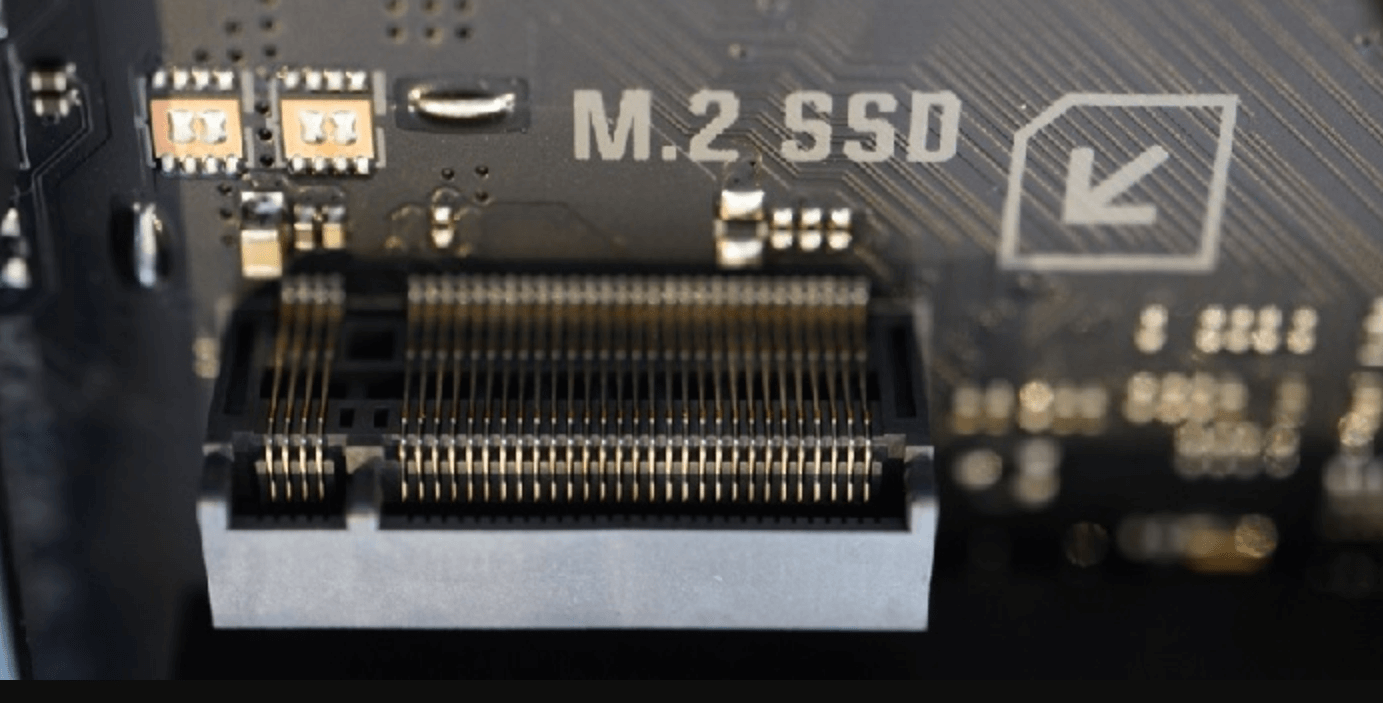
What Is An M.2 SSD?
An M.2 SSD is a solid-state drive that fits a certain form factor for a small, high-performance storage device. M.2 SSDs are far smaller than conventional 2.5-inch SSDs and link straight to the motherboard, removing the need for cables and offering quicker data transfer rates.
Types of M.2 SSDs:
There are several M.2 SSD variants mostly distinguished by their interface:
- SATA (Serial ATA): Though smaller, these drives communicate similarly to conventional SATA SSDs.
- NVMe (Non-Volatile Memory Express): Operating on the PCIe interface, these devices provide quicker read and write speeds than SATA.
Why Do We Need to Format M.2 SSD?
When you format a disk, all of its data is erased. Many people do this to clean up their data. You might also want to format an M.2 SSD for other reasons:
- Change/Choose a file system: NTFS and FAT32 work differently, and not all machines can handle both. You can format your M.2 SSD to change the file system or pick a different one for different devices.
- Ensure the drive works with a certain OS: Just like each device needs a different file system, the PC's operating system needs one that works with it to run.
- Fix some disk errors: Formatting the disk can fix some problems.
Before you format your M.2 SSD, you need to do the following:
- Backup Existing Data: Everything on the drive is erased when formatted. If you have a new M.2 SSD, this shouldn't be a problem. But if you're replacing an old drive, make sure you have another storage device to save all your important info.
- Check Compatibility: Make sure that your SSD's M.2 form factor and the M.2 drive on your hardware are compatible. For more information, check the manual or page for your motherboard.
- Identify the M.2 Slot: Find the space for M.2 on your motherboard. It's likely to be near the PCIe slots and be held in place by a screw.
How to Format M.2 SSD on Windows/macOS?
Format M.2 SSD on Windows with Disk Management
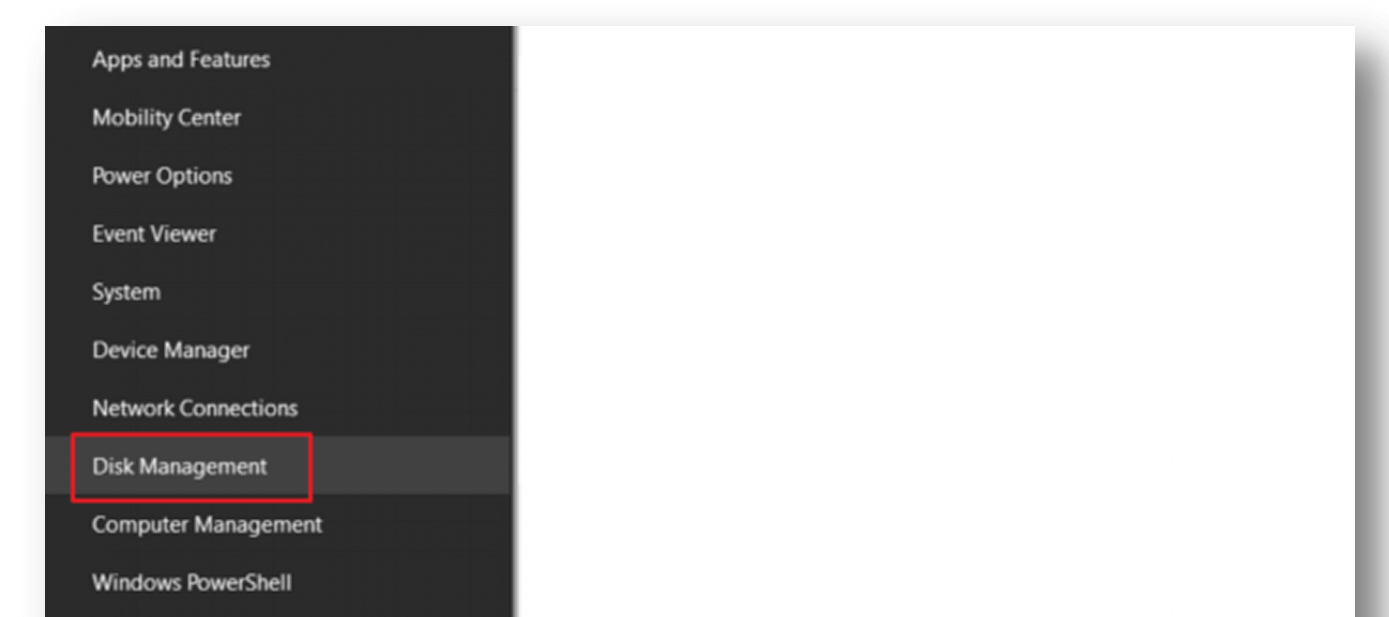
Step 1. Click on the Windows icon, then right-click and pick "Disk Management" from the menu.
Step 2. After that, find the M.2 SSD in Disk Management, then right-click it and choose Format. Follow the wizard to format the M.2 SSD to NTFS or ExFAT.
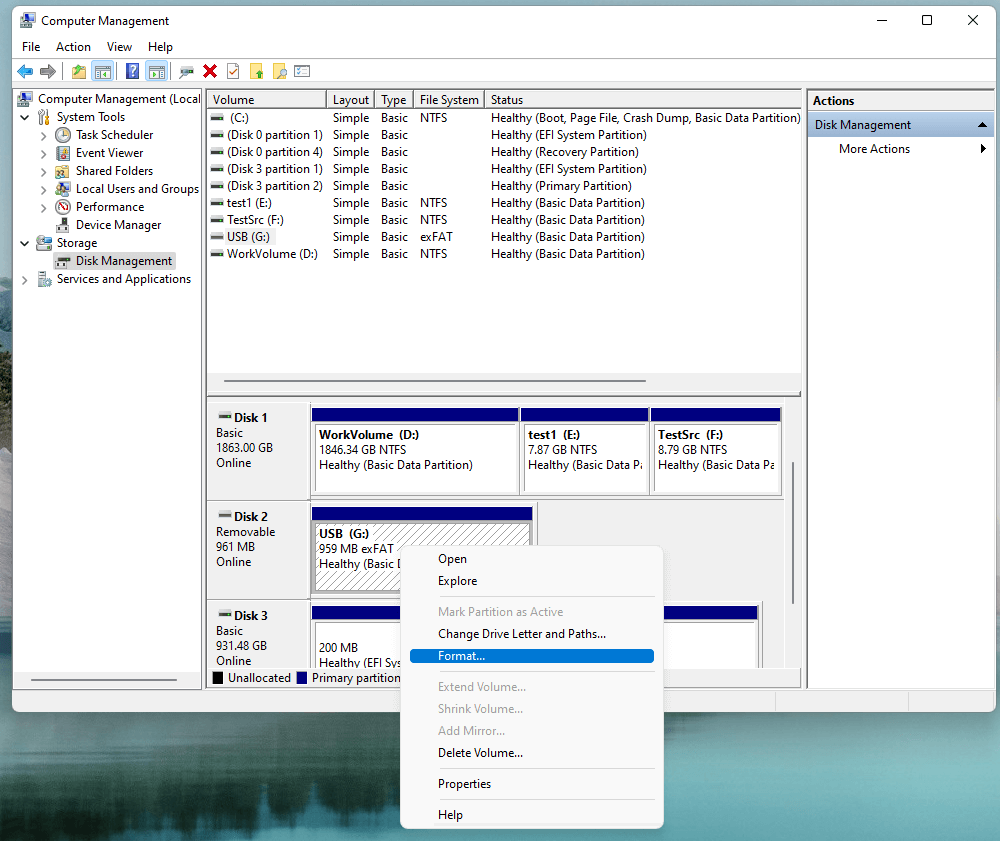
Note:
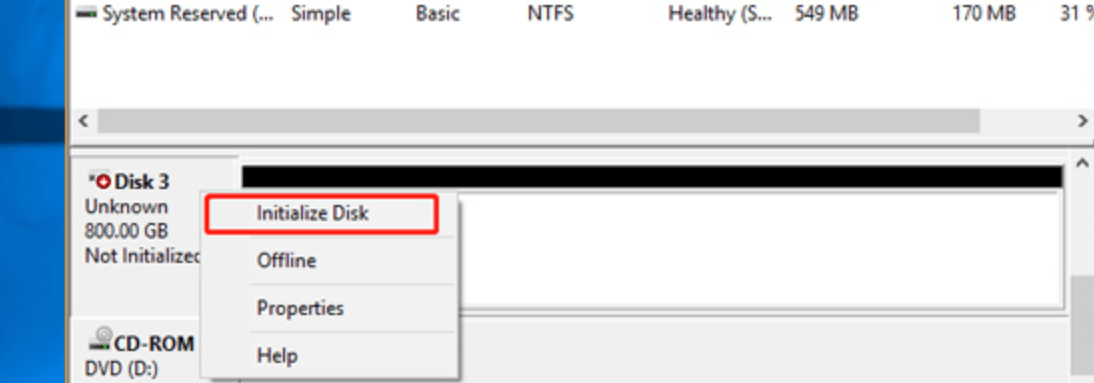
If the M.2 SSD is not initialized, just choose Initialize Disk to reformat the SSD for your Windows computer.
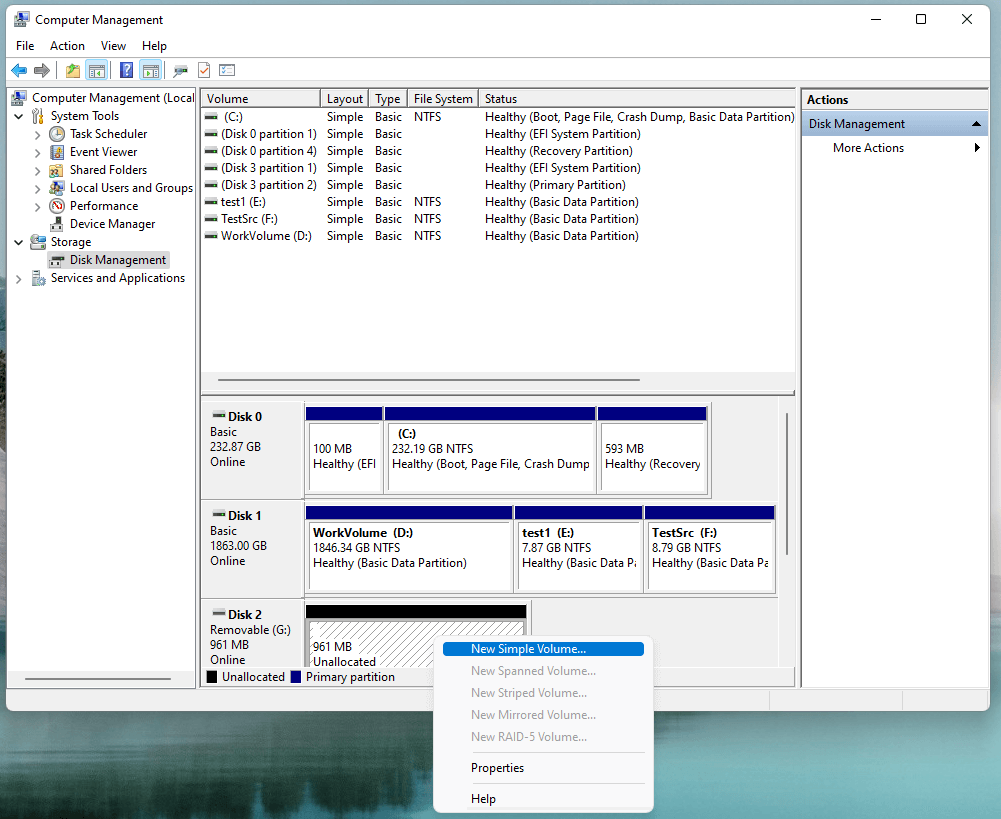
If the disk space of the M.2 SSD shows as Unallocated, choose New Simple Volume to create a disk volume on the SSD.
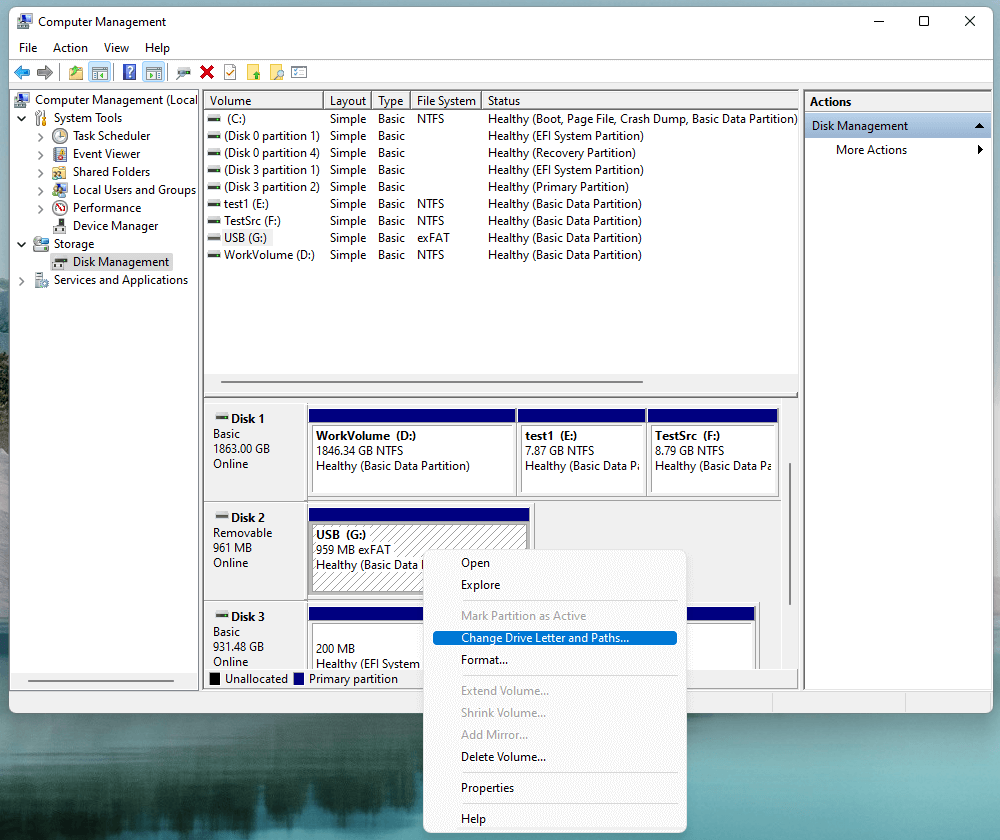
If the M.2 SSD is not showing up on computer, choose Change Drive Letter and Path to assign a drive letter for it.
Format M.2 SSD on Mac with Disk Utility:
If the M.2 SSD is an external drive, follow the steps below to format it.
- Connect the M.2 SSD to the Mac.
- Open Disk Utility.
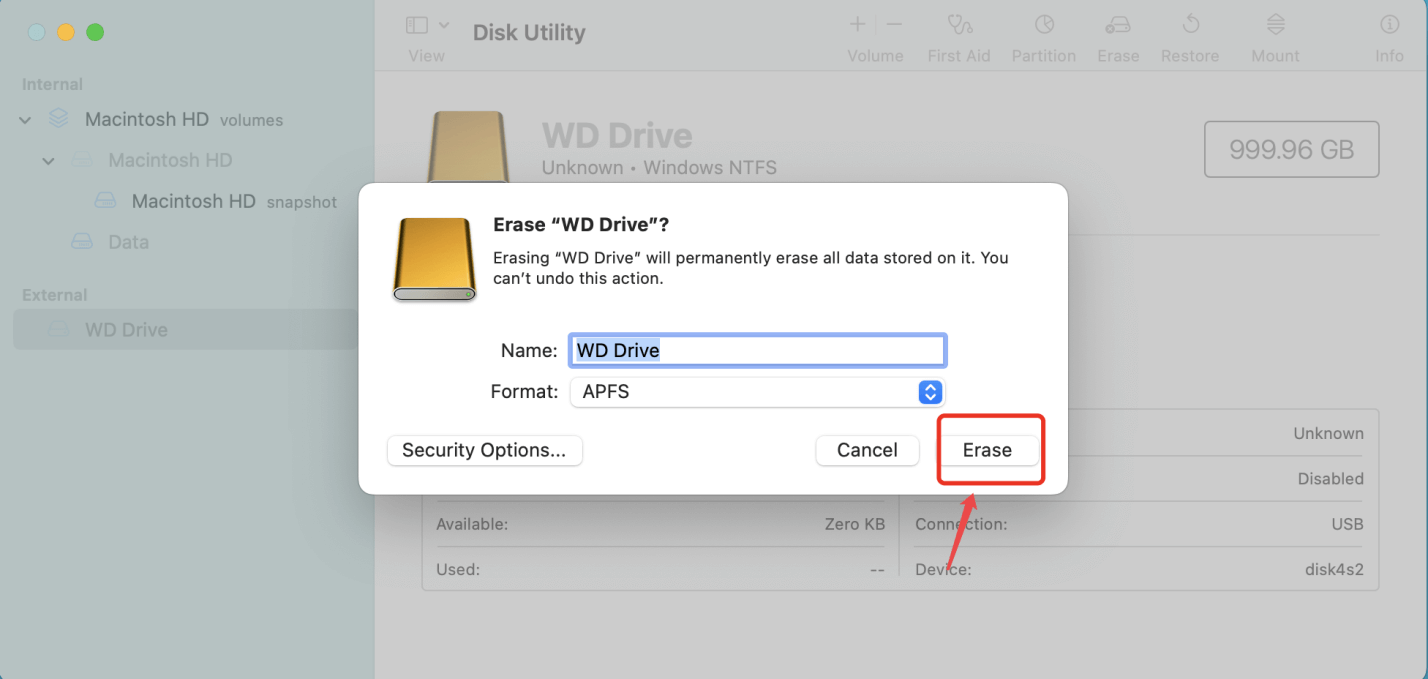
- Select the M.2 SSD, click Erase.
- Select a file system, such as APFS, Mac OS Extended or ExFAT.
- Click Erase again.
- When it gets finished, click on Done button.
If you want to format the M.2 SSD which is startup disk of your Mac, follow the steps below:
Step 1. Boot your Mac into macOS Recovery mode.
Click on Apple logo, then choose Shut Down. Then turn on the Mac press and hold Command+R keys (For Intel-based Mac) or Power button (for Apple silicon Mac) until it boots into macOS Recovery mode.
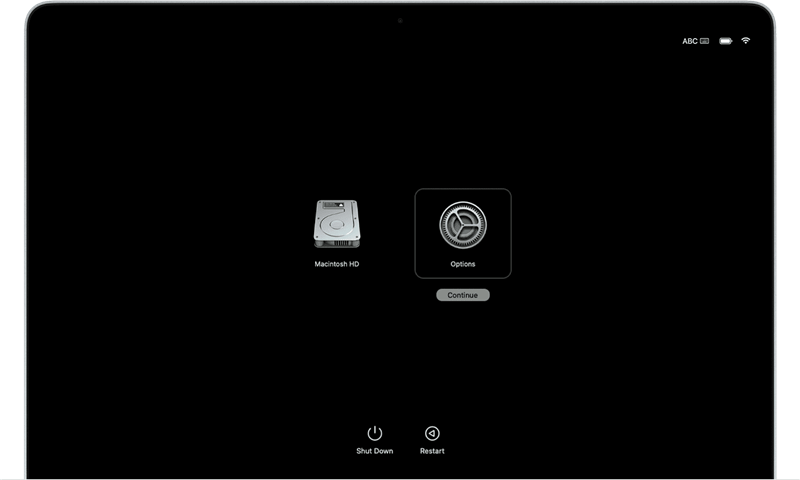
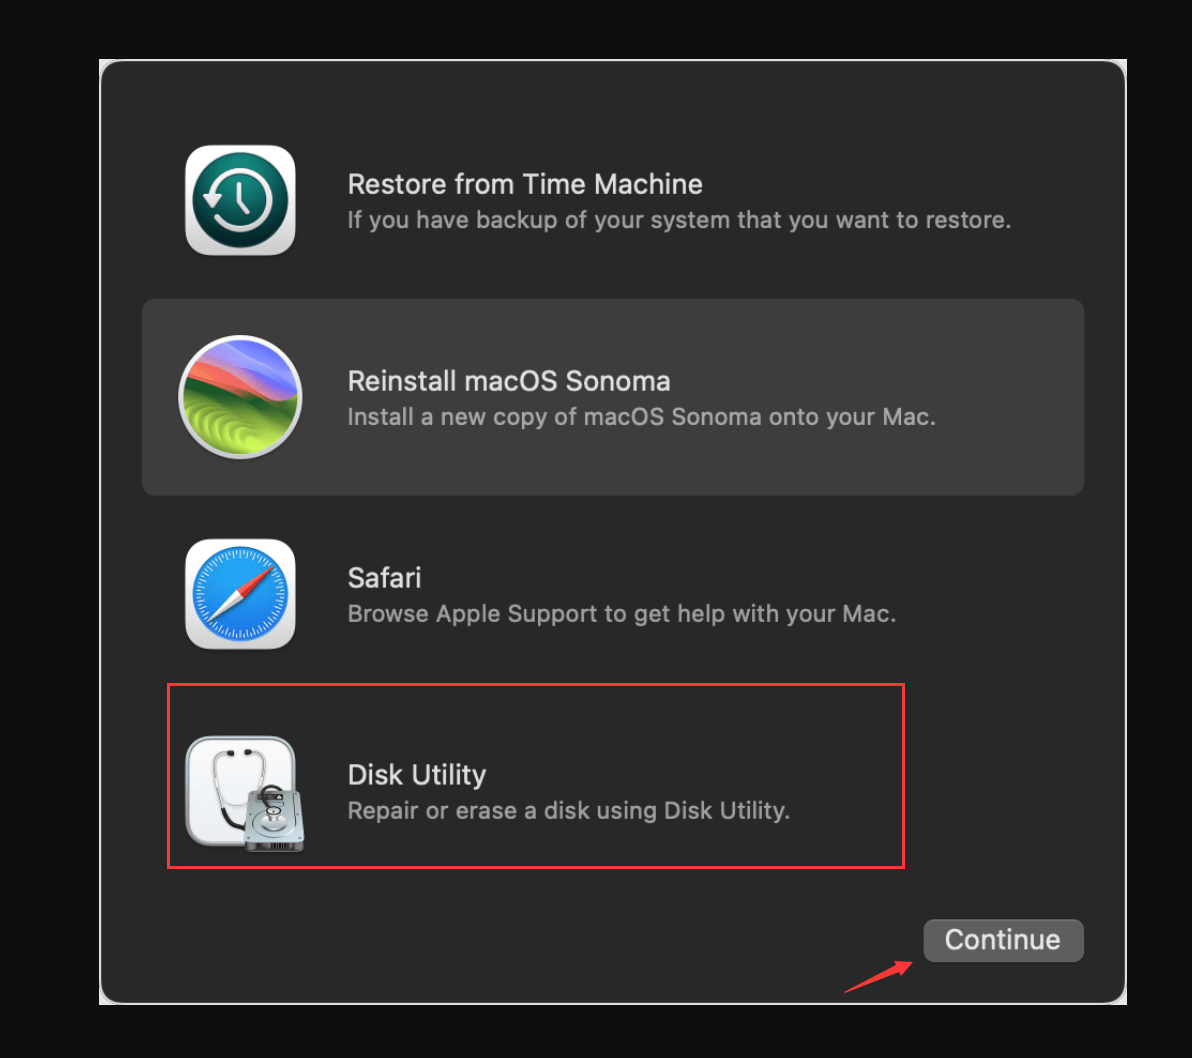
Step 2. Select Disk Utility.
Select Options and click on Continue button. Enter your Mac login passwords if required. Then select Disk Utility and click on Continue button.
Step 3. Erase the M.2 SSD.
Select the M.2 SSD, click Erase. Then select the file system, give it a new name, click Erase again to start erasing the SSD.
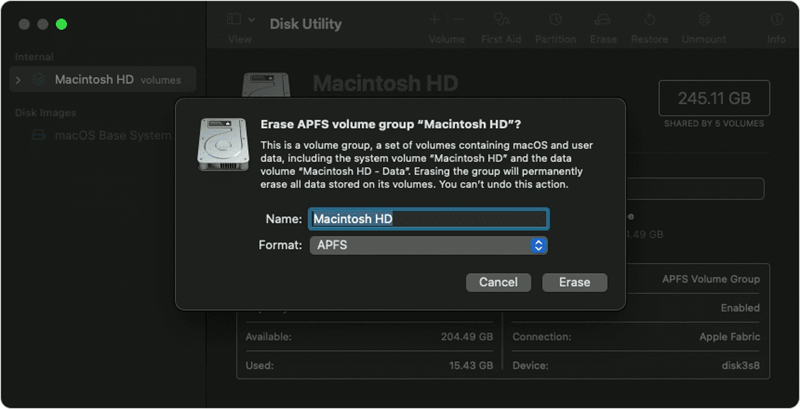
Once the process gets finished, click on Done button. Go back to the Utilities window, select either Reinstall macOS or Restore from a Backup to perform the action you want, then click Continue. If not, turn off your Mac and restart it normally.
Troubleshooting Formatting Issues:
Here are some things you can try if you have problems formatting your M.2 SSD:
- Ensure Proper Connection: Double-check that your M.2 SSD is firmly in place in the slot on your laptop or desktop processor.
- Check Disk Management (Windows): Ensure the disk is showing up as "Online" and does not give you any problems.
- Consult Motherboard Manual (Desktop): The manual with your motherboard may have specific directions on formatting M.2 drives.
- Use a Different Formatting way: If you're using Windows, try using a different way (Disk Management vs. Command Prompt) or third-party software.
- Update Drivers (Windows): Ensure your motherboard has the most up-to-date storage drivers loaded.
How to Unformat M.2 SSD?
If you have lost data due to formatting the M.2 SSD, just use a SSD data recovery program to help you unformat the M.2 SSD and get the lost data back.
Step 1. Download and install the best data recovery program - Donemax Data Recovery on your computer and make sure the M.2 SSD is connected to the computer.
Step 2. Open Donemax Data Recovery and select the M.2 SSD to start data recovery.

Step 3. Click on Scan button to deeply scan the M.2 SSD and find all recoverable files.

Step 4. After scanning, you can preview the recoverable files. Then select the wanted files, click on Recover button to save them.

How to Wipe M.2 SSD Before Selling or Donating?
Before you sell or donate your old M.2 SSD, you’d better permanently erase all data from it to prevent potential data recovery.
Donemax Data Eraser is a great SSD wipe tool. It can help you securely and quickly wipe your M.2 SSD, then permanently erase all data from it. Once the data is erased by Donemax Data Eraser, the data is lost for good, cannot be recovered by any method.
Step 1. Download and install Donemax Data Eraser on your computer.
Step 2. Open Donemax Data Eraser, choose Erase Hard Drive, select the M.2 SSD and click on Erase Now button
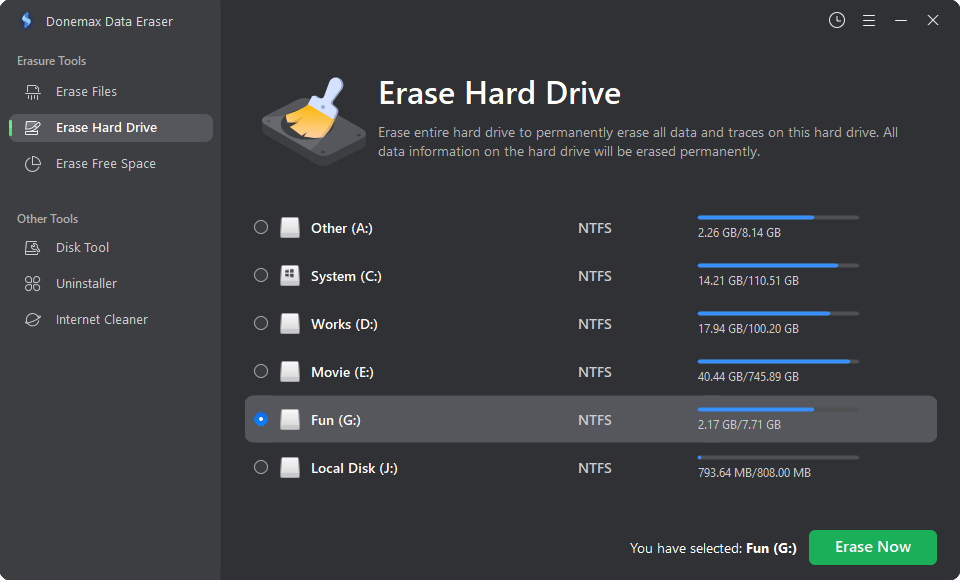
Step 3. Select a data erasure standard, click on Continue button to format and wipe the M.2 SSD.
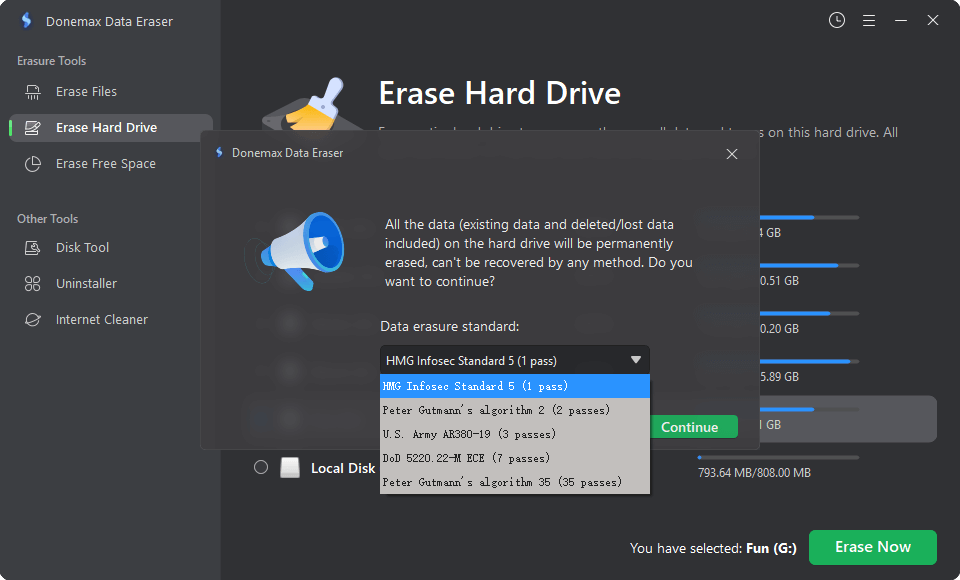
Once the process gets finished, all data stored on the M.2 SSD is erased permanently, cannot be recovered by any method.
Conclusion:
Formatting an M.2 SSD is important to maximize its speed and stability. In this guide, we've looked at the most important parts of M.2 SSDs, from how to install them to how to format them in different operating systems. If you follow the steps and suggestions, you can ensure that your M.2 SSD works well and safely.
Remember that regular care and following the manufacturer's instructions will help it last longer and keep working at its best. A properly formatted M.2 SSD can make your system much faster and give you a better overall user experience, whether gaming, doing work, or just using your computer for everyday chores.
Related Articles
- Nov 18, 2025What is SSD, About SSD Types, Compare SSD to HDD
- Jun 06, 2025Sabrent Rocket SSD Not Showing Up on My Computer, Fix It Now
- May 13, 2025Is It Possible to Format a SSD to FAT32?
- Nov 13, 2024Can I Recover Data If TRIM Is Enabled on My SSD Drive?
- Mar 31, 202510 Solutions to Fix SanDisk Extreme Portable SSD Not Recognized on Mac
- Jan 14, 2025Best 6 Solutions to Fix SSD Is Unreadable

Christina
Christina is the senior editor of Donemax software who has worked in the company for 4+ years. She mainly writes the guides and solutions about data erasure, data transferring, data recovery and disk cloning to help users get the most out of their Windows and Mac. She likes to travel, enjoy country music and play games in her spare time.

Gerhard Chou
In order to effectively solve the problems for our customers, every article and troubleshooting solution published on our website has been strictly tested and practiced. Our editors love researching and using computers and testing software, and are willing to help computer users with their problems
