Before we start: Donemax Data Recovery for Mac can help you recover files from unmounted or not recognized SanDisk Extreme Portable SSD on Mac. Before fixing SanDisk Extreme Portable SSD not recognized on Mac, you can use this software to recover deleted/formatted and inaccessible files from the SSD.
PAGE CONTENT:
The SanDisk Extreme Portable SSD is a highly popular external storage device among Mac users due to its fast data transfer speeds, compact design, and durability. Whether you're using it for professional work, media storage, or backups, it provides a reliable solution for handling large files with ease.
However, despite its reliability, some users encounter an issue where the SanDisk Extreme Portable SSD is not recognized on their Mac. This can be frustrating, especially when important files are stored on the drive.
If your Mac fails to detect the SanDisk Extreme Portable SSD, don't worry! In this guide, we will explore the possible reasons for this issue and walk you through step-by-step solutions to fix it.

Common Causes of SanDisk Extreme Portable SSD Not Being Recognized on Mac
Before diving into the fixes, it's important to understand why your Mac isn't detecting the SanDisk Extreme Portable SSD. Some common causes include:
- Faulty or Loose Connection – A damaged or improperly connected USB cable or port can prevent your Mac from recognizing the SanDisk Extreme Portable SSD.
- Incompatible macOS Version – Older macOS versions may not support the SanDisk Extreme Portable SSD properly.
- File System Incompatibility – If the SanDisk Extreme Portable SSD is formatted in NTFS (Windows format), macOS won't recognize it unless additional software is installed.
- Corrupted or Uninitialized SSD – If the SanDisk Extreme Portable SSD is uninitialized or has file system corruption, it may not show up in Finder or Disk Utility.
- Power Supply Issues – If you're using a USB hub or adapter that doesn't supply enough power, the SanDisk Extreme Portable SSD may not function properly.
- Hardware Failure – The SanDisk Extreme Portable SSD itself may have physical damage or internal component failure.
Now that we know the common causes, let us move on to the solutions.
10 Solutions to Fix SanDisk Extreme Portable SSD Not Recognized by Mac
#1 Basic Troubleshooting Steps
Before trying advanced solutions, perform these basic checks:
- Check USB Cable and Port – Try a different cable and USB-C port to rule out physical issues.
- Restart Your Mac – A simple restart can sometimes resolve device recognition issues.
- Connect the SSD Directly – Avoid using USB hubs, as they may not provide sufficient power.
If the SSD is still not recognized, move on to the next steps.
#2 Check If the SSD Appears in Disk Utility
macOS may fail to display the SSD in Finder, but it could still appear in Disk Utility. To check:
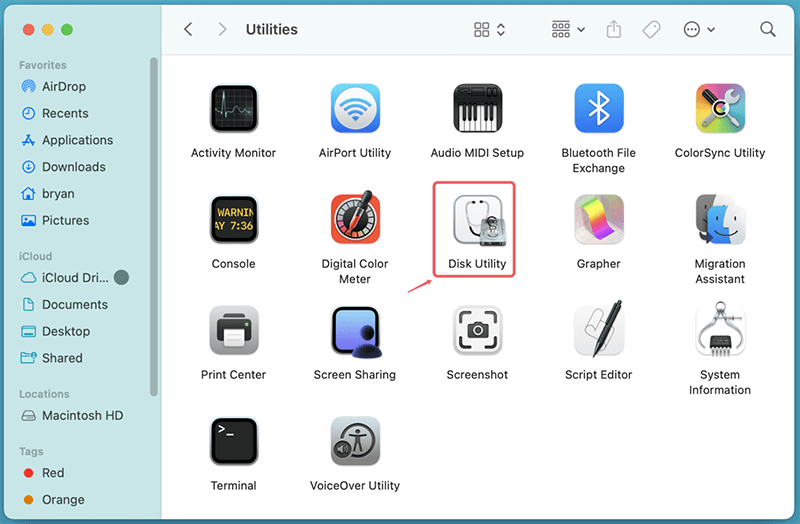
Step 1. Open Disk Utility via Applications from Utilities.
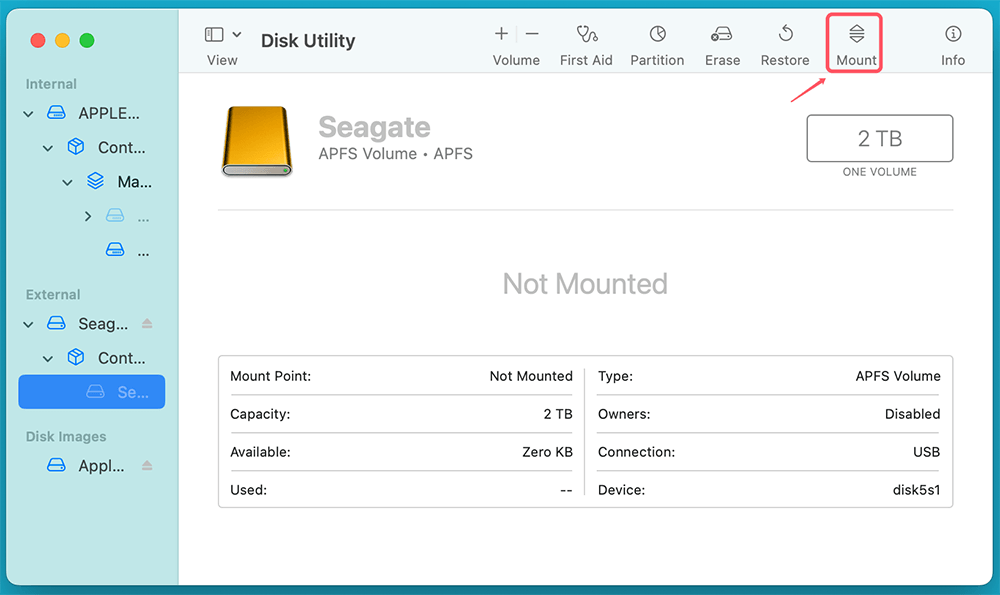
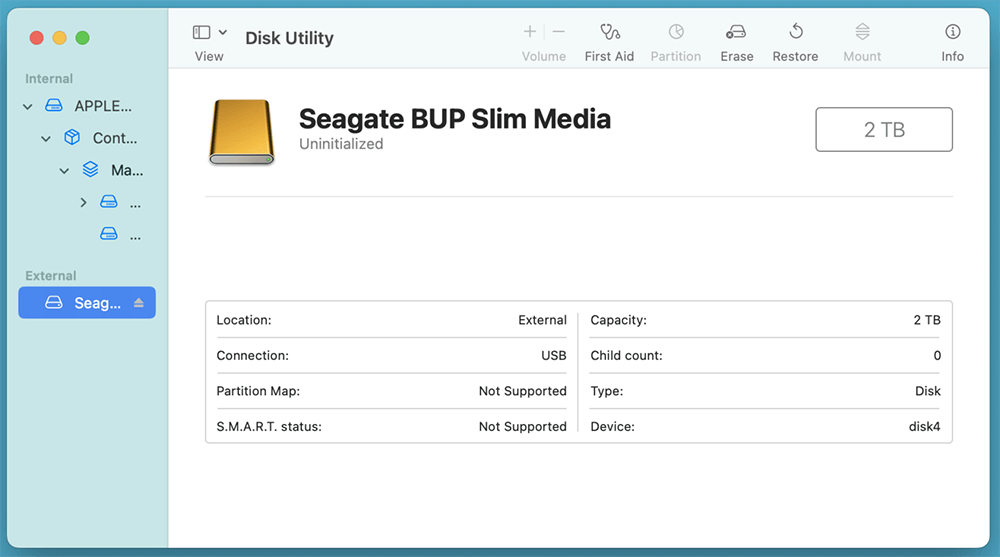
Step 2. Look for your SSD in the left sidebar.
- If it appears but isn't mounted, click Mount.
![Look for your SSD in the left sidebar]()
- If it's listed as uninitialized, you may need to format it (more on this later).
![Look for your SSD in the left sidebar]()
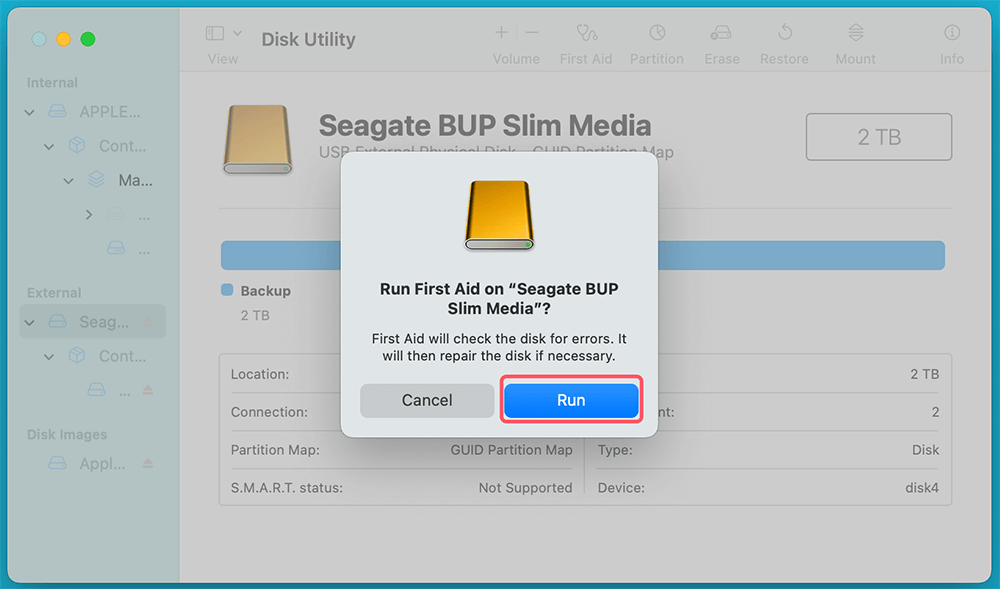
Step 3. Run First Aid – Click on First Aid to repair any errors in the drive's file system.
If the SSD does not appear in Disk Utility, proceed to the next steps.
#3 Verify Finder Settings
Your Mac might be detecting the SSD, but it's simply not showing it in Finder. Here's how to check:
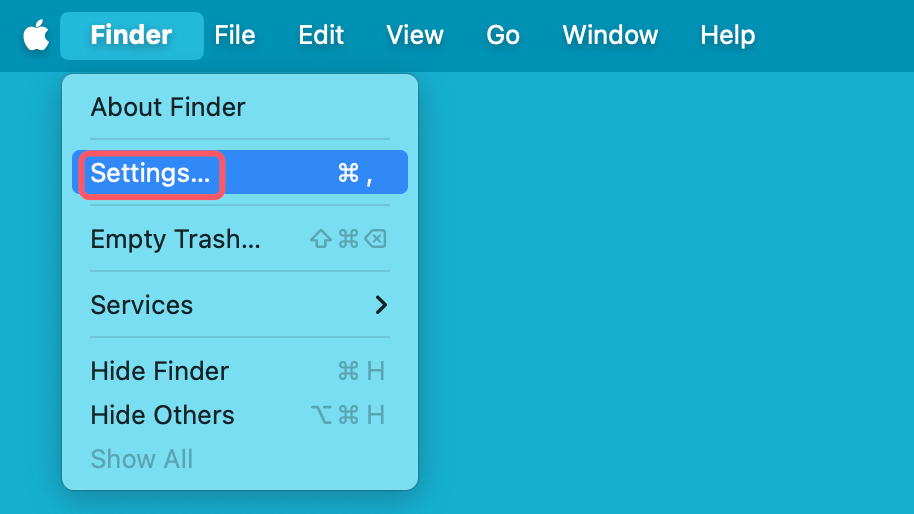
Step 1. Open Finder and click Finder Settings.
Step 2. Go to the Sidebar tab and ensure External disks is checked.
Step 3. Next, go to the General tab and ensure External disks is selected.
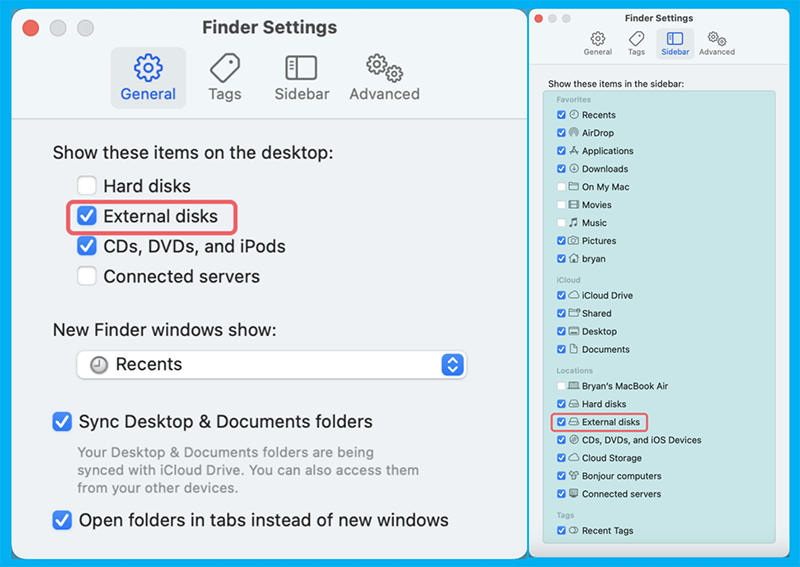
This ensures that the SSD appears in Finder and or desktop if it is recognized by macOS.
#4 Check System Information
To verify if your Mac detects the SSD at a hardware level:
Step 1. Click the Apple menu > About This Mac > More Info > System Report.
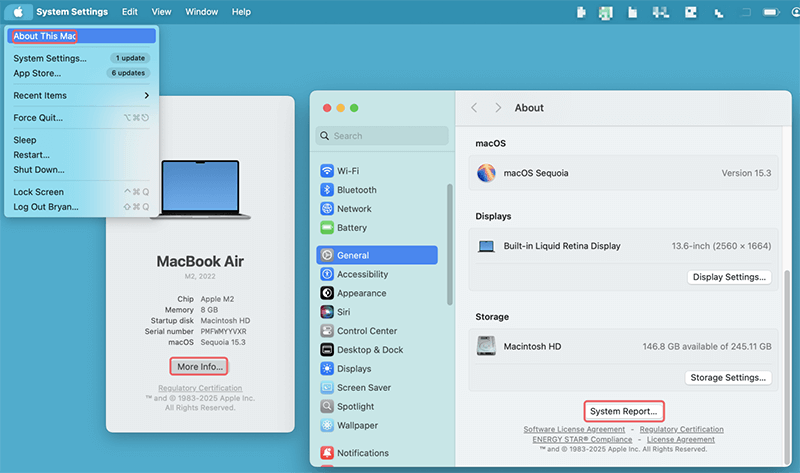
Step 2. In the left sidebar, select USB (or Thunderbolt, depending on your SSD).
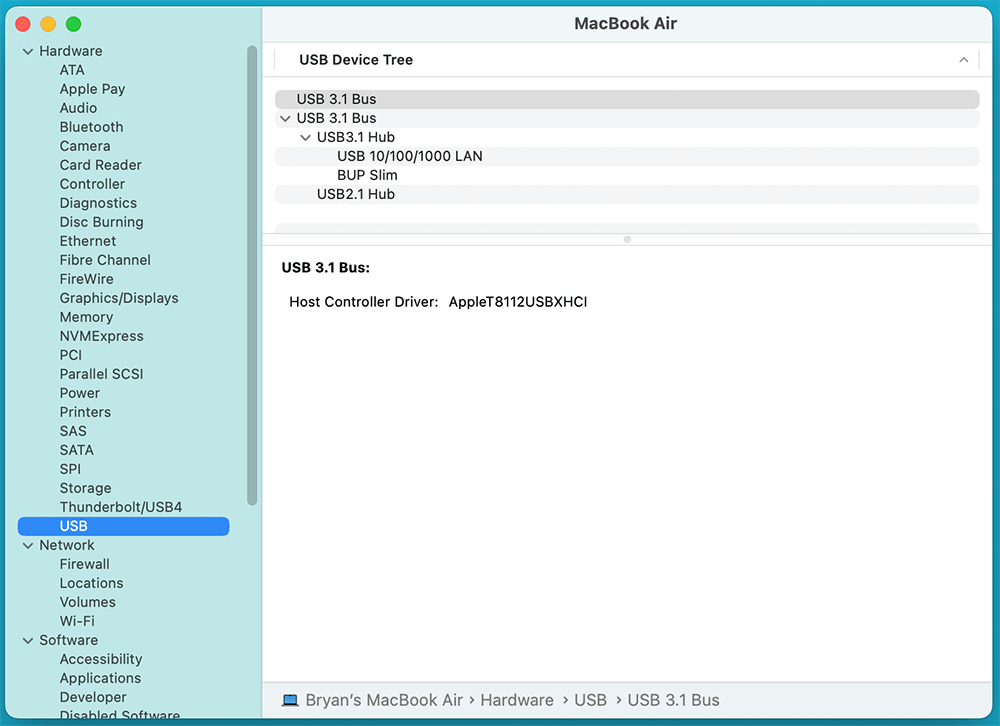
Step 3. Look for your SanDisk SSD in the list of connected devices.
If your SSD is listed in System Information but not in Finder or Disk Utility, macOS may not be able to mount it properly.
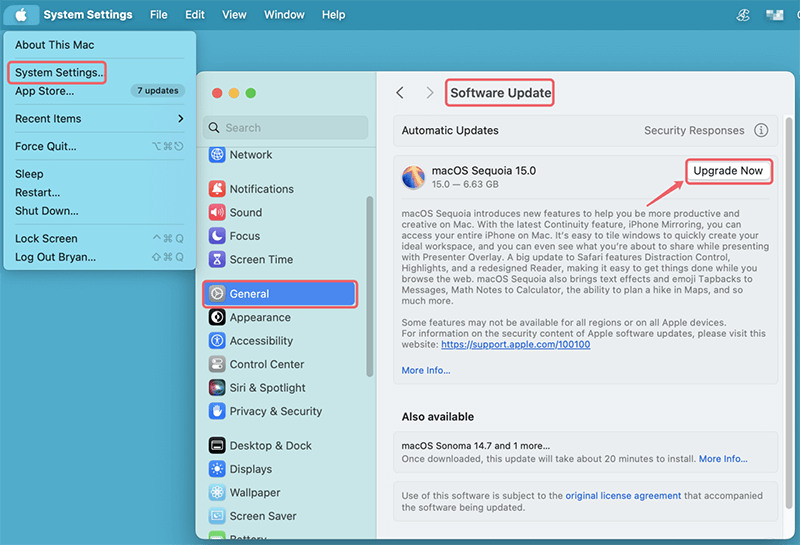
#5 Update macOS and SSD Firmware
Sometimes, an outdated macOS version may cause compatibility issues with external SSDs.
- Install any available macOS updates by going to System Setting > General > Software Update.
![Update macOS and SSD Firmware]()
- Check if SanDisk provides firmware updates for your SSD on their official website.
If your Mac is up to date and the SSD still isn't recognized, proceed to formatting.
#6 Change File System Format (If Necessary)
If your SanDisk Extreme Portable SSD is not recognized by your Mac, the issue could be related to an incompatible file system format. Different operating systems use different file systems, and macOS might not be able to read or write to certain formats without additional software.
Step 1: Check the Current File System Format
To see the format of your SanDisk SSD:
- Open Disk Utility via Applications from Utilities.
- Select your SanDisk SSD from the left sidebar.
- Look under Format to see if it's formatted as NTFS, ExFAT, APFS, or another file system.
Step 2: Decide Whether to Reformat the Drive
- If the SSD is NTFS: macOS can only read the drive but cannot write to it. You have two options:
- Install an NTFS driver for Mac (like Donemax NTFS for Mac).
- Reformat the SSD to exFAT or APFS (recommended for macOS users).
- If the SSD is formatted in an unknown or corrupted file system: You will need to reformat it.
Step 3: Back Up Your Data (Important!)
Reformatting erases all data on the drive!
Before proceeding, copy important files to another storage device or cloud service like Google Drive, iCloud, or an external hard drive.
Step 4: Reformat the SanDisk Extreme Portable SSD
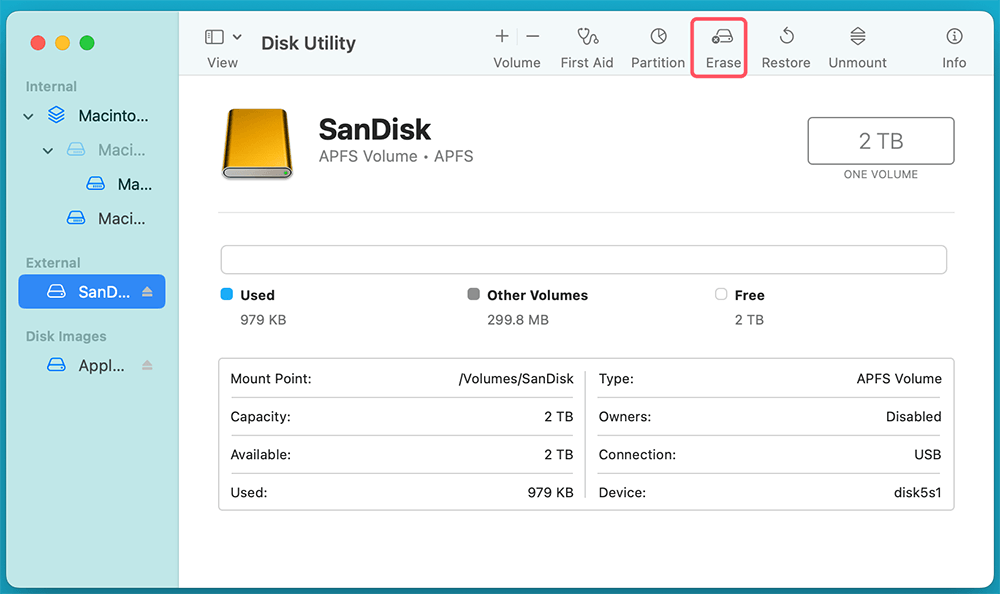
How to reformat your SSD in Disk Utility:
- Open Disk Utility via Applications from Utilities.
- Select your SanDisk SSD from the sidebar.
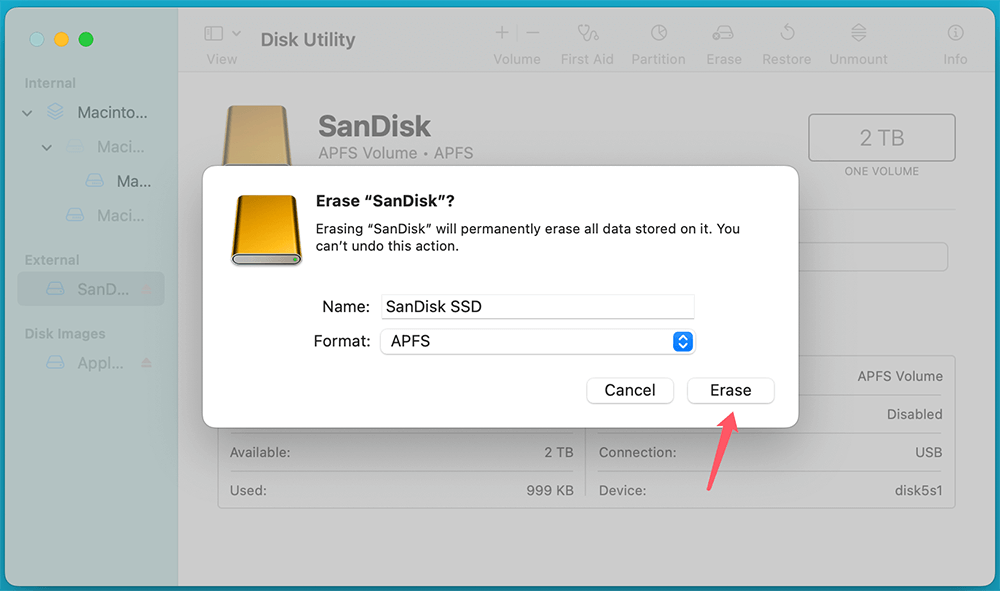
- Click Erase at the top of the window.
![Click Erase at the top of the window]()
- Choose a new Format:
- APFS – Best for macOS users.
- ExFAT – Best for cross-platform use (Mac & Windows).
- Set a Name for the drive (e.g., "SanDisk SSD").
- Click Erase to format the drive.
![Click Erase to format the drive]()
- Wait for the process to complete and then click Done.
Now, reconnect the SSD and check if macOS recognizes it.
Step 5: Verify the SSD After Formatting
Once formatted, you should:
- Check if the SSD appears in Finder under "External Drives."
- Try copying files to and from the SSD to confirm it works properly.
- Eject the drive safely before unplugging it to prevent future issues.
If you still experience issues, try resetting NVRAM/SMC or using Terminal to mount the drive (covered in previous sections).
Alternative: Format the SSD Using Terminal (For Advanced Users)
If Disk Utility fails to format the SSD, you can use Terminal as an alternative:
Step 1. Open Terminal via Applications from Utilities.
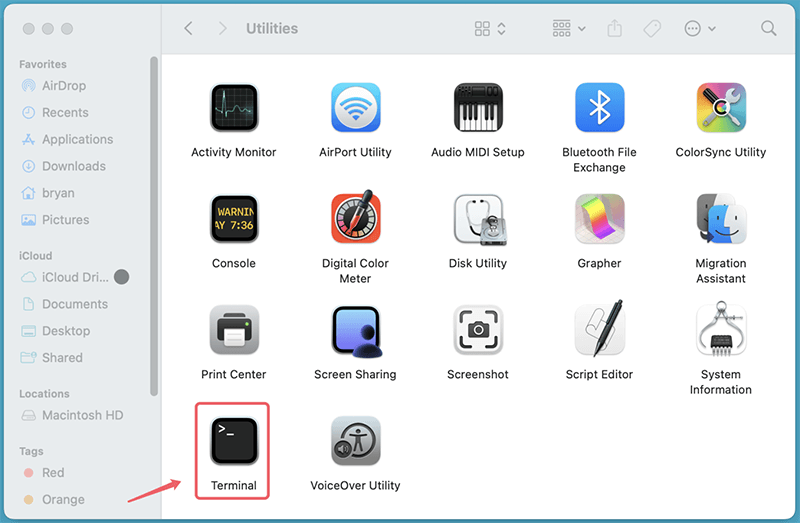
Step 2. Type the following command to list all connected drives:
diskutil list
Locate your SanDisk SSD (e.g., /dev/disk4).
Step 3. To erase and format the drive as ExFAT, use:
diskutil eraseDisk ExFAT SanDiskSSD /dev/disk4
(Replace "SanDiskSSD" with your preferred drive name and /dev/disk4 with your actual disk identifier).
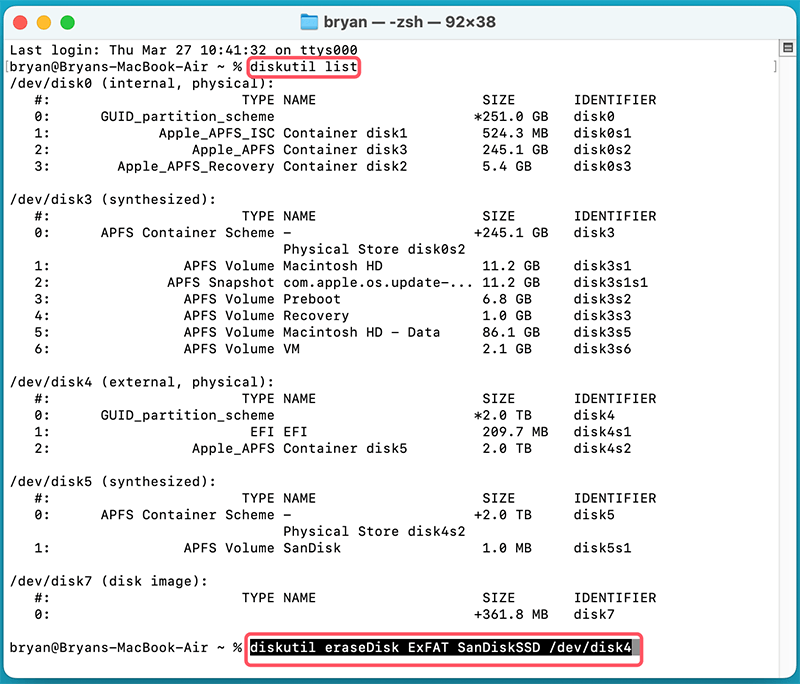
Step 4. Wait for the process to complete.
Why does formatting matter?
- If your SSD was previously used with Windows (NTFS), macOS won't be able to write to it without additional software.
- Formatting the SSD to APFS or ExFAT ensures full compatibility with macOS.
If you're planning to use the SSD with both Mac and Windows, choose ExFAT. If it's only for Mac users, APFS is the best choice.
#7 Use NTFS for Mac Tool
If the SanDisk Extreme Portable SSD has been formatted to NTFS file system, you can use NTFS for Mac tool to mount it and enable writable for it.
Step 1. Download and install the reliable NTFS for Mac tool, then open it.
Step 2. Open Donemax NTFS for Mac, then select the NTFS SanDisk Extreme Portable SSD, click on Mount button.

Step 3. Click on Enable Writable button so that your Mac can write data to it.

#8 Reset NVRAM and SMC
Your Mac's NVRAM and SMC store hardware settings, and resetting them can resolve SSD detection issues.
How to Reset NVRAM:
- Turn Off your Mac.
- After turning it back on, press Option + Command + P + R for 20 seconds right away.
How to Reset SMC:
For Apple silicon Macs, simply restart your Mac.
For Intel Macs:
- Turn Off your Mac.
- For ten seconds, hold down Shift + Control + Option while pressing the power button.
- Release and restart your Mac.
Now check if your SSD is detected.
#9 Use Terminal to Mount the Drive
If Disk Utility doesn't show your SSD, try mounting it manually via Terminal:
Step 1. Open Terminal from Utilities via Applications.
Step 2. Type:
diskutil list
This lists all connected storage devices. Look for your SSD (e.g., /dev/disk4).
Step 3. Mount the drive manually:
diskutil mount /dev/disk4
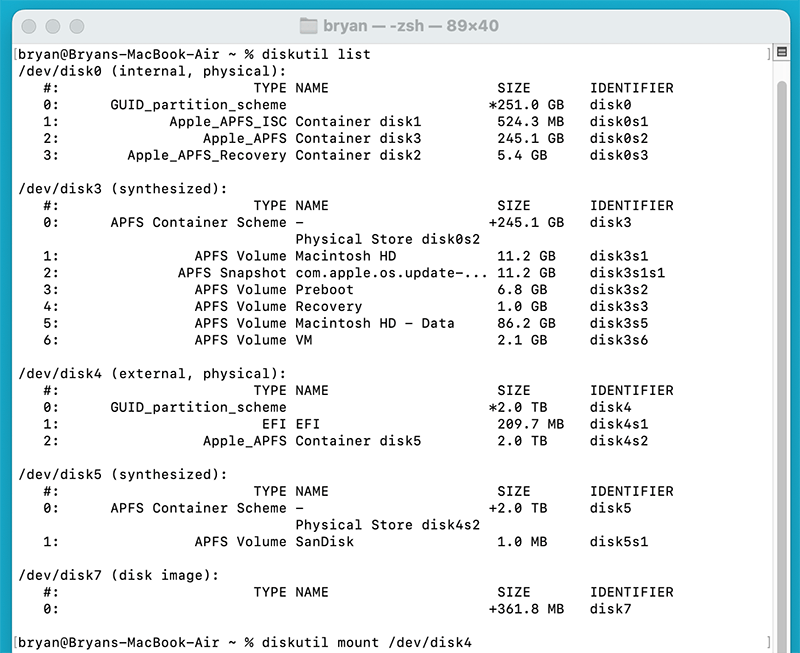
(Replace disk4 with your actual drive identifier).
If this works, your SSD should now appear in Finder.
#10 Try Connecting to a Different Mac or Windows PC
If your Mac still doesn't detect the SSD:
- Try a different Mac to rule out macOS-specific issues.
- Try a Windows PC and check if the drive is recognized.
- If it works on another device, back up your data and reformat it.
Recover Data from Unrecognized or Erased SanDisk Extreme Portable SSD on Mac
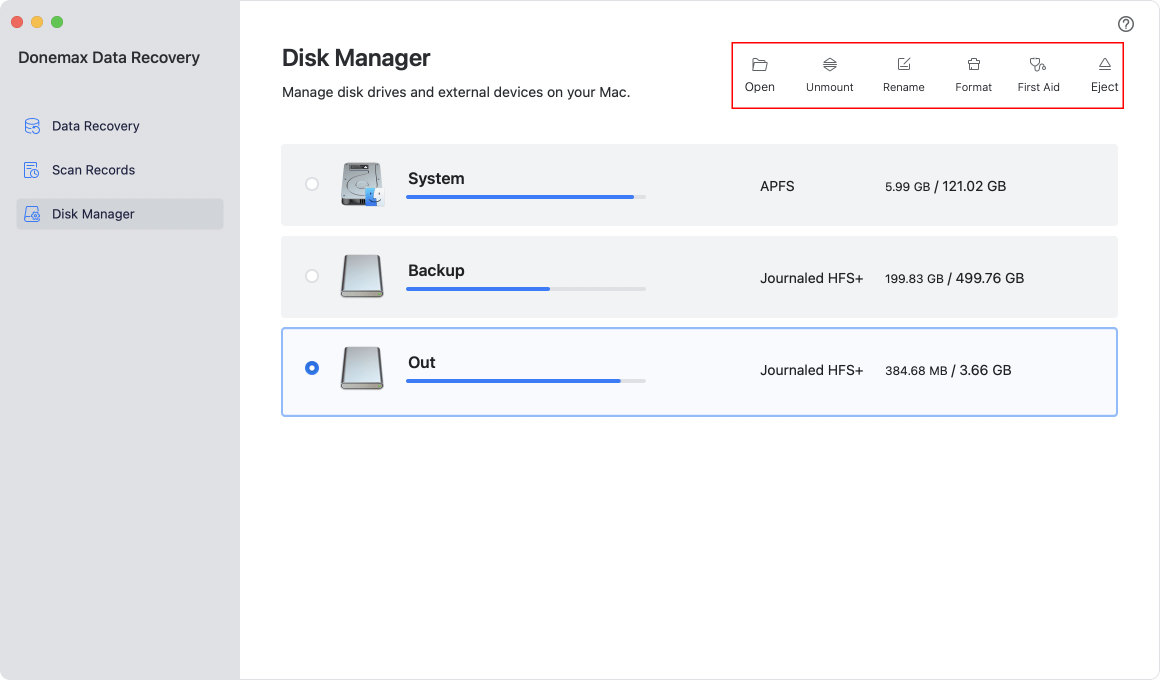
Before or after fixing SanDisk Extreme Portable SSD not recognized on Mac, you can use Mac data recovery software - such as Donemax Data Recovery for Mac to recover deleted, formatted and inaccessible files.
Step 1. Download and install Donemax Data Recovery for Mac, run it from Launchpad.
Step 2. Open Donemax Data Recovery for Mac, then select the SanDisk Extreme Portable SSD to start data recovery.

Step 3. Click on Scan button to deeply scan the SanDisk Extreme Portable SSD and find all recoverable files including deleted files, formatted/erased files, inaccessible files, etc.

Step 4. Once the scan is completed, you can preview all recoverable files. Then select the wanted files, click on Recover button to save them.

Donemax Data Recovery for Mac also can help you mount SanDisk Extreme Portable SSD on Mac, fix damaged SanDisk Extreme Portable SSD on Mac, reformat corrupted SanDisk Extreme Portable SSD on Mac, etc.
Conclusion
Dealing with a SanDisk Extreme Portable SSD not recognized on Mac can be frustrating, but in most cases, the issue can be resolved through simple troubleshooting steps.
- Check cables, ports, and Finder settings.
- Use Disk Utility to mount or repair the drive.
- Ensure macOS and SSD firmware are updated.
- Run NTFS for Mac tool to mount the SSD.
- Reformat the SSD if necessary.
- Reset NVRAM/SMC and try Terminal commands.
If none of these solutions work, you may need to contact SanDisk support or consider data recovery. To prevent future issues, always safely eject your SSD and keep backups of important data.


Donemax Data Recovery for Mac
Donemax Data Recovery for Mac is one of the best Mac data recovery software. It is easy-to-use and can help in recovering deleted, formatted, inaccessible or lost data from Mac HDD/SSD, external disk, USB drive, SD card, camera or other storage devices.
Related Articles
- Jul 19, 2024SSD Maintenance Tips: Protect SSD
- Nov 05, 2024How to Upgrade HDD to SSD on Toshiba Laptop?
- Jan 14, 2025How to Fix Corrupted or Dead SSD Without Losing Data?
- Feb 05, 20256 Solutions to Fix Can't Format SSD in Disk Management
- Jul 15, 2024Fix SanDisk Professional G-DRIVE Not Working on Mac Without Losing Data
- Oct 25, 2024How to Enable SSD TRIM on Mac?

Lucien
Lucien is a writer and a chief programmer of Donemax software who has worked in the company for 5+ years. He has written much of the content on the site and devotes to providing troubleshooting and solution for Windows and Mac users including disk cloning, data recovery, migration, eraser, error fixes.

Gerhard Chou
In order to effectively solve the problems for our customers, every article and troubleshooting solution published on our website has been strictly tested and practiced. Our editors love researching and using computers and testing software, and are willing to help computer users with their problems
