PAGE CONTENT:
Solid State Drives (SSDs) have changed how data is stored because they are faster and more reliable than traditional Hard Disk Drives (HDDs). TRIM is an important function for keeping SSDs running well and lasting long. TRIM makes it easier for SSDs to handle unused data blocks, which speeds up write processes and makes the drive last longer.
Apple's SSDs can use TRIM with macOS, but third-party SSDs might not have it turned on by default. Turning on TRIM on your Mac can improve the speed of your SSD and make sure it works at its best.
This guide will show you how to turn on SSD TRIM on macOS. It includes steps like using Terminal commands and third-party software to check the state of TRIM. If you do these things, your SSD will work well for years.
Introduction to SSD TRIM
TRIM is an order that makes it easier for an SSD to deal with data blocks that aren't being used. When you delete a file from an SSD, the space is marked as free for future use by the operating system, not the file itself.
The TRIM command tells the SSD which data blocks are no longer being used so the drive can delete them. This process helps the SSD keep its best write performance and last longer.
Why TRIM is Important for SSDs
Without TRIM, an SSD can't tell the difference between data blocks being used and those not. That can slow down writing speeds and make the drive wear out faster. These are some ways that TRIM helps:
- Enhanced Performance: TRIM makes sure that write operations are faster and more efficient by removing blocks that aren't being used.
- Increased Longevity: TRIM helps your SSD last longer by lowering the number of write processes it needs to do.
- Reduced Fragmentation: TRIM helps the drive stay efficient by lowering data fragmentation.
TRIM Support in macOS
Apple's macOS automatically supports TRIM for its SSDs. However, TRIM might not be turned on by default if you use an SSD from a different company. macOS 10.10.4 (Yosemite) and later versions allow users to set TRIM on third-party SSDs using a command-line utility.
How to Check TRIM Support on Your Mac:
TRIM is usually turned on by default in macOS because it works with most native Apple SSDs. But if you're using an older Mac or a third-party SSD, ensuring TRIM works is a good idea. To check, do the following:
- Select the Apple icon in your screen's upper left corner.
- Choose "System Settings" from the list of options.
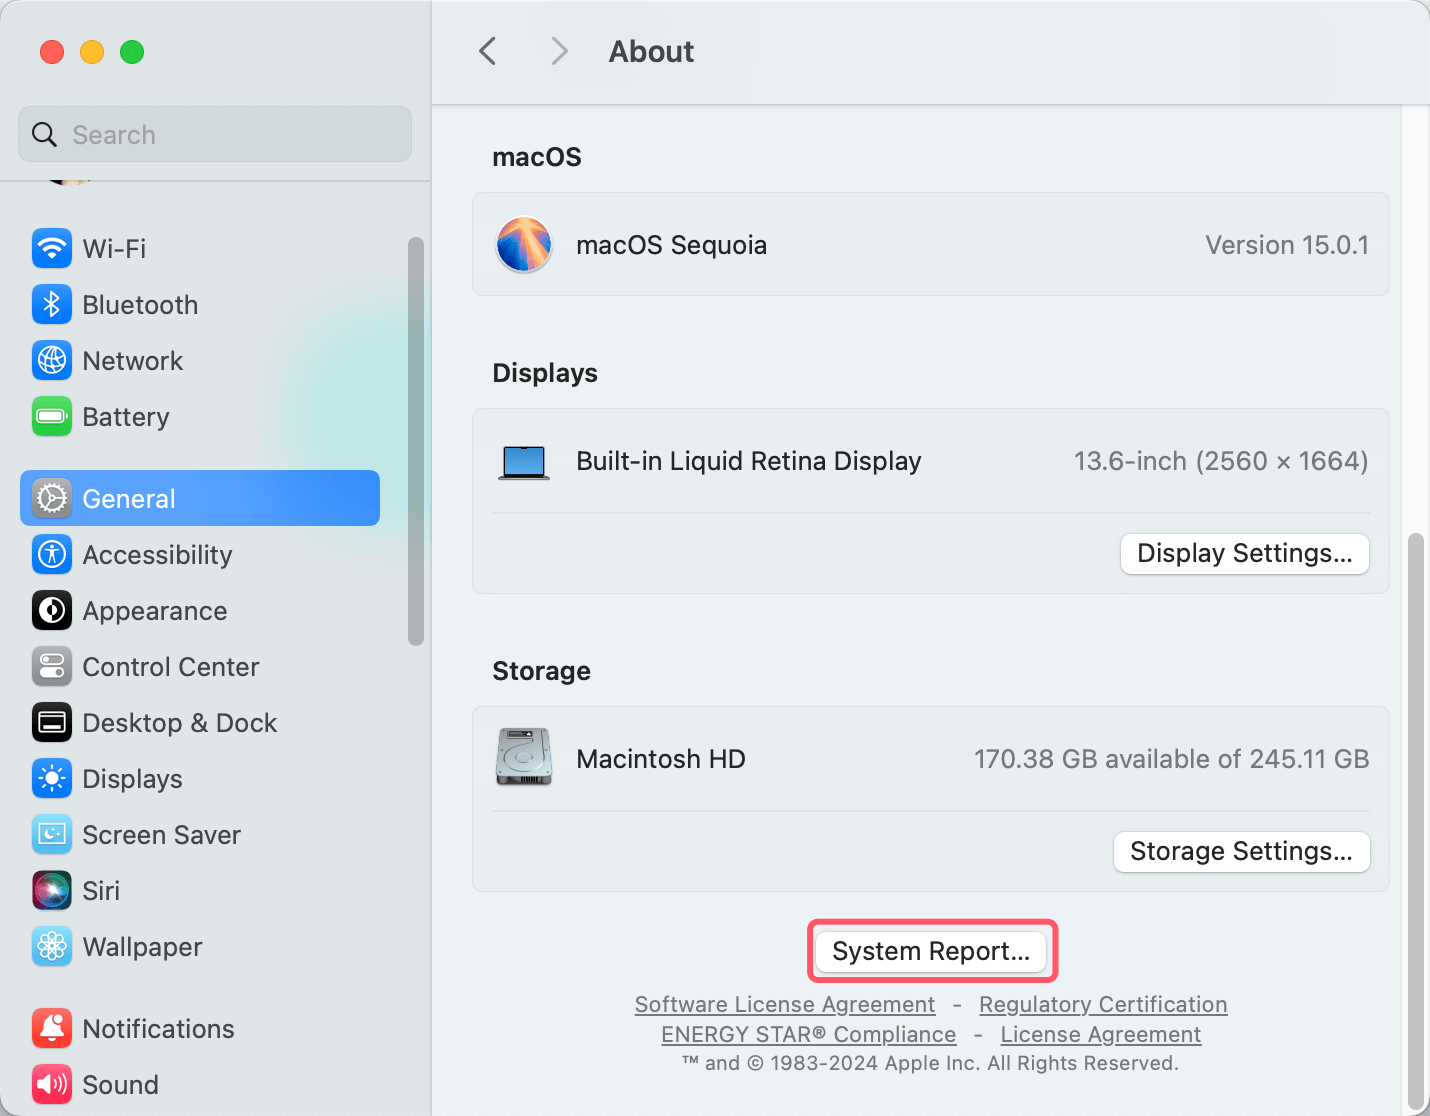
- Then choose General on the left and choose About on the right.
![Check TRIM Support on Your Mac]()
- Scroll down to the bottom of the window and choose "System Report."
![Check TRIM Support on Your Mac]()
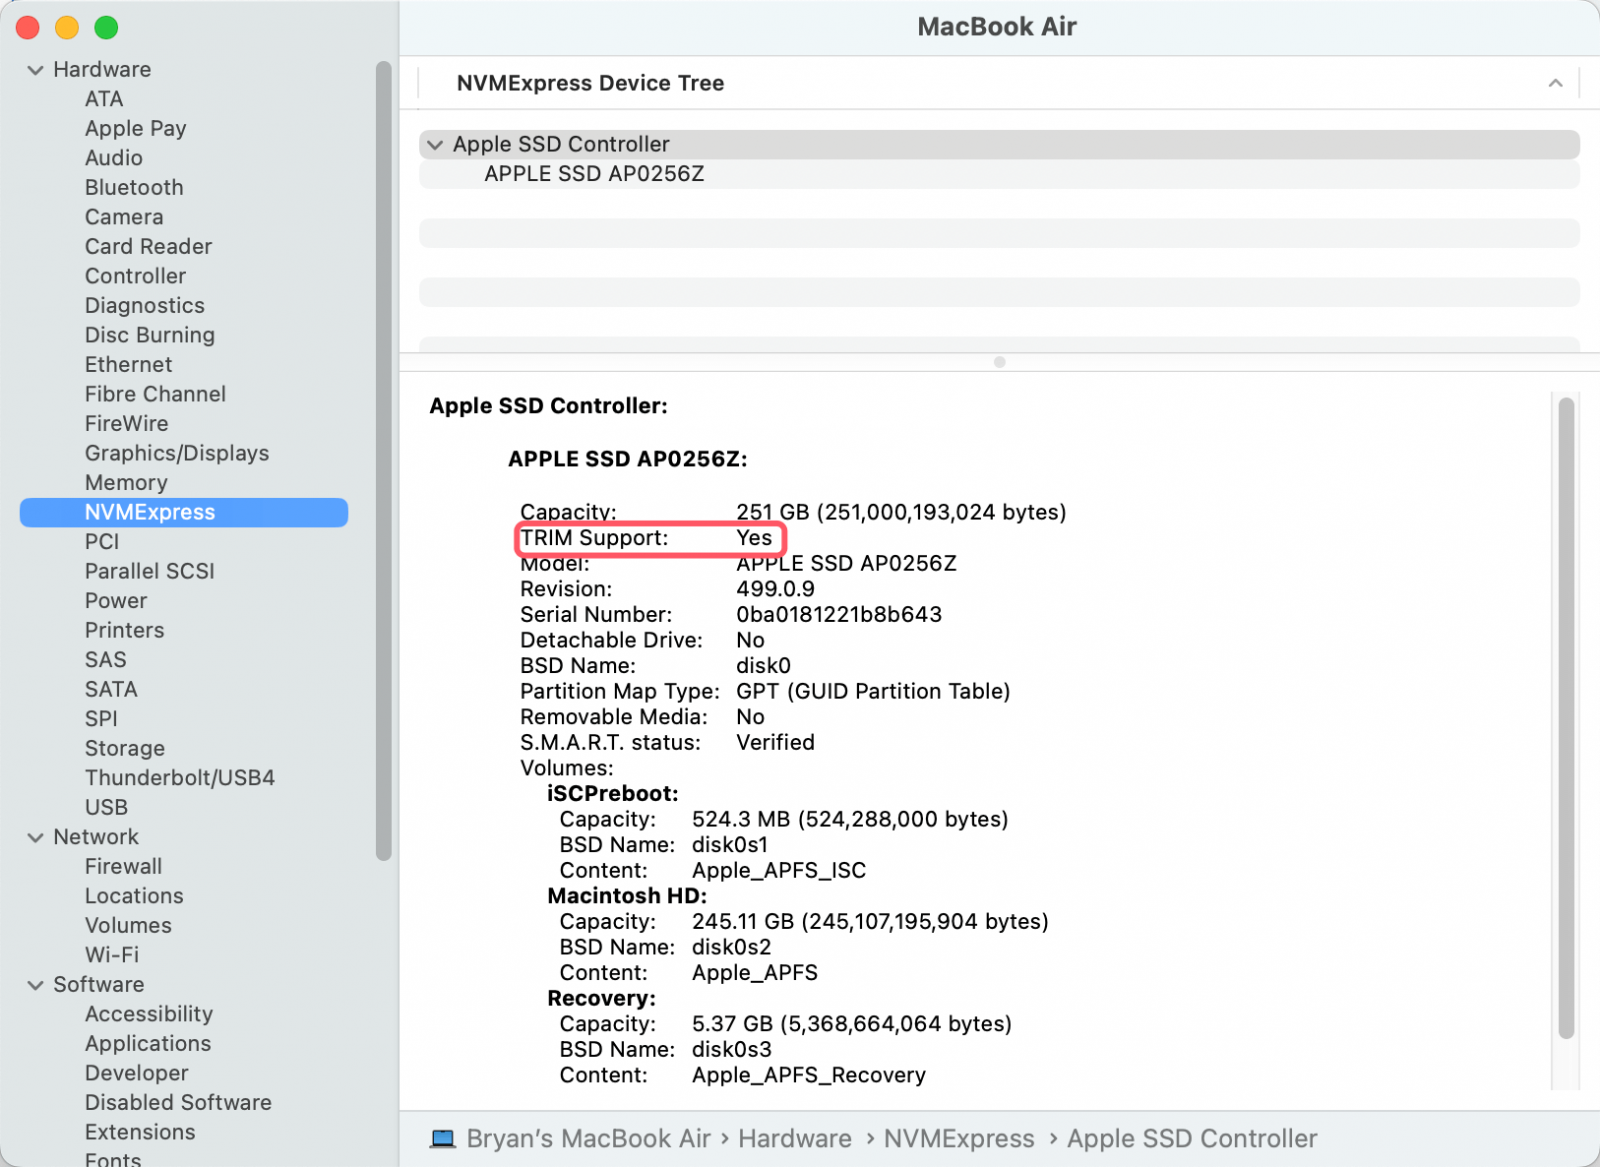
- On the left-hand menu, under "Hardware," look for "SATA/SATA Express" or "NVME Express," based on the type of interface on your SSD.
![Check TRIM Support on Your Mac]()
- Scroll down to the right and look for "TRIM Support." When it says "Yes," TRIM is on. If it says "No," you may need to turn it on by hand (this is necessary for some third-party SSDs).
How to Enable TRIM on macOS:
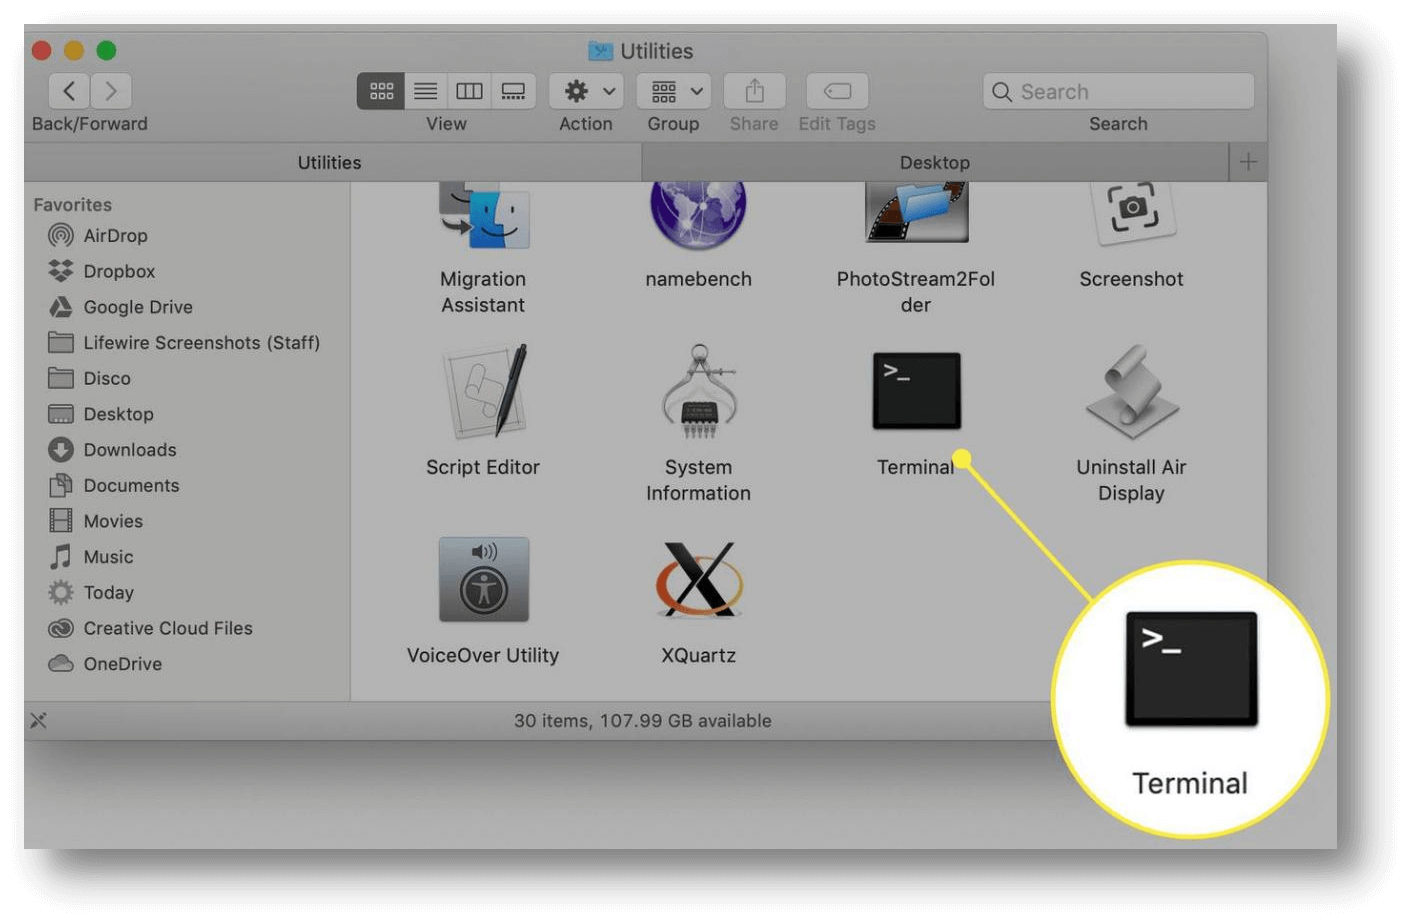
- Open Terminal: The Terminal app is in the "Utilities" folder inside the "Applications" folder. Press Command + Space to open it and type "Terminal" into Spotlight.
![Enable TRIM on macOS]()
- Enter the Command: Put in the exact command shown below and press Enter:
sudo trimforce enable
- Administrator Password: When asked, type in your master password. For safety reasons, this password will not be shown on the screen. Just type it in and press Enter.
- Warning Message: You'll see a message about the possible risks of turning on TRIM. Carefully read it; don't move forward until you know what it means.
- Confirmation: If you're ready to move forward, type "y" (lowercase) and press Enter to confirm that you want to turn on TRIM.
- Reboot Required: The screen will tell you that you need to restart your computer for the changes to take effect. To start the restart, type "y" and press Enter again.
Troubleshooting TRIM Issues:
If you still have problems after turning on TRIM, try these steps to fix them:
- Re-disable TRIM: The following command can be run in Terminal to turn off TRIM if it causes problems:
sudo trimforce disable
![Enable TRIM on macOS]()
- Check for firmware updates: Visit the SSD maker's website to download and install any available firmware changes.
- Use Third-Party Software: Third-party tools like Trim Enabler have diagnostic and repair options to help fix TRIM problems.
- Consult Support: If the problems persist, contact the SSD manufacturer's support team for help.
Additional Considerations for SSD Care
Even though TRIM is important, here are some other things you can do to improve the health of your Mac's SSD:
- Maintain free space: Leaving some empty room on your SSD will help it run faster and work with TRIM better. Aim for 10 to 20 percent empty room.
- Disable unnecessary startup items: Running apps in the background when your Mac first starts up can slow it down. To control what starts up, go to System Preferences or System Settings.
- Consider disabling Spotlight indexing for large folders: When you first start scanning with Spotlight, it can be hard on your SSD. If you rarely look through large media folders like photos and videos in Spotlight, stop it from indexing them. System Preferences or System Settings > Spotlight is where you can change how Spotlight indexes things.
- Keep your macOS updated: Apple regularly releases updates that improve the SSD speed of SSDs and how TRIM works. If you keep your Mac up to date, you'll get these changes.
- Data Backup: Before you turn on TRIM, you should always back up your data because the process changes low-level system settings.
- Firmware Updates: Ensure you have the most recent firmware on your SSD. Manufacturers often release updates that improve speed and TRIM support.
- Monitor SSD health: To monitor your SSD's health, use Disk Utility or other third-party apps. These tools can inform you how long the drive will last and what problems might occur.
How to Back Up Mac's Internal SSD on Mac?
Disk cloning software can help you clone everything from your Mac's internal SSD to an external hard drive and make a full bootable clone backup.
Step 1. Download and install the reliable Mac disk cloning software - Donemax Disk Clone for Mac.
Step 2. Open Donemax Disk Clone for Mac, choose OS Clone mode. The internal SSD has been selected by default as the source drive, you just need to select the external hard drive as the destination drive.

Step 3. Click on Clone Now button to clone all data including apps, macOS, settings, user data from the internal SSD to the external hard drive.

How to Repair a Damaged SSD on Mac?
Disk Utility can help you securely and quickly fix a damaged SSD on Mac:
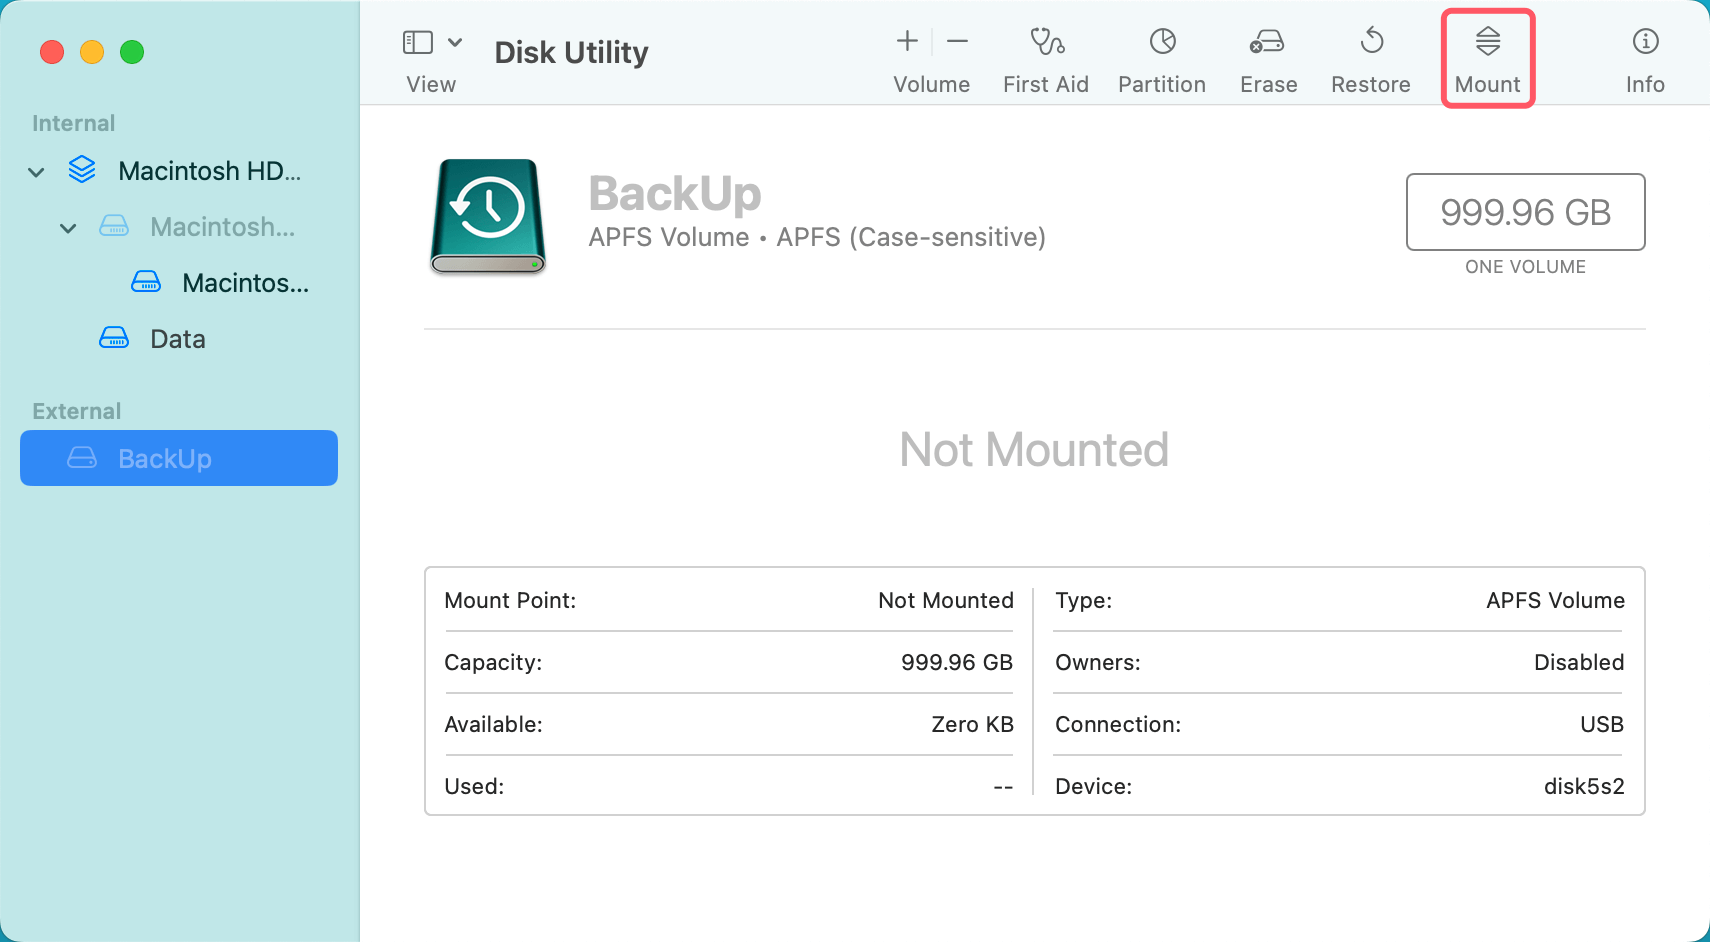
Step 1. Connect the SSD to your Mac, and open Disk Utility. If the SSD is not mounted, click on Mount button.
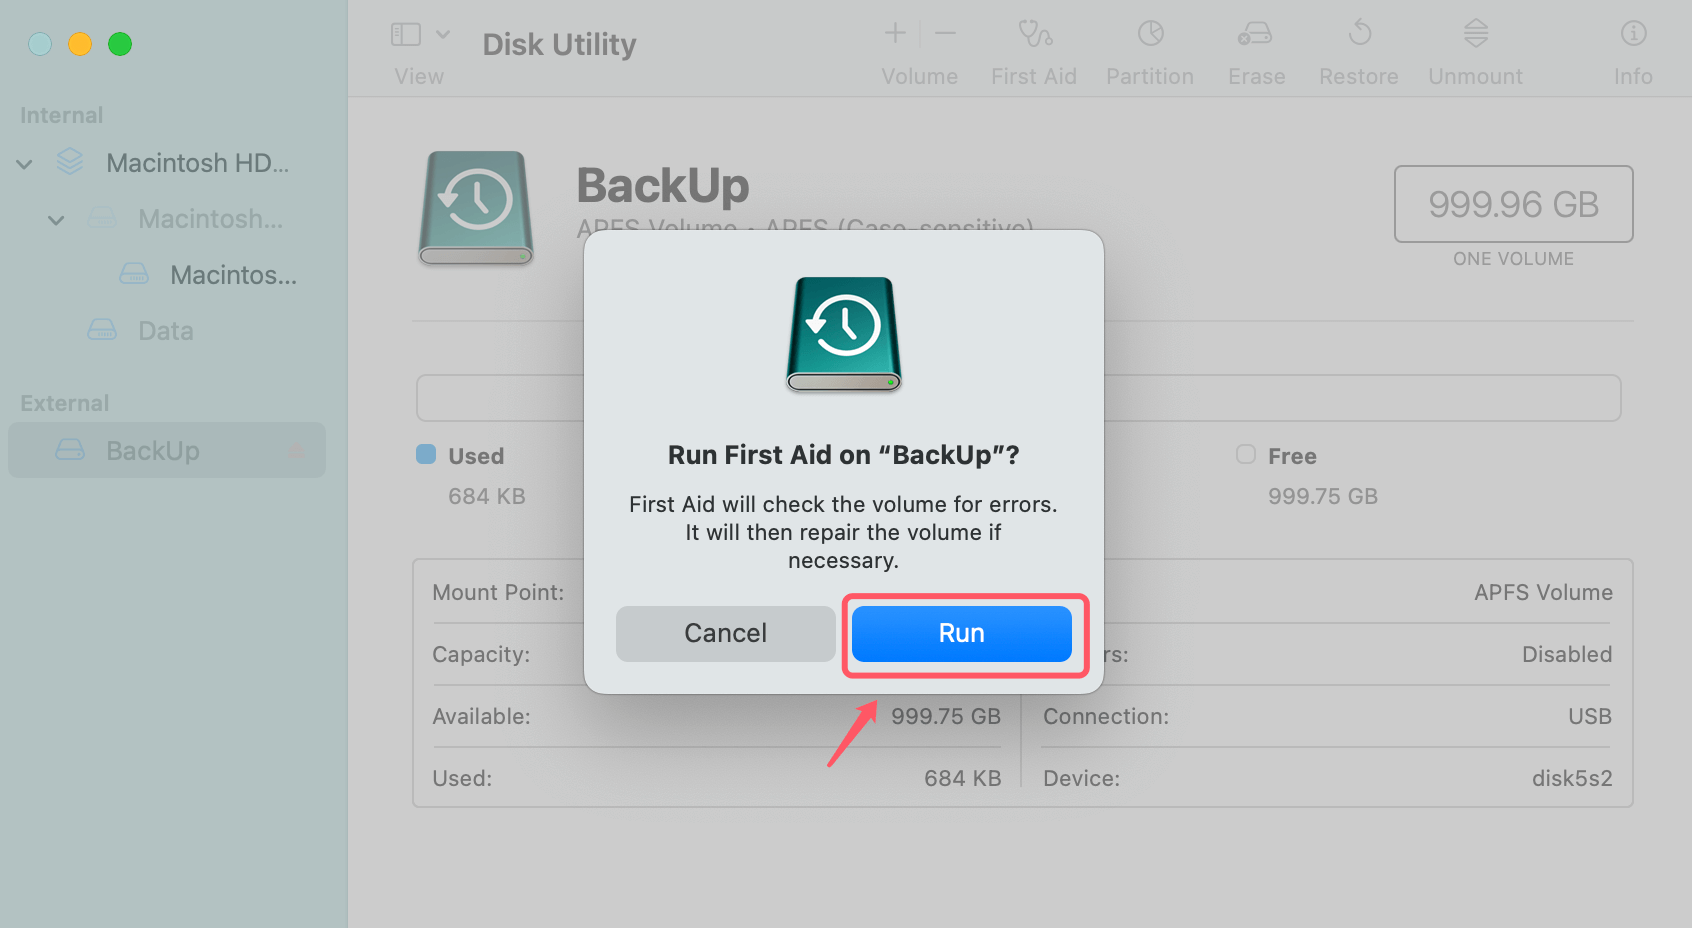
Step 2. Then click on First Aid button. When new window opens, click on Run to fix the damaged SSD.
Conclusion:
A simple but effective way to improve the speed and lifespan of your Mac's SSD is to turn on TRIM. Following the steps in this guide ensures that your SSD works at its best, giving you faster write speeds and less wear over time.
To prevent problems, ensure your SSD is compatible, back up your data, and keep the firmware up to date. When you turn on TRIM, your Mac's storage will be managed more efficiently, so your working needs will be met quickly and reliably. Turn on TRIM today to keep your SSD running quickly and efficiently for years.
Related Articles
- Jul 19, 2024SSD Maintenance Tips: Protect SSD
- Jan 17, 2025How to Format an SSD to ExFAT or FAT32 on Mac: A Detailed Guide
- Jan 14, 2025How to Fix Corrupted or Dead SSD Without Losing Data?
- Jan 14, 2025Best 6 Solutions to Fix SSD Is Unreadable
- Mar 19, 2025[3 Method] Securely Erase Seagate Ultra Compact SSD: A Comprehensive Guide
- Nov 05, 2024How to Upgrade HDD to SSD on Toshiba Laptop?

Christina
Christina is the senior editor of Donemax software who has worked in the company for 4+ years. She mainly writes the guides and solutions about data erasure, data transferring, data recovery and disk cloning to help users get the most out of their Windows and Mac. She likes to travel, enjoy country music and play games in her spare time.

Gerhard Chou
In order to effectively solve the problems for our customers, every article and troubleshooting solution published on our website has been strictly tested and practiced. Our editors love researching and using computers and testing software, and are willing to help computer users with their problems

