PAGE CONTENT:
Solid State Drives (SSDs) are fast becoming the go-to choice for storage devices, thanks to their superior speed, durability, and energy efficiency compared to traditional hard drives. Whether you've purchased a new SSD or need to reformat an old one, it's crucial to choose the correct file system to ensure optimal performance and compatibility with your Mac and other devices. This guide will walk you through the process of formatting your SSD to either ExFAT or FAT32 on macOS, explaining the key differences between these file systems, and providing detailed instructions to help you get the job done quickly and efficiently.
Overview
When you buy an SSD, it often comes preformatted with a specific file system, usually APFS (Apple File System) or HFS+. However, these formats are not always suitable for all purposes. If you plan to use the SSD with both a Mac and other devices like Windows computers, game consoles, or cameras, you may need to reformat the drive to a more universally recognized file system such as ExFAT or FAT32.
In this article, we'll explore the differences between ExFAT and FAT32, when to use each of these file systems, and how to format your SSD using macOS's built-in Disk Utility tool. We'll also cover some troubleshooting tips in case you encounter issues along the way.
Understand File Systems: ExFAT vs. FAT32
Before you begin the process of formatting your SSD, it’s important to understand what ExFAT and FAT32 are, as well as the differences between the two.
What is ExFAT?
ExFAT is a file system designed by Microsoft for flash drives, external hard drives, and SSDs. It is an improvement over the older FAT32 system, providing several advantages for modern devices and larger storage media.
Benefits of ExFAT:
- Cross-platform compatibility: ExFAT is supported by both macOS and Windows operating systems, making it ideal for transferring files between a Mac and a Windows PC without any issues.
- Large file support: One of the biggest advantages of ExFAT over FAT32 is its ability to handle large files. With ExFAT, there is no 4GB file size limit, so you can store and transfer files larger than 4GB.
- Ideal for larger drives: ExFAT can handle larger drives (more than 32GB) without the restrictions of FAT32.
When to Use ExFAT:
- When you need to use the SSD with both macOS and Windows PCs.
- When you plan to store large files, such as videos or high-resolution images, that exceed the 4GB limit imposed by FAT32.
- For external SSDs, USB drives, or memory cards that need to be compatible across different operating systems.
What is FAT32?
FAT32 (File Allocation Table 32) is an older file system that has been around since the 1990s. While it is not as advanced as ExFAT, it is still widely used in various devices such as USB flash drives, digital cameras, and game consoles.
Benefits of FAT32:
- Universal compatibility: FAT32 is supported by almost every operating system, including macOS, Windows, Linux, and even embedded systems like cameras and video game consoles.
- Efficient for smaller drives: FAT32 is a lightweight file system that works best with smaller drives (up to 32GB). It has a simple structure, which makes it a reliable choice for devices with limited storage.
Limitations of FAT32:
- 4GB file size limit: FAT32 cannot handle files larger than 4GB, making it unsuitable for modern multimedia files, high-definition videos, or large datasets.
- Partition size limit: FAT32 supports partitions up to 8TB, but drives larger than this may not work well with FAT32.
When to Use FAT32:
- When you need a file system that works with a wide range of devices, including older ones or devices like cameras, game consoles, and media players.
- When you are working with smaller drives, such as USB sticks or external hard drives under 32GB, where the 4GB file size limit is not an issue.
When to Use ExFAT or FAT32?
Choosing between ExFAT and FAT32 depends largely on the specific use case and the devices you need to use the SSD with. Here are some scenarios that will help you decide:
| When to Use ExFAT: | When to Use FAT32: |
|---|---|
|
|
Before Formatting Your SSD to ExFAT or FAT32
Before formatting your SSD, it's crucial to ensure that all important data is backed up and that the SSD is in good condition.
Step 1: Backup Your Data
Formatting an SSD will erase all the data on it, so it's essential to back up your files first. Here are a few ways to back up data on macOS:
- Time Machine: macOS includes a built-in backup tool called Time Machine. You can use it to back up your SSD to an external drive or network storage.
- Cloud Storage: If you use services like iCloud, Google Drive, or Dropbox, you can upload your important files to the cloud.
- External Storage: Copy files manually to another external drive or USB stick.
Step 2: Check SSD Health
To ensure your SSD is functioning properly, you can use the built-in Disk Utility tool in macOS to check the health of your drive.
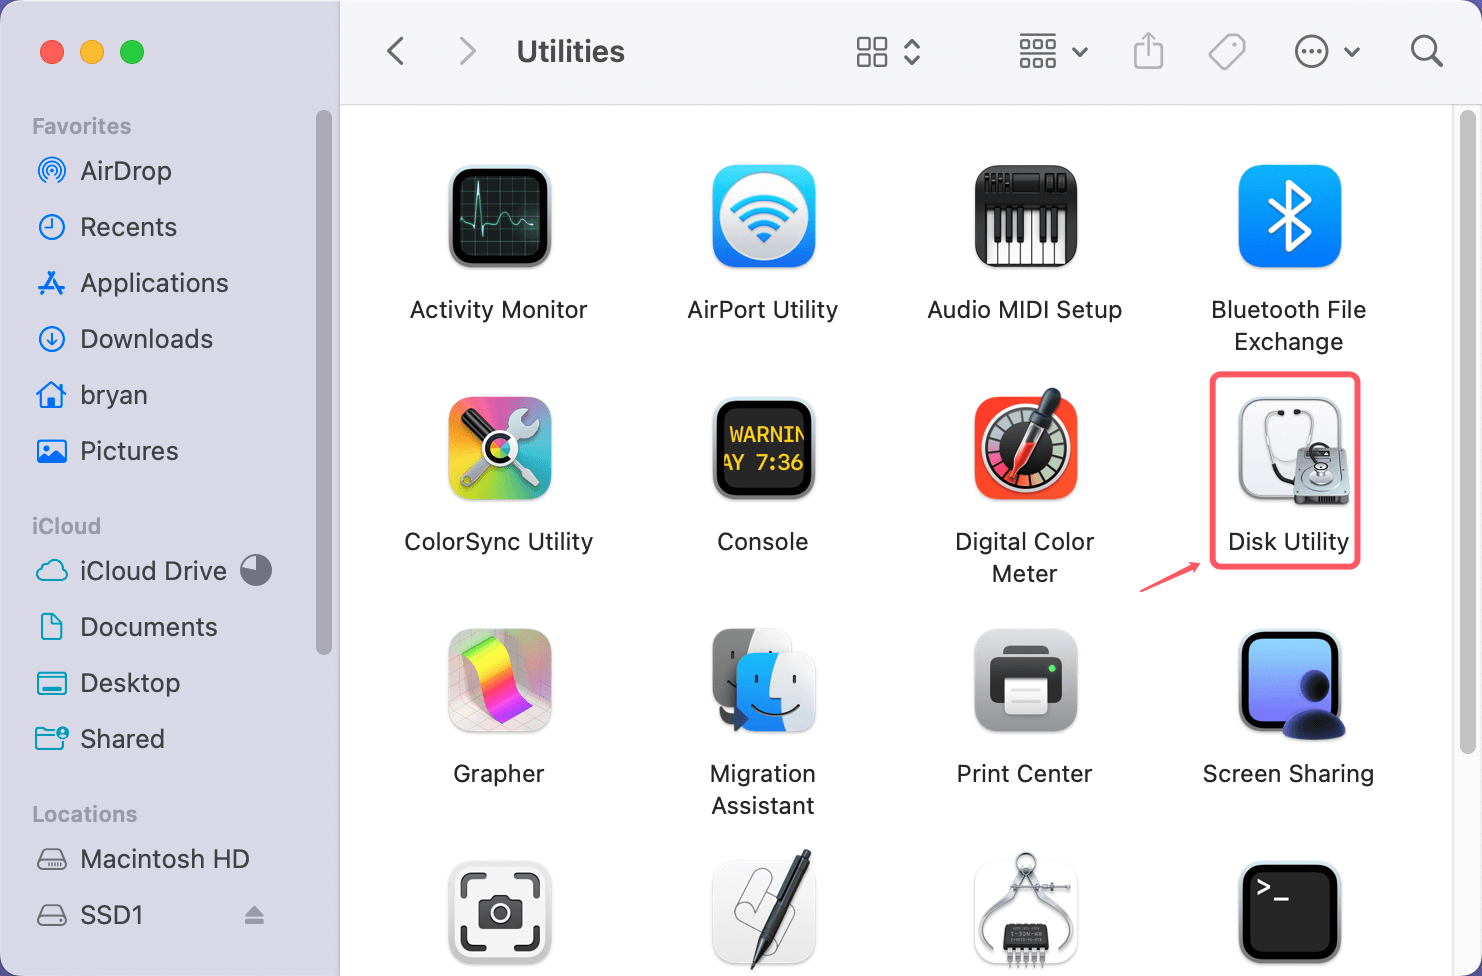
- Go to Applications in Utilities or search for Disk Utility in Spotlight to launch it.
- Select the SSD from the left-hand sidebar.
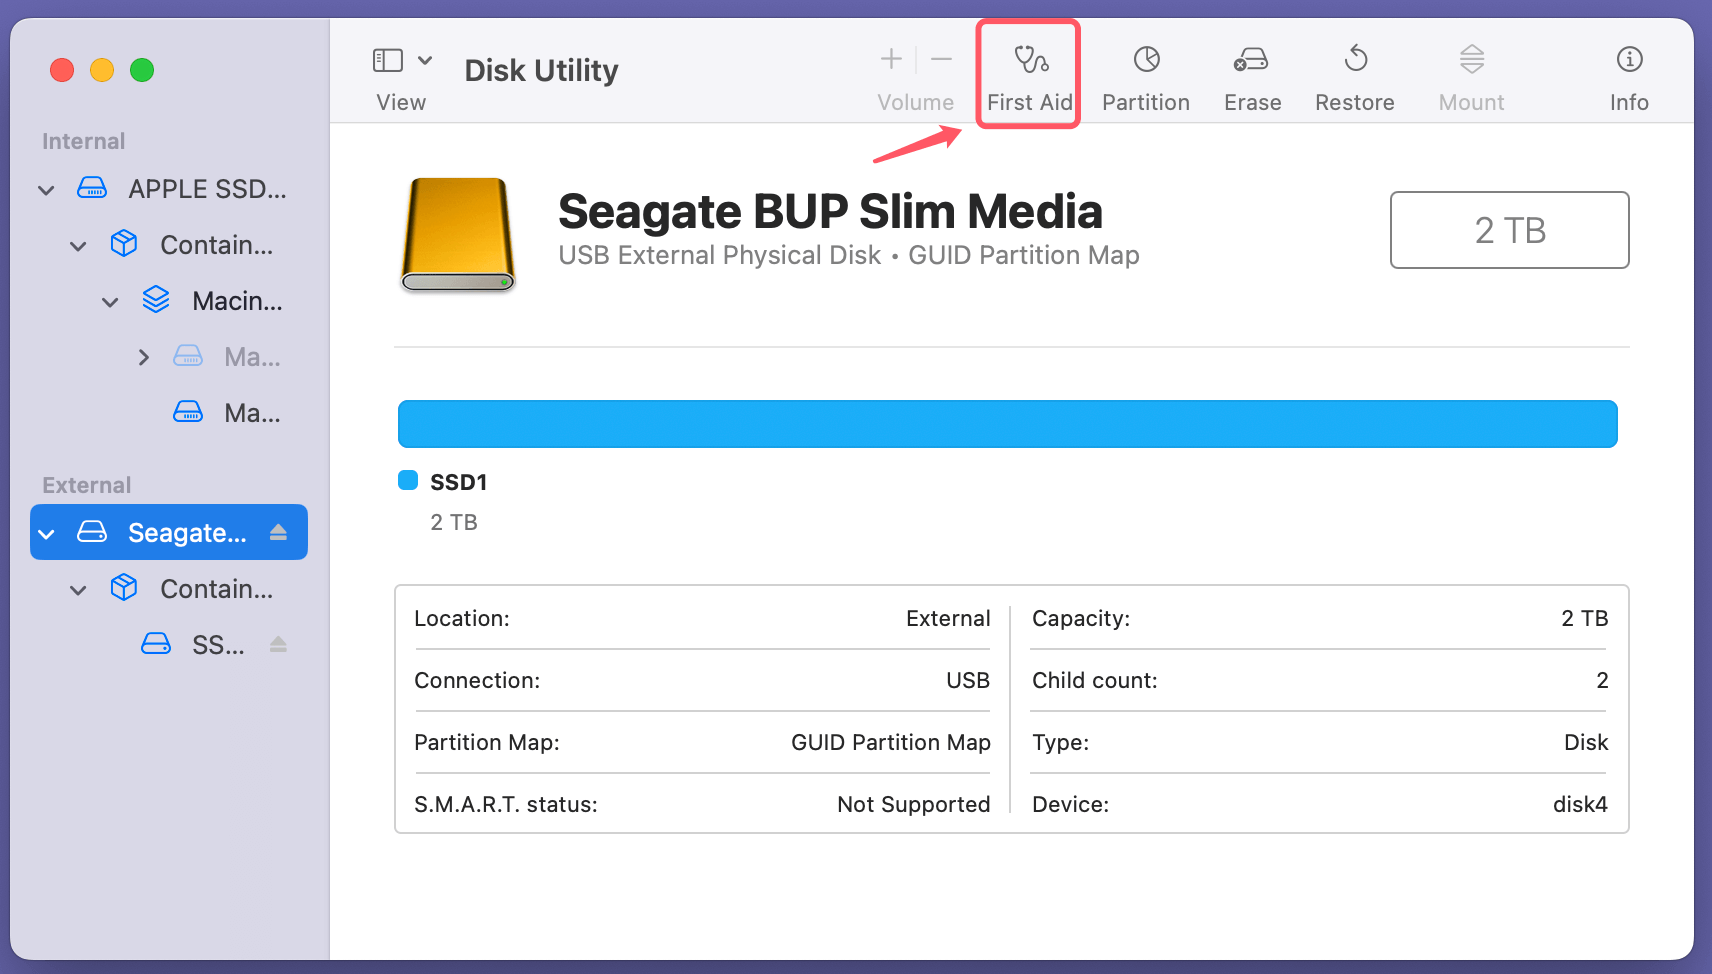
- Click First Aid and let Disk Utility check the drive for errors. If there are any issues, Disk Utility will attempt to repair them.
![Formatting your SSD to ExFAT or FAT32 on Mac]()
Format an SSD to ExFAT or FAT32 on Mac
Once your data is backed up and your SSD is ready for formatting, follow these steps to format your SSD to either ExFAT or FAT32 on macOS:
Method 1. Format an SSD Using Disk Utility
- Open Disk Utility: Go to Disk Utility from Utilities via Applications or search for it using Spotlight.
![Formatting your SSD to ExFAT or FAT32 on Mac]()
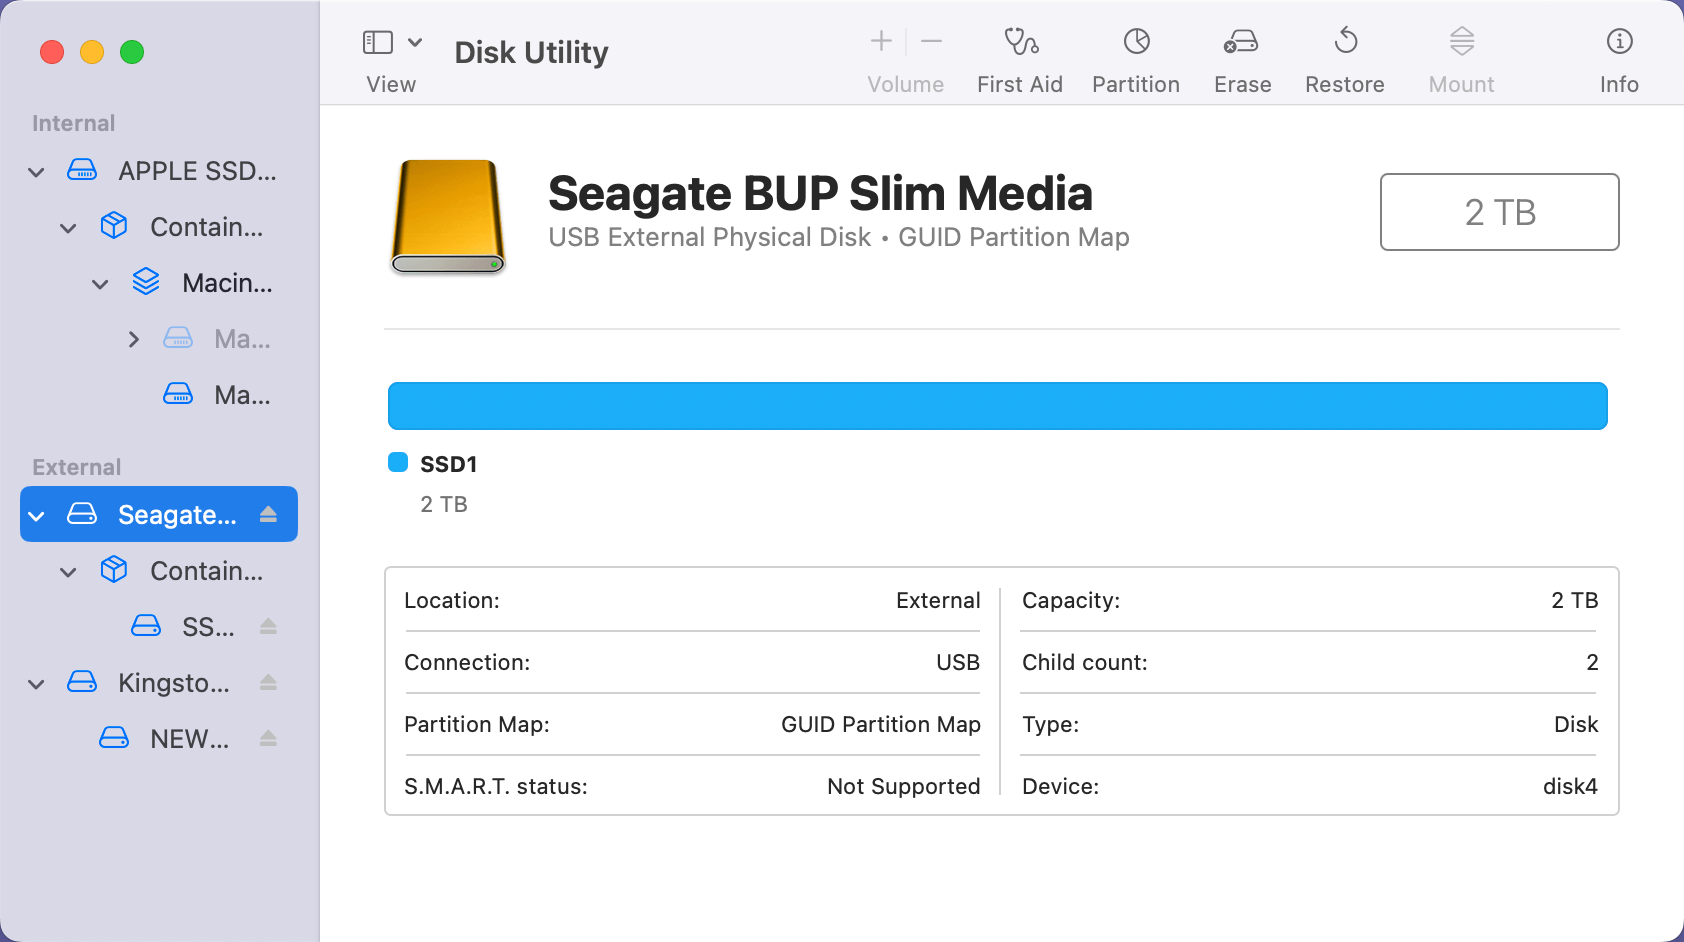
- Select Your SSD: In the left sidebar, you'll see a list of available drives. Select the SSD you want to format.
![Formatting your SSD to ExFAT or FAT32 on Mac]()
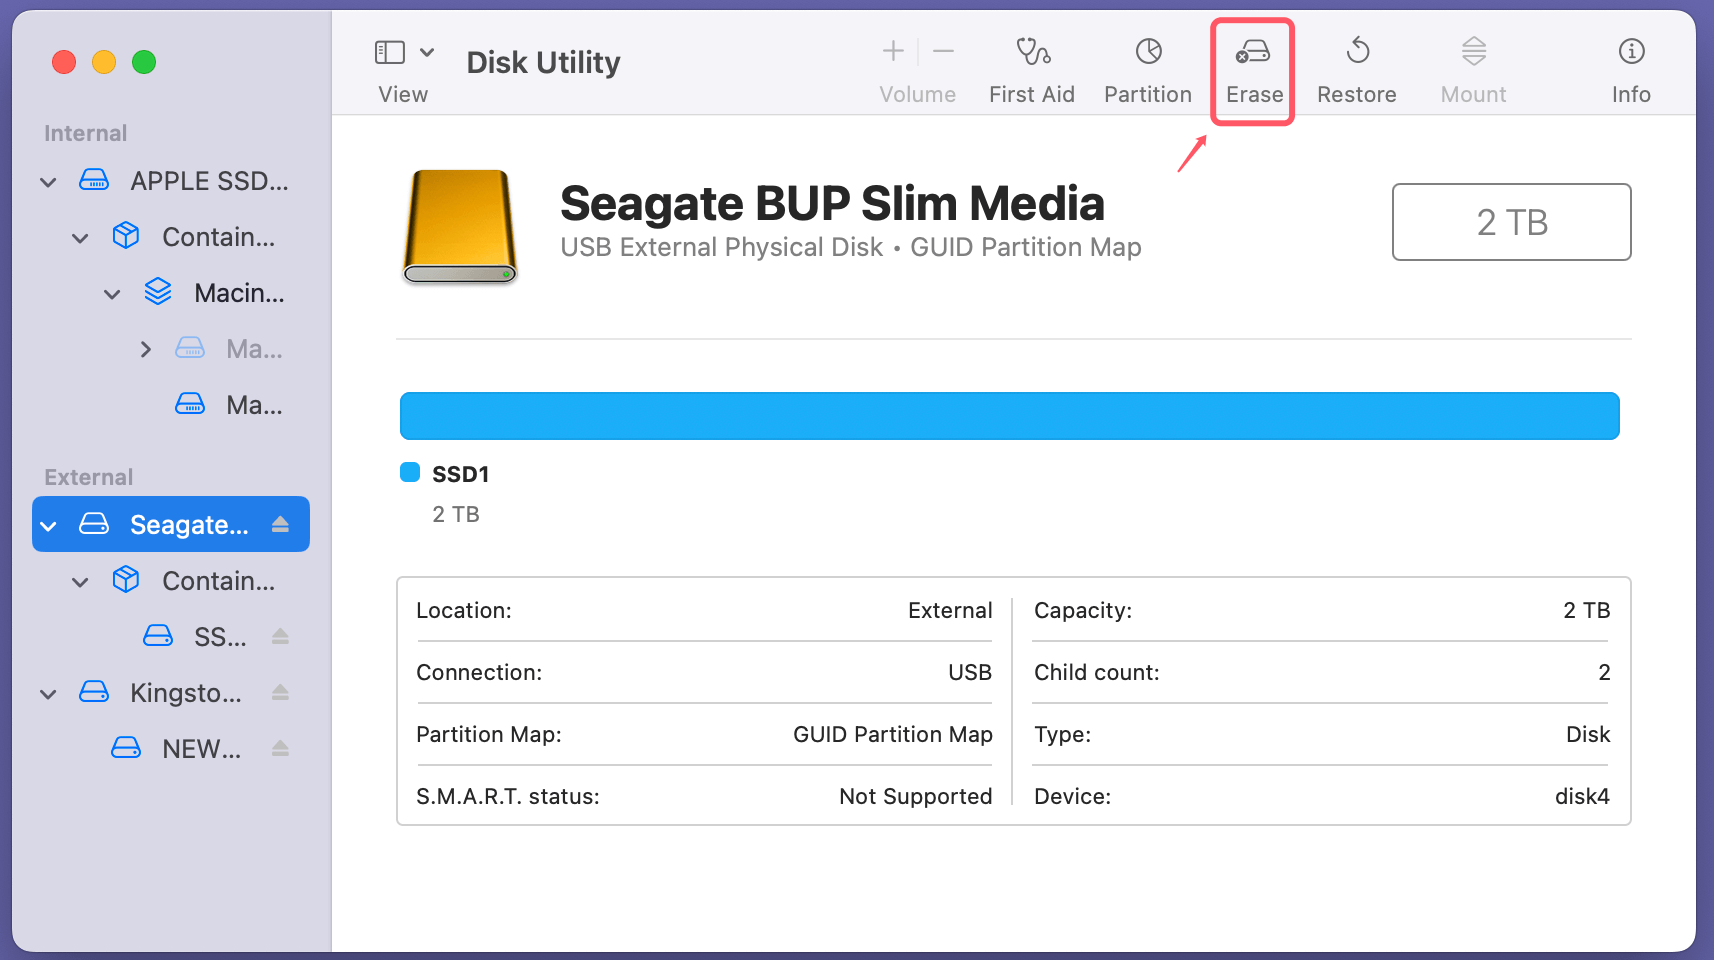
- Erase the Drive: Click the Erase button at the top of the Disk Utility window. This will open a dialog where you can choose the format for your drive.
![Formatting your SSD to ExFAT or FAT32 on Mac]()
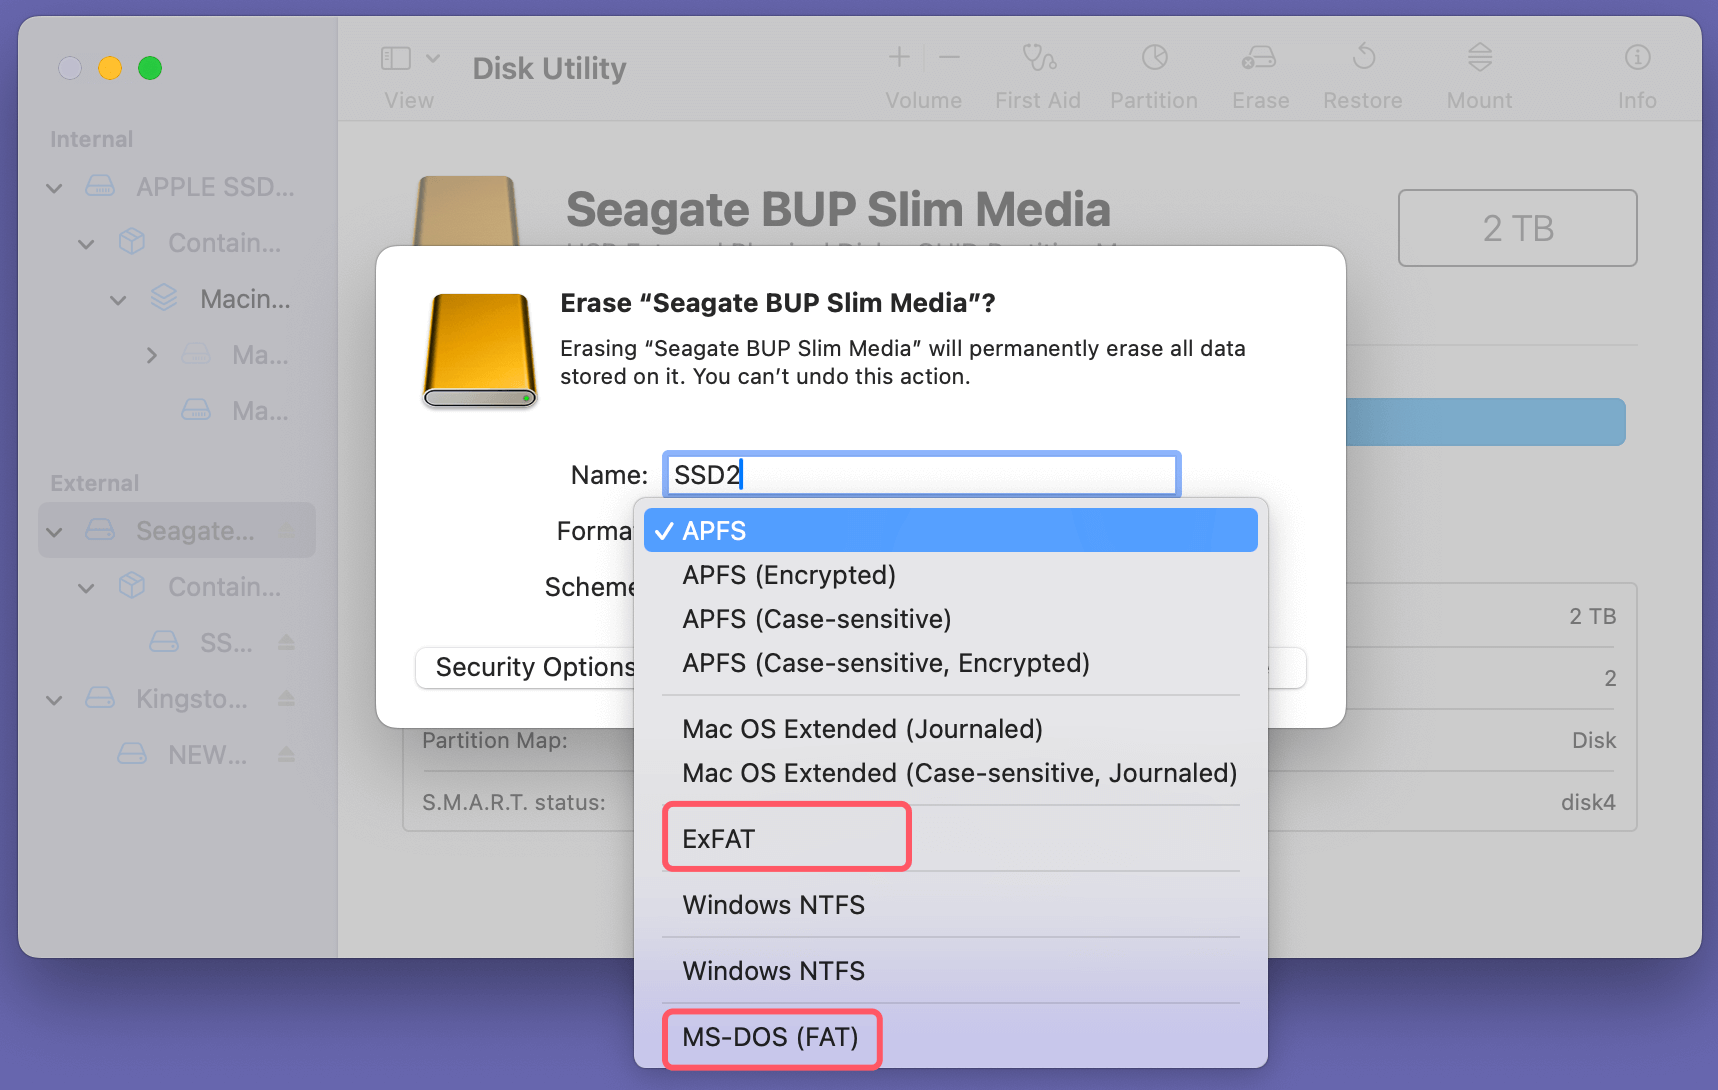
- Choose the Format:
- From the Format dropdown menu, choose ExFAT or MS-DOS (FAT) (this is FAT32).
![Formatting your SSD to ExFAT or FAT32 on Mac]()
- Name your drive if you wish to do so (this name will be visible when the drive is connected to your Mac or any other device).
- From the Format dropdown menu, choose ExFAT or MS-DOS (FAT) (this is FAT32).
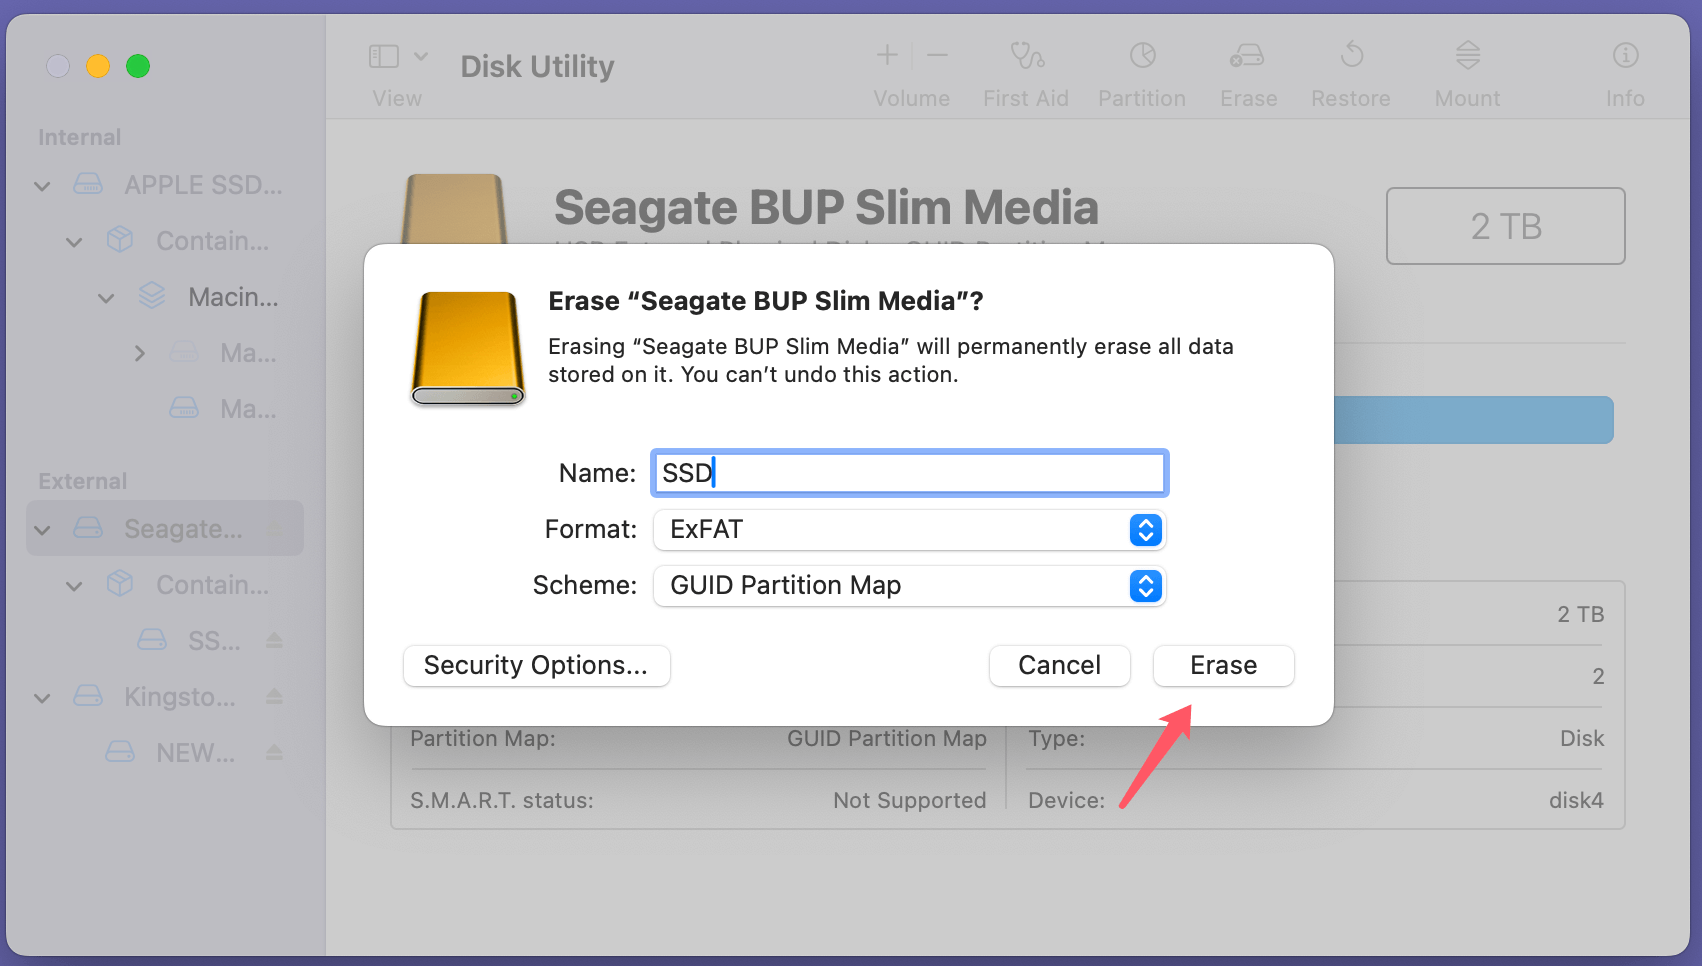
- Confirm and Erase: Once you've chosen your desired file system, click Erase to begin the formatting process.
![Formatting your SSD to ExFAT or FAT32 on Mac]()
The process may take several minutes depending on the size of the SSD.
- Completion: Your SSD will be formatted and prepared for usage with the file system of your choice once the procedure is finished.
Method 2. Format to FAT32 Using Terminal or Third-Party Tools
If you attempt to format a large drive (over 32GB) to FAT32 using Disk Utility, you may notice that the option isn't available. macOS restricts FAT32 formatting to drives 32GB or smaller. To format larger drives to FAT32, you can use Terminal or third-party software.
Using Terminal to Format to FAT32:
1. Open Terminal from Utilities via Applications.
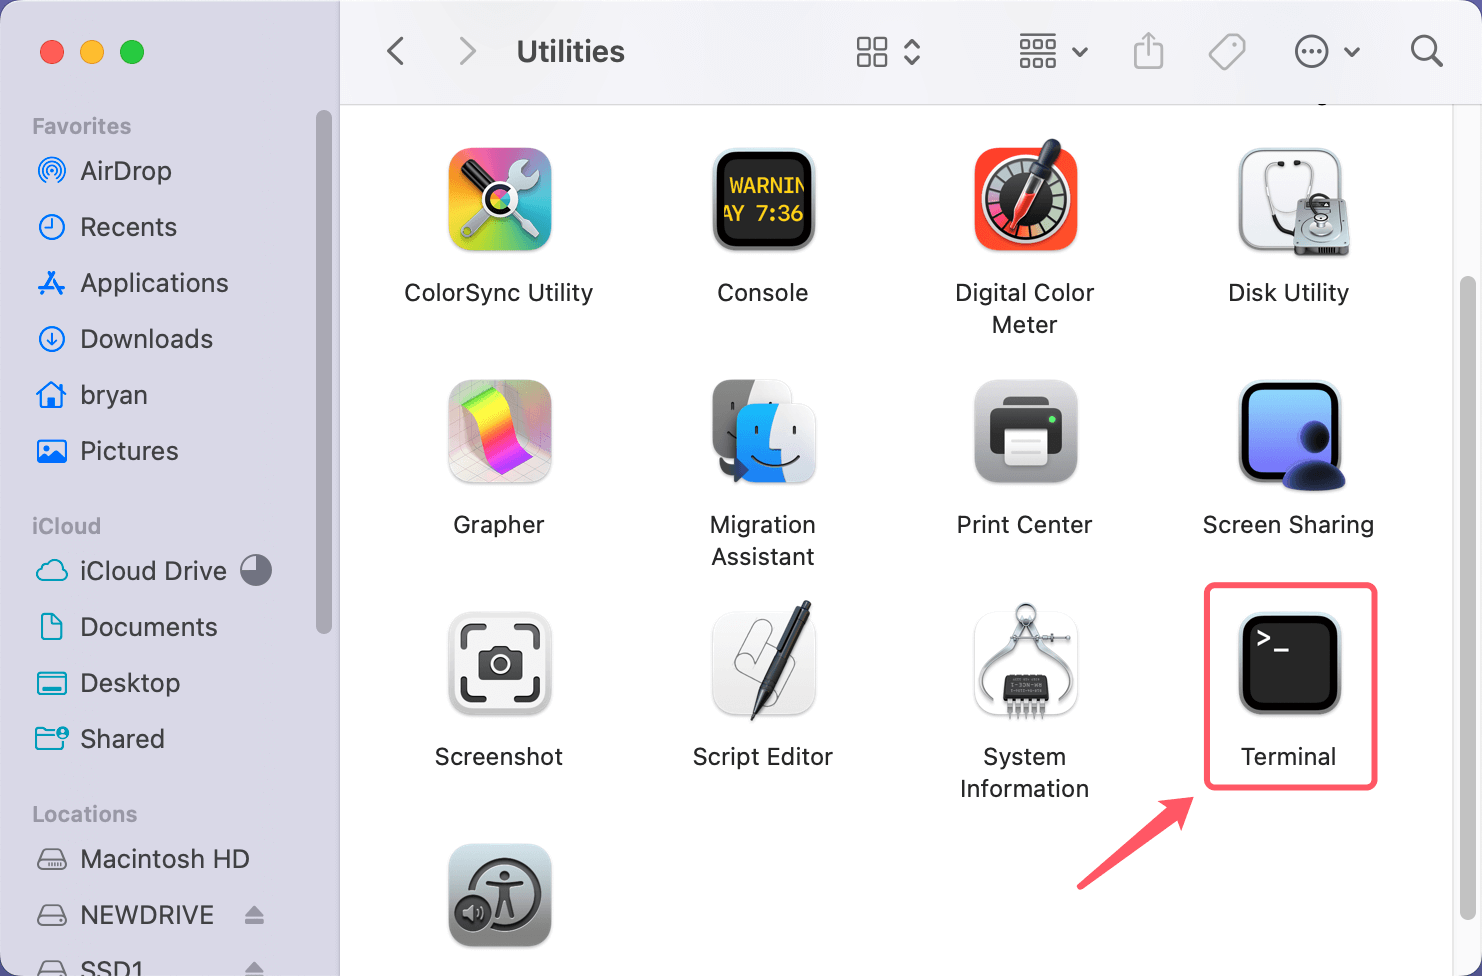
2. When Terminal opens, type diskutil list and press enter.
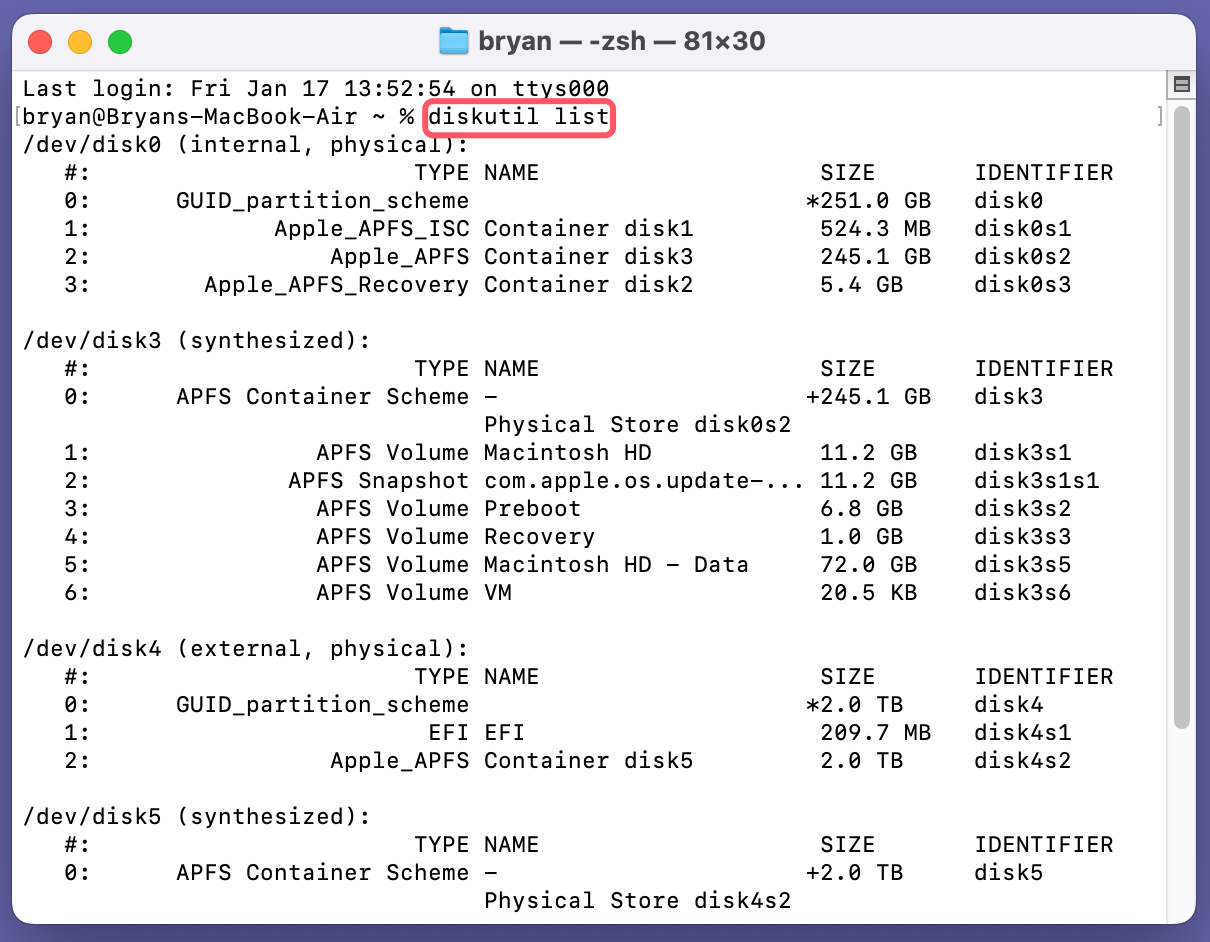
It will lists all drives, find the SSD and remember its disk identifier, such as /dev/disk5 or /dev/disk6.
Use the following command:
sudo diskutil eraseDisk FAT32 <DriveName> MBRFormat /dev/diskX
Replace <DriveName> with the desired name for your SSD and /dev/diskX with the appropriate disk identifier for your SSD.

Third-Party Tools:
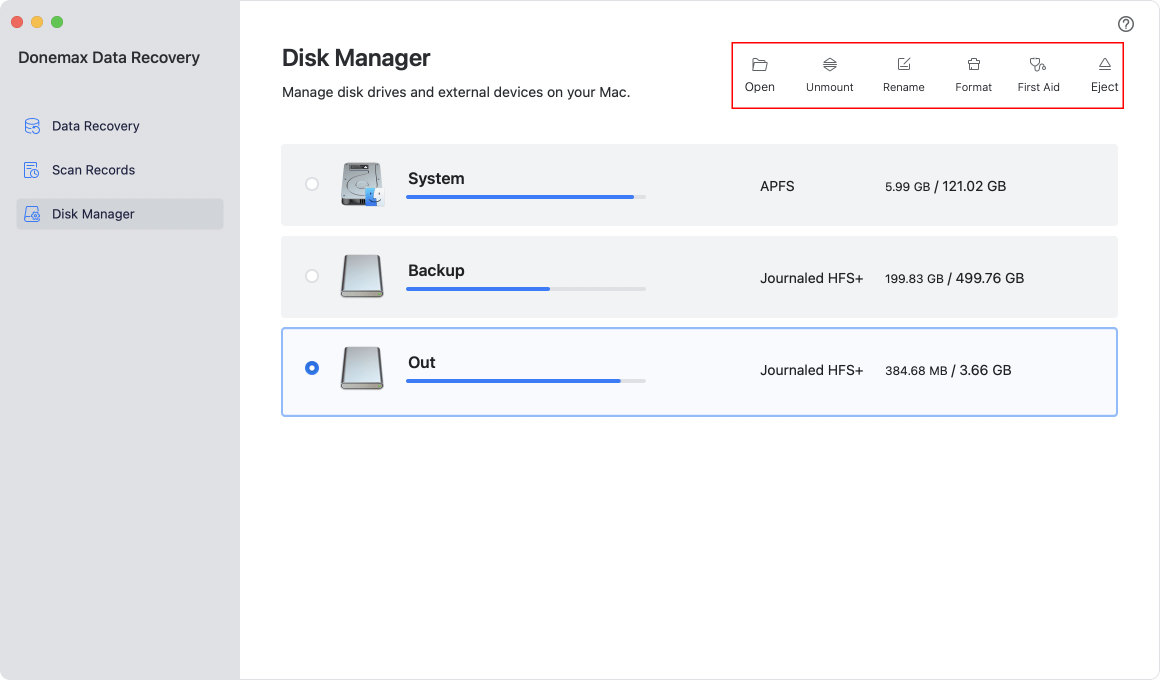
There are also third-party applications like Donemax Data Recovery or GParted that allow you to format large drives to FAT32.
Troubleshooting Common Issues
Even after following the instructions, you might run into some issues. Here are a few common problems and how to resolve them:
Drive Not Appearing After Format
- Ensure the drive is properly connected to your Mac.
- Reboot your Mac and check if the drive appears in Finder.
- Open Disk Utility and check if the SSD is listed. If not, there may be a hardware issue.
Failed Formatting Process
- If the formatting process fails, check if the SSD has any underlying issues. Run First Aid in Disk Utility to attempt repairs.
Incompatibility with Other Devices
- If the SSD isn't recognized on a non-Mac device, ensure the file system you chose is compatible with that device (ExFAT for cross-platform compatibility).
Recover Lost Data After Erasing SSD to ExFAT or FAT32 on Mac
The erased data is not lost for good and can be recovered by Mac data recovery software, such as Donemax Data Recovery for Mac.
Step 1. Click Download button below to download Donemax Data Recovery for Mac, then install it on your Mac.
Step 2. Open Launchpad, find and run Donemax Data Recovery for Mac, select the formatted SSD to start data recovery.

Step 3. Once your have select the SSD, click on Scan button to deeply scan it. It will find all deleted/erased files.

Step 4. After deep scan, Donemax Data Recovery for Mac will list all recoverable files. Find and select the files you want to recover, click on Recover button to save them.

Conclusion
Formatting your SSD to ExFAT or FAT32 on Mac is a straightforward process that ensures compatibility with both macOS and other devices. While ExFAT is generally the better choice for larger drives and modern files, FAT32 remains useful for small drives and older systems. By following this guide, you can ensure your SSD is formatted correctly and optimized for the tasks at hand.
Now that you know how to format your SSD on a Mac, you can enjoy the benefits of cross-platform compatibility and larger file sizes, all while keeping your data safe and organized. If you have lost data due to erasing your SSD, just use Mac data recovery software - Donemax Data Recovery for Mac to get the lost data back.


Donemax Data Recovery for Mac
Donemax Data Recovery for Mac is one of the best Mac data recovery software. It is easy-to-use and can help in recovering deleted, formatted, inaccessible or lost data from Mac HDD/SSD, external disk, USB drive, SD card, camera or other storage devices.
Related Articles
- Jul 11, 2025Fix SanDisk G-Drive Not Working on Mac Without Losing Data
- Jul 19, 2024SSD Maintenance Tips: Protect SSD
- Mar 31, 202510 Solutions to Fix SanDisk Extreme Portable SSD Not Recognized on Mac
- Nov 21, 2024Fix Bad Sectors on SSD Without Losing Data
- Jun 06, 2025Sabrent Rocket SSD Not Showing Up on My Computer, Fix It Now
- Feb 24, 2025Reset or Erase SSD with Diskpart (Command Prompt Tool)

Christina
Christina is the senior editor of Donemax software who has worked in the company for 4+ years. She mainly writes the guides and solutions about data erasure, data transferring, data recovery and disk cloning to help users get the most out of their Windows and Mac. She likes to travel, enjoy country music and play games in her spare time.

Gerhard Chou
In order to effectively solve the problems for our customers, every article and troubleshooting solution published on our website has been strictly tested and practiced. Our editors love researching and using computers and testing software, and are willing to help computer users with their problems

