Your Mac may be set to boot from various sources outside the primary disk, including a bootable CD or DVD, a USB flash drive, an external drive, a network volume, a second volume, or an entirely separate disk.
Switching the starting disk requires a different procedure on Macs with Intel processors than those with Apple silicon. Here's a guide on how to modify your Mac's boot configuration.
What Is A Startup Disk?
A startup disk, often known as a boot disk, is the storage medium upon which your Mac boots. To get your Mac up and running regularly, you need to boot it from a startup disk. The Macintosh HD (Macintosh Hard Drive) or Apple SSD is the default starting disk.
Any external storage device, like a USB drive, hard disk drive (HDD), solid-state drive (SSD), etc., may hold macOS for a MacBook Air, MacBook Pro, or iMac. Only the primary hard drive should be used as the boot device. Mac will start up and boot from it automatically.
If there are many disks available, you may choose which to use to start the computer. This is particularly useful when the MacBook won't power up, and you need to access data stored on an external hard drive.
Change Mac Startup disk
First of all, connect the bootable disk to your Mac. Then follow the guide below to set the bootable disk as the startup disk for your Mac.
#1 Change your startup disk once
Apple silicon Macs
Step 1. Shut down your Mac.
Step 2. Restart your Mac, press and hold the power button until you see Loading startup options. On an Apple silicon Mac mini, wait for the system indicator light to turn amber.
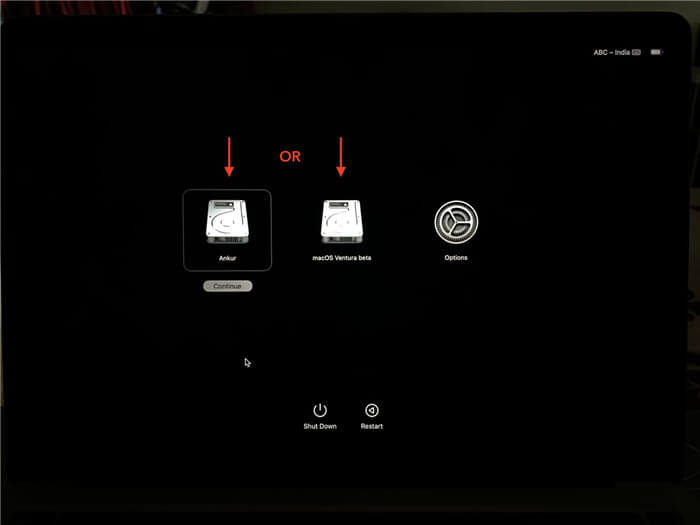
Step 3. Your Mac will scan all the disks attached to it. With the available startup disks displayed, select the bootable drive and click Continue below it.
![set Mac startup disk]()
Then your Mac will boot from the selected bootable drive.
Intel-based Macs
Step 1. Shut down your Mac.
Step 2. With your Intel-based Mac turned off, press the power button to start up the computer and then immediately press and hold the Option key to invoke the startup disk manager.
Step 3. With the available startup disks shown, select one and then click the Up arrow to boot into your computer from the startup disk you just selected.
As mentioned, this is a one-time change. The next time your open your Mac, it will boot from the default startup disk.
#2 Change your startup disk for every startup
If you want to change your Mac's default startup disk, you must use System Preferences.
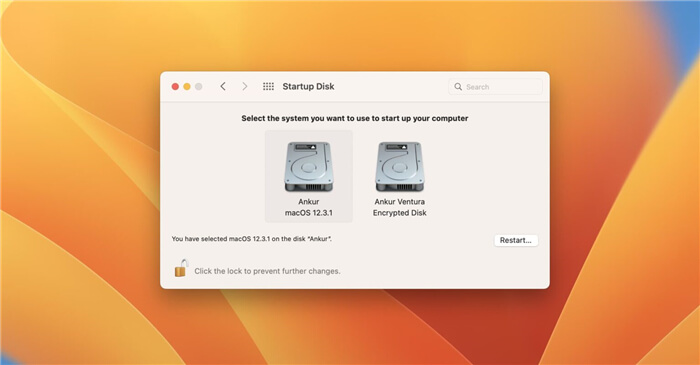
Step 1. Click Apple Logo and choose System Preferences.
Step 2. Click Startup Disk.
Step 3. Click the lock at the bottom left to unlock the preference pane.
Step 4. Click the icon of the disk you want to use, then click Restart.
![set Mac startup disk]()
Note: If a disk is encrypted, select and click Unlock. After that, follow step 4.
![set Mac startup disk]()
Your Mac will now use the selected startup disk going forward until you change it again. If you have an Apple silicon Mac, you can also set the default startup volume at boot time:
Step 1. With the computer shut down, press and hold the power button until you see Loading startup options.
Step 2. Select a volume, press and hold the Option key, then click Always Use.
How to Create A Bootable Clone Disk for Mac?
With Donemax Disk Clone for Mac, you can create a bootable clone for your Mac. Just download Donemax Disk Clone for Mac, select OS Clone mode and then clone the Mac startup disk to the external hard drive. Once the cloning process gets finished, you can use the external hard drive as the bootable disk for your Mac.
Donemax Disk Clone for Mac
Conclusion
There are various more boot modes available on your Mac beyond the standard disk selection menu. These include Apple Diagnostics, Safe Mode, and Target Disk Mode. They are interesting, so don't forget to check them out.


